
如何在 iOS App 中整合 Facebook 廣告完整指南
不久前有人問我該如何在專案中整合 Facebook 廣告。因為之前沒用過,本以為一定很難,所以事先查閱了大量文檔。結果通讀之後發現其實並不難,僅僅幾分鐘,我就搞定了人生中的第一個 Facebook 廣告 App!
Facebook 廣告是一種把廣告整合進 App、藉由廣告點擊量來獲取收入的方式。這個做法並不複雜:在 Facebook SDK(一個由 Facebook 推出的 SDK 框架)中,有一個專門和廣告相關的框架,那就是 Audience Network。你只要在 App 中使用這個框架就行了。
Facebook 為不同平台提供了不同的廣告類型,但對行動裝置來說只有 3 種:Native(原生)、Interstitial(插頁式) 與 Banners(橫幅)。簡單介紹一下:
Native 廣告能放置在 App 的任何地方,可以被重新客製化,從外觀上看與視圖上的其他 UI 毫無差別。這些視圖可以來自手動建立的自訂 view,也可以來自 Audience Network 框架提供的模板(部分屬性可被客製)。若要在 table view 中顯示這些廣告,你有兩種做法:要麼使用自訂 cell 顯示廣告並手動處理所有 table view 回調,要麼使用框架提供的類,幾乎不用處理回調,但缺點是無法自訂外觀。
Interstitial 廣告是全屏廣告,一旦顯示就會整個遮住 App,因此外觀不需要任何客製。
Banner 廣告是小幅面廣告,經常顯示在螢幕頂部或底部,除高度外都不能被客製。
本文會介紹這 3 種廣告,並示範如何在 Facebook Developers portal 中進行必要設定。給你一個永遠正確的老忠告:看文檔去!另外要說明的是,本文範例專案使用 Xcode 7.3.1 與 Swift 2.2 編寫,請勿在 Swift 3.0 中打開運行。
關於範例 App
本教學同樣提供一個 demo App。為了把注意力集中在整合廣告上,這個 App 設計得很簡單,你可以下載開始專案,跟著一步步完成最終的 App。
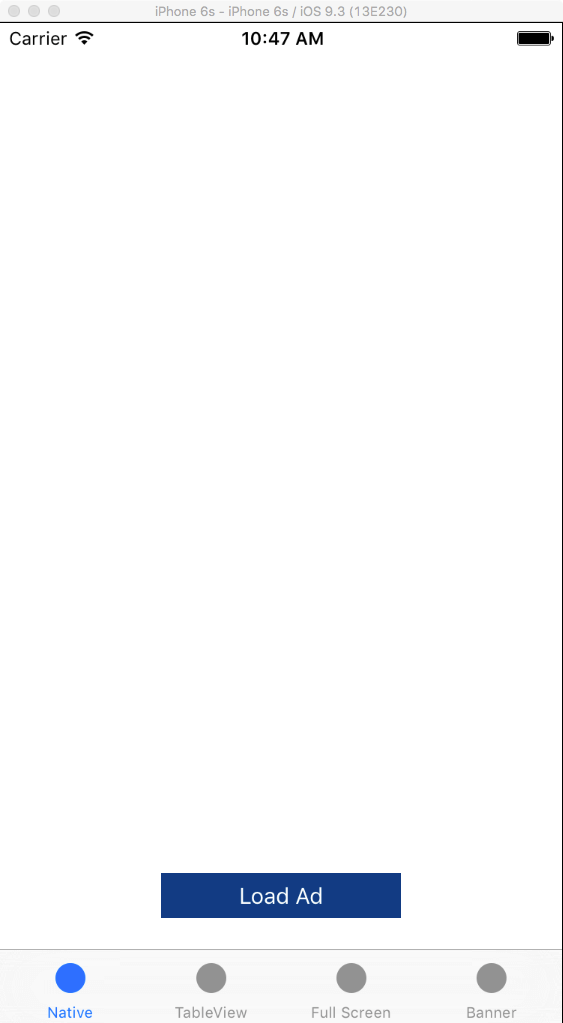
這是一個 tab bar App,包含 4 個 tab,每個 tab 展示一種廣告類型:
第一個 tab 的 view controller 是 SingleAdsViewController,展示 native 廣告,我們會同時示範自訂 view 與「模板化」兩種 native 廣告。
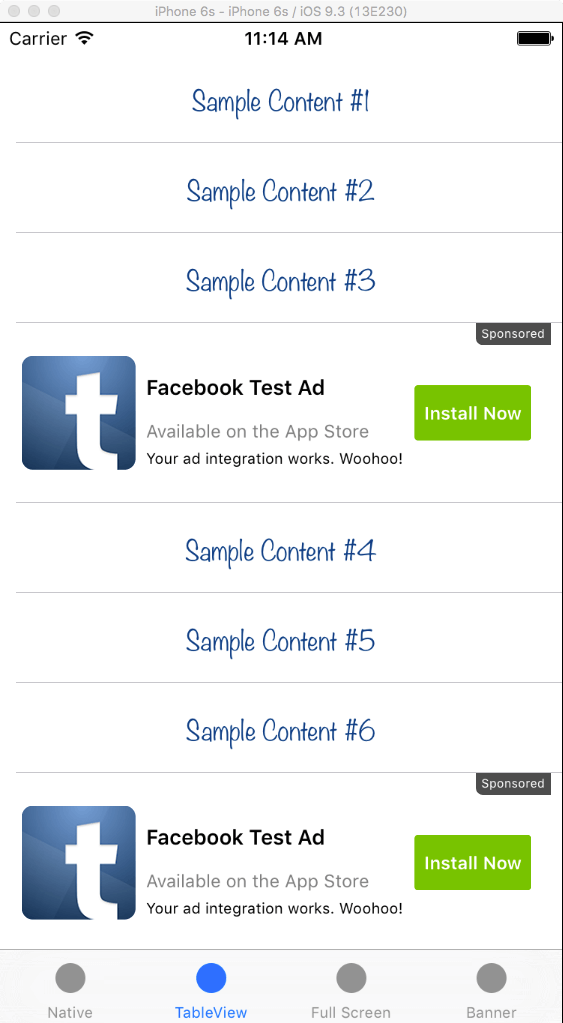
第二個 tab 的 view controller 是 TableViewAdsViewController,用 table view 顯示廣告,並使用 Audience Network 框架提供的工具,把廣告插入到示範資料行之間。
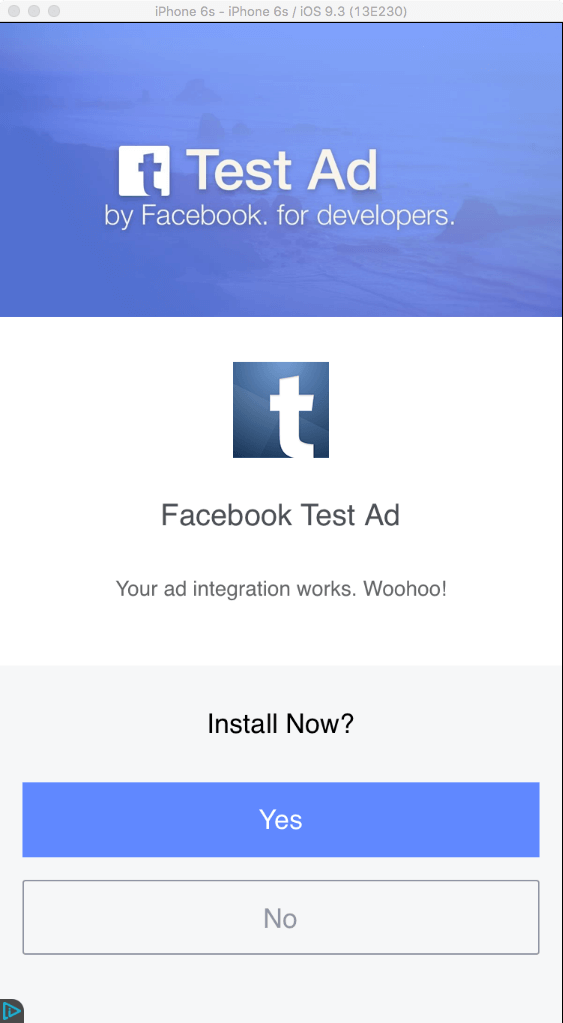
第三個 tab 的 view controller 是 FullScreenAdsViewController,點擊按鈕時顯示全屏廣告。
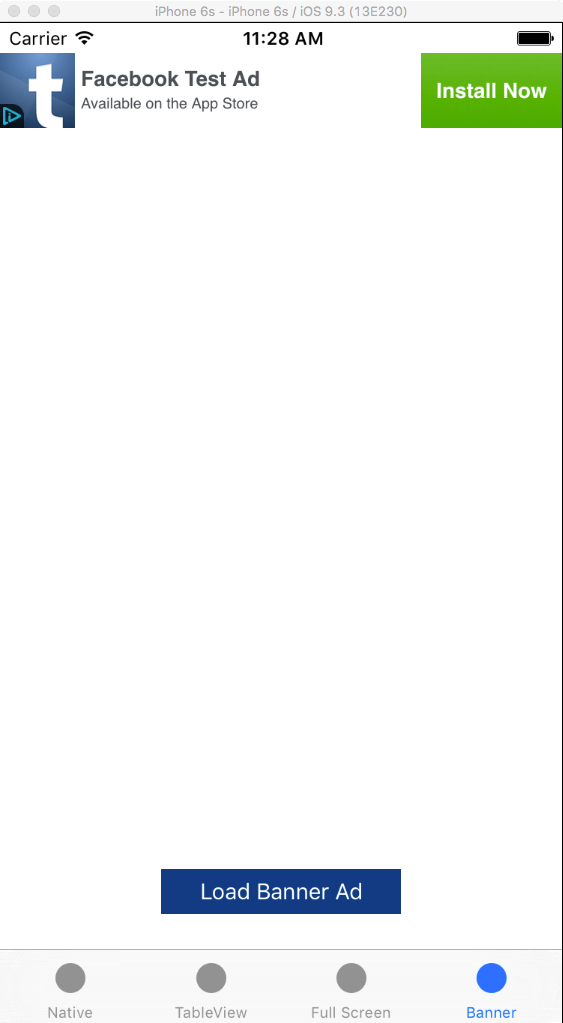
最後一個是 BannerAdsViewController,顧名思義,顯示橫幅廣告。
最終效果如下:
Native 廣告(自訂 view):
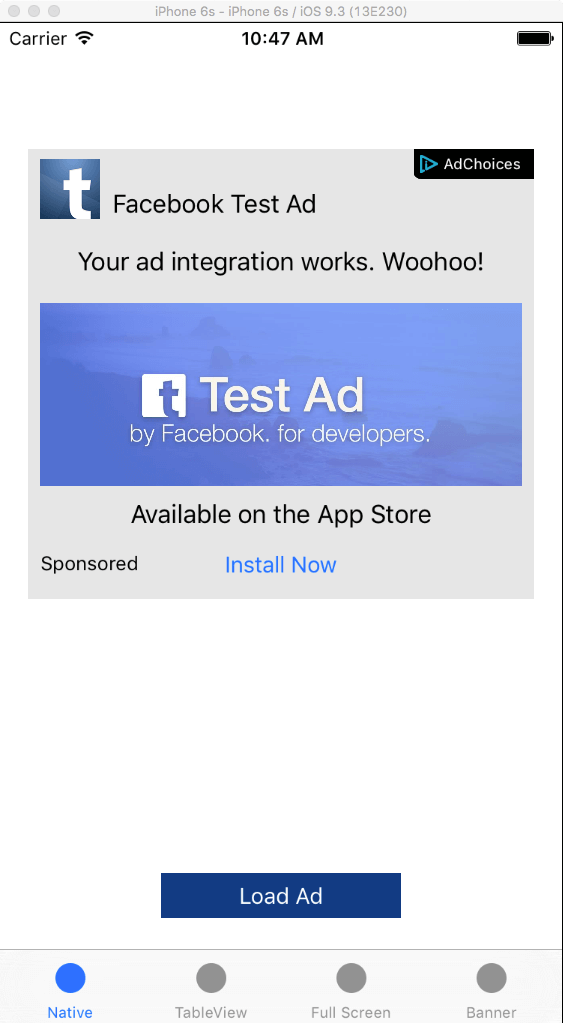
在 table view 中顯示 Native 廣告:
全屏廣告:
橫幅廣告:
準備工作
首先我們要介紹 Facebook Developers portal,因為我們必須在這裡進行一些操作並取得重要資料。簡單說,你需要新建一個 Facebook App 並做一些配置,最終獲得幾個 ID,而這些 ID 是在 App 中顯示廣告所必須的。
用瀏覽器登入 Facebook 帳號,進入相關頁面並點擊綠色的 Start Now 按鈕,然後輸入 App 名字、選擇目標平台為 iOS,並點擊 Create a New Facebook App ID。這一步至關重要,千萬不要遺漏。
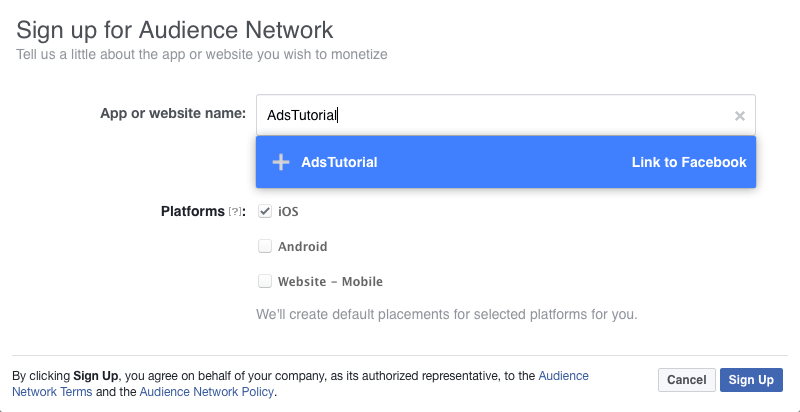
接著表單會多出兩欄:一欄填入你的聯絡信箱,另一欄選擇與該 App 相符的類別。
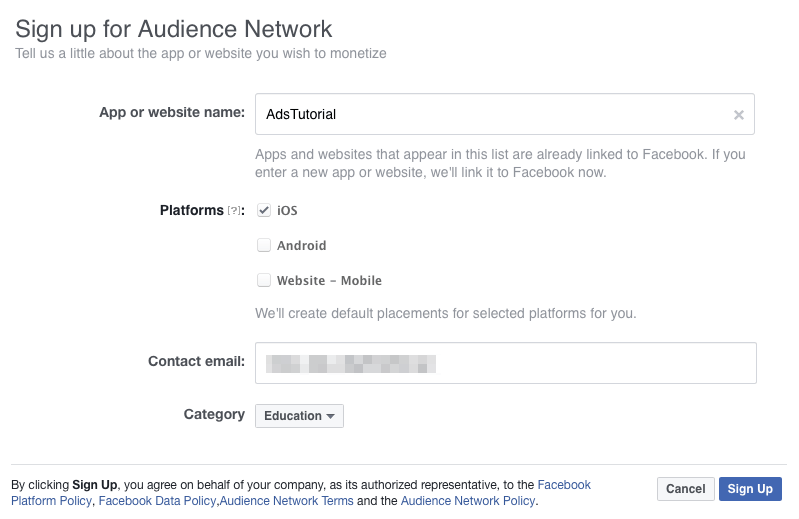
填完資訊後點擊 Sign Up,通過安全檢查後進入下一步。如果沒有錯誤,你會看到 Audience Network 產品的 Placements 設定。這是一個關鍵的地方,這裡會建立 placement ID,用於在 App 中顯示廣告。一個 placement 代表廣告在 App 中的一個位置,Facebook 透過它來收集點擊並優化廣告顯示。
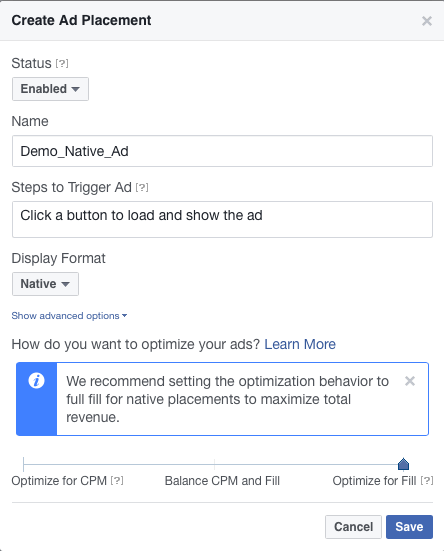
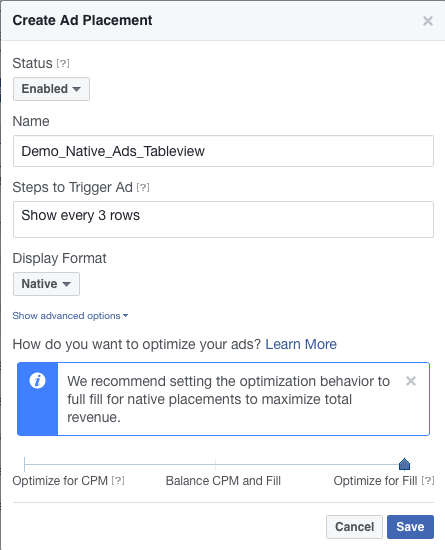
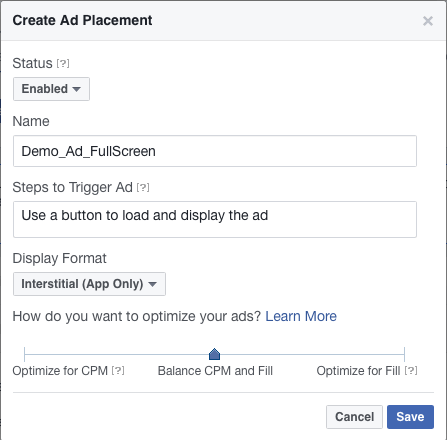
在我們的 demo App 中需要 4 個 placement ID,因此除了自動建立的之外,還需手動建立其他的。點擊 Create Ad Placement 按鈕,然後在彈出視窗中輸入資訊。
demo 中的第一個廣告是 native 廣告,我們用一個按鈕來載入與顯示:
第二個廣告是在第二個 tab 的 table view 中顯示的一系列 native 廣告:
第三個廣告是全屏廣告:
第四個廣告(橫幅)的 placement 配置留給你練習。每個新的 placement 加入後,都會被分配一個 Placement ID 值,我們稍後會用到。
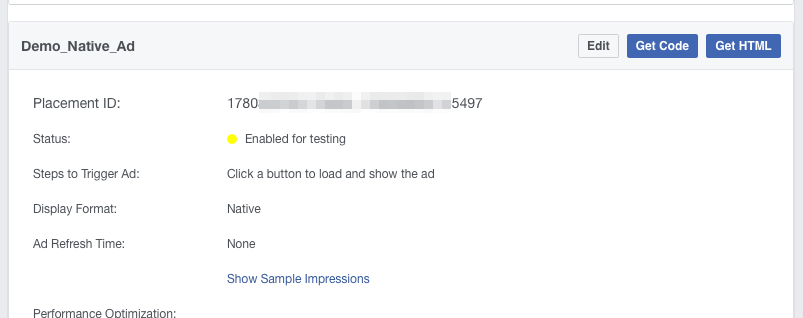
另外,若你點擊 Get Code 按鈕,會立刻看到使用該廣告與 placement ID 的範例程式碼。遺憾的是它們是 Objective-C 的,你需要自行轉換成 Swift。
重要事項:測試廣告
繼續之前,有一件事你必須知道。根據文檔,只允許以兩種方式運行 測試廣告:一是在模擬器中運行 App;二是在真機上透過 Xcode 除錯時,需在載入廣告前加入一行程式碼 [FBAdSettings addTestDevice:@"HASHED ID"];,這個 hashed ID 會在第一次於裝置上請求載入廣告時列印到控制台。
除此之外,你的 App 從 Facebook 請求到的將是 真正的廣告。在 Facebook 審查團隊審查 App 之前,你不會看到廣告。審查會在你把 App 發布到公網(如 App Store)之後開始。因此,你需要把 App 的下載 URL 輸入到 Placement 設定頁頂端的文本框,以便審查團隊下載,然後等候評審(約幾天),並不時查看 portal 的 Alerts 區域以了解結果。
App 的設定
做完 Facebook 的設定後,我們還需在專案中加入 Facebook Audience Network 框架。有兩種方式:使用 CocoaPods 下載 Facebook iOS SDK,或手動下載後把框架直接拖進 Xcode。
加入框架後,你還必須新增另外三個依賴框架。在專案導覽器中點擊專案名稱,於 General 視窗找到 Linked Frameworks and Libraries,點擊 + 按鈕三次,依序加入:
StoreKit、CoreMotion、AdSupport。
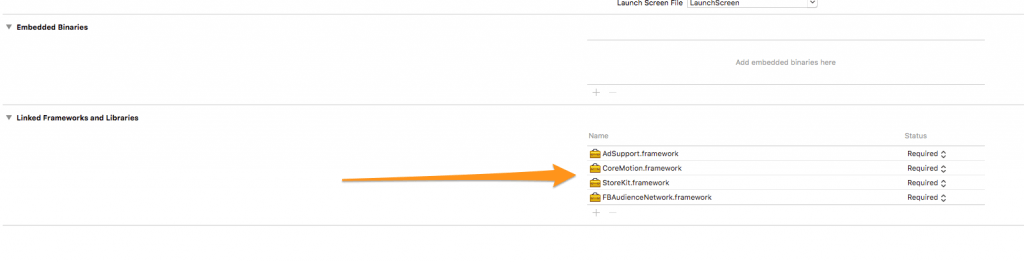
由於 Facebook SDK 是用 Objective-C 編寫的,我們需要用一個 bridging header 檔來導入這個庫,才能在 Swift 中使用它。步驟如下:點擊 File → New → File,選擇 iOS 下的 Source,選 header file 模板,命名為 AdsTutorial-Bridging-Header.h 並儲存。
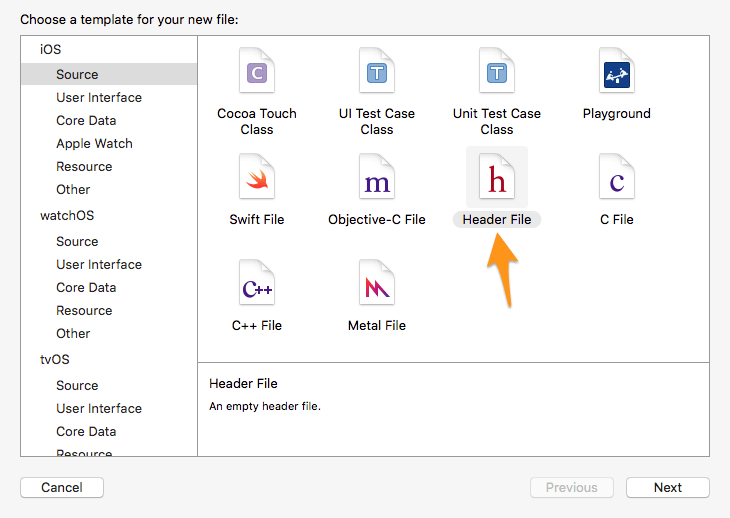
選中這個檔案,貼入:
#import
接著再次選中專案名稱,點擊 Build Settings,確保顯示 All 設定,搜尋 Bridging Header,雙擊 Objective-C Bridging Header 右側的內容區,輸入:
AdsTutorial/AdsTutorial-Bridging-Header.h

回車,專案設定就完成了。
顯示 Native 廣告
Native 廣告的外觀可以被完全客製,甚至和 App 中的其他 UI 一模一樣。有兩種方法:手動建立所有 view 並顯示廣告內容,或使用標準模板再覆蓋某些屬性。本節先介紹第一種。
在 Interface Builder 中,你會看到一顆用來載入廣告的按鈕,以及一個用來顯示廣告內容的 view(含幾個 subview)。這些控件都已和 SingleAdsViewController 中的 IBOutlet 屬性連接好:
viewAdContainer(顯示廣告內容的容器,App 啟動時隱藏)、lblAdTitle(廣告標題)、lblAdBody(廣告主體文字)、imgAdIcon(廣告圖標)、btnAdAction(call-to-action 按鈕)、lblSocialContext(顯示如「Available on the App Store」的訊息)。
請求廣告時要注意:廣告的基本欄位(如 title、icon)總是有值,但其他欄位可能為空,為避免閃退,必須妥善處理。
在所有 IBOutlet 屬性宣告後加入兩個屬性:
var nativeAd: FBNativeAd!
var coverMediaView: FBMediaView!
nativeAd 代表 App 中的 native 廣告,coverMediaView 是一種能顯示圖片或影片的特殊 view,只能透過程式碼建立。
在 Load Ad 按鈕被點擊時請求廣告,程式碼如下:
@IBAction func loadNativeAd(sender: AnyObject) {
    nativeAd = FBNativeAd(placementID: "PLACEMENT_ID")
    nativeAd.delegate = self
    nativeAd.loadAd()
}
記得把 "PLACEMENT_ID" 替換成你自己的 Placement ID。你也可以指定快取選項,例如讓影片載入後立即播放:
nativeAd.mediaCachePolicy = FBNativeAdsCachePolicy.Video
接著採用 FBNativeAdDelegate 協議,並實作兩個必做的關鍵方法:
class SingleAdsViewController: UIViewController, FBNativeAdDelegate { ... }

func nativeAdDidLoad(nativeAd: FBNativeAd) {
    handleLoadedNativeAdUsingCustomViews()
}

func nativeAd(nativeAd: FBNativeAd, didFailWithError error: NSError) {
    print(error)
}
在 handleLoadedNativeAdUsingCustomViews() 方法中,我們把廣告資料賦給各個 view,並確保資料有確定值:
func handleLoadedNativeAdUsingCustomViews() {
    // 標題
    lblAdTitle.text = nativeAd.title
    // 主體文字(若有)
    if let body = nativeAd.body { lblAdBody.text = body }
    // call-to-action 按鈕標題
    btnAdAction.setTitle(nativeAd.callToAction, forState: UIControlState.Normal)
    // 異步載入並顯示圖標
    nativeAd.icon?.loadImageAsyncWithBlock({ (iconImage) in
        if let image = iconImage { self.imgAdIcon.image = image }
    })
    // 建立媒體 view
    let yPoint = lblAdBody.frame.origin.y + lblAdBody.frame.size.height + 8.0
    let coverMediaViewFrame = CGRectMake(lblAdBody.frame.origin.x, yPoint, lblAdBody.frame.size.width, lblSocialContext.frame.origin.y - yPoint - 8.0)
    let coverMediaView = FBMediaView(frame: coverMediaViewFrame)
    coverMediaView.clipsToBounds = true
    coverMediaView.nativeAd = nativeAd
    viewAdContainer.addSubview(coverMediaView)
    // social context(若有)
    if let socialContext = nativeAd.socialContext { lblSocialContext.text = socialContext }
}
這裡有三點要注意:body 與 social context 可能為空,需先檢查;圖標以異步方式載入;coverMediaView 需手動加入容器,並務必使用 clipsToBounds 以免媒體超出容器寬度。
此外,我們還要提供一個 AdChoices view,供使用者設定廣告隱私選項:
func handleLoadedNativeAdUsingCustomViews() {
    ...
    let adChoicesView = FBAdChoicesView(nativeAd: nativeAd)
    viewAdContainer.addSubview(adChoicesView)
    adChoicesView.updateFrameFromSuperview()
}
要讓廣告在使用者點擊時能全屏展示,可讓整個容器可點擊:
nativeAd.registerViewForInteraction(viewAdContainer, withViewController: self)
或者只讓 call-to-action 按鈕可點擊:
nativeAd.registerViewForInteraction(viewAdContainer, withViewController: self, withClickableViews: [btnAdAction])
最後讓一直隱藏的容器變為可見:
viewAdContainer.hidden = false
運行 App,點擊第一個 tab 的 Load Ad 按鈕,若前面步驟正確,你應該能看到第一個測試廣告(建議用模擬器測試)。
在每次重新載入廣告前,記得先清理上一個 coverMediaView 並註銷 nativeAd 的交互:
@IBAction func loadNativeAd(sender: AnyObject) {
    if coverMediaView != nil {
        coverMediaView.removeFromSuperview()
        coverMediaView = nil
    }
    if nativeAd != nil { nativeAd.unregisterView() }
    nativeAd = FBNativeAd(placementID: "PLACEMENT_ID")
    nativeAd.delegate = self
    nativeAd.loadAd()
}
Native 廣告模板
接下來試試 Audience Network 內建的 native 廣告模板。它不需要手工建立 view,只要指定廣告 view 的 frame,再進行一些顏色、字體的設定即可。我們新增一個方法 handleLoadedNativeAdUsingTemplate():
func handleLoadedNativeAdUsingTemplate() {
    let nativeAdView = FBNativeAdView(nativeAd: nativeAd, withType: FBNativeAdViewType.GenericHeight300)
    nativeAdView.frame = CGRectMake(20.0, 100.0, UIScreen.mainScreen().bounds.size.width - 40.0, 300.0)
    self.view.addSubview(nativeAdView)
    nativeAd.registerViewForInteraction(nativeAdView, withViewController: self)
}
並把 nativeAdDidLoad 改為呼叫新方法:
func nativeAdDidLoad(nativeAd: FBNativeAd) {
    handleLoadedNativeAdUsingTemplate()
}
運行後效果如下:
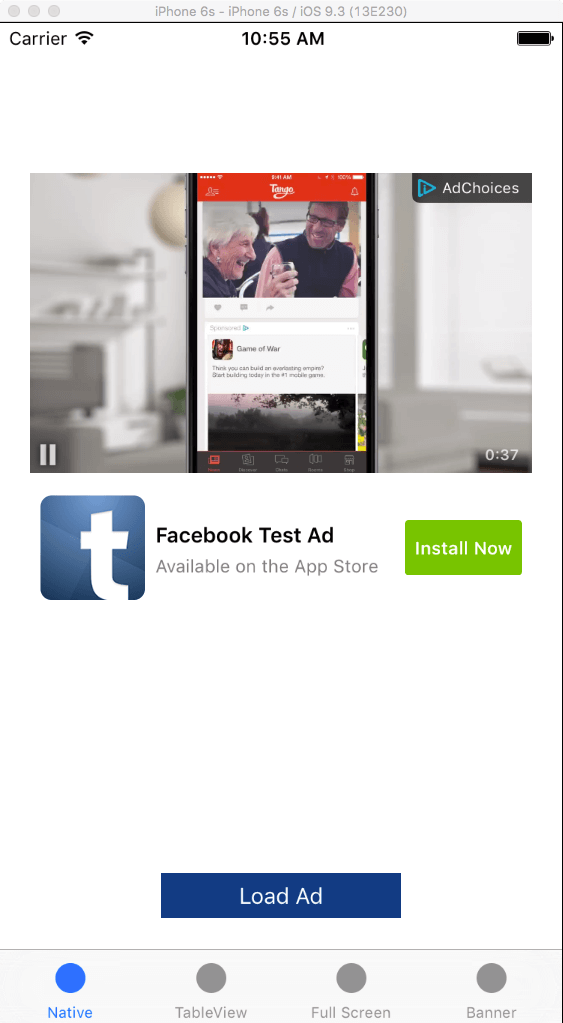
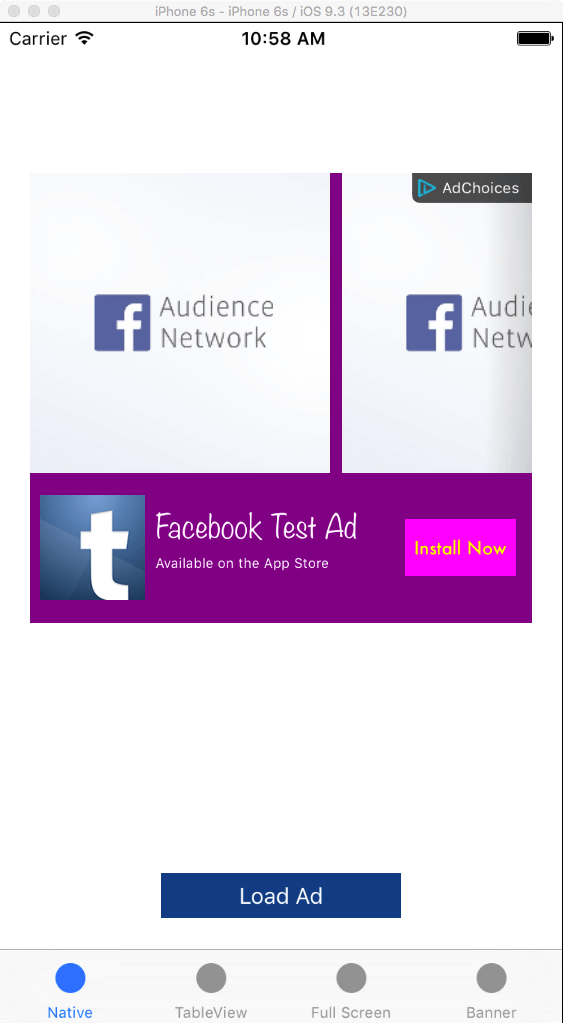
FBNativeAdView 有 4 種預設高度:GenericHeight100、GenericHeight120、GenericHeight300、GenericHeight400。設定 frame 時高度必須與之一致。你還可以透過 FBNativeAdViewAttributes 設定多項屬性(背景色、標題顏色與字體、按鈕顏色等),且必須在初始化前設定才會生效:
func handleLoadedNativeAdUsingTemplate() {
    let attributes = FBNativeAdViewAttributes()
    attributes.buttonColor = UIColor.magentaColor()
    attributes.buttonTitleColor = UIColor.yellowColor()
    attributes.backgroundColor = UIColor.purpleColor()
    attributes.titleFont = UIFont(name: "Noteworthy", size: 20.0)
    attributes.titleColor = UIColor.whiteColor()
    attributes.buttonTitleFont = UIFont(name: "Futura", size: 12.0)
    attributes.descriptionColor = UIColor.whiteColor()

    let nativeAdView = FBNativeAdView(nativeAd: nativeAd, withType: FBNativeAdViewType.GenericHeight300, withAttributes: attributes)
    nativeAdView.frame = CGRectMake(20.0, 100.0, UIScreen.mainScreen().bounds.size.width - 40.0, 300.0)
    self.view.addSubview(nativeAdView)
    nativeAd.registerViewForInteraction(nativeAdView, withViewController: self)
}
再次運行,效果如下:
在 Table View 中顯示 Native 廣告
Native 廣告可以很輕易地整合進 table view,因為框架提供了專門的工具。此時我們會用到兩個新類:FBNativeAdsManager(負責下載一組廣告並管理,會克隆已下載的廣告以便重複顯示)與 FBNativeAdTableViewCellProvider(自動把廣告整合進 table view,提供建立 cell 與計算行高的方法)。
打開 TableViewAdsViewController.swift,宣告 3 個屬性:
let adRowStep = 4
var adsManager: FBNativeAdsManager!
var adsCellProvider: FBNativeAdTableViewCellProvider!
adRowStep 表示廣告顯示的頻次(此處每隔 3 個 cell 插入一個廣告)。接著實作初始化並載入廣告的方法:
func configureAdManagerAndLoadAds() {
    if adsManager == nil {
        adsManager = FBNativeAdsManager(placementID: "PLACEMENT_ID", forNumAdsRequested: 5)
        adsManager.delegate = self
        adsManager.loadAds()
    }
}
初始化需兩個參數:placement ID,以及要下載的廣告數量(最多不超過 10)。別忘了在 viewWillAppear 中呼叫它。
接著採用兩個協議 FBNativeAdsManagerDelegate 與 FBNativeAdDelegate:
class TableViewAdsViewController: UIViewController, UITableViewDelegate, UITableViewDataSource, FBNativeAdDelegate, FBNativeAdsManagerDelegate { ... }
廣告下載成功後,實例化 adsCellProvider 並刷新 table view:
func nativeAdsLoaded() {
    adsCellProvider = FBNativeAdTableViewCellProvider(manager: adsManager, forType: FBNativeAdViewType.GenericHeight120)
    adsCellProvider.delegate = self
    if tblAdsDemo != nil { tblAdsDemo.reloadData() }
}

func nativeAdsFailedToLoadWithError(error: NSError) {
    print(error)
}
然後調整 table view 顯示的 cell 行數,把廣告數量也計入:
func tableView(tableView: UITableView, numberOfRowsInSection section: Int) -> Int {
    if adsCellProvider != nil {
        return Int(adsCellProvider.adjustCount(UInt(self.sampleData.count), forStride: UInt(adRowStep)))
    } else {
        return sampleData.count
    }
}
再依據列索引建立並加入廣告 cell,同時注意 else 分支中陣列索引的調整,以避免閃退:
func tableView(tableView: UITableView, cellForRowAtIndexPath indexPath: NSIndexPath) -> UITableViewCell {
    if adsCellProvider != nil && adsCellProvider.isAdCellAtIndexPath(indexPath, forStride: UInt(adRowStep)) {
        return adsCellProvider.tableView(tableView, cellForRowAtIndexPath: indexPath)
    } else {
        let cell = tableView.dequeueReusableCellWithIdentifier("idCellSample", forIndexPath: indexPath) as! SampleCell
        cell.lblTitle.text = sampleData[indexPath.row - Int(indexPath.row / adRowStep)]
        return cell
    }
}
這裡之所以用 indexPath.row - Int(indexPath.row / adRowStep) 而非原本的 indexPath.row,是因為廣告被插入後,行索引可能超過 sampleData 陣列長度,若不調整就會閃退。最後為每一列設定正確高度:
func tableView(tableView: UITableView, heightForRowAtIndexPath indexPath: NSIndexPath) -> CGFloat {
    if adsCellProvider != nil && adsCellProvider.isAdCellAtIndexPath(indexPath, forStride: UInt(adRowStep)) {
        return adsCellProvider.tableView(tableView, heightForRowAtIndexPath: indexPath)
    } else {
        return 60.0
    }
}
運行 App 切換到第二個 tab,稍等片刻,廣告便會交錯顯示在其他內容之間。
全屏廣告
全屏廣告(interstitial)相對簡單,我們只需下載廣告,然後在 view controller 中呈現,並採用 FBInterstitialAdDelegate 協議。打開 FullScreenAdsViewController.swift,修改類宣告並聲明屬性:
class FullScreenAdsViewController: UIViewController, FBInterstitialAdDelegate { ... }

var fullScreenAd: FBInterstitialAd!
在顯示按鈕的 IBAction 中載入廣告:
@IBAction func showFullScreenAd(sender: AnyObject) {
    fullScreenAd = FBInterstitialAd(placementID: "PLACEMENT_ID")
    fullScreenAd.delegate = self
    fullScreenAd.loadAd()
    btnShowAd.enabled = false
}
然後是委託方法,載入成功時顯示廣告並重新啟用按鈕:
func interstitialAdDidLoad(interstitialAd: FBInterstitialAd) {
    interstitialAd.showAdFromRootViewController(self)
    btnShowAd.enabled = true
}

func interstitialAd(interstitialAd: FBInterstitialAd, didFailWithError error: NSError) {
    print(error)
    btnShowAd.enabled = true
}
運行 App 切到第三個 tab,點擊按鈕,稍等片刻,全屏廣告便會顯示。
橫幅廣告
橫幅廣告使用 FBAdView 類與 FBAdViewDelegate 協議。打開 BannerAdsViewController.swift,宣告屬性並採用協議:
var bannerAdView: FBAdView!

class BannerAdsViewController: UIViewController, FBAdViewDelegate { ... }
在 loadBannerAd 中初始化並載入,同時設定 frame:
@IBAction func loadBannerAd(sender: AnyObject) {
    bannerAdView = FBAdView(placementID: "PLACEMENT_ID", adSize: kFBAdSizeHeight50Banner, rootViewController: self)
    bannerAdView.frame = CGRectMake(0.0, 20.0, UIScreen.mainScreen().bounds.size.width, 50.0)
    bannerAdView.delegate = self
    bannerAdView.hidden = true
    self.view.addSubview(bannerAdView)
    bannerAdView.loadAd()
}
初始化需 3 個參數:placement ID、廣告尺寸、顯示廣告的 view controller。注意我們先把橫幅設為隱藏,待下載成功後才顯示。載入成功時讓它顯示:
func adViewDidLoad(adView: FBAdView) {
    bannerAdView.hidden = false
}

func adView(adView: FBAdView, didFailWithError error: NSError) { print(error) }
func adViewDidClick(adView: FBAdView) { print("Did tap on ad view") }
運行 App 切到最後一個 tab 即可測試。
總結
一旦你決定在 App 中整合 Facebook 廣告,前面討論的所有選項你都能靈活運用。本文盡量涵蓋了大部分內容,但仍建議你通讀一遍官方文檔,那裡有更多細節。對每個開發者而言,了解如何透過 Audience Network 框架整合 Facebook 廣告,等於多開闢了一條從 App 本身以外獲得收入的途徑。希望本文能激發你的興趣,並讓你學到新的東西。祝開發順利!