
在 iOS 8 SDK 中使用 Touch ID API(下):認證流程、備用密碼與筆記 CRUD
在 iOS 8 SDK 中使用 Touch ID API(上)
執行 Touch ID 認證
介面與專案設定都完成後,第一件事就是把 Touch ID 認證機制接進 App。Touch ID 依附於 Local Authentication 框架,而這個框架預設不在專案裡,必須先手動加入。
在 Project Navigator 點選專案,切到 Build Phases 頁籤,你會看到幾個摺疊選項。我們要的是 Link Binary With Libraries,展開後點擊小加號。
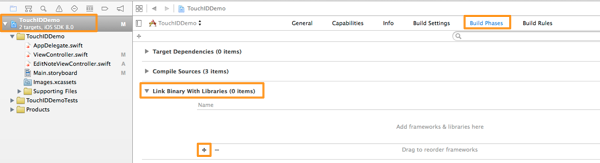
在彈出的視窗中輸入 Local Authentication,Xcode 會立刻找到它。
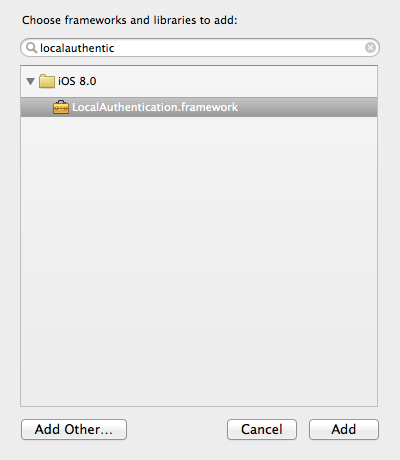
選中並按下 Add,框架就進來了。回到 ViewController.swift,在檔案頂端引入:
import LocalAuthentication
接著建立一個名為 authenticateUser() 的新函式:
func authenticateUser() { }這個方法沒有回傳值,也不接受任何參數。
使用 Touch ID 與 Local Authentication 的第一步,通常是取得認證上下文:
func authenticateUser() {
        // Get the local authentication context.
        let context : LAContext = LAContext()
}
當然也能寫成 let context = LAContext(),型別會被推斷出來。個人偏好寫全型別,可讀性更好。接著需要兩個變數:一個 NSError,一個用來說明彈出 Touch ID 對話框原因的 String:
func authenticateUser() {
        // Get the local authentication context.
        let context = LAContext()
        // Declare a NSError variable.
        var error: NSError?
        // Set the reason string that will appear on the authentication alert.
        var reasonString = "Authentication is needed to access your notes."
}
錯誤變數的宣告是可選的,因為沒有錯誤時它會是 nil。提醒一下,Swift 的 nil 有別於 Objective-C 的 nil,它代表「沒有值」。reasonString 的內容可以自訂,寫成任何你想要的提示。
如果裝置支援並已啟用 Touch ID,下一步是呼叫 canEvaluatePolicy 向框架確認。它接受兩個參數:要評估的策略與錯誤物件。
func authenticateUser() {
        ...
        // Check if the device can evaluate the policy.
        if context.canEvaluatePolicy(LAPolicy.DeviceOwnerAuthenticationWithBiometrics, error: &error) {
        }
}
DeviceOwnerAuthenticationWithBiometrics 是 LAPolicy 的一個屬性,注意錯誤變數是以傳參考方式傳入。條件成立,代表裝置支援 Touch ID、系統設定中已啟用並設有密碼,且至少錄入一枚指紋。此時套用該認證策略並顯示 Touch ID 對話框:
func authenticateUser() {
        ...
        if context.canEvaluatePolicy(LAPolicy.DeviceOwnerAuthenticationWithBiometrics, error: &error) {
            context.evaluatePolicy(LAPolicy.DeviceOwnerAuthenticationWithBiometrics, localizedReason: reasonString, reply: { (success: Bool, evalPolicyError: NSError?) -> Void in
            })
        }
}
evaluatePolicy 的第三個參數是完整的 completion handler。認證成功時我們會從磁碟載入筆記;失敗則需要處理錯誤。由於這是教學範例而非正式應用,我們只顯示錯誤資訊。可能的錯誤中,有一類是使用者選擇改用自訂密碼,此時我們會呼叫稍後才實作的另一個方法,彈出自訂警示視圖讓使用者輸入密碼。
func authenticateUser() {
        ...
        if context.canEvaluatePolicy(LAPolicy.DeviceOwnerAuthenticationWithBiometrics, error: &error) {
            context.evaluatePolicy(LAPolicy.DeviceOwnerAuthenticationWithBiometrics, localizedReason: reasonString, reply: { (success: Bool, evalPolicyError: NSError?) -> Void in
                if success {
                }
                else{
                    // If authentication failed then show a message to the console with a short description.
                    // In case that the error is a user fallback, then show the password alert view.
                    println(evalPolicyError?.localizedDescription)
                    switch evalPolicyError!.code {
                        case LAError.SystemCancel.toRaw():
                            println("Authentication was cancelled by the system")
                        case LAError.UserCancel.toRaw():
                            println("Authentication was cancelled by the user")
                        case LAError.UserFallback.toRaw():
                            println("User selected to enter custom password")
                            NSOperationQueue.mainQueue().addOperationWithBlock({ () -> Void in
                                self.showPasswordAlert()
                            })
                        default:
                            println("Authentication failed")
                            NSOperationQueue.mainQueue().addOperationWithBlock({ () -> Void in
                                self.showPasswordAlert()
                            })
                    }
                }
            })
        }
}
若 success 為真,我們載入筆記資料;否則做兩件事:先把錯誤描述印到 console(evalPolicyError 是 optional,取值時需要解包),再用 switch 逐一判斷錯誤類型(想用 if 也可以)。
這裡有兩點要留意:第一,並非所有錯誤類型都出現在這裡,有些發生在請求 Local Authentication 框架的階段(也就是 canEvaluatePolicy 那一步);第二,我們對每個錯誤類型都呼叫 toRaw(),因為要把它從列舉型別轉成原始整數,否則編譯器會報錯(可自行試試)。
另外你會看到對 showPasswordAlert 的呼叫——這是個尚未實作的方法。當它被觸發時,會顯示可輸入密碼的自訂警示框。我們在兩種情況下呼叫它:使用者選擇改用密碼,以及 Touch ID 無法辨識指紋導致認證失敗。重點是這個方法必須在主執行緒執行,因為顯示警示視圖屬於視覺變更,而 completion handler 是在背景執行緒被呼叫的,所以要包一層 NSOperationQueue.mainQueue()。另外兩種情況只印訊息到 console。
以上大致就是整合 Touch ID 所需的程式碼,但還不能收工,因為我們沒處理「Touch ID 對話框根本出不來」的情形。可能的原因包括:
 Touch ID 不可用
 裝置設定中未設定密碼
 尚未錄入任何指紋
 裝置不支援 Touch ID
為應對這些情況,我們在原本的 if 後面補一個 else 分支,判斷錯誤原因並顯示對應訊息;不論錯誤為何,都呼叫 showPasswordAlert 強制讓使用者以密碼登入。
func authenticateUser() {
        // Get the local authentication context.
        let context = LAContext()
        // Declare a NSError variable.
        var error: NSError?
        // Set the reason string that will appear on the authentication alert.
        var reasonString = "Authentication is needed to access your notes."
        // Check if the device can evaluate the policy.
        if context.canEvaluatePolicy(LAPolicy.DeviceOwnerAuthenticationWithBiometrics, error: &error) {
            context.evaluatePolicy(LAPolicy.DeviceOwnerAuthenticationWithBiometrics, localizedReason: reasonString, reply: { (success: Bool, evalPolicyError: NSError?) -> Void in
                if success {
                }
                else{
                    println(evalPolicyError?.localizedDescription)
                    switch evalPolicyError!.code {
                        case LAError.SystemCancel.toRaw():
                            println("Authentication was cancelled by the system")
                        case LAError.UserCancel.toRaw():
                            println("Authentication was cancelled by the user")
                        case LAError.UserFallback.toRaw():
                            println("User selected to enter custom password")
                            self.showPasswordAlert()
                        default:
                            println("Authentication failed")
                            self.showPasswordAlert()
                    }
                }
            })
        }
        else{
            // If the security policy cannot be evaluated then show a short message depending on the error.
            switch error!.code{
                case LAError.TouchIDNotEnrolled.toRaw():
                    println("TouchID is not enrolled")
                case LAError.PasscodeNotSet.toRaw():
                    println("A passcode has not been set")
                default:
                    // The LAError.TouchIDNotAvailable case.
                    println("TouchID not available")
            }
            println(error?.localizedDescription)
            // Show the custom alert view to allow users to enter the password.
            self.showPasswordAlert()
        }
}
別忘了在 viewDidLoad 中呼叫這個方法,否則什麼都不會發生:
override func viewDidLoad() {
        super.viewDidLoad()
        authenticateUser()
}
Swift 中呼叫方法時 self 通常可以省略,但 block 內部不行,這就是為什麼 completion handler 裡必須寫 self。
提供自訂認證方式
前面呼叫了三次 showPasswordAlert,Xcode 正因為找不到這個方法而報錯。為了保持簡單,我們不另闢密碼輸入介面,而是直接彈一個帶安全文字欄位的警示視圖。
func showPasswordAlert() {
        var passwordAlert : UIAlertView = UIAlertView(title: "TouchIDDemo", message: "Please type your password", delegate: self, cancelButtonTitle: "Cancel", otherButtonTitles: "Okay")
        passwordAlert.alertViewStyle = UIAlertViewStyle.SecureTextInput
        passwordAlert.show()
}
這樣一來,只要使用者選擇密碼登入或 Touch ID 認證失敗,就會跳出警示視圖。但光這樣還不夠——我們還得驗證輸入的密碼是否正確,因此要實作 alertView(_:clickedButtonAtIndex:) 這個 delegate 方法(上面程式碼已把 self 設為 delegate)。示範中我們假定正確密碼是 appcoda;若輸入錯誤或留空,就再彈一次警示視圖。
func alertView(alertView: UIAlertView!, clickedButtonAtIndex buttonIndex: Int) {
        if buttonIndex == 1 {
                if !alertView.textFieldAtIndex(0)!.text.isEmpty {
                    if alertView.textFieldAtIndex(0)!.text == "appcoda" {
                    }
                    else{
                        showPasswordAlert()
                    }
            }
                else{
                    showPasswordAlert()
                }
        }
}
密碼正確時,我們載入筆記資料並顯示到 table view。
此時 Xcode 會報錯,因為我們還沒採用 UIAlertViewDelegate 協議。到檔案頂部把它加上即可:
class ViewController: UIViewController, UIAlertViewDelegate
子類化並遵循協議時,父類寫在最前面,之後的所有協議用逗號分隔。
備用認證機制完成。提醒一句:在真實應用中用警示視圖收密碼是很糟的做法,示範可以,上線不行。
建立新筆記
認證都搞定後,可以來做 App 本體了。先從建立新筆記開始——沒有資料就無從顯示。
筆記資料存在 App 的 documents 目錄下,因此我們需要兩個方法:取得檔案完整路徑,以及判斷檔案是否存在。這兩個功能在 ViewController(檢查並載入資料)與 EditNoteViewController(載入既有資料、追加新資料、儲存編輯)中都會用到。由於邏輯幾乎相同,我們把它們放進 AppDelegate,透過應用代理物件直接呼叫。
開啟 AppDelegate.swift,加入取得路徑的方法:
func getPathOfDataFile() -> String {
        let pathsArray = NSSearchPathForDirectoriesInDomains(NSSearchPathDirectory.DocumentDirectory, NSSearchPathDomainMask.UserDomainMask, true)
        let documentsPath = pathsArray[0] as String
        let dataFilePath = documentsPath.stringByAppendingPathComponent("notesData")
        return dataFilePath
}
這裡把筆記檔命名為 notesData,叫什麼其實無所謂。這段實作示範了 Swift 中操作文件目錄的寫法,值得當成可重用的程式碼片段;同時這也是我們第一次寫出有回傳值的方法。
再來是檢查檔案是否存在:
func checkIfDataFileExists() -> Bool {
        if NSFileManager.defaultManager().fileExistsAtPath(getPathOfDataFile()) {
            return true
        }
        return false
}
用 NSFileManager 判斷,寫法與 Objective-C 幾乎一致:找到就回傳 true,否則 false。
有了這兩個工具方法,回到 EditNoteViewController.swift,宣告並初始化應用代理常量:
let appDelegate = UIApplication.sharedApplication().delegate as AppDelegate
接著要讓保存按鈕能運作。在那之前先處理一件小事:讓鍵盤在這個視圖控制器被推入時自動彈出,寫作會順手很多。在 viewDidLoad 中加一行:
self.txtNoteTitle.becomeFirstResponder()
另外,如果按鍵盤的 Return 能把焦點交給下方的文字視圖,體驗會更好。這需要三步:遵循 UITextFieldDelegate 協議、把自己設為文字欄的 delegate、實作 delegate 方法。
class EditNoteViewController: UIViewController, UITextFieldDelegate
在 viewDidLoad 中指定 delegate:
txtNoteTitle.delegate = self
最後是 delegate 方法:
func textFieldShouldReturn(textField: UITextField!) -> Bool {
        // Resign the textfield from first responder.
        textField.resignFirstResponder()
        // Make the textview the first responder.
        tvNoteBody.becomeFirstResponder()
        return true
}
按下 Return 時,文字欄放棄焦點,文字視圖接手。
回到保存按鈕。先建立 IBAction:開啟 Main.storyboard 並打開 Assistant Editor。

確認右側顯示的是 ViewController.swift:
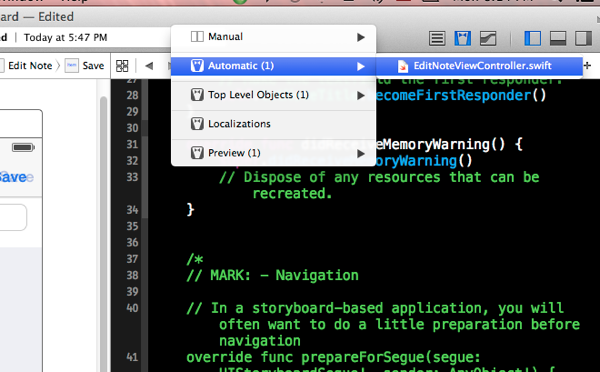
按住 Ctrl 點擊保存按鈕,拖曳到輔助編輯器:
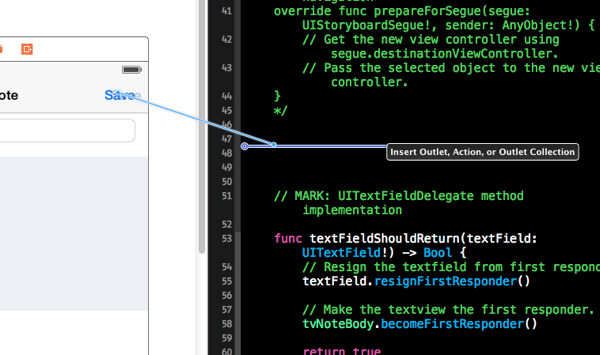
在彈出的對話框中,把 Connection 選為 Action,名稱填 saveNote,按下 Connect。
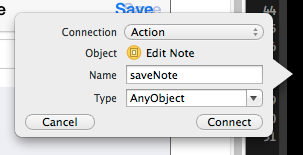
關掉輔助編輯器,回到 EditNoteViewController.swift。
saveNote 要做的第一件事,是確認使用者有輸入標題。沒有標題就什麼都不做,直接 return:
@IBAction func saveNote(sender: AnyObject) {
        if self.txtNoteTitle.text.isEmpty {
            println("No title for the note was typed.")
            return
        }
}
整體邏輯如下:
 先把標題與內容組成一個字典(Swift Dictionary)。
 接著宣告一個可變陣列 NSMutableArray。
 若資料檔已存在,就載入既有內容,再把新字典追加進去。
 若資料檔不存在,直接用該字典初始化陣列。
 把陣列寫回磁碟。
 最後把視圖控制器從導航堆疊彈出。
對應程式碼:
@IBAction func saveNote(sender: AnyObject) {
        if self.txtNoteTitle.text.isEmpty {
            println("No title for the note was typed.")
            return
        }
        // Create a dictionary with the note data.
        var noteDict = ["title": self.txtNoteTitle.text, "body": self.tvNoteBody.text]
        // Declare a NSMutableArray object.
        var dataArray: NSMutableArray
        // If the notes data file exists then load its contents and add the new note data too, otherwise
        // just initialize the dataArray array and add the new note data.
        if appDelegate.checkIfDataFileExists() {
            // Load any existing notes.
            dataArray = NSMutableArray(contentsOfFile: appDelegate.getPathOfDataFile())
            // Add the dictionary to the array.
            dataArray.addObject(noteDict)
        }
        else{
            // Create a new mutable array and add the noteDict object to it.
            dataArray = NSMutableArray(object: noteDict)
        }
        // Save the array contents to file.
        dataArray.writeToFile(appDelegate.getPathOfDataFile(), atomically: true)
        // Pop the view controller
        self.navigationController!.popViewControllerAnimated(true)
}
問題在這裡:ViewController 無法得知 EditNoteViewController 彈出前筆記是否真的存好了,因此不會更新表視圖。解法是用自訂協議搭配 delegate 模式,稍後再補;我們先回頭把資料載入功能補完。
筆記列表
從 ViewController.swift 開始。這裡有兩件事:寫一個載入資料的方法,以及實作必要的 table view 方法把資料呈現出來。
先宣告應用代理,方便呼叫先前寫的兩個方法(放在 IBOutlet 屬性之後):
let appDelegate = UIApplication.sharedApplication().delegate as AppDelegate
再宣告一個用來承載資料的可變陣列。之所以用可變陣列而非固定陣列,是因為後續要實作刪除筆記,需要修改內容:
var dataArray: NSMutableArray!
宣告為 optional,是因為若資料檔不存在,它會保持 nil。
現在實作載入方法:檔案存在就載入並刷新 table view,否則印個訊息。
func loadData(){
        if appDelegate.checkIfDataFileExists() {
            self.dataArray = NSMutableArray(contentsOfFile: appDelegate.getPathOfDataFile())
            self.tblNotes.reloadData()
        }
        else{
            println("File does not exist")
        }
}
接著在認證成功的 completion handler 中呼叫它:
if success {
            NSOperationQueue.mainQueue().addOperationWithBlock({ () -> Void in
                self.loadData()
            })
}
同樣必須在主執行緒載入並更新畫面。另外,使用者輸入正確密碼時也要呼叫:
if alertView.textFieldAtIndex(0).text == "appcoda" {
            loadData()
}
第二部分是設定 table view。先在檔案頂部遵循兩個協議:
class ViewController: UIViewController, UIAlertViewDelegate, UITableViewDelegate, UITableViewDataSource
並在 viewDidLoad 中把自己設為 delegate 與 dataSource:
override func viewDidLoad() {
    ...
    tblNotes.delegate = self
    tblNotes.dataSource = self
}
最後實作必要的 table view 方法。先指定 section 數量:
func numberOfSectionsInTableView(tableView: UITableView!) -> Int {
        return 1
}
再回傳行數。若資料檔不存在,dataArray 會是 nil,所以要先確認再回傳:
func tableView(tableView: UITableView, numberOfRowsInSection section: Int) -> Int {
        if let array = dataArray {
            return array.count
        }
        else{
            return 0
        }
}
這裡用 optional binding 把 dataArray 解包到常數 array 再取 count。
補充一個替代寫法:直接把 count 回傳即可,但前提是不要把 dataArray 宣告為 optional,而是宣告後立刻初始化,這樣它就不會是 nil。所以不要寫:
var dataArray: NSMutableArray!
而要寫:
var dataArray: NSMutableArray = NSMutableArray()
代價是 loadData 中會再用檔案內容重新初始化一次。兩種做法都可行,我們選擇 optional 版本。
接著回傳 cell:
func tableView(tableView: UITableView, cellForRowAtIndexPath indexPath: NSIndexPath) -> UITableViewCell {
        var cell = tableView.dequeueReusableCellWithIdentifier("idCell") as UITableViewCell
        let currentNote = self.dataArray.objectAtIndex(indexPath.row) as Dictionary
            cell.textLabel!.text = currentNote["title"]
        return cell
}
取出對應位置的字典,把標題設到 cell 的文字標籤上。
最後指定列高:
func tableView(tableView: UITableView, heightForRowAtIndexPath indexPath: NSIndexPath) -> CGFloat {
        return 60.0
}
現在檔案裡所有筆記都能列出來了。接下來用 delegate 讓 table view 在新增或修改後自動刷新。
delegate 模式
Objective-C 中用 delegate 通知其他類別資料已變動,需要定義協議、宣告方法、讓類別遵循並設定 delegate。Swift 的寫法與此高度相似。
EditNoteViewController 不會主動通知 ViewController,所以 delegate 是必要手段。第一步,開啟 EditNoteViewController.swift,在類別實作之前定義協議:
protocol EditNoteViewControllerDelegate{ }裡面只宣告一個方法,在筆記儲存後呼叫:
protocol EditNoteViewControllerDelegate{
    func noteWasSaved()
}
接著在類別內部宣告 delegate 屬性:
var delegate : EditNoteViewControllerDelegate?
必須是 optional,因為可能沒有任何物件被指派給它。
接下來兩件事:在 saveNote 中呼叫代理方法,並在 ViewController 中實作它。先修改 saveNote,在彈出視圖控制器之前加上通知:
@IBAction func saveNote(sender: AnyObject) {
    ...
        // Notify the delegate class that the note has been saved.
        delegate?.noteWasSaved()
        // Pop the view controller
        self.navigationController!.popViewControllerAnimated(true)
}
再回到 ViewController,遵循新協議:
class ViewController: UIViewController, UIAlertViewDelegate, UITableViewDelegate, UITableViewDataSource, EditNoteViewControllerDelegate
Xcode 此時會報錯,因為 noteWasSaved 尚未實作:
func noteWasSaved() {
        // Load the data and reload the table view.
        loadData()
}
loadData 會把該做的都做完了。
最後一步是在 prepareForSegue 中把自己設為 EditNoteViewController 的 delegate:
override func prepareForSegue(segue: UIStoryboardSegue, sender: AnyObject!) {
        if segue.identifier == "idSegueEditNote"{
            var editNoteViewController : EditNoteViewController = segue.destinationViewController as EditNoteViewController
            editNoteViewController.delegate = self
}
示範中並沒有其他 segue,這個 if 是為了展示如何在 Swift 中判斷 segue 識別碼。透過 destinationViewController 取得目標實例,再把 self 設為其 delegate。
在 Swift 裡用協議與 delegate 其實相當直觀,步驟也很明確。
編輯筆記
到這裡,範例 App 已功能完整且具備保護機制。接下來加上編輯與刪除兩個功能,順便多學一些 Swift。
編輯的邏輯很簡單:使用者點擊某個 cell 時,把該列索引傳給 EditNoteViewController,後者從磁碟載入資料並顯示對應內容;同時要調整 saveNote,讓編輯後的內容是覆寫而非新增。
先實作點擊的 table view 方法:
func tableView(tableView: UITableView, didSelectRowAtIndexPath indexPath: NSIndexPath) {
}
我們要保存被點擊的列索引,然後觸發 segue。先在類別頂部宣告屬性:
var noteIndexToEdit: Int!
方法內容如下:
func tableView(tableView: UITableView, didSelectRowAtIndexPath indexPath: NSIndexPath) {
        noteIndexToEdit = indexPath.row
        performSegueWithIdentifier("idSegueEditNote", sender: self)
}
接著在 EditNoteViewController.swift 宣告對應屬性:
var indexOfEditedNote : Int!
回到 ViewController.swift 的 prepareForSegue,把值傳過去:
override func prepareForSegue(segue: UIStoryboardSegue, sender: AnyObject!) {
        if segue.identifier == "idSegueEditNote"{
            ...
            if (noteIndexToEdit != nil) {
                editNoteViewController.indexOfEditedNote = noteIndexToEdit
                noteIndexToEdit = nil
            }
        }
}
這裡有個關鍵細節:傳完索引後要把 noteIndexToEdit 設為 nil。否則編輯完再新增筆記時,indexOfEditedNote 仍帶著舊值,EditNoteViewController 會誤以為要編輯既有筆記,導致嚴重錯誤。
回到 EditNoteViewController.swift,新增一個方法把邏輯寫清楚:
func editNote() {
        // Load all notes.
        var notesArray: NSArray = NSArray(contentsOfFile: appDelegate.getPathOfDataFile())
        // Get the dictionary at the specified index.
        let noteDict : Dictionary = notesArray.objectAtIndex(indexOfEditedNote) as Dictionary
            // Set the textfield text.
        txtNoteTitle.text = noteDict["title"]
        // Set the textview text.
        tvNoteBody.text = noteDict["body"]
}
步驟很清晰:載入全部筆記、取出要編輯的那筆、把標題與內容填進控制項。
呼叫時機很重要。文字欄與文字視圖必須已完成初始化,否則會崩潰——例如在 viewDidLoad 中呼叫就不安全。最合適的位置是 viewDidAppear,此時子視圖確定已就緒:
override func viewDidAppear(animated: Bool) {
        if (indexOfEditedNote != nil) {
            editNote()
        }
}
呼叫前先確認 indexOfEditedNote 有實際值。
最後再調整一次 saveNote,讓它能區分「新增」與「覆寫」。找到那段 if 判斷:
if appDelegate.checkIfDataFileExists
在其方法體中補上判斷:
@IBAction func saveNote(sender: AnyObject) {
        ...
        if appDelegate.checkIfDataFileExists() {
            // Load any existing notes.
            dataArray = NSMutableArray(contentsOfFile: appDelegate.getPathOfDataFile())
            // Check if is editing a note or not.
            if indexOfEditedNote == nil {
                // Add the dictionary to the array.
                dataArray.addObject(noteDict)
            }
            else{
                // Replace the existing dictionary to the array.
                dataArray.replaceObjectAtIndex(indexOfEditedNote, withObject: noteDict)
            }
        }
        ...
}
indexOfEditedNote 為 nil 就把新字典加進陣列;有值則用新字典替換該索引位置的舊項目。
編輯與儲存既有筆記的能力,現在具備了。
刪除筆記
最後一塊拼圖:刪除。開啟 ViewController.swift,實作這個 table view 方法:
func tableView(tableView: UITableView, commitEditingStyle editingStyle: UITableViewCellEditingStyle, forRowAtIndexPath indexPath: NSIndexPath) {
}
用 if 判斷使用者是否左滑以顯示刪除按鈕。若是,就從 dataArray 移除對應字典、寫回檔案,並動態刷新 table view:
func tableView(tableView: UITableView, commitEditingStyle editingStyle: UITableViewCellEditingStyle, forRowAtIndexPath indexPath: NSIndexPath) {
        if editingStyle == UITableViewCellEditingStyle.Delete{
            // Delete the respective object from the dataArray array.
            dataArray.removeObjectAtIndex(indexPath.row)
            // Save the array to disk.
            let appDelegate = UIApplication.sharedApplication().delegate as AppDelegate
            dataArray.writeToFile(appDelegate.getPathOfDataFile(), atomically: true)
            // Reload the tableview.
            tblNotes.reloadSections(NSIndexSet(index: 0), withRowAnimation: UITableViewRowAnimation.Automatic)
        }
}
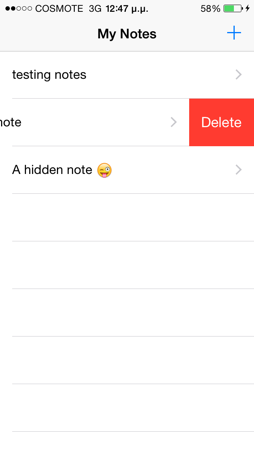
這樣就足夠了,任何既有筆記都能直接刪除。加個確認提示對話框可能更貼心,但這裡為求簡潔略過。
編譯與執行
現在是時候跑起來了:試試 Touch ID、自訂警示視圖,還有新增、編輯與刪除筆記。以下是幾張實機截圖。
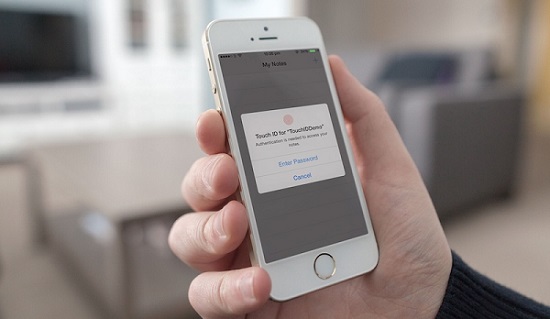
Touch ID 對話框
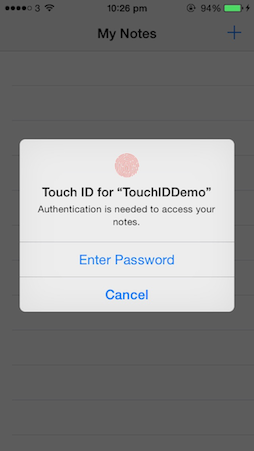
帶安全文字欄的密碼提示視圖
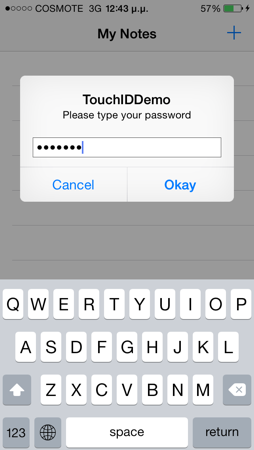
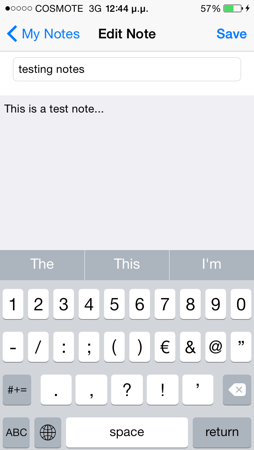
撰寫新筆記
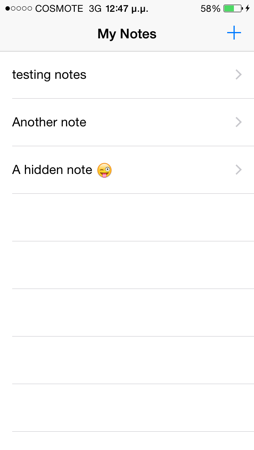
顯示筆記
刪除筆記
總結
iOS 8 系列的第一篇教程到這裡告一段落。作為開篇,我們用 Swift 寫了一個功能完整的應用,也寫了不少程式碼,並刻意示範了多種實用技巧。
快速回顧一下,我們用 Swift 完成了:
 搭配 Local Authentication 框架實作 Touch ID 驗證機制。
 建立 IBOutlet 屬性與 IBAction 方法。
 實作所需的 table view 方法。
 定義了一個簡單的協議。
 使用了 delegate 模式。
 操作檔案與文件路徑。
 用 NSOperationQueue 在主執行緒執行方法。
 把一個簡單想法轉化成完整的應用邏輯。
希望這篇教程對你有所幫助。方便對照學習的完整 Xcode 專案可另行下載。