
XMPPFramework 入門:登入、好友、訊息、聊天室與心跳一次上手
XMPPFramework 是 OS X/iOS 平台的開源專案,以 Objective-C 實作了 XMPP 協定(RFC-3920),並附帶讀寫 XML 的工具類,讓基於 XMPP 的即時通訊應用開發省下不少力氣。以下依實際開發順序,梳理最常用到的幾個環節。
一、登入與好友上下線
常用類別
- XMPPStream:整個框架的基礎服務類別
- XMPPRoster:好友列表
- XMPPRosterCoreDataStorage:好友(帳號)在 Core Data 中的存取
- XMPPvCardCoreDataStorage:名片資訊(暱稱、簽名、性別、年齡等)在 Core Data 中的存取
- XMPPvCardTemp:名片實體類別,從資料庫取出的即為此型別
- XMPPvCardAvatarModule:好友頭像
- XMPPReconnect:斷線自動重連
- XMPPRoom:多人群聊支援
- XMPPPubSub:發布/訂閱
連線到伺服器
- (void)connect {
    if (self.xmppStream == nil) {
        self.xmppStream = [[XMPPStream alloc] init];
        [self.xmppStream addDelegate:self delegateQueue:dispatch_get_main_queue()];
    }
    if (![self.xmppStream isConnected]) {
        NSString *username = [[NSUserDefaults standardUserDefaults] objectForKey:@"username"];
        XMPPJID *jid = [XMPPJID jidWithUser:username domain:@"lizhen" resource:@"Ework"];
        [self.xmppStream setMyJID:jid];
        [self.xmppStream setHostName:@"10.4.125.113"];
        NSError *error = nil;
        if (![self.xmppStream connect:&error]) {
            NSLog(@"Connect Error: %@", [[error userInfo] description]);
        }
    }
}
連線成功後,XMPPStreamDelegate 會依序回呼。首先是:
- (void)xmppStream:(XMPPStream *)sender socketDidConnect:(GCDAsyncSocket *)socket
接著是:
- (void)xmppStreamDidConnect:(XMPPStream *)sender
在這個方法裡呼叫 authenticateWithPassword 進行密碼驗證,成功後會回呼:
- (void)xmppStreamDidAuthenticate:(XMPPStream *)sender
上線:在上述驗證成功的方法中送出 presence。
- (void)xmppStreamDidAuthenticate:(XMPPStream *)sender {
    XMPPPresence *presence = [XMPPPresence presenceWithType:@"available"];
    [self.xmppStream sendElement:presence];
}
登出並斷線
- (void)disconnect {
    XMPPPresence *presence = [XMPPPresence presenceWithType:@"unavailable"];
    [self.xmppStream sendElement:presence];
    [self.xmppStream disconnect];
}好友狀態:實作下面的方法,每當收到 presence 標籤就會被回呼。
- (void)xmppStream:(XMPPStream *)sender didReceivePresence:(XMPPPresence *)presence
presence 標籤的格式大致如下:
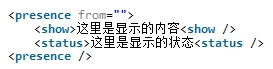
常見狀態值:available(上線)、away(離開)、do not disturb(忙碌)、unavailable(下線)。
- (void)xmppStream:(XMPPStream *)sender didReceivePresence:(XMPPPresence *)presence {
    NSString *presenceType = [presence type];
    NSString *presenceFromUser = [[presence from] user];
    if (![presenceFromUser isEqualToString:[[sender myJID] user]]) {
        if ([presenceType isEqualToString:@"available"]) {
            // 好友上線
        } else if ([presenceType isEqualToString:@"unavailable"]) {
            // 好友下線
        }
    }
}
二、收發訊息
收訊息:實作 - (void)xmppStream:didReceiveMessage:,收到 message 標籤時回呼。依 XMPP 協定,訊息本文放在 body 標籤內。
- (void)xmppStream:(XMPPStream *)sender didReceiveMessage:(XMPPMessage *)message {
    NSString *messageBody = [[message elementForName:@"body"] stringValue];
}發訊息:把內容放進 body,並補上 type 與 to 屬性。

- (void)sendMessage:(NSString *) message toUser:(NSString *) user {
    NSXMLElement *body = [NSXMLElement elementWithName:@"body"];
    [body setStringValue:message];
    NSXMLElement *message = [NSXMLElement elementWithName:@"message"];
    [message addAttributeWithName:@"type" stringValue:@"chat"];
    NSString *to = [NSString stringWithFormat:@"%@@example.com", user];
    [message addAttributeWithName:@"to" stringValue:to];
    [message addChild:body];
    [self.xmppStream sendElement:message];
}
三、好友列表與名片
常用介面一覽:
[_xmppRoster fetchRoster];                       // 抓取好友列表

// 收到單一好友節點
- (void)xmppRoster:(XMPPRoster *)sender didRecieveRosterItem:(NSXMLElement *)item
// 好友列表抓取完畢
- (void)xmppRosterDidEndPopulating:(XMPPRoster *)sender

// 向伺服器請求名片
- (void)fetchvCardTempForJID:(XMPPJID *)jid;
// 有快取就不請求,沒有才發出請求
- (void)fetchvCardTempForJID:(XMPPJID *)jid ignoreStorage:(BOOL)ignoreStorage;
// 有快取直接回傳,沒有則回傳空並向伺服器抓取
- (XMPPvCardTemp *)vCardTempForJID:(XMPPJID *)jid shouldFetch:(BOOL)shouldFetch;
// 更新自己的名片
- (void)updateMyvCardTemp:(XMPPvCardTemp *)vCardTemp;
// 收到名片資料的回呼
- (void)xmppvCardTempModule:(XMPPvCardTempModule *)vCardTempModule
        didReceivevCardTemp:(XMPPvCardTemp *)vCardTemp
                     forJID:(XMPPJID *)jid
加好友
// name 為對方帳號
- (void)XMPPAddFriendSubscribe:(NSString *)name {
    XMPPJID *jid = [XMPPJID jidWithString:
                    [NSString stringWithFormat:@"%@@%@", name, XMPPHOST]];
    [xmppRoster subscribePresenceToUser:jid];
}
收到加好友請求
- (void)xmppRoster:(XMPPRoster *)sender
    didReceivePresenceSubscriptionRequest:(XMPPPresence *)presence {
    NSString *presenceType = [NSString stringWithFormat:@"%@", [presence type]];
    NSString *presenceFromUser = [NSString stringWithFormat:@"%@", [[presence from] user]];
    XMPPJID *jid = [XMPPJID jidWithString:presenceFromUser];
    // 接受請求並加入名單
    [xmppRoster acceptPresenceSubscriptionRequestFrom:jid andAddToRoster:YES];
}
刪除好友
- (void)removeBuddy:(NSString *)name {
    XMPPJID *jid = [XMPPJID jidWithString:
                    [NSString stringWithFormat:@"%@@%@", name, XMPPHOST]];
    [self xmppRoster] removeUser:jid];
}
四、聊天室
初始化
XMPPJID *roomJID = [XMPPJID jidWithString:ROOM_JID];
xmppRoom = [[XMPPRoom alloc] initWithRoomStorage:self jid:roomJID];
[xmppRoom activate:xmppStream];
[xmppRoom addDelegate:self delegateQueue:dispatch_get_main_queue()];
建立成功
- (void)xmppRoomDidCreate:(XMPPRoom *)sender {
    DDLogInfo(@"%@: %@", THIS_FILE, THIS_METHOD);
}
以暱稱加入
[xmppRoom joinRoomUsingNickname:@"quack" history:nil];
加入成功後抓取房間資訊
- (void)xmppRoomDidJoin:(XMPPRoom *)sender {
    [xmppRoom fetchConfigurationForm];
    [xmppRoom fetchBanList];
    [xmppRoom fetchMembersList];
    [xmppRoom fetchModeratorsList];
}
房間存在時的回呼:
- (void)xmppRoom:(XMPPRoom *)sender didFetchBanList:(NSArray *)items;
- (void)xmppRoom:(XMPPRoom *)sender didFetchMembersList:(NSArray *)items;
- (void)xmppRoom:(XMPPRoom *)sender didFetchModeratorsList:(NSArray *)items;
房間不存在時的回呼:
- (void)xmppRoom:(XMPPRoom *)sender didNotFetchBanList:(XMPPIQ *)iqError;
- (void)xmppRoom:(XMPPRoom *)sender didNotFetchMembersList:(XMPPIQ *)iqError;
- (void)xmppRoom:(XMPPRoom *)sender didNotFetchModeratorsList:(XMPPIQ *)iqError;
離開房間
[xmppRoom deactivate:xmppStream];
其他 XMPPRoomDelegate 方法,包含離開房間、成員加入與退出、以及群內發言:
- (void)xmppRoomDidLeave:(XMPPRoom *)sender
- (void)xmppRoom:(XMPPRoom *)sender occupantDidJoin:(XMPPJID *)occupantJID
- (void)xmppRoom:(XMPPRoom *)sender occupantDidLeave:(XMPPJID *)occupantJID
- (void)xmppRoom:(XMPPRoom *)sender didReceiveMessage:(XMPPMessage *)message
                                     fromOccupant:(XMPPJID *)occupantJID
五、訊息回執(XEP-0184)
發送訊息時附加回執請求:
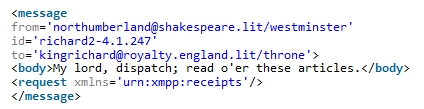
NSString *siID = [XMPPStream generateUUID];
XMPPMessage *message = [XMPPMessage messageWithType:@"chat" to:jid elementID:siID];
NSXMLElement *receipt = [NSXMLElement elementWithName:@"request" xmlns:@"urn:xmpp:receipts"];
[message addChild:receipt];
[message addBody:@"測試"];
[self.xmppStream sendElement:message];
收到回執請求時,需回送 received 節點;同時也要處理自己收到的 received,以判定對方已讀。
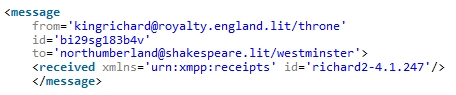
- (void)xmppStream:(XMPPStream *)sender didReceiveMessage:(XMPPMessage *)message {
    NSXMLElement *request = [message elementForName:@"request"];
    if (request) {
        if ([request.xmlns isEqualToString:@"urn:xmpp:receipts"]) {
            // 組裝並送出自動回執
            XMPPMessage *msg = [XMPPMessage messageWithType:
                                [message attributeStringValueForName:@"type"]
                                to:message.from
                                elementID:[message attributeStringValueForName:@"id"]];
            NSXMLElement *recieved = [NSXMLElement elementWithName:@"received"
                                                          xmlns:@"urn:xmpp:receipts"];
            [msg addChild:recieved];
            [self.xmppStream sendElement:msg];
        }
    } else {
        NSXMLElement *received = [message elementForName:@"received"];
        if (received && [received.xmlns isEqualToString:@"urn:xmpp:receipts"]) {
            NSLog(@"message send success!");
        }
    }
    // 訊息本體處理其餘邏輯
}
六、加上心跳監聽(XEP-0199)
為了掌握伺服器是否仍然存活,實務上一定會加上心跳。XMPPFramework 提供了 XMPPAutoPing 與 XMPPPing 兩個類別,由於前者已內含後者,使用 XMPPAutoPing 更為省事。
// 初始化並啟動 ping
- (void)autoPingProxyServer:(NSString*)strProxyServer {
    _xmppAutoPing = [[XMPPAutoPing alloc] init];
    [_xmppAutoPing activate:_xmppStream];
    [_xmppAutoPing addDelegate:self delegateQueue:dispatch_get_main_queue()];
    _xmppAutoPing.respondsToQueries = YES;
    _xmppAutoPing.pingInterval = 2;
    if (nil != strProxyServer) {
        // 為 nil 時則監聽 socket 目前連線的伺服器
        _xmppAutoPing.targetJID = [XMPPJID jidWithString:strProxyServer];
    }
}

// 停止監聽
[_xmppAutoPing deactivate];
[_xmppAutoPing removeDelegate:self];
_xmppAutoPing = nil;

// XMPPAutoPingDelegate 回呼
- (void)xmppAutoPingDidSendPing:(XMPPAutoPing *)sender
- (void)xmppAutoPingDidReceivePong:(XMPPAutoPing *)sender
- (void)xmppAutoPingDidTimeout:(XMPPAutoPing *)sender
(原文作者:易穎,經作者授權轉載。)