
Masonry 實戰:用鏈式語法馴服 Auto Layout
前言
MagicNumber -> autoresizingMask -> autolayout
這是純手寫程式碼時代,介面排版經歷的三個階段。
iPhone 1 到 3GS 的年代,視窗尺寸固定在 320×480,算好相對位置就能收工。iPhone 4、4S 迎來 Retina 螢幕,但尺寸不變,對開發者而言算是意外之喜。到了 iPhone 5、5S,高度變成 568,autoresizingMask 開始派上用場——之所以還沒換成 Auto Layout,純粹是因為仍得支援 iOS 5。等到 iPhone 6 這一代寬度也變了,加上不再需要背 iOS 5,全面改用 Auto Layout 終於成為合理選擇。
問題是,Auto Layout 的上手曲線並不友善。iOS 6 推出它時,我看過官方文件與範例後就直接放到一旁了——繁瑣且囉嗦,有同感的人應該不少。直到 iPhone 6 發表,適配已無迴避空間,我才想起先前在 GitHub 上掃到過的 Masonry。花了幾個小時摸索之後,Auto Layout 就通了——而過程中我幾乎沒讀過任何官方文件。這正是我想寫這篇介紹的原因。
Masonry 是什麼
專案位址:https://github.com/Masonry/Masonry
Masonry 是一個輕量級的排版框架,自帶一套描述語法,用鏈式寫法包裝 Auto Layout,簡潔且可讀性高,同時支援 iOS 與 OS X。
先看官方範例:
[view1 mas_makeConstraints:^(MASConstraintMaker *make) {
    make.edges.equalTo(superview).with.insets(padding);
}];
把 block 裡那句話唸出來——make edges equalTo superview with insets——view1 的約束就設好了。近乎自然語言的表達方式,正是它最迷人的地方。
支援的屬性
@property (nonatomic, strong, readonly) MASConstraint *left;
@property (nonatomic, strong, readonly) MASConstraint *top;
@property (nonatomic, strong, readonly) MASConstraint *right;
@property (nonatomic, strong, readonly) MASConstraint *bottom;
@property (nonatomic, strong, readonly) MASConstraint *leading;
@property (nonatomic, strong, readonly) MASConstraint *trailing;
@property (nonatomic, strong, readonly) MASConstraint *width;
@property (nonatomic, strong, readonly) MASConstraint *height;
@property (nonatomic, strong, readonly) MASConstraint *centerX;
@property (nonatomic, strong, readonly) MASConstraint *centerY;
@property (nonatomic, strong, readonly) MASConstraint *baseline;
它們與 NSLayoutAttribute 的對應關係如下:
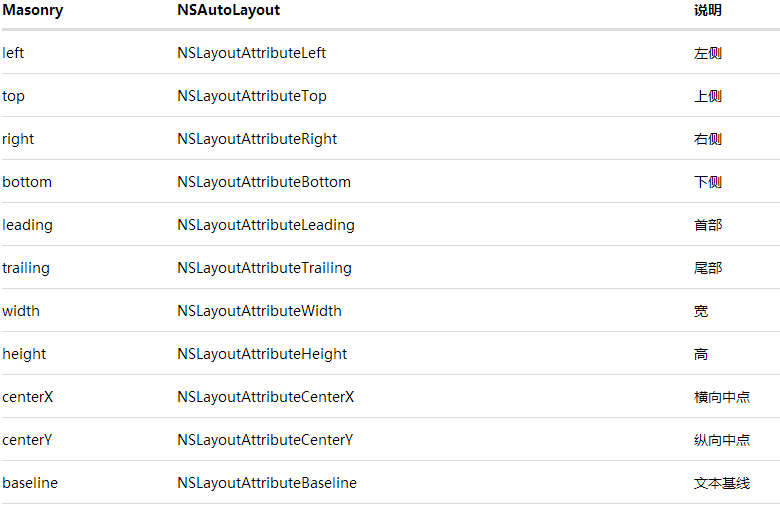
其中 leading 與 left、trailing 與 right 在一般情況下等價;只有當排版方向為從右至左(例如阿拉伯文介面)時才會對調。也就是說,日常開發用 left 和 right 就好。iOS 8 之後又新增了一批屬性,Masonry 暫時還不支援,但若你仍需相容 iOS 6、7,這些也不在關心範圍內。
開始實例之前,先定義一個常用巨集:
#define WS(weakSelf) __weak __typeof(&*self)weakSelf = self;
用來在 block 中快速取得 weak 版本的 self。以下範例的 superview 一律是一個尺寸為 300×300 的 UIView。
1. 基礎:讓 view 居中
- (void)viewDidLoad {
    [super viewDidLoad];

    WS(ws);

    UIView *sv = [UIView new];
    [sv showPlaceHolder];
    sv.backgroundColor = [UIColor blackColor];
    [self.view addSubview:sv];
    [sv mas_makeConstraints:^(MASConstraintMaker *make) {
        make.center.equalTo(ws.view);
        make.size.mas_equalTo(CGSizeMake(300, 300));
    }];
}
效果如下:
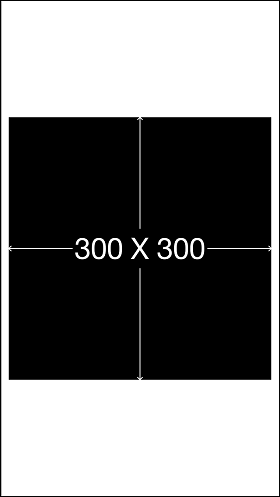
幾個重點:
// 從此大致可以告別 CGRectMake
UIView *sv = [UIView new];
// 進行 Auto Layout 之前,務必先加入 superview,否則會報錯
[self.view addSubview:sv];
// mas_makeConstraints 負責新增約束
[sv mas_makeConstraints:^(MASConstraintMaker *make) {
    make.center.equalTo(ws.view);              // 居中
    make.size.mas_equalTo(CGSizeMake(300, 300)); // 尺寸 300×300
}];
這裡有兩個細節需要補充。
第一,新增約束有三個函數:
- (NSArray *)mas_makeConstraints:(void(^)(MASConstraintMaker *make))block;
- (NSArray *)mas_updateConstraints:(void(^)(MASConstraintMaker *make))block;
- (NSArray *)mas_remakeConstraints:(void(^)(MASConstraintMaker *make))block;

/* mas_makeConstraints 只負責新增;同一對象上不能存在兩條相同約束,否則報錯。
   mas_updateConstraints 會更新 block 中出現過的約束,避免重複衝突。
   mas_remakeConstraints 會清除先前所有約束,只保留這次的。
   三者搭配使用,足以應付各種情境。 */
第二,equalTo 與 mas_equalTo 的差別在哪?後者其實是巨集:
#define mas_equalTo(...)                 equalTo(MASBoxValue((__VA_ARGS__)))
#define mas_greaterThanOrEqualTo(...)    greaterThanOrEqualTo(MASBoxValue((__VA_ARGS__)))
#define mas_lessThanOrEqualTo(...)       lessThanOrEqualTo(MASBoxValue((__VA_ARGS__)))
#define mas_offset(...)                  valueOffset(MASBoxValue((__VA_ARGS__)))
可見 mas_equalTo 只是把參數做了一次「裝箱」處理(MASBoxValue 的實作可查原始碼)。除了 NSNumber 已支援的數值型別之外,它另外支援 CGPoint、CGSize 與 UIEdgeInsets。
2. 初級:四周留 10pt 邊距
UIView *sv1 = [UIView new];
[sv1 showPlaceHolder];
sv1.backgroundColor = [UIColor redColor];
[sv addSubview:sv1];
[sv1 mas_makeConstraints:^(MASConstraintMaker *make) {
    make.edges.equalTo(sv).with.insets(UIEdgeInsetsMake(10, 10, 10, 10));

    /* 等價於:
    make.top.equalTo(sv).with.offset(10);
    make.left.equalTo(sv).with.offset(10);
    make.bottom.equalTo(sv).with.offset(-10);
    make.right.equalTo(sv).with.offset(-10); */

    /* 也等價於:
    make.top.left.bottom.and.right.equalTo(sv).with.insets(UIEdgeInsetsMake(10, 10, 10, 10)); */
}];
效果如下:
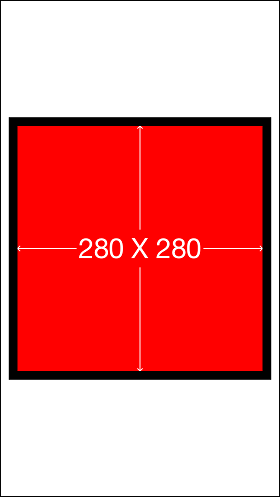
edges 其實就是 top、left、bottom、right 的簡寫,分開寫也可以,只是麻煩些。至於 bottom 與 right 為什麼是負值——因為這裡算的是絕對位置,底部要從父視圖底邊往上退 10,右邊同理,所以取負數。
另外有意思的是 and 與 with,這兩個方法什麼事都沒做:
- (MASConstraint *)with { return self; }
- (MASConstraint *)and  { return self; }
但在鏈式語法中,它們讓整句話讀起來格外順,設計上頗見巧思。
3. 初級:兩塊等寬、間距 10 的並排 view
int padding1 = 10;
[sv2 mas_makeConstraints:^(MASConstraintMaker *make) {
    make.centerY.mas_equalTo(sv.mas_centerY);
    make.left.equalTo(sv.mas_left).with.offset(padding1);
    make.right.equalTo(sv3.mas_left).with.offset(-padding1);
    make.height.mas_equalTo(@150);
    make.width.equalTo(sv3);
}];
[sv3 mas_makeConstraints:^(MASConstraintMaker *make) {
    make.centerY.mas_equalTo(sv.mas_centerY);
    make.left.equalTo(sv2.mas_right).with.offset(padding1);
    make.right.equalTo(sv.mas_right).with.offset(-padding1);
    make.height.mas_equalTo(@150);
    make.width.equalTo(sv2);
}];
效果如下:
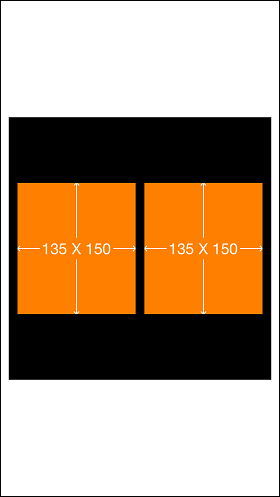
關鍵在於讓兩個子視圖互相約束寬度,剩下的數值就由系統自行解算。
4. 中級:UIScrollView 內順序排列並自動算出 contentSize
UIScrollView *scrollView = [UIScrollView new];
scrollView.backgroundColor = [UIColor whiteColor];
[sv addSubview:scrollView];
[scrollView mas_makeConstraints:^(MASConstraintMaker *make) {
    make.edges.equalTo(sv).with.insets(UIEdgeInsetsMake(5, 5, 5, 5));
}];

UIView *container = [UIView new];
[scrollView addSubview:container];
[container mas_makeConstraints:^(MASConstraintMaker *make) {
    make.edges.equalTo(scrollView);
    make.width.equalTo(scrollView);
}];

int count = 10;
UIView *lastView = nil;
for (int i = 1; i <= count; ++i) {
    UIView *subv = [UIView new];
    [container addSubview:subv];
    subv.backgroundColor = [UIColor
        colorWithHue: (arc4random() % 256 / 256.0)
        saturation: (arc4random() % 128 / 256.0) + 0.5
        brightness: (arc4random() % 128 / 256.0) + 0.5
             alpha: 1];

    [subv mas_makeConstraints:^(MASConstraintMaker *make) {
        make.left.and.right.equalTo(container);
        make.height.mas_equalTo(@(20 * i));

        if (lastView) {
            make.top.mas_equalTo(lastView.mas_bottom);
        } else {
            make.top.mas_equalTo(container.mas_top);
        }
    }];

    lastView = subv;
}

[container mas_makeConstraints:^(MASConstraintMaker *make) {
    make.bottom.equalTo(lastView.mas_bottom);
}];
頂部與尾部的實際效果:
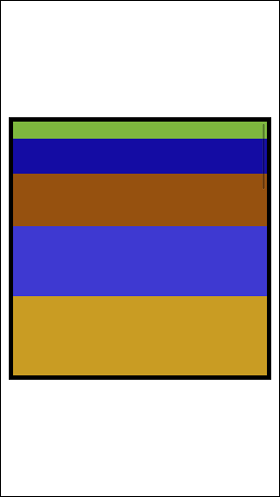
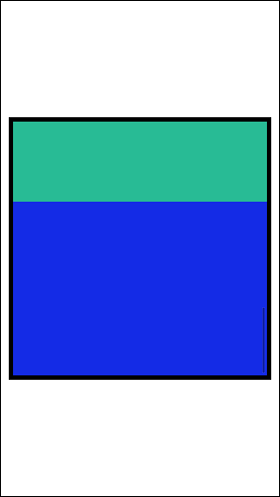
從捲動指示條就能看出內容已如預期排好。這裡的關鍵是 container 這個中間層——它讓 scrollView 的 contentSize 能被自動推導出來。
5. 高級:等間距排列一組 view
Auto Layout 並未提供直接的等間距排列能力,Masonry 官方範例也沒有對應案例。但參考第 3 個實例的思維,可以用「插入空白佔位視圖」的技巧達成,於是我寫了以下 Category:
@implementation UIView (Masonry_LJC)

- (void) distributeSpacingHorizontallyWith:(NSArray*)views {
    NSMutableArray *spaces = [NSMutableArray arrayWithCapacity:views.count + 1];

    for (int i = 0; i < views.count + 1; ++i) {
        UIView *v = [UIView new];
        [spaces addObject:v];
        [self addSubview:v];

        [v mas_makeConstraints:^(MASConstraintMaker *make) {
            make.width.equalTo(v.mas_height);
        }];
    }

    UIView *v0 = spaces[0];
    __weak __typeof(&*self)ws = self;

    [v0 mas_makeConstraints:^(MASConstraintMaker *make) {
        make.left.equalTo(ws.mas_left);
        make.centerY.equalTo(((UIView*)views[0]).mas_centerY);
    }];

    UIView *lastSpace = v0;
    for (int i = 0; i < views.count; ++i) {
        UIView *obj = views[i];
        UIView *space = spaces[i + 1];

        [obj mas_makeConstraints:^(MASConstraintMaker *make) {
            make.left.equalTo(lastSpace.mas_right);
        }];

        [space mas_makeConstraints:^(MASConstraintMaker *make) {
            make.left.equalTo(obj.mas_right);
            make.centerY.equalTo(obj.mas_centerY);
            make.width.equalTo(v0);
        }];

        lastSpace = space;
    }

    [lastSpace mas_makeConstraints:^(MASConstraintMaker *make) {
        make.right.equalTo(ws.mas_right);
    }];
}

- (void) distributeSpacingVerticallyWith:(NSArray*)views {
    NSMutableArray *spaces = [NSMutableArray arrayWithCapacity:views.count + 1];

    for (int i = 0; i < views.count + 1; ++i) {
        UIView *v = [UIView new];
        [spaces addObject:v];
        [self addSubview:v];

        [v mas_makeConstraints:^(MASConstraintMaker *make) {
            make.width.equalTo(v.mas_height);
        }];
    }

    UIView *v0 = spaces[0];
    __weak __typeof(&*self)ws = self;

    [v0 mas_makeConstraints:^(MASConstraintMaker *make) {
        make.top.equalTo(ws.mas_top);
        make.centerX.equalTo(((UIView*)views[0]).mas_centerX);
    }];

    UIView *lastSpace = v0;
    for (int i = 0; i < views.count; ++i) {
        UIView *obj = views[i];
        UIView *space = spaces[i + 1];

        [obj mas_makeConstraints:^(MASConstraintMaker *make) {
            make.top.equalTo(lastSpace.mas_bottom);
        }];

        [space mas_makeConstraints:^(MASConstraintMaker *make) {
            make.top.equalTo(obj.mas_bottom);
            make.centerX.equalTo(obj.mas_centerX);
            make.height.equalTo(v0);
        }];

        lastSpace = space;
    }

    [lastSpace mas_makeConstraints:^(MASConstraintMaker *make) {
        make.bottom.equalTo(ws.mas_bottom);
    }];
}

@end
實際跑一次,特意給幾個 view 不同尺寸以檢驗效果:
UIView *sv11 = [UIView new];
UIView *sv12 = [UIView new];
UIView *sv13 = [UIView new];
UIView *sv21 = [UIView new];
UIView *sv31 = [UIView new];
sv11.backgroundColor = [UIColor redColor];
sv12.backgroundColor = [UIColor redColor];
sv13.backgroundColor = [UIColor redColor];
sv21.backgroundColor = [UIColor redColor];
sv31.backgroundColor = [UIColor redColor];
[sv addSubview:sv11];
[sv addSubview:sv12];
[sv addSubview:sv13];
[sv addSubview:sv21];
[sv addSubview:sv31];

[sv11 mas_makeConstraints:^(MASConstraintMaker *make) {
    make.centerY.equalTo(@[sv12, sv13]);
    make.centerX.equalTo(@[sv21, sv31]);
    make.size.mas_equalTo(CGSizeMake(40, 40));
}];
[sv12 mas_makeConstraints:^(MASConstraintMaker *make) {
    make.size.mas_equalTo(CGSizeMake(70, 20));
}];
[sv13 mas_makeConstraints:^(MASConstraintMaker *make) {
    make.size.mas_equalTo(CGSizeMake(50, 50));
}];
[sv21 mas_makeConstraints:^(MASConstraintMaker *make) {
    make.size.mas_equalTo(CGSizeMake(50, 20));
}];
[sv31 mas_makeConstraints:^(MASConstraintMaker *make) {
    make.size.mas_equalTo(CGSizeMake(40, 60));
}];
[sv distributeSpacingHorizontallyWith:@[sv11, sv12, sv13]];
[sv distributeSpacingVerticallyWith:@[sv11, sv21, sv31]];
[sv showPlaceHolderWithAllSubviews];
[sv hidePlaceHolder];
成果如下:
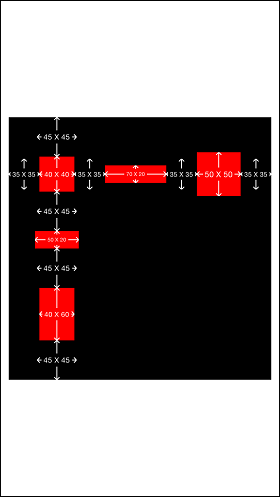
不論水平或垂直方向,間距都完全一致,而其中的秘訣正是在目標視圖之間插入尺寸相同的空白佔位視圖——圖上的留白標註就是它們。
小結
五個案例大致涵蓋了 Masonry 的日常用法。若仍覺得意猶未盡,直接抓官方 demo 來讀會更快。
總的來說,Masonry 是個非常出色的 Auto Layout 封裝,能省下可觀的開發與學習成本,對偏愛純程式碼的 iOS 開發者尤其親切。在 iPhone 6 之後的適配潮裡,它值得放進你的工具箱。