
iOS 8 互動式本地通知實戰:以購物提醒 App 為例
(原文:Creating Interactive Local Notifications in iOS 8 作者:Gabriel Theodoropoulos 譯者:ibenjamin)
通知是 App 與使用者溝通的橋樑,尤其是在 App 未於前景執行時。它的目的很單純:引起使用者注意,讓使用者得以回應。從程式角度看,通知有一套相當標準的 API,照著文件走就能實作;每個 App 真正需要決定的,只有自己那一層業務邏輯。
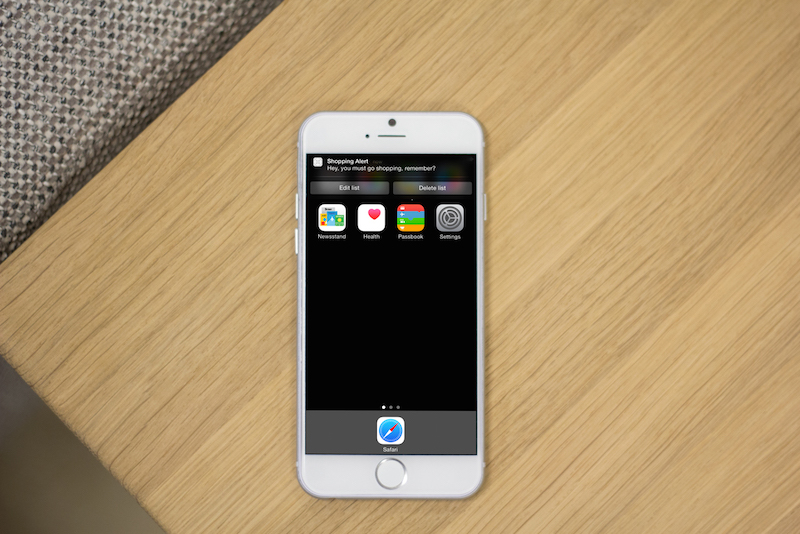
iOS 8 起,通知大致可分為:
- 本地通知(Local Notifications):由 App 自行定義並在預定時間觸發。
- 遠端通知(Remote Notifications):又分兩類——(a) 推送通知,由伺服器發起,經 APNS 送達裝置;(b) 靜默通知,同樣是推送但不顯示給使用者,而是立即喚醒 App 執行任務,完成後再由 App 發一則本地通知告知結果。
此外 iOS 8 還引入了地區通知(Location Notifications),本質上仍屬本地通知,只在使用者進入特定地理區域或 iBeacon 範圍時才觸發。
而 iOS 8 最重要的變化是:通知變得「可互動」。開發者可以為通知指定使用者可觸發的動作(actions),甚至在 App 完全未被啟動的情況下完成處理。這些動作會被歸入類別(categories),一次綁定多個動作,並以識別碼區分,App 只需實作代理方法即可處理。
本文聚焦本地通知,並搭配官方文件與 WWDC 2014 Session 713 一起閱讀效果最好。
關於本地通知
本地通知在指定的日期與時間由 App 觸發。雖好用,但過度使用會嚴重傷害使用者體驗。呈現方式有三種,可任意組合:
- Alert 或 Banner:依使用者在設定中的選擇呈現,內容應可本地化。
- 聲音:可播放自訂或系統預設音效,適合使用者不會一直盯著螢幕的情境;但不重要的通知不該發出聲響。
- Badge:抵達時 App 圖示上的數字加一,處理後減一,為 0 時隱藏。
iOS 7 以前,使用者只能點擊通知開啟 App 再自行處理;現在開發者可以直接提供預先定義好的動作。此外,本地通知還可攜帶附加資料,透過 userInfo 字典傳遞,不論 App 是否在執行都能讀取。
另有一個限制值得記住:待處理的本地通知最多 64 個,超出部分會被捨棄;無論以何種順序排入,最早者最先觸發。
範例 App 概覽
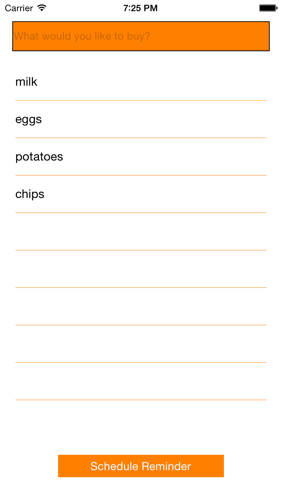
我們要做一個購物清單 App,通知會提醒使用者該買的東西。功能只有兩項:新增/刪除物品,以及選擇通知的日期與時間。
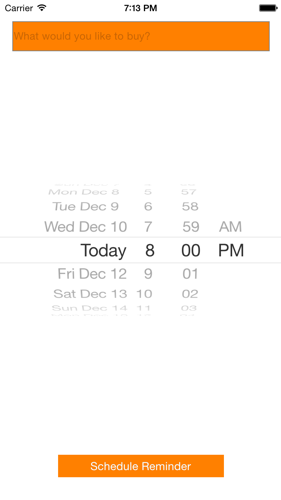
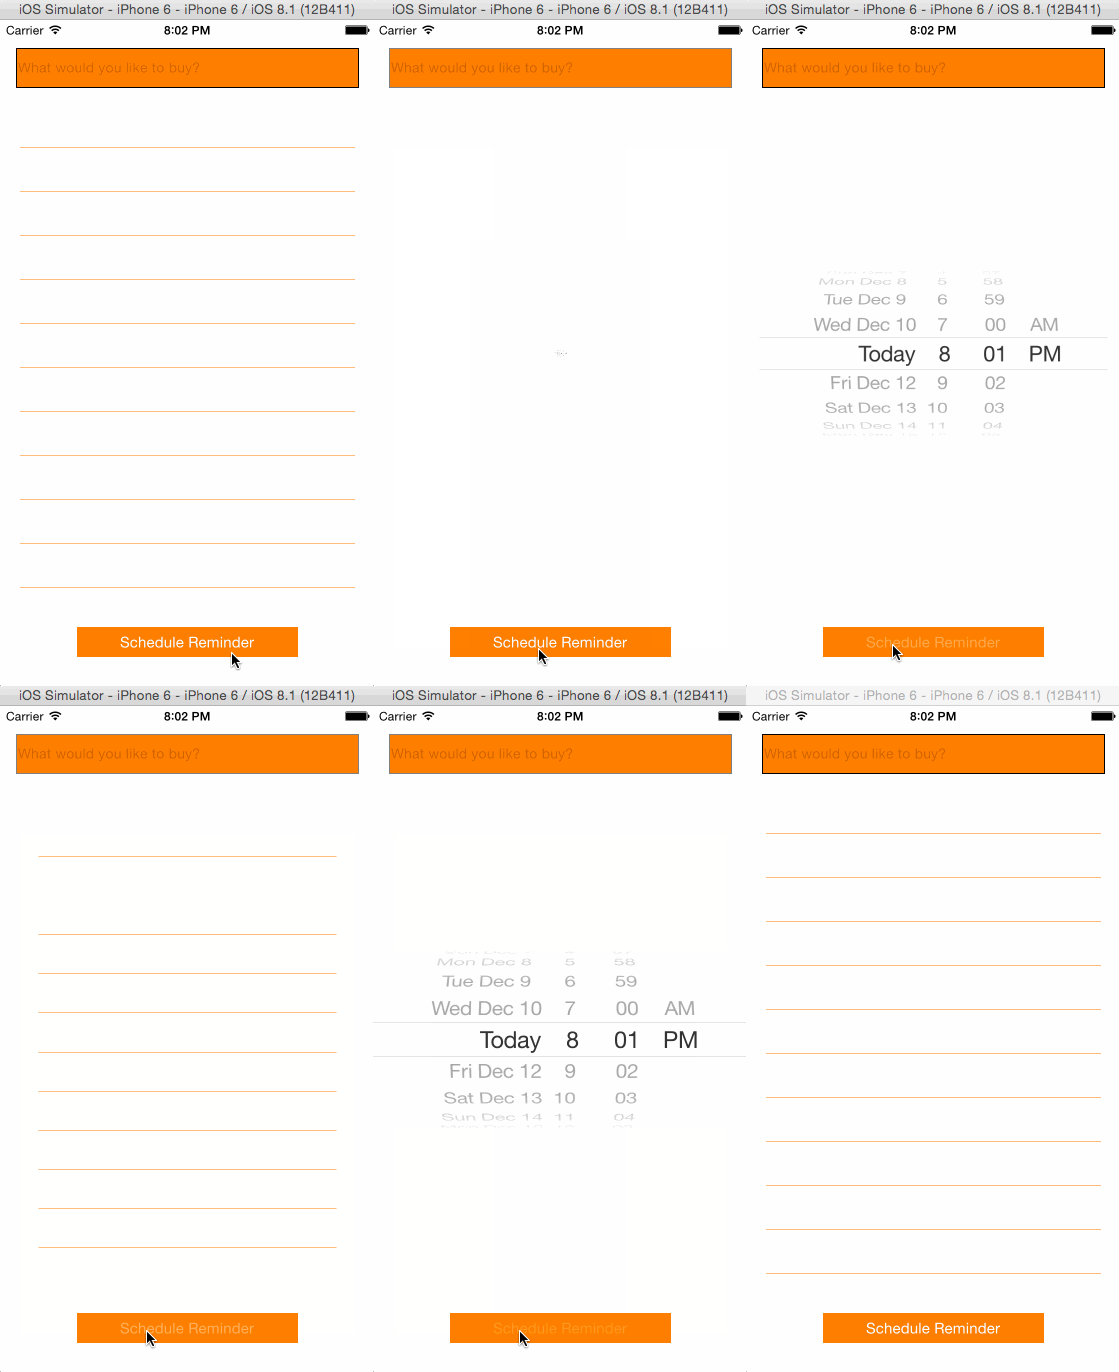
新增物品用 text field,清單用 table view 呈現,左滑可刪除;date picker 負責挑選提醒時間,點擊按鈕後以動畫方式在 table view 與 date picker 之間切換(順帶示範 Swift 中的 UIView 動畫)。
我們定義三個通知動作:
- 「好,買到了」(OK, got it):只讓通知消失,App 不執行任何任務。
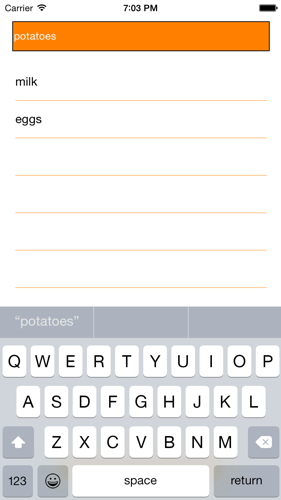
- 「編輯清單」(Edit list):啟動 App,並讓輸入框取得焦點。
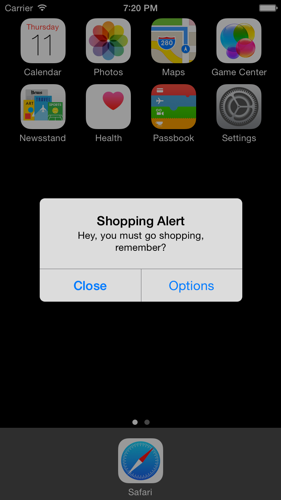
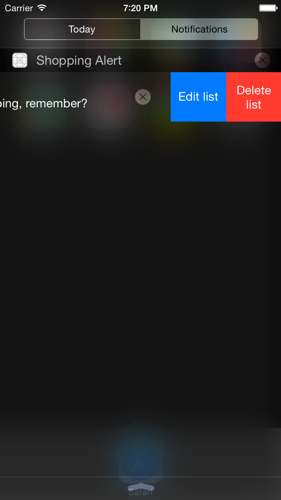
- 「刪除清單」(Delete list):不啟動 App,直接清空清單;下次開啟時清單已不見。
基礎專案
為了把重點放在通知本身,起始專案已備好基本介面:Main.storyboard 中的 subview、IBOutlet 與 IBAction 都已連線,各控制器需遵循的協定也已宣告,table view 的 delegate 與 dataSource 方法都寫好但尚無邏輯,viewDidLoad 中也已設定代理。快速瀏覽一遍即可。
實作購物清單
先為 ViewController 加上資料容器:
var shoppingList: NSMutableArray!
我們不在 viewDidLoad 初始化它,而是在第一次新增物品時才建立。
接著實作 textFieldShouldReturn(textField:),讓輸入框成為新增入口:
func textFieldShouldReturn(textField: UITextField) -> Bool {
    if shoppingList == nil {
        shoppingList = NSMutableArray()
    }
    shoppingList.addObject(textField.text)
    tblShoppingList.reloadData()
    txtAddItem.text = ""
    txtAddItem.resignFirstResponder()
    return true
}
然後補上 table view 的資料源方法:
func numberOfSectionsInTableView(tableView: UITableView) -> Int {
    return 1
}

func tableView(tableView: UITableView, numberOfRowsInSection section: Int) -> Int {
    var rows = 0
    if let list = shoppingList {
        rows = list.count
    }
    return rows
}

func tableView(tableView: UITableView, heightForRowAtIndexPath indexPath: NSIndexPath) -> CGFloat {
    return 50.0
}
注意這裡對 shoppingList 做了空值判斷。接著取出 reuse identifier 為 idCellItem 的原型 cell 並填值:
func tableView(tableView: UITableView, cellForRowAtIndexPath indexPath: NSIndexPath) -> UITableViewCell {
    var cell = tableView.dequeueReusableCellWithIdentifier("idCellItem") as UITableViewCell
    cell.textLabel?.text = shoppingList.objectAtIndex(indexPath.row) as NSString
    return cell
}
這裡的 as NSString 不可省略,必須讓編譯器明確知道我們要指派字串。
刪除功能抽成獨立方法:
func removeItemAtIndex(index: Int) {
    shoppingList.removeObjectAtIndex(index)
    tblShoppingList.reloadData()
}
並在左滑刪除的代理方法中呼叫:
func tableView(tableView: UITableView, commitEditingStyle editingStyle: UITableViewCellEditingStyle, forRowAtIndexPath indexPath: NSIndexPath) {
    if editingStyle == UITableViewCellEditingStyle.Delete {
        removeItemAtIndex(indexPath.row)
    }
}
if 判斷是必要的,可確保只有按下刪除鈕才會觸發;而 indexPath.row 正是要刪除的元素索引。至於為何要把刪除邏輯獨立成一個方法而非直接寫在代理裡,留給讀者思考。
保存與讀取清單
接下來要讓清單能持久化。NSMutableArray 本身就支援寫檔與讀檔:
func saveShoppingList() {
    let pathsArray = NSSearchPathForDirectoriesInDomains(NSSearchPathDirectory.DocumentDirectory, NSSearchPathDomainMask.UserDomainMask, true)
    let documentsDirectory = pathsArray[0] as String
    let savePath = documentsDirectory.stringByAppendingPathComponent("shopping_list")
    shoppingList.writeToFile(savePath, atomically: true)
}
前兩行取得 Documents 目錄,接著組出檔案路徑,最後呼叫 writeToFile(_:atomically:)。保存時機有兩處:新增物品與刪除物品之後。
func textFieldShouldReturn(textField: UITextField) -> Bool {
    ...
    saveShoppingList()
    return true
}

func removeItemAtIndex(index: Int) {
    ...
    saveShoppingList()
}
讀取方法則先確認檔案存在:
func loadShoppingList() {
    let pathsArray = NSSearchPathForDirectoriesInDomains(NSSearchPathDirectory.DocumentDirectory, NSSearchPathDomainMask.UserDomainMask, true)
    let documentsDirectory = pathsArray[0] as String
    let shoppingListPath = documentsDirectory.stringByAppendingPathComponent("shopping_list")
    if NSFileManager.defaultManager().fileExistsAtPath(shoppingListPath) {
        shoppingList = NSMutableArray(contentsOfFile: shoppingListPath)
        tblShoppingList.reloadData()
    }
}
檔案不存在時什麼都不做;存在則以內容初始化陣列並刷新列表。在 viewDidLoad 中呼叫即可,這一步在「App 未啟動卻要處理通知」時特別關鍵。
override func viewDidLoad() {
    ...
    loadShoppingList()
}
選擇提醒時間與切換動畫
viewDidLoad 中已有一行 datePicker.hidden = true。我們讓「Schedule Reminder」按鈕充當開關:按下時 date picker 出現、table view 隱藏,再按一次則相反,兩者以動畫過渡。
func animateMyViews(viewToHide: UIView, viewToShow: UIView) {
    let animationDuration = 0.35
    UIView.animateWithDuration(animationDuration, animations: { () -> Void in
        viewToHide.transform = CGAffineTransformScale(viewToHide.transform, 0.001, 0.001)
    }) { (completion) -> Void in
        viewToHide.hidden = true
        viewToShow.hidden = false
        viewToShow.transform = CGAffineTransformScale(viewToShow.transform, 0.001, 0.001)
        UIView.animateWithDuration(animationDuration, animations: { () -> Void in
            viewToShow.transform = CGAffineTransformIdentity
        })
    }
}
邏輯是:第一段動畫把要隱藏的 view 縮小到接近零(frame 不變,視覺上像拉遠消失);完成後切換 hidden 狀態,把要顯示的 view 先縮到極小,再放大回原始尺寸形成拉近效果。總時長 0.35 + 0.35 = 0.7 秒,調整 animationDuration 即可改變節奏。
@IBAction func scheduleReminder(sender: AnyObject) {
    if datePicker.hidden {
        animateMyViews(tblShoppingList, viewToShow: datePicker)
    }
    else {
        animateMyViews(datePicker, viewToShow: tblShoppingList)
    }
    txtAddItem.enabled = !txtAddItem.enabled
}
最後一行用布林值切換輸入框的啟用狀態:清單可見時才允許新增。
宣告通知類型
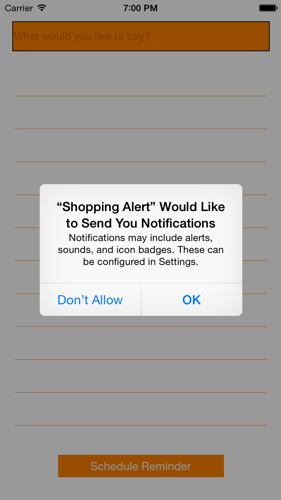
App 第一次使用通知時,系統會跳出詢問,使用者之後仍可到設定中變更,所以看到下圖的提示別意外——請選「允許」,否則什麼都看不到。
先建立 setupNotificationSettings(),指定要支援的通知類型:
func setupNotificationSettings() {
    // 指定通知類型
    var notificationTypes: UIUserNotificationType = UIUserNotificationType.Alert | UIUserNotificationType.Sound
}
UIUserNotificationType 是列舉型別,用位元 OR(|)可組合多種類型。本範例只做 Alert 與 Sound,badge 留給讀者自行嘗試。
建立通知動作
每個動作都是一個 UIMutableUserNotificationAction 物件,iOS 8 新增,常用屬性如下:
- identifier:全 App 唯一的識別字串,用來判斷使用者點了哪個動作,不可重複。
- title:顯示在動作按鈕上的文字,建議簡短(1–2 個字),可本地化。
- destructive:設為 true 時,banner 中該按鈕會變紅,通常用於刪除、移除等破壞性操作。
- authenticationRequired:設為 true 時,使用者須先通過身份驗證才能觸發,適合敏感操作。
- activationMode:列舉,決定 App 是否被啟動。Foreground 會開啟 App;Background 則給 App 數秒執行時間。
var justInformAction = UIMutableUserNotificationAction()
justInformAction.identifier = "justInform"
justInformAction.title = "OK, got it"
justInformAction.activationMode = UIUserNotificationActivationMode.Background
justInformAction.destructive = false
justInformAction.authenticationRequired = false

var modifyListAction = UIMutableUserNotificationAction()
modifyListAction.identifier = "editList"
modifyListAction.title = "Edit list"
modifyListAction.activationMode = UIUserNotificationActivationMode.Foreground
modifyListAction.destructive = false
modifyListAction.authenticationRequired = true

var trashAction = UIMutableUserNotificationAction()
trashAction.identifier = "trashAction"
trashAction.title = "Delete list"
trashAction.activationMode = UIUserNotificationActivationMode.Background
trashAction.destructive = true
trashAction.authenticationRequired = true
編輯清單需要啟動 App,且要求身份驗證以免被他人亂改;刪除清單則不啟動 App,但因可能造成資料遺失,同時開啟 destructive 與 authenticationRequired。
用類別(Category)打包動作
只要通知支援動作,就必須建立類別。類別是 UIMutableUserNotificationCategory 物件,只有 identifier 屬性與一個方法:
func setActions(_ actions: [AnyObject]!, forContext context: UIUserNotificationActionContext)
第一個參數是動作陣列,順序即為顯示順序。第二個參數是情境列舉:
UIUserNotificationActionContextDefault:未鎖機時於螢幕中央顯示完整 alert,最多 4 個動作。UIUserNotificationActionContextMinimal:以 banner 呈現,最多 2 個動作,需挑出最重要的。
let actionsArray = NSArray(objects: justInformAction, modifyListAction, trashAction)
let actionsArrayMinimal = NSArray(objects: trashAction, modifyListAction)

var shoppingListReminderCategory = UIMutableUserNotificationCategory()
shoppingListReminderCategory.identifier = "shoppingListReminderCategory"
shoppingListReminderCategory.setActions(actionsArray, forContext: UIUserNotificationActionContext.Default)
shoppingListReminderCategory.setActions(actionsArrayMinimal, forContext: UIUserNotificationActionContext.Minimal)
註冊通知設定
接著用 UIUserNotificationSettings 把類型與類別註冊進系統:
convenience init(forTypes allowedUserNotificationTypes: UIUserNotificationType, categories actionSettings: NSSet?)
第二個參數是 NSSet,即使只有一個類別也必須用集合包裝。
let categoriesForSettings = NSSet(objects: shoppingListReminderCategory)
let newNotificationSettings = UIUserNotificationSettings(forTypes: notificationTypes, categories: categoriesForSettings)
UIApplication.sharedApplication().registerUserNotificationSettings(newNotificationSettings)
由於這個方法會在 viewDidLoad 中被呼叫(每次啟動都跑一次),要避免重複註冊,用 if 判斷目前的類型是否已設定:
func setupNotificationSettings() {
    let notificationSettings: UIUserNotificationSettings! = UIApplication.sharedApplication().currentUserNotificationSettings()
    if (notificationSettings.types == UIUserNotificationType.None) {
        ...
    }
}
若 types 為 None,代表尚未註冊,才執行設定流程。反過來說,當你想修改類型、動作或類別時,把這個 if 暫時註解掉跑一次即可,測試完再還原。
排程本地通知
iOS 8 的排程方式與舊版幾乎相同,唯一新要求是必須指定類別。先認識幾個關鍵屬性:
- fireDate:觸發時間,NSDate 物件。
- alertBody:通知內容,務求簡潔。
- alertAction:以 alert 呈現時該按鈕的標題。
func scheduleLocalNotification() {
    var localNotification = UILocalNotification()
    localNotification.fireDate = datePicker.date
    localNotification.alertBody = "Hey, you must go shopping, remember?"
    localNotification.alertAction = "View List"
    localNotification.category = "shoppingListReminderCategory"
    UIApplication.sharedApplication().scheduleLocalNotification(localNotification)
}
呼叫時機放在 scheduleReminder 中。要注意一個陷阱:重複排程不會取代舊的通知,若不處理就會累積出一堆多余提醒。解法是在 date picker 出現時先清除全部待發通知:
@IBAction func scheduleReminder(sender: AnyObject) {
    if datePicker.hidden {
        animateMyViews(tblShoppingList, viewToShow: datePicker)
        UIApplication.sharedApplication().cancelAllLocalNotifications()
    }
    else {
        animateMyViews(datePicker, viewToShow: tblShoppingList)
        scheduleLocalNotification()
    }
    txtAddItem.enabled = !txtAddItem.enabled
}
修正通知時間的秒數問題
這裡藏著一個容易忽略的 bug:如果你在 10:23:14 排程 14:00 觸發,通知不會在 14:00:00 送出,而是在 14:00:14。原因是 date picker 無法設定秒,系統會沿用「排程那一刻」的秒數。對即時性要求高的 App,這種偏差可能造成嚴重後果。
修法是把日期拆解成 date components、把 second 歸零,再組回 NSDate,這需要 NSCalendar 協助:
func fixNotificationDate(dateToFix: NSDate) -> NSDate {
    var dateComponets: NSDateComponents = NSCalendar.currentCalendar().components(NSCalendarUnit.DayCalendarUnit | NSCalendarUnit.MonthCalendarUnit | NSCalendarUnit.YearCalendarUnit | NSCalendarUnit.HourCalendarUnit | NSCalendarUnit.MinuteCalendarUnit, fromDate: dateToFix)
    dateComponets.second = 0
    var fixedDate: NSDate! = NSCalendar.currentCalendar().dateFromComponents(dateComponets)
    return fixedDate
}
在設定 fireDate 時套用即可:
func scheduleLocalNotification() {
    var localNotification = UILocalNotification()
    localNotification.fireDate = fixNotificationDate(datePicker.date)
    localNotification.alertBody = "Hey, you must go shopping, remember?"
    localNotification.alertAction = "View List"
    localNotification.category = "shoppingListReminderCategory"
    UIApplication.sharedApplication().scheduleLocalNotification(localNotification)
}
處理通知動作
最後一塊拼圖在 AppDelegate.swift。首先是設定完成的通知代理方法,適合用來檢查目前生效的類型(使用者隨時可能到設定中更改):
func application(application: UIApplication, didRegisterUserNotificationSettings notificationSettings: UIUserNotificationSettings) {
    println(notificationSettings.types.rawValue)
}
App 正在執行時收到本地通知,則由這個方法接手:
func application(application: UIApplication, didReceiveLocalNotification notification: UILocalNotification) {
    // 正式環境請替換為實際處理邏輯
    println("Received Local Notification:")
    println(notification.alertBody)
}
使用者點擊動作後,依 identifier 分派處理,並以 NSNotification 通知 ViewController:
func application(application: UIApplication, handleActionWithIdentifier identifier: String?, forLocalNotification notification: UILocalNotification, completionHandler: () -> Void) {
    if identifier == "editList" {
        NSNotificationCenter.defaultCenter().postNotificationName("modifyListNotification", object: nil)
    }
    else if identifier == "trashAction" {
        NSNotificationCenter.defaultCenter().postNotificationName("deleteListNotification", object: nil)
    }
    completionHandler()
}
justInform 不需額外處理。別忘了呼叫 completionHandler(),系統靠它確認你已處理完畢。
回到 ViewController,在 viewDidLoad 註冊觀察者:
override func viewDidLoad() {
    ...
    NSNotificationCenter.defaultCenter().addObserver(self, selector: "handleModifyListNotification", name: "modifyListNotification", object: nil)
    NSNotificationCenter.defaultCenter().addObserver(self, selector: "handleDeleteListNotification", name: "deleteListNotification", object: nil)
}
編輯清單:讓輸入框成為第一回應者,鍵盤自動彈出。
func handleModifyListNotification() {
    txtAddItem.becomeFirstResponder()
}
刪除清單:清空陣列、存檔、刷新列表,這樣使用者下次開啟時清單已空。
func handleDeleteListNotification() {
    shoppingList.removeAllObjects()
    saveShoppingList()
    tblShoppingList.reloadData()
}
執行與驗證
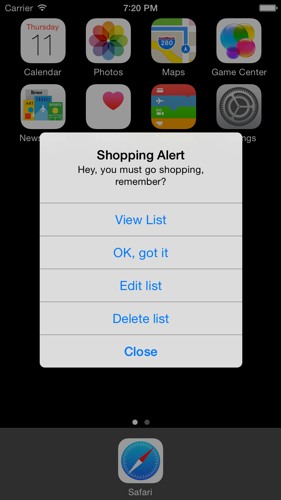
執行 App,新增幾個物品,排程一兩分鐘後的通知,然後退出 App 等待。想切換 banner 與 alert,到裝置設定的 Shopping Alert 中選擇即可。
新增物品:
排程本地通知:
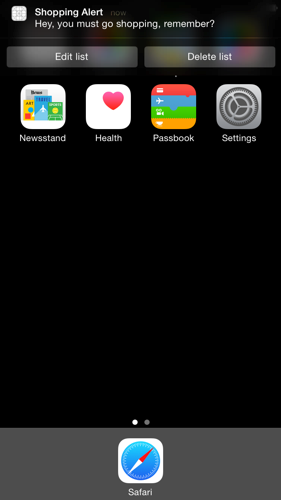
Banner 呈現,可見動作(minimal context):
Alert 呈現,全部動作(default context):
通知中心中的呈現(minimal context):
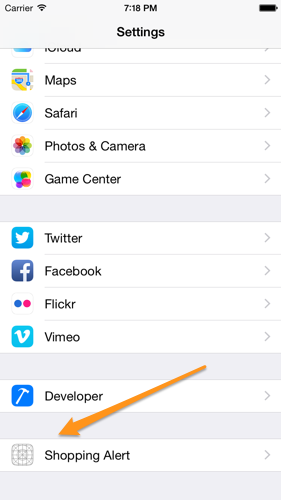
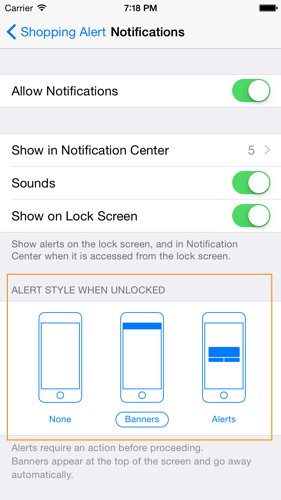
總結
iOS 8 讓通知變得更好用:使用者不必開啟 App 就能直接回應。本文介紹了類型、動作與類別的設定方式,示範了排程與時間修正,也示範了如何在 App 未啟動時完成實際工作。掌握了本地通知的思路之後,遠端通知與地區通知的實作路徑也大致清楚了,剩下的細節就留給官方文件。玩得開心!
(本文由 CocoaChina 組織翻譯,譯文權利歸譯者所有,未經允許禁止轉載。)