
Masonry 實戰手冊:用鏈式語法馴服 iOS 自動布局
本文為投稿文章,作者:Jekyll
Masonry 是一個輕量級的布局框架,擁有自己的描述語法,用更優雅的鏈式寫法封裝了 Auto Layout,簡潔明瞭且可讀性高,同時支援 iOS 與 Mac OS X。簡單說,它是一個用程式碼寫 iOS/OS X 界面的庫,可以取代 Interface Builder 裡的 Auto Layout。GitHub 地址:https://github.com/SnapKit/Masonry
本章內容
- Masonry 配置
- Masonry 使用
- Masonry 實例
Masonry 配置
- 推薦用 CocoaPods 引入:pod 'Masonry'。若不清楚 pod 怎麼用,可參考我的另一篇文章:提高 iOS 開發效率的工具
- 引入頭文件 #import "Masonry.h"
語法講解
mas_makeConstraints 用來為 view 添加約束。約束大致分為幾類:邊距、寬、高、左上右下的距離,以及基線。添加約束後還可以帶修正,修正分為 offset(位移)與 multipliedBy(倍率)兩種。
語法結構一般是 make.equalTo / make.greaterThanOrEqualTo / make.lessThanOrEqualTo,後面接倍數與位移修正。
注意點 1:使用 mas_makeConstraints 的元素必須事先加入父視圖,例如 [self.view addSubview:view];
注意點 2:mas_equalTo 與 equalTo 的差別在於前者多了類型轉換。大多數情況下兩者可通用,但涉及數值時用 mas_equalTo;涉及對象或多個屬性時用 equalTo。特別是多屬性時必須用 equalTo,例如 make.left.and.right.equalTo(self.view);
注意點 3:with 與 and 這兩個方法其實不做任何操作,只是回傳對象本身,存在的唯一目的是提升可讀性。make.left.and.right.equalTo(self.view); 與 make.left.right.equalTo(self.view); 完全等價,但加了 and 明顯更好讀。
初級示例
// exp1: 中心點與 self.view 相同,寬度為 400*400 -(void)exp1{ UIView *view = [UIView new]; [view setBackgroundColor:[UIColor redColor]]; [self.view addSubview:view]; [view mas_makeConstraints:^(MASConstraintMaker *make) { make.center.equalTo(self.view); make.size.mas_equalTo(CGSizeMake(400,400)); }]; } // exp2: 上下左右邊距都為 10 -(void)exp2{ UIView *view = [UIView new]; [view setBackgroundColor:[UIColor redColor]]; [self.view addSubview:view]; [view mas_makeConstraints:^(MASConstraintMaker *make) { make.edges.equalTo(self.view).with.insets(UIEdgeInsetsMake(10, 10, 10, 10)); // make.left.equalTo(self.view).with.offset(10); // make.right.equalTo(self.view).with.offset(-10); // make.top.equalTo(self.view).with.offset(10); // make.bottom.equalTo(self.view).with.offset(-10); }]; } // exp3 讓兩個高度為 150 的 view 垂直居中且等寬且等間隔排列 間隔為 10 -(void)exp3{ UIView *view1 = [UIView new]; [view1 setBackgroundColor:[UIColor redColor]]; [self.view addSubview:view1]; UIView *view2 = [UIView new]; [view2 setBackgroundColor:[UIColor redColor]]; [self.view addSubview:view2]; [view1 mas_makeConstraints:^(MASConstraintMaker *make) { make.centerY.mas_equalTo(self.view.mas_centerY); make.height.mas_equalTo(150); make.width.mas_equalTo(view2.mas_width); make.left.mas_equalTo(self.view.mas_left).with.offset(10); make.right.mas_equalTo(view2.mas_left).offset(-10); }]; [view2 mas_makeConstraints:^(MASConstraintMaker *make) { make.centerY.mas_equalTo(self.view.mas_centerY); make.height.mas_equalTo(150); make.width.mas_equalTo(view1.mas_width); make.left.mas_equalTo(view1.mas_right).with.offset(10); make.right.equalTo(self.view.mas_right).offset(-10); }]; }高級示例 1:用 Masonry 復刻 iOS 計算器
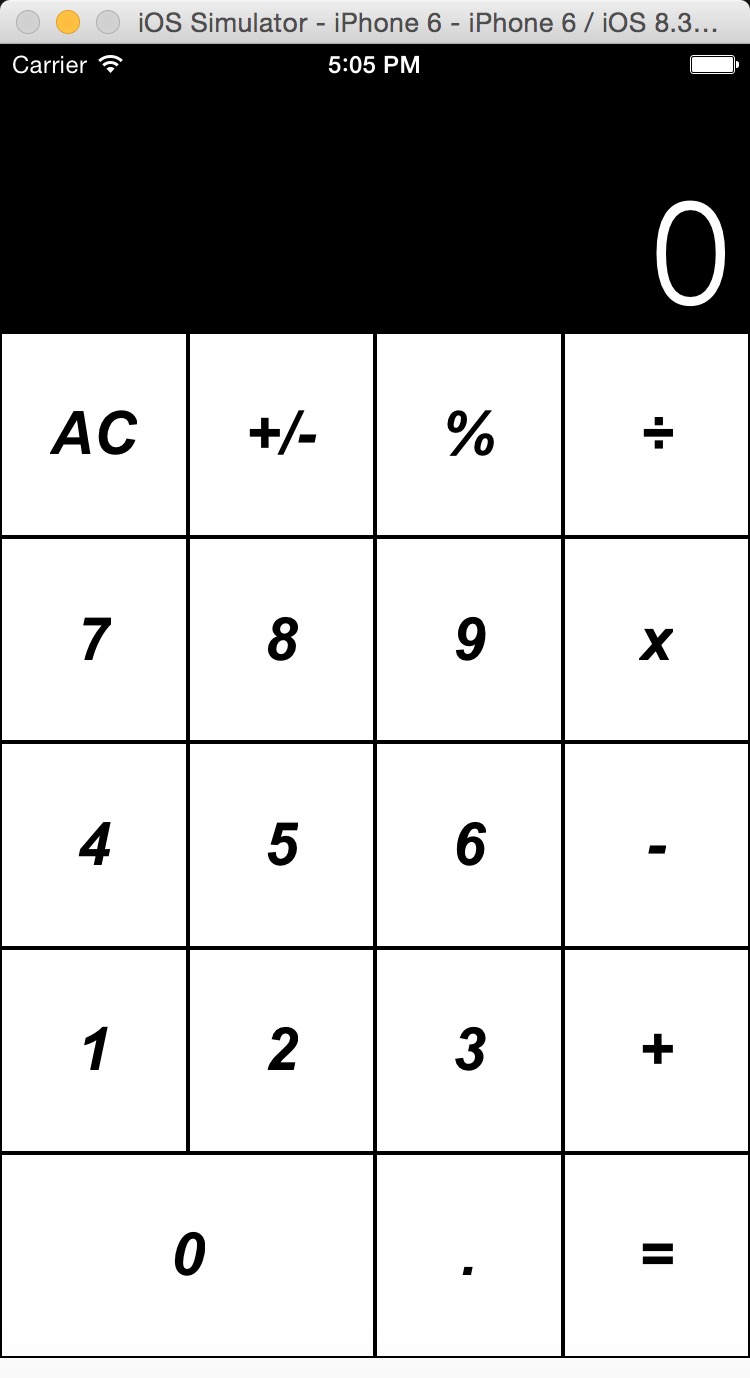
// 高級布局練習 ios 自帶計算器布局 -(void)exp4{ // 申明區域,displayView 是顯示區域,keyboardView 是鍵盤區域 UIView *displayView = [UIView new]; [displayView setBackgroundColor:[UIColor blackColor]]; [self.view addSubview:displayView]; UIView *keyboardView = [UIView new]; [self.view addSubview:keyboardView]; // 先按 1:3 分割 displView(顯示結果區域)和 keyboardView(鍵盤區域) [displayView mas_makeConstraints:^(MASConstraintMaker *make) { make.top.equalTo(self.view.mas_top); make.left.and.right.equalTo(self.view); make.height.equalTo(keyboardView).multipliedBy(0.3f); }]; [keyboardView mas_makeConstraints:^(MASConstraintMaker *make) { make.top.equalTo(displayView.mas_bottom); make.bottom.equalTo(self.view.mas_bottom); make.left.and.right.equalTo(self.view); }]; // 設置顯示位置的數字為 0 UILabel *displayNum = [[UILabel alloc]init]; [displayView addSubview:displayNum]; displayNum.text = @"0"; displayNum.font = [UIFont fontWithName:@"HeiTi SC" size:70]; displayNum.textColor = [UIColor whiteColor]; displayNum.textAlignment = NSTextAlignmentRight; [displayNum mas_makeConstraints:^(MASConstraintMaker *make) { make.left.and.right.equalTo(displayView).with.offset(-10); make.bottom.equalTo(displayView).with.offset(-10); }]; // 定義鍵盤鍵名稱,?號代表合並的單元格 NSArray *keys = @[@"AC",@"+/-",@"%",@"÷" ,@"7",@"8",@"9",@"x" ,@"4",@"5",@"6",@"-" ,@"1",@"2",@"3",@"+" ,@"0",@"?",@".",@"="]; int indexOfKeys = 0; for (NSString *key in keys){ // 循環所有鍵 indexOfKeys++; int rowNum = indexOfKeys %4 ==0? indexOfKeys/4:indexOfKeys/4 +1; int colNum = indexOfKeys %4 ==0? 4 :indexOfKeys %4; NSLog(@"index is:%d and row:%d,col:%d",indexOfKeys,rowNum,colNum); // 鍵樣式 UIButton *keyView = [UIButton buttonWithType:UIButtonTypeCustom]; [keyboardView addSubview:keyView]; [keyView setTitleColor:[UIColor blackColor] forState:UIControlStateNormal]; [keyView setTitle:key forState:UIControlStateNormal]; [keyView.layer setBorderWidth:1]; [keyView.layer setBorderColor:[[UIColor blackColor]CGColor]]; [keyView.titleLabel setFont:[UIFont fontWithName:@"Arial-BoldItalicMT" size:30]]; // 鍵約束 [keyView mas_makeConstraints:^(MASConstraintMaker *make) { // 處理 0 合並單元格 if([key isEqualToString:@"0"] || [key isEqualToString:@"?"] ){ if([key isEqualToString:@"0"]){ [keyView mas_makeConstraints:^(MASConstraintMaker *make) { make.height.equalTo(keyboardView.mas_height).with.multipliedBy(.2f); make.width.equalTo(keyboardView.mas_width).multipliedBy(.5); make.left.equalTo(keyboardView.mas_left); make.baseline.equalTo(keyboardView.mas_baseline).with.multipliedBy(.9f); }]; }if([key isEqualToString:@"?"]){ [keyView removeFromSuperview]; } } // 正常的單元格 else{ make.width.equalTo(keyboardView.mas_width).with.multipliedBy(.25f); make.height.equalTo(keyboardView.mas_height).with.multipliedBy(.2f); // 按照行和列添加約束,這裡添加行約束 switch (rowNum) { case 1: { make.baseline.equalTo(keyboardView.mas_baseline).with.multipliedBy(.1f); keyView.backgroundColor = [UIColor colorWithRed:205 green:205 blue:205 alpha:1]; } break; case 2: { make.baseline.equalTo(keyboardView.mas_baseline).with.multipliedBy(.3f); } break; case 3: { make.baseline.equalTo(keyboardView.mas_baseline).with.multipliedBy(.5f); } break; case 4: { make.baseline.equalTo(keyboardView.mas_baseline).with.multipliedBy(.7f); } break; case 5: { make.baseline.equalTo(keyboardView.mas_baseline).with.multipliedBy(.9f); } break; default: break; } // 按照行和列添加約束,這裡添加列約束 switch (colNum) { case 1: { make.left.equalTo(keyboardView.mas_left); } break; case 2: { make.right.equalTo(keyboardView.mas_centerX); } break; case 3: { make.left.equalTo(keyboardView.mas_centerX); } break; case 4: { make.right.equalTo(keyboardView.mas_right); [keyView setBackgroundColor:[UIColor colorWithRed:243 green:127 blue:38 alpha:1]]; } break; default: break; } } }]; } }這個例子用 baseline 來控制高度位置,精度似乎不太理想。如果想更精準地控制,可以改成逐行添加,每次拿當前行的 top 去 equalTo 上一行的 bottom。給個思路提示:
for(遍歷所有行) for(遍歷所有列) // 當前行約束根據上一行去設置 ......
下一個例子用的就是這種思路。
高級示例 2:依設計圖用 Masonry 布局
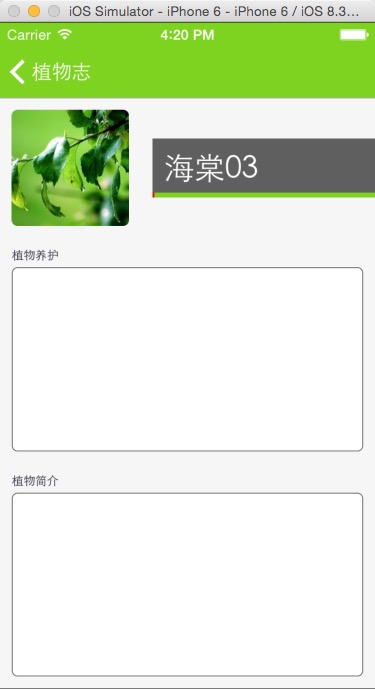
步驟 1
步驟 2
步驟 1 的程式碼:
-(void)createUI{ UIView *titleView = [UIView new]; titleView.backgroundColor = [UIColor redColor]; UIView *caredView = [UIView new]; [self.view addSubview:caredView]; UIView *brifeView = [UIView new]; [self.view addSubview:brifeView]; //self.view self.view.backgroundColor = [UIColor colorWithWhite:0.965 alpha:1.000]; //thrm UIImageView *plantThrm = [[UIImageView alloc]initWithImage:[UIImage imageNamed:@"defalutPlantReferenceIcon"]]; [self.view addSubview:plantThrm]; [plantThrm mas_makeConstraints:^(MASConstraintMaker *make) { make.left.and.top.equalTo(self.view).with.offset(10); }]; //title [self.view addSubview:titleView]; UIImageView *bgTitleView = [[UIImageView alloc]initWithImage:[UIImage imageNamed:@"bg-plant-reference-title"]]; [titleView addSubview:bgTitleView]; [titleView mas_makeConstraints:^(MASConstraintMaker *make) { make.right.equalTo(self.view.mas_right); make.left.equalTo(plantThrm.mas_right).with.offset(20); make.centerY.equalTo(plantThrm.mas_centerY); }]; [bgTitleView mas_makeConstraints:^(MASConstraintMaker *make) { make.edges.equalTo(titleView); }]; UILabel *title = [[UILabel alloc]init]; title.textColor = [UIColor whiteColor]; title.font = [UIFont fontWithName:@"Heiti SC" size:26]; title.text = _reference.name; [titleView addSubview:title]; [title mas_makeConstraints:^(MASConstraintMaker *make) { make.left.equalTo(titleView.mas_left).offset(10); make.width.equalTo(titleView.mas_width); make.centerY.equalTo(titleView.mas_centerY); }]; //植物養護 UILabel *caredTitle = [[UILabel alloc]init]; caredTitle.textColor = [UIColor colorWithRed:0.172 green:0.171 blue:0.219 alpha:1.000]; caredTitle.font = [UIFont fontWithName:@"Heiti SC" size:10]; caredTitle.text = @"植物養護"; [self.view addSubview:caredTitle]; [caredTitle mas_makeConstraints:^(MASConstraintMaker *make) { make.top.equalTo(plantThrm.mas_bottom).with.offset(20); make.left.and.right.equalTo(self.view).with.offset(10); make.height.mas_equalTo(10); }]; //將圖層的邊框設置為圓腳 caredView.layer.cornerRadius = 5; caredView.layer.masksToBounds = YES; //給圖層添加一個有色邊框 caredView.layer.borderWidth = 1; caredView.layer.borderColor = [[UIColor colorWithWhite:0.521 alpha:1.000]CGColor]; caredView.backgroundColor = [UIColor whiteColor]; [caredView mas_makeConstraints:^(MASConstraintMaker *make) { make.top.equalTo(caredTitle.mas_bottom).with.offset(5); make.left.equalTo(self.view.mas_left).with.offset(10); make.right.equalTo(self.view.mas_right).with.offset(-10); make.height.equalTo(brifeView); }]; //植物簡介 UILabel *brifeTitle = [[UILabel alloc]init]; brifeTitle.textColor = [UIColor colorWithRed:0.172 green:0.171 blue:0.219 alpha:1.000]; brifeTitle.font = [UIFont fontWithName:@"Heiti SC" size:10]; brifeTitle.text = @"植物簡介"; [self.view addSubview:brifeTitle]; [brifeTitle mas_makeConstraints:^(MASConstraintMaker *make) { make.top.equalTo(caredView.mas_bottom).with.offset(20); make.left.and.right.equalTo(self.view).with.offset(10); make.height.mas_equalTo(10); }]; //將圖層的邊框設置為圓腳 brifeView.layer.cornerRadius = 5; brifeView.layer.masksToBounds = YES; //給圖層添加一個有色邊框 brifeView.layer.borderWidth = 1; brifeView.layer.borderColor = [[UIColor colorWithWhite:0.521 alpha:1.000]CGColor]; brifeView.backgroundColor = [UIColor whiteColor]; [brifeView mas_makeConstraints:^(MASConstraintMaker *make) { make.top.equalTo(brifeTitle.mas_bottom).with.offset(5); make.left.equalTo(self.view.mas_left).with.offset(10); make.right.equalTo(self.view.mas_right).with.offset(-10); make.bottom.equalTo(self.view.mas_bottom).with.offset(-10); make.height.equalTo(caredView); }]; }完成後如下圖(步驟 1):
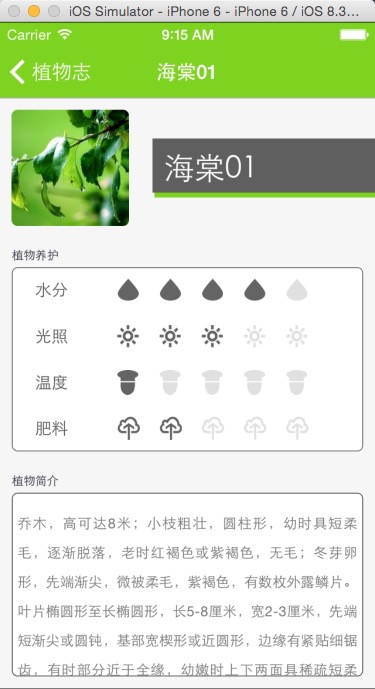
步驟 2 是在上面基礎上補上「植物養護」部分的 UI。思路是先把區塊拆成四行,再逐行構造行內樣式。
//把塊拆分為四行 -(void)createIndexUIWithView:(UIView *)view{ //拆分四行 UIView *row1 = [UIView new]; UIView *row2 = [UIView new]; UIView *row3 = [UIView new]; UIView *row4 = [UIView new]; [view addSubview:row1]; [view addSubview:row2]; [view addSubview:row3]; [view addSubview:row4]; [row1 mas_makeConstraints:^(MASConstraintMaker *make) { make.right.and.left.equalTo(view); make.height.equalTo(view.mas_height).multipliedBy(0.25); make.top.equalTo(view.mas_top); }]; [row2 mas_makeConstraints:^(MASConstraintMaker *make) { make.right.and.left.equalTo(view); make.top.equalTo(row1.mas_bottom); make.height.equalTo(view.mas_height).multipliedBy(0.25); }]; [row3 mas_makeConstraints:^(MASConstraintMaker *make) { make.right.equalTo(view.mas_right); make.top.equalTo(row2.mas_bottom); make.height.equalTo(view.mas_height).multipliedBy(0.25); make.left.equalTo(view.mas_left); }]; [row4 mas_makeConstraints:^(MASConstraintMaker *make) { make.right.and.left.equalTo(view); make.top.equalTo(row3.mas_bottom); make.height.equalTo(view.mas_height).multipliedBy(0.25); }]; [self createIndexRowUI:PlantReferenceWaterIndex withUIView:row1]; [self createIndexRowUI:PlantReferenceSumIndex withUIView:row2]; [self createIndexRowUI:PlantReferenceTemperatureIndex withUIView:row3]; [self createIndexRowUI:PlantReferenceElectrolyteIndex withUIView:row4]; } //構造每行的UI -(void)createIndexRowUI:(PlantReferenceIndex) index withUIView:(UIView *)view{ //index標題 UILabel *indexTitle = [UILabel new]; indexTitle.font = [UIFont fontWithName:@"HeiTi SC" size:14]; indexTitle.textColor = [UIColor colorWithWhite:0.326 alpha:1.000]; [view addSubview:indexTitle]; [indexTitle mas_makeConstraints:^(MASConstraintMaker *make) { make.left.equalTo(view.mas_left).with.offset(20); make.centerY.equalTo(view.mas_centerY); }]; switch (index) { case PlantReferenceWaterIndex: { indexTitle.text = @"水分"; UIImageView * current; for(int i=1;i<=5;i++){ if(i<_reference.waterIndex){ current = [[UIImageView alloc]initWithImage:[UIImage imageNamed:@"icon_water_light"]]; }else{ current = [[UIImageView alloc]initWithImage:[UIImage imageNamed:@"icon_water_dark"]]; } [view addSubview:current]; //間距12%,左邊留空30% [current mas_makeConstraints:^(MASConstraintMaker *make) { make.left.equalTo(view.mas_right).with.multipliedBy(0.12*(i-1) +0.3); make.centerY.equalTo(view.mas_centerY); }]; } } break; case PlantReferenceSumIndex: { indexTitle.text = @"光照"; UIImageView * current; for(int i=1;i<=5;i++){ if(i<_reference.temperatureIndex){ current = [[UIImageView alloc]initWithImage:[UIImage imageNamed:@"icon_summer_light"]]; }else{ current = [[UIImageView alloc]initWithImage:[UIImage imageNamed:@"icon_summer_dark"]]; } [view addSubview:current]; //間距12%,左邊留空30% [current mas_makeConstraints:^(MASConstraintMaker *make) { make.left.equalTo(view.mas_right).with.multipliedBy(0.12*(i-1) +0.3); make.centerY.equalTo(view.mas_centerY); }]; } } break; case PlantReferenceTemperatureIndex: { indexTitle.text = @"溫度"; UIImageView * current; for(int i=1;i<=5;i++){ if(i<_reference.sumIndex){ current = [[UIImageView alloc]initWithImage:[UIImage imageNamed:@"icon_temperature_light"]]; }else{ current = [[UIImageView alloc]initWithImage:[UIImage imageNamed:@"icon_temperature_dark"]]; } [view addSubview:current]; //間距12%,左邊留空30% [current mas_makeConstraints:^(MASConstraintMaker *make) { make.left.equalTo(view.mas_right).with.multipliedBy(0.12*(i-1) +0.3); make.centerY.equalTo(view.mas_centerY); }]; } } break; case PlantReferenceElectrolyteIndex: { indexTitle.text = @"肥料"; UIImageView * current; for(int i=1;i<=5;i++){ if(i<_reference.electrolyteIndex){ current = [[UIImageView alloc]initWithImage:[UIImage imageNamed:@"icon_electolyte_light"]]; }else{ current = [[UIImageView alloc]initWithImage:[UIImage imageNamed:@"icon_electolyte_dark"]]; } [view addSubview:current]; //間距12%,左邊留空30% [current mas_makeConstraints:^(MASConstraintMaker *make) { make.left.equalTo(view.mas_right).with.multipliedBy(0.12*(i-1) +0.3); make.centerY.equalTo(view.mas_centerY); }]; } } break; default: break; } }步驟 2 中,createUI 在步驟 1 的基礎上做了些微調(把植物簡介改成 UITextView 以支援段落樣式,並呼叫 createIndexUIWithView 填充養護數據):
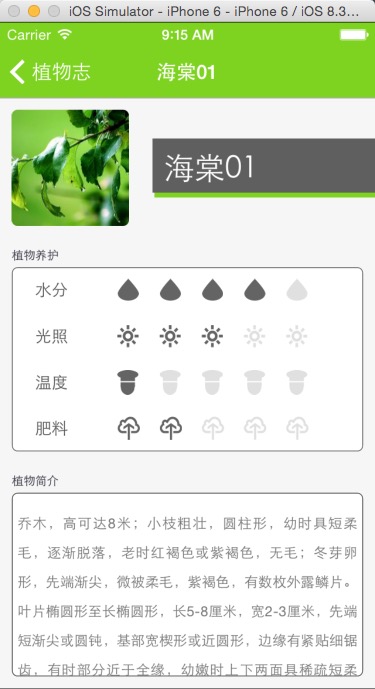
-(void)createUI{ self.title = _reference.name; UIView *titleView = [UIView new]; UIView *caredView = [UIView new]; [self.view addSubview:caredView]; UITextView *brifeView = [UITextView new]; [self.view addSubview:brifeView]; //self.view self.view.backgroundColor = [UIColor colorWithWhite:0.965 alpha:1.000]; //thrm UIImageView *plantThrm = [[UIImageView alloc]initWithImage:[UIImage imageNamed:@"defalutPlantReferenceIcon"]]; [self.view addSubview:plantThrm]; [plantThrm mas_makeConstraints:^(MASConstraintMaker *make) { make.left.and.top.equalTo(self.view).with.offset(10); }]; //title [self.view addSubview:titleView]; UIImageView *bgTitleView = [[UIImageView alloc]initWithImage:[UIImage imageNamed:@"bg-plant-reference-title"]]; [titleView addSubview:bgTitleView]; [titleView mas_makeConstraints:^(MASConstraintMaker *make) { make.right.equalTo(self.view.mas_right); make.left.equalTo(plantThrm.mas_right).with.offset(20); make.centerY.equalTo(plantThrm.mas_centerY); }]; [bgTitleView mas_makeConstraints:^(MASConstraintMaker *make) { make.edges.equalTo(titleView); }]; UILabel *title = [[UILabel alloc]init]; title.textColor = [UIColor whiteColor]; title.font = [UIFont fontWithName:@"Heiti SC" size:26]; title.text = _reference.name; [titleView addSubview:title]; [title mas_makeConstraints:^(MASConstraintMaker *make) { make.left.equalTo(titleView.mas_left).offset(10); make.width.equalTo(titleView.mas_width); make.centerY.equalTo(titleView.mas_centerY); }]; //植物養護 UILabel *caredTitle = [[UILabel alloc]init]; caredTitle.textColor = [UIColor colorWithRed:0.172 green:0.171 blue:0.219 alpha:1.000]; caredTitle.font = [UIFont fontWithName:@"Heiti SC" size:10]; caredTitle.text = @"植物養護"; [self.view addSubview:caredTitle]; [caredTitle mas_makeConstraints:^(MASConstraintMaker *make) { make.top.equalTo(plantThrm.mas_bottom).with.offset(20); make.left.and.right.equalTo(self.view).with.offset(10); make.height.mas_equalTo(10); }]; //植物養護 數據 [self createIndexUIWithView:caredView]; //將圖層的邊框設置為圓腳 caredView.layer.cornerRadius = 5; caredView.layer.masksToBounds = YES; //給圖層添加一個有色邊框 caredView.layer.borderWidth = 1; caredView.layer.borderColor = [[UIColor colorWithWhite:0.521 alpha:1.000]CGColor]; caredView.backgroundColor = [UIColor whiteColor]; [caredView mas_makeConstraints:^(MASConstraintMaker *make) { make.top.equalTo(caredTitle.mas_bottom).with.offset(5); make.left.equalTo(self.view.mas_left).with.offset(10); make.right.equalTo(self.view.mas_right).with.offset(-10); make.height.equalTo(brifeView); }]; //植物簡介 UILabel *brifeTitle = [[UILabel alloc]init]; brifeTitle.textColor = [UIColor colorWithRed:0.172 green:0.171 blue:0.219 alpha:1.000]; brifeTitle.font = [UIFont fontWithName:@"Heiti SC" size:10]; brifeTitle.text = @"植物簡介"; [self.view addSubview:brifeTitle]; [brifeTitle mas_makeConstraints:^(MASConstraintMaker *make) { make.top.equalTo(caredView.mas_bottom).with.offset(20); make.left.and.right.equalTo(self.view).with.offset(10); make.height.mas_equalTo(10); }]; //將圖層的邊框設置為圓腳 brifeView.layer.cornerRadius = 5; brifeView.layer.masksToBounds = YES; //給圖層添加一個有色邊框 brifeView.layer.borderWidth = 1; brifeView.layer.borderColor = [[UIColor colorWithWhite:0.447 alpha:1.000]CGColor]; brifeView.backgroundColor = [UIColor whiteColor]; //文字樣式 NSMutableParagraphStyle *paragraphStyle = [[NSMutableParagraphStyle alloc]init]; paragraphStyle.lineHeightMultiple = 20.f; paragraphStyle.maximumLineHeight = 25.f; paragraphStyle.minimumLineHeight = 15.f; paragraphStyle.alignment = NSTextAlignmentJustified; NSDictionary *attributes = @{ NSFontAttributeName:[UIFont systemFontOfSize:12], NSParagraphStyleAttributeName:paragraphStyle, NSForegroundColorAttributeName:[UIColor colorWithWhite:0.447 alpha:1.000]}; //植物簡介數據 brifeView.attributedText = [[NSAttributedString alloc] initWithString: _reference.brief attributes:attributes]; [brifeView mas_makeConstraints:^(MASConstraintMaker *make) { make.top.equalTo(brifeTitle.mas_bottom).with.offset(5); make.left.equalTo(self.view.mas_left).with.offset(10); make.right.equalTo(self.view.mas_right).with.offset(-10); make.bottom.equalTo(self.view.mas_bottom).with.offset(-10); make.height.equalTo(caredView); }]; }完成後如下圖(步驟 2):