
動手實作 iOS 自定義轉場動畫:從基礎 API 到實戰範例

本文由 CocoaChina 譯者 @ALEX吳浩文 翻譯
作者:Andrew Hershberger
原文:Custom Transitions on iOS
這是 iOS 自定義視圖控制器轉場系列的第一篇,重點放在如何打造屬於自己的非互動式轉場動畫。
我們在使用一般 iOS 應用時,幾乎天天都在進行視圖之間的切換。早期若你嫌系統預設的轉場不夠看,就只能完全靠自己硬寫;直到 iOS 7,Apple 才正式提供了一套 API,讓開發者可以自由定義這些過場動畫。
系統本身內建了幾種常見的轉場型態:Navigation controller 用 push 與 pop 來呈現層級式的導航;tab bar controller 靠切換分頁在各大區塊間跳轉;而任何視圖控制器都能以模態(modal)的方式,依任務需求 present 或 dismiss 另一個視圖控制器。
API 概覽
每一段自定義轉場都環繞著三個核心角色:
from view controller(即將消失的那一位)
to view controller(即將登場的那一位)
一位負責演出動畫的動畫控制器
有趣的是,自定義轉場的觸發方式和過去並沒有兩樣。以 push 與 pop 來說,仍是呼叫 UINavigationController 的 push、pop 或 set 系列方法來改動視圖堆疊;切換分頁則是修改 UITabBarController 的 selectedIndex 或 selectedViewController;模態場景則是呼叫 presentViewController:animated:completion: 或 dismissViewControllerAnimated:completion:。無論哪一種,這一步都決定了誰是「from」誰是「to」。
要啟用自定義轉場,你需要一位動畫控制器。這對我而言是最容易搞混的環節,因為不同轉場需要的動畫控制器並不相同。下表說明了如何為各種轉場提供對應的動畫控制器,請記住:委派方法永遠回傳動畫控制器。
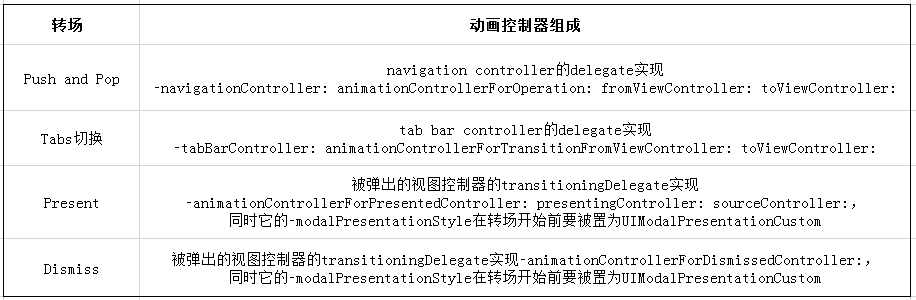
動畫控制器可以是任何遵循 UIViewControllerAnimatedTransitioning 協議的物件。這個協議要求實作兩個方法:一個回報動畫時間長度,另一個負責演出動畫。兩者被呼叫時都會帶入一份上下文(context),而這份上下文正是你存取資訊與所需物件的入口。以下幾點值得留意:
from view controller
to view controller
兩個視圖控制器 view 的第一幀與最後一幀
container view,依文件所述,即「轉場中作為視圖父層的那個視圖」
特別重要的一點:上下文還實作了 completeTransition:,你務必在自定義轉場結束時呼叫它一次。
關於自定義轉場,你該知道的差不多就這些了,接著我們看幾個實作範例吧!
實作範例
以下所有範例都能在 GitHub 找到,你可以把專案 clone 下來,邊看邊動手試。
這三個範例都直接或間接繼承了 TWTExampleViewController。它只負責設定視圖背景色,並讓你能點擊畫面任意處結束範例、返回主選單。
翻轉式的 push 與 pop
這個範例的目標,是讓 push 與 pop 改用翻轉(flip)動畫,而非預設的滑入。一開始我建立一個 navigation controller,並把 TWTPushExampleViewController 的實例設為 root。TWTPushExampleViewController 在導覽列上加入了一個名為「Push」的右側按鈕,點擊時會把一個新的 TWTPushExampleViewController 壓入堆疊:
- (void)pushButtonTapped { TWTPushExampleViewController *viewController = [[TWTPushExampleViewController alloc] init]; viewController.delegate = self.delegate; [self.navigationController pushViewController:viewController animated:YES]; }navigation controller 的設定發生在 TWTExamplesListViewController(也就是執行 demo 主選單的視圖控制器)之中。值得注意的是,它把自己設為 navigation controller 的委派對象:
- (void)presentPushExample { TWTPushExampleViewController *viewController = [[TWTPushExampleViewController alloc] init]; viewController.delegate = self; UINavigationController *navigationController = [[UINavigationController alloc] initWithRootViewController:viewController]; navigationController.delegate = self; [self presentViewController:navigationController animated:YES completion:nil]; }這代表當 navigation controller 的轉場即將開始時,TWTExamplesListViewController 會收到委派通知,並有機會回傳一位動畫控制器。對於這種轉場,我選用 TWTSimpleAnimationController 的實例,它其實是對 +[UIView transitionFromView:toView:duration:options:completion:] 的一層封裝:
- (id)navigationController:(UINavigationController *)navigationController animationControllerForOperation:(UINavigationControllerOperation)operation fromViewController:(UIViewController *)fromVC toViewController:(UIViewController *)toVC { TWTSimpleAnimationController *animationController = [[TWTSimpleAnimationController alloc] init]; animationController.duration = 0.5; animationController.options = ( operation == UINavigationControllerOperationPush ? UIViewAnimationOptionTransitionFlipFromRight : UIViewAnimationOptionTransitionFlipFromLeft); return animationController; }若是 push,我採用從右側翻轉;否則採用從左側翻轉。
以下是 TWTSimpleAnimationController 的實作:
- (NSTimeInterval)transitionDuration:(id)transitionContext { return self.duration; } - (void)animateTransition:(id)transitionContext { UIViewController *fromViewController = [transitionContext viewControllerForKey:UITransitionContextFromViewControllerKey]; UIViewController *toViewController = [transitionContext viewControllerForKey:UITransitionContextToViewControllerKey]; toViewController.view.frame = [transitionContext finalFrameForViewController:toViewController]; [toViewController.view layoutIfNeeded]; [UIView transitionFromView:fromViewController.view toView:toViewController.view duration:self.duration options:self.options completion:^(BOOL finished) { [transitionContext completeTransition:YES]; }]; }別忘了,這兩個方法都是 UIViewControllerAnimatedTransitioning 協議的一部分,會由 UIKit 在動畫控制器演出自定義轉場時呼叫。
關於 animateTransition:,有幾件事值得注意:
from view controller、to view controller,以及 to view controller 的最後一幀,都是從轉場上下文中取出。上下文還有其他可取的資訊,但這個案例用不到全部。
+[UIView transitionFromView:toView:duration:options:completion:]會自動負責視圖的層級加入與移除;後續範例我會示範手動處理的做法。在轉場的 completion 區塊裡,我呼叫
[transitionContext completeTransition: YES]告知系統轉場已結束。若忘了這步,你将無法與 app 互動;遇到這種狀況,第一個該檢查的就是這裡。
以上就是全部了!現在有幾個可以動手嘗試的方向:
改變動畫的持續時間,觀察它如何影響導覽列的動畫表現。
把動畫選項從 flip 改成 page curl。
想辦法讓堆疊中的每個視圖控制器都能指定自己的動畫控制器,可參考文末推薦模式中的做法。
淡入淡出切換分頁
這個範例應該很眼熟,它沿用相同思路,只是把主角換成 tab bar controller。
以下是 TWTExamplesListViewController 的設定:
- (void)presentTabsExample { NSMutableArray *viewControllers = [[NSMutableArray alloc] init]; for (NSUInteger i=0; i<3; i++) { TWTChangingTabsExampleViewController *viewController = [[TWTChangingTabsExampleViewController alloc] init]; viewController.delegate = self; viewController.index = i; [viewControllers addObject:viewController]; } UITabBarController *tabBarController = [[UITabBarController alloc] init]; [tabBarController setViewControllers:viewControllers animated:NO]; tabBarController.delegate = self; [self presentViewController:tabBarController animated:YES completion:nil]; }TWTChangingTabsExampleViewController 的 index 只是用來為每個視圖控制器客製標籤的方法。一如往常,TWTExamplesListViewController 擔任委派,並在切換分頁時提供動畫控制器:
- (id)tabBarController:(UITabBarController *)tabBarController animationControllerForTransitionFromViewController:(UIViewController *)fromVC toViewController:(UIViewController *)toVC { TWTSimpleAnimationController *animationController = [[TWTSimpleAnimationController alloc] init]; animationController.duration = 0.5; animationController.options = UIViewAnimationOptionTransitionCrossDissolve; return animationController; }看起來很熟悉吧?這樣就足夠了。
彈出覆蓋式視圖
我最喜歡自定義轉場的一個用途,就是彈出覆蓋式的視圖控制器。過去若你想模仿社群分享選單,或任何需要「保持背後內容可見」的呈現方式,只能在許多不理想的做法中挑一個(把視圖直接加到 window 上是我見過最通用的方式)。所幸,這一切再也沒有必要。
能這樣玩的关键在于:當被彈出視圖控制器的 modalPresentationStyle 被設為 UIModalPresentationCustom 時,系統不會自動把它從視圖層中移除。於是彈出時它彷彿只是「離場」,讓被彈出的視圖得以顯示於其上。
以下是 TWTExamplesListViewController 的設定:
- (void)presentPresentExample { TWTOverlayExampleViewController *viewController = [[TWTOverlayExampleViewController alloc] init]; viewController.delegate = self; viewController.modalPresentationStyle = UIModalPresentationCustom; viewController.transitioningDelegate = self; [self presentViewController:viewController animated:YES completion:nil]; }這裡有兩個重點:modalPresentationStyle 被設為 UIModalPresentationCustom,而被彈出視圖控制器的 transitioningDelegate 被設為 TWTExamplesListViewController。當轉場開始時,TWTExamplesListViewController 便會收到轉場的委派通知:
- (id)animationControllerForPresentedController:(UIViewController *)presented presentingController:(UIViewController *)presenting sourceController:(UIViewController *)source { return [[TWTPresentAnimationController alloc] init]; }如你所見,我建立了一個專用的動畫控制器類別作為示範。我將聚焦在 animateTransition: 的實作,因為它與先前的部分略有不同。
開場時,我用 transitionContext 取出 toViewController(被彈出的視圖控制器)與 containerView(容器視圖)。
UIViewController *toViewController = [transitionContext viewControllerForKey:UITransitionContextToViewControllerKey]; UIView *containerView = [transitionContext containerView];
containerView 在轉場中是 from 與 to 兩個視圖控制器的父層。起初,to view controller 的視圖尚未加入 containerView,其 frame 也尚未確定。這裡我直接賦值 frame,當然你也可以改用 auto layout。
CGRect frame = containerView.bounds; frame = UIEdgeInsetsInsetRect(frame, UIEdgeInsetsMake(40.0, 40.0, 200.0, 40.0)); toViewController.view.frame = frame; [containerView addSubview:toViewController.view];
對於這種轉場,我希望視圖「彈」進螢幕。為此,我用 UIView 的 spring 動畫把 scale 從 0.3 放大到 1。
順帶一提,若動畫中 scale 從大於 0 的值起步、同時 alpha 從 0 過渡到 1,往往能讓速度感比單純 scale 從 0 到 1 更俐落。你可以試著刪掉 alpha 動畫,再與從 0 起步的 scale 動畫比較看看。
toViewController.view.alpha = 0.0; toViewController.view.transform = CGAffineTransformMakeScale(0.3, 0.3); NSTimeInterval duration = [self transitionDuration:transitionContext]; [UIView animateWithDuration:duration / 2.0 animations:^{ toViewController.view.alpha = 1.0; }]; CGFloat damping = 0.55; [UIView animateWithDuration:duration delay:0.0 usingSpringWithDamping:damping initialSpringVelocity:1.0 / damping options:0 animations:^{ toViewController.view.transform = CGAffineTransformIdentity; } completion:^(BOOL finished) { [transitionContext completeTransition:YES]; }];在 completion 區塊中我呼叫 completeTransition:,到這裡就完成了!接下來轮到收場……
在 dismiss 開始時,TWTExamplesListViewController 收到轉場的委派通知:
- (id)animationControllerForDismissedController:(UIViewController *)dismissed { return [[TWTDismissAnimationController alloc] init]; }它回傳另一位自定義動畫控制器。我們來看看 animateTransition::
UIViewController *fromViewController = [transitionContext viewControllerForKey:UITransitionContextFromViewControllerKey]; NSTimeInterval duration = [self transitionDuration:transitionContext]; [UIView animateWithDuration:3.0 * duration / 4.0 delay:duration / 4.0 options:UIViewAnimationOptionCurveEaseIn animations:^{ fromViewController.view.alpha = 0.0; } completion:^(BOOL finished) { [fromViewController.view removeFromSuperview]; [transitionContext completeTransition:YES]; }]; [UIView animateWithDuration:2.0 * duration delay:0.0 usingSpringWithDamping:1.0 initialSpringVelocity:-15.0 options:0 animations:^{ fromViewController.view.transform = CGAffineTransformMakeScale(0.3, 0.3); } completion:nil];如你所見,這裡的巧思就是把彈出動畫反向播放。需要特別留意的一點是:from view controller 的視圖在轉場結束前就已從視圖層中被移除了。
繼續之前,不妨動手改一改收場的動畫。
推薦模式
讀到這裡,你大概已經發現這個 API 高度依賴協議與委派方法,因此很容易把自定義轉場寫得雜亂又難以重用。以下幾個模式能幫助我保持整潔:
1. 用專門的物件擔任動畫控制器
雖然視圖控制器可以直接兼職動畫控制器,但這幾乎一定會削弱自定義轉場的可重用性;何況視圖控制器早已因「做得太多」而惡名昭彰。想打造可重用的動畫控制器,只需建立一個遵循 UIViewControllerAnimatedTransitioning 協議的 NSObject 子類,並在需要時回傳它的實例即可。
我們在 Toast 裡的 TWTSimpleAnimationController 就是這麼做的,它容易重用,也很方便透過 CocoaPods 整合。
2. 別讓 UINavigationControllerDelegate 去背轉場細節
用 navigation controller 的委派回傳動畫控制器很方便——前提是你想讓所有 push 與 pop 都以同樣方式呈現。然而有些時候,你可能只想自定義其中某一次 push 或 pop。
一種雜亂的做法,是暫時把 navigation controller 的委派對象換成一個「知道這次轉場」的物件;另一種雜亂的做法,是讓委派根據特定的 from/to view controller 去寫一堆判斷邏輯。顯然兩者都不是好選擇。
用模式可以優雅地解決這個問題:只要替 UIViewController 加上 pushAnimationController 與 popAnimationController 兩個屬性,navigation controller 的委派就能回傳由被 push 或被 pop 的視圖控制器所指定的動畫控制器。如此一來,委派保持通用,也不必更換委派對象。TWTNavigationControllerDelegate 就實作了這個模式,同樣收錄在 Toast 裡。
以上就是自定義動畫式視圖控制器轉場的入門介紹。別忘了到 Toast 瞧瞧我們的視圖控制器轉場模組,並敬請期待第二篇——那將涵蓋自定義的互動式轉場。