
UICollectionView 入門:從工作流程到 FlowLayout 佈局解析


作者:liuchungui
如果只是要做單方向的直向清單,UITableView 完全夠用;但若需要橫向滑動清單、gridView 這類線性佈局,用 UICollectionView 搭配 UICollectionViewFlowLayout 最合適;再更複雜的排版,則可以搭配自訂 Layout 來實現。
這篇文章就來好好談談 UICollectionView。
先看它的工作流程:
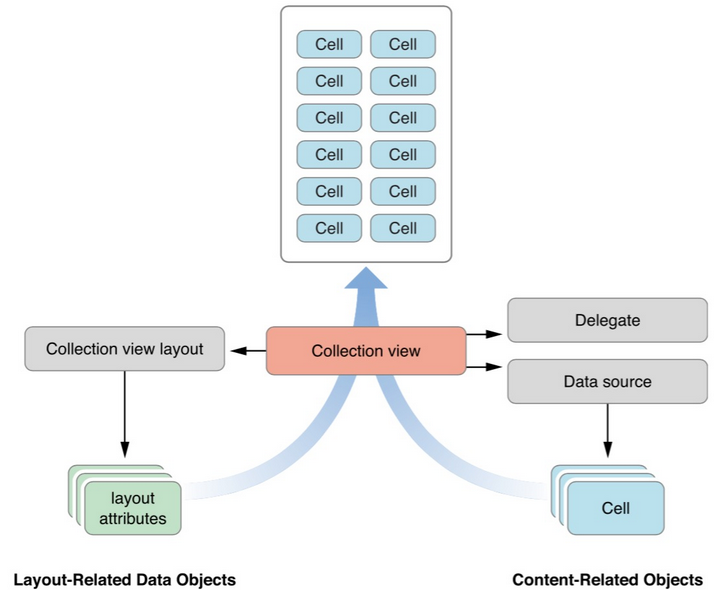
當 UICollectionView 要顯示內容時,先向 data source 取得 cell,再向 UICollectionViewLayout 取得對應的 layout attributes(佈局屬性),最後依每個 cell 的佈局屬性完成排版,構成最終畫面。使用者互動則一律透過 delegate 處理。以上說的只是 cell,UICollectionView 內部還有 Supplementary View 與 Decoration View,同樣可以被佈局。
下面把 UICollectionView 拆成三塊來說明:視圖、data source 與 delegate、以及 UICollectionViewLayout。
一、視圖
UICollectionView 上呈現內容的視圖有三種:Cell、Supplementary View、Decoration View。
Cell
主要的內容都由它呈現,由 data source 提供。
Supplementary View
用來展示每一組的附屬資訊,取得方式與 cell 類似,同樣來自 data source 方法,但它是可選的——例如 flow layout 中的 header 與 footer 就屬於 Supplementary View。
Decoration View
純裝飾性視圖,不具功能,與 data source 無關,完全由 layout 物件自己決定。
二、data source 與 delegate
1. 註冊 cell 或 Supplementary View 以便重用
在 data source 把 cell 或 Supplementary View 交給 collectionView 之前,必須先註冊以支援重用:
- registerClass:forCellWithReuseIdentifier:
- registerNib:forCellWithReuseIdentifier:
- registerClass:forSupplementaryViewOfKind:withReuseIdentifier:
- registerNib:forSupplementaryViewOfKind:withReuseIdentifier:
前兩個用來註冊 cell,後兩個註冊 Supplementary View。註冊方式有兩種:直接註冊 class,重用時會走 initWithFrame 這類初始化流程;註冊 nib 則會自動載入 nib 檔。
註冊之後如何重用?在 data source 回傳 cell 或 Supplementary View 的方法中,透過 dequeueReusableCellWithReuseIdentifier:forIndexPath: 或 dequeueReusableSupplementaryViewOfKind:withReuseIdentifier:forIndexPath: 取得即可。
- (UICollectionViewCell *)collectionView:(UICollectionView *)collectionView
                  cellForItemAtIndexPath:(NSIndexPath *)indexPath {
    CollectionViewCell *cell = (CollectionViewCell *)[collectionView
        dequeueReusableCellWithReuseIdentifier:CellReuseIdentify
                                 forIndexPath:indexPath];
    cell.backgroundColor = [UIColor lightGrayColor];
    cell.textLabel.text = [NSString stringWithFormat:@"(%zd,%zd)", indexPath.section, indexPath.row];
    return cell;
}
2. data source 方法
與 UITableView 類似,主要有:
- numberOfSectionsInCollectionView:
- collectionView:numberOfItemsInSection:
- collectionView:cellForItemAtIndexPath:
- collectionView:viewForSupplementaryElementOfKind:atIndexPath:
差別在於多了一個回傳 Supplementary View 的方法。
3. delegate 方法
data source 負責提供資料,delegate 則負責使用者互動與和資料無關的外觀行為,主要分成兩部分。
第一部分是管理選取與高亮狀態:
- collectionView:shouldSelectItemAtIndexPath:/didSelectItemAtIndexPath:/didDeselectItemAtIndexPath:
- collectionView:shouldHighlightItemAtIndexPath:/didHighlightItemAtIndexPath:/didUnhighlightItemAtIndexPath:
第二部分是長按 cell 時顯示編輯選單。與 UITableView 不同,UICollectionView 長按 cell 可以彈出編輯選單,用來剪下、複製、貼上 cell。要讓選單出現必須滿足幾個條件:
- delegate 必須實作以下三個方法:collectionView:shouldShowMenuForItemAtIndexPath:、collectionView:canPerformAction:forItemAtIndexPath:withSender:、collectionView:performAction:forItemAtIndexPath:withSender:
- shouldShowMenuForItemAtIndexPath: 對該 cell 要回傳 YES
- canPerformAction: 方法中,cut:、copy:、paste: 這三個 action 至少要有一個回傳 YES。UICollectionView 只支援這三種操作,因此至少要開放其中一種。
條件都滿足後,長按 cell 便會彈出編輯選單,選擇對應 action 後會回呼 performAction:forItemAtIndexPath:withSender: 讓你處理具體邏輯。
若想只保留複製與貼上,可以在 canPerformAction: 方法中做過濾:
- (BOOL)collectionView:(UICollectionView *)collectionView
    canPerformAction:(SEL)action
  forItemAtIndexPath:(NSIndexPath *)indexPath
            withSender:(id)sender {
    if ([NSStringFromSelector(action) isEqualToString:@"copy:"] ||
        [NSStringFromSelector(action) isEqualToString:@"paste:"]) {
        return YES;
    }
    return NO;
}
三、UICollectionViewLayout
UICollectionViewLayout 透過 UICollectionViewLayoutAttributes 來管理 cell、Supplementary View 與 Decoration View 的位置、transform、alpha、hidden 等屬性。它本身只是個基礎類別,實際使用時都是它的子類。系統提供了最常用的 UICollectionViewFlowLayout,足以做出 grid view;若無法滿足需求,則可以子類化或完全自訂,這部分留待下一篇。
UICollectionViewFlowLayout 常用屬性
// 同一組內,直向為列間距、橫向為欄間距
@property (nonatomic) CGFloat minimumLineSpacing;
// 直向為同一列內 cell 間距、橫向為同一欄內 cell 間距
@property (nonatomic) CGFloat minimumInteritemSpacing;
// 每個 cell 的一致尺寸
@property (nonatomic) CGSize itemSize;
// 滑動方向,預設為直向
@property (nonatomic) UICollectionViewScrollDirection scrollDirection;
// 每組 header 尺寸(直向滑動只看高、橫向只看寬)
@property (nonatomic) CGSize headerReferenceSize;
// 每組 footer 尺寸
@property (nonatomic) CGSize footerReferenceSize;
// 每組內容的內縮間距
@property (nonatomic) UIEdgeInsets sectionInset;
注意:FlowLayout 這些屬性是「統一設定」,若統一設定無法滿足需求,可以實作 UICollectionViewDelegateFlowLayout 的代理方法逐一客製。
直向與橫向滑動時,FlowLayout 的佈局邏輯並不相同:
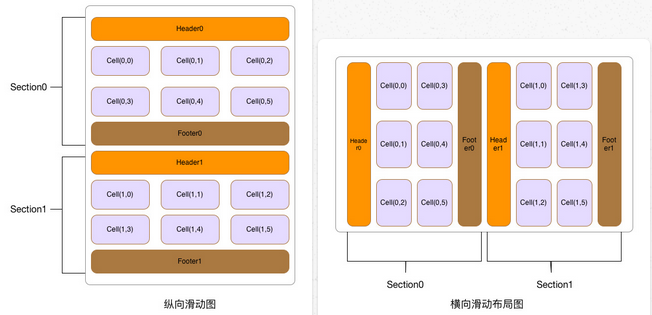
可見它會依 scrollDirection 而產生不同佈局。
直向滑動
Cell 佈局:內容寬度等同視圖寬度且固定,會依 sectionInset 的左右內縮、itemSize 寬度與 minimumInteritemSpacing 三個值計算每一列可放幾個 cell:
cellCount =(內容寬 − sectionInset.left − sectionInset.right + minimumInteritemSpacing)/(itemSize.width + minimumInteritemSpacing)
結果四捨五入取整數即為每列 cell 數;接著可算出實際間距:
realInteritemSpacing =(內容寬 − 左右內縮 − cellCount × itemSize.width)/(cellCount − 1)
尺寸、每列數量、間距都確定後,每一列 cell 的 frame 就能算出來。若同一組 cell 在一列放不完,就會換到下一列,而這第二列與第一列在直向間隔 minimumLineSpacing,這樣整組的佈局就確定了。
Header 與 Footer:分別依 headerReferenceSize 與 footerReferenceSize 的「高」來決定,它們本質上就是兩種不同類型的 Supplementary View。
橫向滑動
Cell 佈局:內容高度等同視圖高度且固定,cell 由上到下排列,改以 sectionInset 的上下內縮、itemSize 高度與 minimumInteritemSpacing 計算每一欄可放幾個 cell,公式與直向同理;後續邏輯一致,只是 minimumLineSpacing 此時代表欄與欄之間的間距。
Header 與 Footer:改以「寬」來決定尺寸。
參考資料:
- Collection View Programming Guide for iOS
- WWDC 2012 Session 205 — Introducing Collection Views