
iOS 動畫實戰:transform 形變與 keyframe 關鍵幀動畫
序言
追求美感是程序員的天性。仔細拆解就會發現,那些令人驚豔的酷炫動畫,本質上不過是一個個基礎動畫的合理組合。掌握最基本的動畫,才是完成酷炫開發之旅的根本。
上一篇從 UIView 動畫說起,介紹了幾種基本動畫如何讓登錄界面變得生動,但它們顯然無法滿足所有需求。本文從一個小 demo 出發,講解強大的 transform 形變以及關鍵幀 keyFrame 動畫。
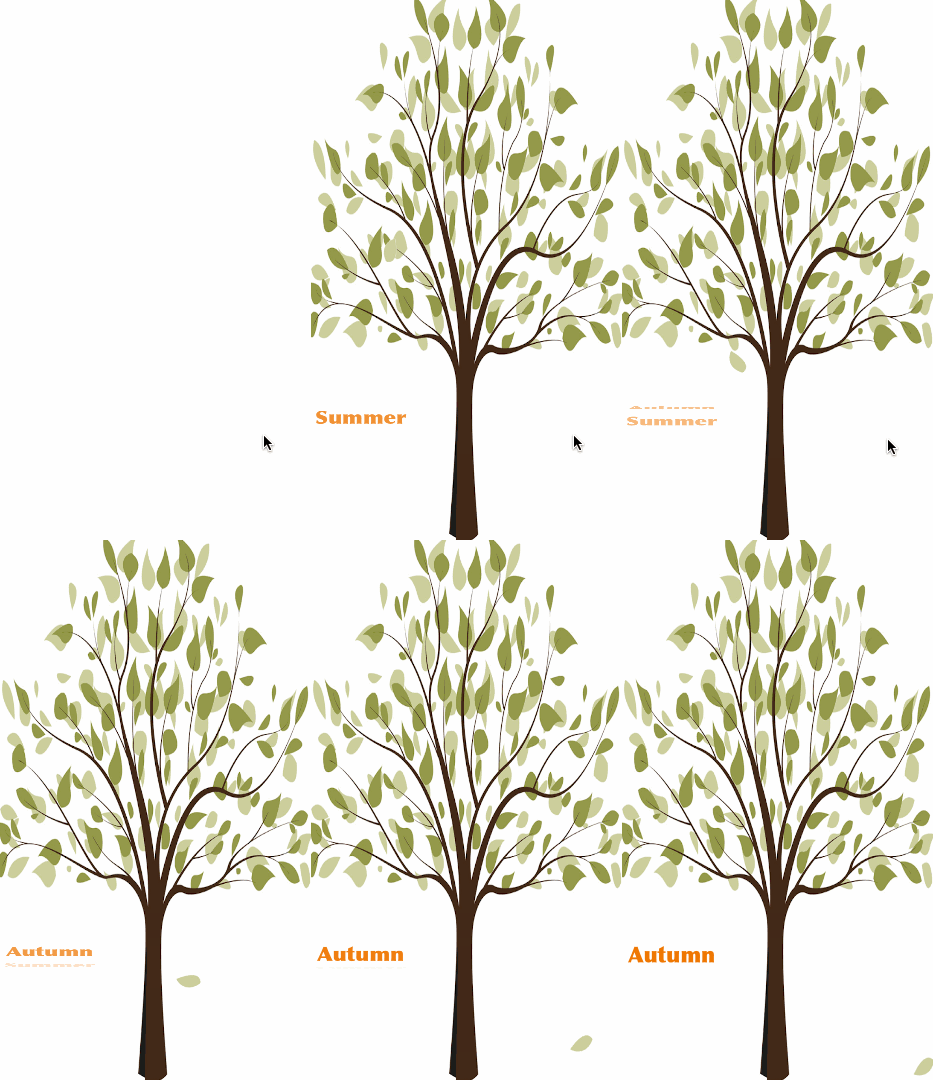
demo 動效圖
可以看到兩個動畫:落葉被風吹落,以及左側文字從 summer 過渡到 autumn。兩者都建立在 transform 之上,其中落葉飄落由關鍵幀動畫驅動。
transform 動畫
transform 在矩陣變換層面改變視圖的呈現效果,可完成旋轉、縮放、平移等操作,修改後視圖的 frame 也會真實改變。表示它的類型有兩個:CGAffineTransform 作用於 UIView,CATransform3D 作用於 layer。後者能實現更強的效果,但需先掌握前者。
想深入了解矩陣變換原理,可參考 CGAffineTransform 相關資料。先記住幾個常用函數:
/// 拼接兩個變換,返回 t = t1 * t2
CGAffineTransformConcat(CGAffineTransform t1, CGAffineTransform t2)
/// 單位矩陣 [1 0 0 1 0 0]
CGAffineTransformIdentity
/// 自定義矩陣
CGAffineTransformMake(CGFloat a, CGFloat b, CGFloat c, CGFloat d, CGFloat tx, CGFloat ty)
/// 旋轉,參數為 角度 * (M_PI / 180)
CGAffineTransformMakeRotation(CGFloat angle)
CGAffineTransformRotate(CGAffineTransform t, CGFloat angle)
/// 縮放
CGAffineTransformMakeScale(CGFloat sx, CGFloat sy)
CGAffineTransformScale(CGAffineTransform t, CGFloat sx, CGFloat sy)
/// 平移
CGAffineTransformMakeTranslation(CGFloat tx, CGFloat ty)
CGAffineTransformTranslate(CGAffineTransform t, CGFloat tx, CGFloat ty)
我把 demo 左下角文字變化過程逐幀錄了下來(推薦 macOS 上的 LICEcap,簡單好用),便於拆解步驟後重現。
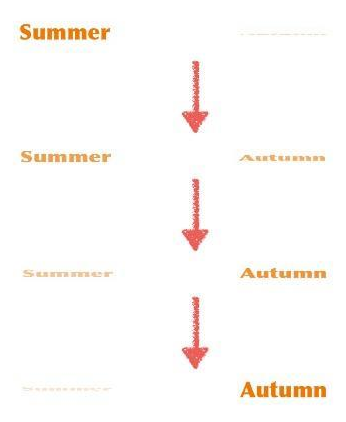
文字變形過程
不難看出這段動畫做了兩件事:y 軸方向的形變縮放,以及透明度的漸變。先放兩個 UILabel(label1、label2),在 viewDidAppear 中寫:
- (void)viewDidAppear: (BOOL)animated {
    label1.transform = CGAffineTransformMakeScale(0, 0);
    label1.alpha = 0;
    [UIView animateWithDuration: 3. animations: ^ {
        label1.transform = CGAffineTransformMakeScale(0, 1);
        label2.transform = CGAffineTransformMakeScale(0, 0.1);
        label1.alpha = 1;
        label2.alpha = 0;
    }];
}
這裡解釋一下 label2 的 y 軸為什麼縮到 0.1 而不是 0。若設為 0,動畫提交後系統出於性能優化會直接讓 label2 保持終態,過渡就沒有了。所以任何「縮小到消失」的需求,把值設得極小即可,別真的給 0。
此時形變已經出來,但 demo 裡還有位移。雖然改 center 也能實現,但那不是重點——用 transform 完成更有意思。
動畫開始時 label 高度為 0,隨後逐漸長到 height,而頂部位置全程不變。也就是說起始 y 為 0,最終中心點在 height / 2(以 label 自身坐標系計)。於是:
- (void)viewDidAppear: (BOOL)animated {
    /// 初始化動畫開始前 label 的位置
    CGFloat offset = label1.frame.size.height * 0.5;
    label1.transform = CGAffineTransformConcat(
        CGAffineTransformMakeScale(0, 0),
        CGAffineTransformTranslate(0, -offset)
    );
    label1.alpha = 0;
    [UIView animateWithDuration: 3. animations: ^ {
        /// 還原 label1 並形變、偏移 label2
        label1.transform = CGAffineTransformConcat(
            CGAffineTransformMakeScale(0, 0),
            CGAffineTransformTranslate(0, offset)
        );
        label1.alpha = 1;
        label2.alpha = 0;
    }];
}
調整兩個 label 的位置並讓其中一個漸隱,文字的翻轉過渡就完成了。
keyframe 動畫
把開頭的 gif 存到本地用預覽打開,你會發現它由一張張圖片組成。事實上動畫、電影、CG 都是連續渲染的靜幀,只要切換夠快就是動畫。此前的平移動畫提交後,系統會按時長算出每一幀並逐幀渲染。
回到落葉動畫:我對葉子的 center 一共做了五次修改,把路徑畫出來並標註轉折點:
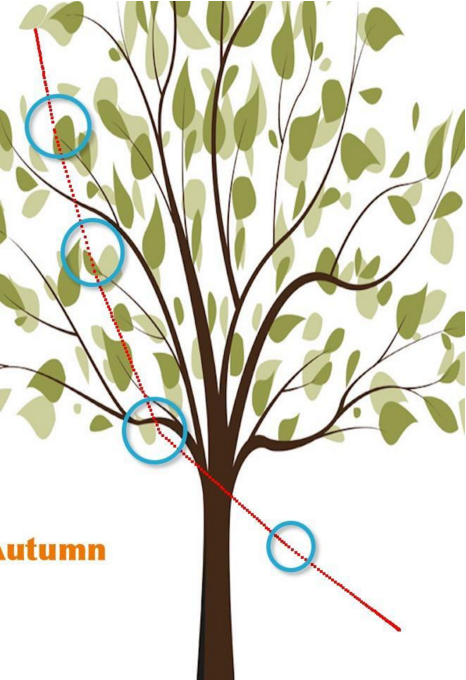
1.png
用 UIView 動畫實現這種折線路徑,只能一層層嵌套:
[self moveLeafWithOffset: (CGPoint){ 15, 80 } completion: ^(BOOL finished) {
    [self moveLeafWithOffset: (CGPoint){ 30, 105 } completion: ^(BOOL finished) {
        [self moveLeafWithOffset: (CGPoint){ 40, 110 } completion: ^(BOOL finished) {
            [self moveLeafWithOffset: (CGPoint){ 90, 80 } completion: ^(BOOL finished) {
                [self moveLeafWithOffset: (CGPoint){ 80, 60 } completion: nil duration: 0.6];
            } duration: 1.2];
        } duration: 1.2];
    } duration: 0.6];
} duration: 0.4];

- (void)moveLeafWithOffset: (CGPoint)offset completion: (void(^)(BOOL finished))completion duration: (NSTimeInterval)duration {
    [UIView animateWithDuration: duration delay: 0 options: UIViewAnimationOptionCurveLinear animations: ^{
        CGPoint center = _leaf.center;
        center.x += offset.x;
        center.y += offset.y;
        _leaf.center = center;
    } completion: completion];
}
再補上旋轉:
[UIView animateWithDuration: 4 animations: ^{
    _leaf.transform = CGAffineTransformMakeRotation(M_PI);
}];
運行後問題很明顯:拐角生硬,能清楚看到折點;而且傳入的 duration 幾乎沒有意義——一個固定時長無法體現飄落過程中的層次節奏。
UIView 提供了另一種方式來解決這兩個問題——關鍵幀動畫:
+ (void)animateKeyframesWithDuration:(NSTimeInterval)duration delay:(NSTimeInterval)delay options:(UIViewKeyframeAnimationOptions)options animations:(void (^)(void))animations completion:(void (^ __nullable)(BOOL finished))completion
+ (void)addKeyframeWithRelativeStartTime:(double)frameStartTime relativeDuration:(double)frameDuration animations:(void (^)(void))animations
第一個方法創建關鍵幀動畫,第二個在動畫塊內插入關鍵幀,兩個參數含義如下:
frameStartTime:該關鍵幀在整個動畫中的起始百分比
frameDuration:該關鍵幀佔整體時長的百分比
用一張圖說明:
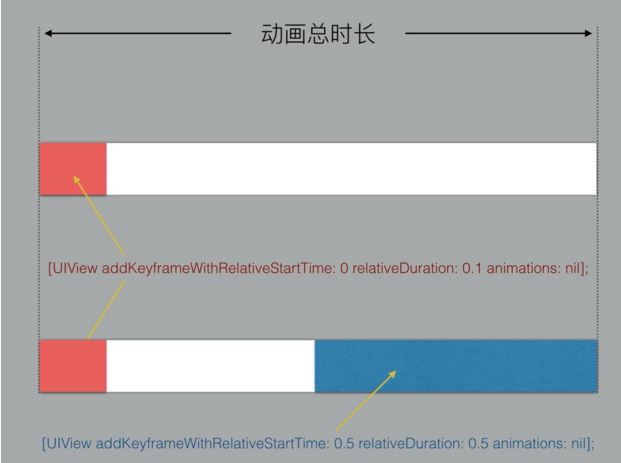
添加關鍵幀方法參數說明
關鍵幀動畫引入了「時長佔比」的概念,讓我們能精確控制每一段的節奏,而不是傳入一個含義模糊的總時長。此外 options 還能讓過渡更平滑,關鍵幀特有的配置有:
UIViewKeyframeAnimationOptionCalculationModeLinear       // 連續運算,線性
UIViewKeyframeAnimationOptionCalculationModeDiscrete     // 離散運算,只顯示關鍵幀
UIViewKeyframeAnimationOptionCalculationModePaced        // 均勻執行運算,線性
UIViewKeyframeAnimationOptionCalculationModeCubic        // 平滑運算
UIViewKeyframeAnimationOptionCalculationModeCubicPaced   // 平滑均勻運算
demo 中選用的是 UIViewKeyframeAnimationOptionCalculationModeCubic,它借助貝塞爾曲線讓落葉下落更順滑。你可以改傳不同參數對比效果。把前面的 UIView 動畫改寫成關鍵幀版本:
[UIView animateKeyframesWithDuration: 4 delay: 0 options: UIViewKeyframeAnimationOptionCalculationModeLinear animations: ^{
    __block CGPoint center = _leaf.center;
    [UIView addKeyframeWithRelativeStartTime: 0 relativeDuration: 0.1 animations: ^{
        _leaf.center = (CGPoint){ center.x + 15, center.y + 80 };
    }];
    [UIView addKeyframeWithRelativeStartTime: 0.1 relativeDuration: 0.15 animations: ^{
        _leaf.center = (CGPoint){ center.x + 45, center.y + 185 };
    }];
    [UIView addKeyframeWithRelativeStartTime: 0.25 relativeDuration: 0.3 animations: ^{
        _leaf.center = (CGPoint){ center.x + 90, center.y + 295 };
    }];
    [UIView addKeyframeWithRelativeStartTime: 0.55 relativeDuration: 0.3 animations: ^{
        _leaf.center = (CGPoint){ center.x + 180, center.y + 375 };
    }];
    [UIView addKeyframeWithRelativeStartTime: 0.85 relativeDuration: 0.15 animations: ^{
        _leaf.center = (CGPoint){ center.x + 260, center.y + 435 };
    }];
    [UIView addKeyframeWithRelativeStartTime: 0 relativeDuration: 1 animations: ^{
        _leaf.transform = CGAffineTransformMakeRotation(M_PI);
    }];
} completion: nil];
對比之下,關鍵幀動畫讓每一段位移的時長佔比一目了然,代碼也比深層嵌套簡潔得多。
尾言
本文是動畫篇的第二篇,至此 UIView 相關的動畫教程告一段落,後續會進一步講解 autolayout 動畫與圖層層次的動畫。祝各位新年快樂,心想事成!
轉載請注明地址和原文作者