
支持自動布局、自動高度變化與 placeholder 的輸入框
本文為投稿文章,作者:KevinTing
不羅嗦,先看效果:輸入框自動彈起彈下,能自動伸縮大小,同時上面的 tableView 也能自動伸縮。
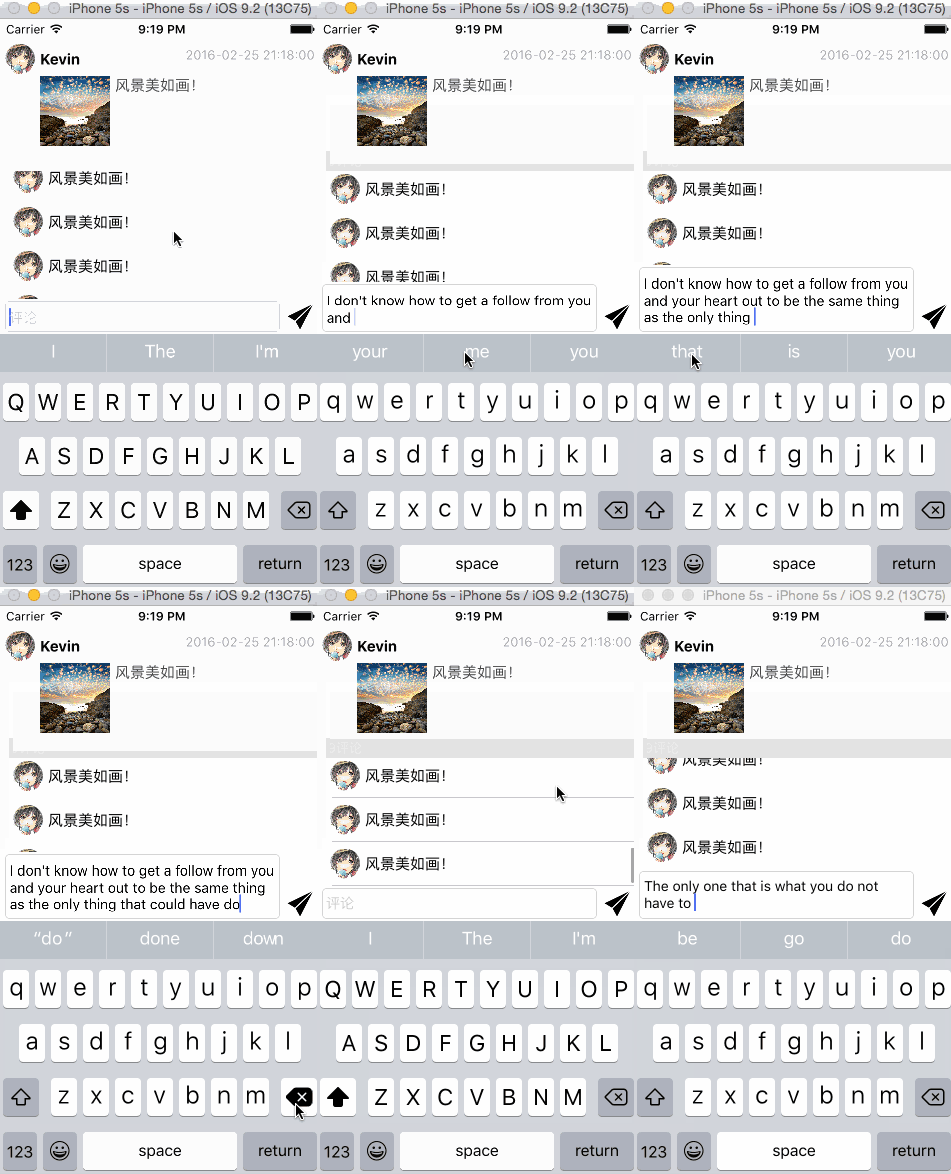
輸入框的彈起彈下我另開一篇描述,這裡不贅述,重點關注輸入框的自動伸縮與 placeholder 的實現。
1、繼承 UITextView
這是基於 Auto Layout 實現的。和網上很多教程一樣,這個輸入框用 UITextView 實現,不然無法放大縮小。
#importIB_DESIGNABLE @interface KTAutoHeightTextView : UITextView // 是否顯示圓角邊界 @property (nonatomic, assign) IBInspectable BOOL showsRoundCorner; // placeholder @property (nonatomic, copy) IBInspectable NSString *placeholder; @end
這裡 IB_DESIGNABLE 宏與 IBInspectable 配合使用,是為了能在 xib 和 storyboard 中直接設置屬性並實時顯示效果。showsRoundCorner 用來模仿 UITextField 的效果。
- (void)setShowsRoundCorner:(BOOL)showsRoundCorner {
    _showsRoundCorner = showsRoundCorner;
    if (showsRoundCorner) {
        self.layer.masksToBounds = YES;
        self.layer.cornerRadius = 5.0;
        self.layer.borderColor = [[UIColor lightGrayColor] CGColor];
        self.layer.borderWidth = 0.5;
    } else {
        self.layer.masksToBounds = NO;
        self.layer.cornerRadius = 0.0;
        self.layer.borderColor = [[UIColor clearColor] CGColor];
        self.layer.borderWidth = 0.0;
    }
}
在 storyboard 裡拖一個 UITextView,把 class 設為 KTAutoHeightTextView,你就會發現可以設置屬性了——這正是 IB_DESIGNABLE 與 IBInspectable 的功勞。把 showsRoundCorner 設為 ON,storyboard 中便會顯示圓角效果。
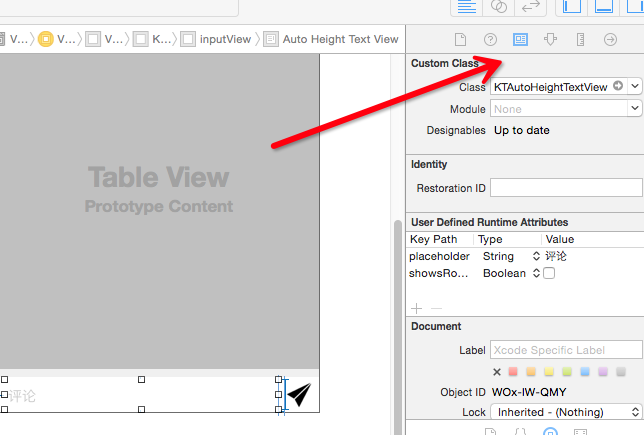
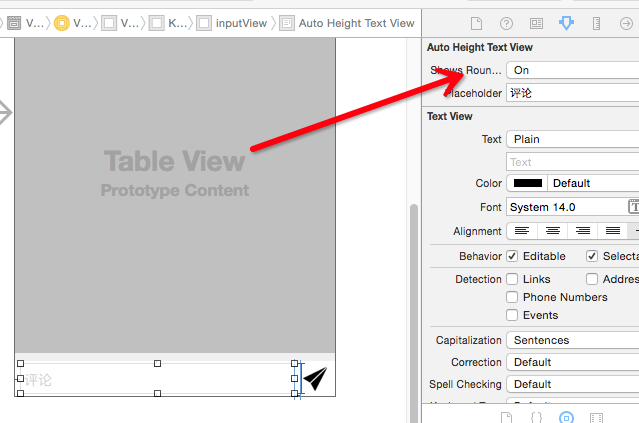
2、placeholder 實現
同樣實現 placeholder 的 setter,代碼很簡單:
- (void)setPlaceholder:(NSString *)placeholder {
    _placeholder = placeholder;
    if (placeholder) {
        if (!_placeholderLabel) {
            _placeholderLabel = [[UILabel alloc] init];
            _placeholderLabel.font = self.font;
            _placeholderLabel.textAlignment = NSTextAlignmentLeft;
            UIEdgeInsets inset = self.textContainerInset;
            CGRect bounds = self.bounds;
            _placeholderLabel.frame = CGRectMake(4.0, inset.top, bounds.size.width - inset.left - inset.right, self.font.lineHeight);
            _placeholderLabel.textColor = [UIColor colorWithWhite:0.801 alpha:1.000];
            [self addSubview:_placeholderLabel];
            _placeholderLabel.text = placeholder;
        }
        _placeholderLabel.hidden = self.text.length > 0;
    } else {
        if (_placeholderLabel) {
            [_placeholderLabel removeFromSuperview];
            _placeholderLabel = nil;
        }
    }
}
placeholder 還需要在編輯時顯示或隱藏,這裡監聽 text 長度變化即可:
- (instancetype)initWithFrame:(CGRect)frame {
    if (self = [super initWithFrame:frame]) {
        [self setup];
    }
    return self;
}
- (void)awakeFromNib {
    [self setup];
}
- (void)dealloc {
    [[NSNotificationCenter defaultCenter] removeObserver:self];
}
- (void)setup {
    [[NSNotificationCenter defaultCenter] addObserver:self
                                           selector:@selector(handleTextDidChange:)
                                               name:UITextViewTextDidChangeNotification
                                             object:self];
}
- (void)handleTextDidChange:(NSNotification *)notif {
    if (!self.placeholder) {
        return;
    }
    UITextView *textView = notif.object;
    self.placeholderLabel.hidden = textView.text.length > 0;
}
也很簡單。值得注意的是 awakeFromNib——因為從 xib 或 storyboard 加載時不會調用 initWithFrame,所以要補上。為了讓 placeholder 的字體能跟隨 UITextView 本身的 font 變化,這裡有個小細節,重寫 font 的 setter:
- (void)setFont:(UIFont *)font {
    [super setFont:font];
    if (_placeholderLabel) {
        UIEdgeInsets insets = self.textContainerInset;
        CGRect bounds = self.bounds;
        _placeholderLabel.frame = CGRectMake(4.0, insets.top, bounds.size.width - insets.left - insets.right, font.lineHeight);
    }
}
3、自動高度變化的實現
對 textView 輸入時,一旦換行,你會發現 contentSize 會改變。這裡正是利用 contentSize 的變化來縮放高度,而沒有去計算一堆 boundingRectWithSize:options:attributes:context:——因為發現它有時候並不準。
- (void)layoutSubviews {
    [super layoutSubviews];
    self.layoutFinished = YES;
}
- (void)setContentSize:(CGSize)contentSize {
    [super setContentSize:contentSize];
    // 監聽 size 變化
    if (self.font) {
        if (self.layoutFinished) { // 更新約束或者大小
            CGFloat fitHeight = [self sizeThatFits:CGSizeMake(self.bounds.size.width, CGFLOAT_MAX)].height;
            if (fabs(fitHeight - self.bounds.size.height) < self.font.lineHeight * 0.5) // 變化量小於一個行距的 0.5 倍
            {
                [self findHeightConstraint];
                return;
            }
            if (self.heightConstraint) {
                self.heightConstraint.constant = fitHeight;
                [self layoutIfNeeded];
            } else {
                CGRect bounds = self.bounds;
                bounds.size.height = fitHeight;
                self.bounds = bounds;
            }
        } else { // 查找 height 約束,記錄初值
            [self findHeightConstraint];
        }
    }
}
- (void)findHeightConstraint {
    if (self.heightConstraint) {
        return;
    }
    for (NSLayoutConstraint *constraint in self.constraints) {
        if (constraint.secondItem == nil && constraint.firstAttribute == NSLayoutAttributeHeight) {
            self.heightConstraint = constraint;
            break;
        }
    }
}
代碼利用 sizeThatFits 在 contentSize 變化時計算合適大小 fitHeight,並按一定規則在合適時機尋找高度約束 heightConstraint:存在 heightConstraint 時修改約束值,不存在時直接改 bounds,從而在自動布局或非自動布局下都能自動匹配高度。
4、如何設置約束
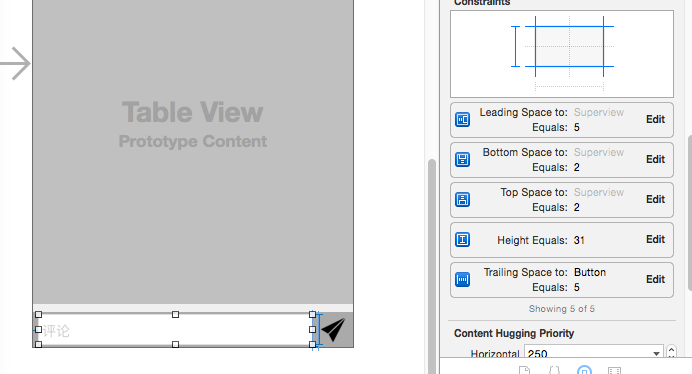
在自動布局下使用 KTAutoHeightTextView,應注意兩點:1、顯然你應該有一個 Height 約束;2、在高度方向上,應讓 KTAutoHeightTextView 的 height 去驅動其他 view 的 height,而不是反過來。第一句好理解,第二句見下圖:KTAutoHeightTextView 設了 5 個約束(一個 height 加上下左右),它的 superView(為明顯起見設成灰色)並沒有設 height 約束,那麼 superView 的高度就會根據 KTAutoHeightTextView 的 height 與上、下三個約束來確定,從而達到「KTAutoHeightTextView 伸縮 → superView 伸縮 → 上面 tableView 也伸縮」的效果。恩,這正是我們想要的!
完整項目:https://github.com/tujinqiu/KTAutoHeightTextView
- 上一篇文章: iOS 經典面試題總結
- 下一篇文章: iOS 實現自定義彈出視圖(popView)