
iOS 開發實戰:用 CoreText 打造超鏈接富文本
前言
行動端發展到今天,社交屬性幾乎無法避免地會落進開發需求裡。而在 IM 場景中,表情與文字的混排更是一道繞不開的功課:怎樣把文字、圖片、可點擊連結編在同一段文本裡,是很值得花時間弄懂的技術。
本文用 iOS 的 CoreText 框架走完一趟圖文混編,順帶把「點擊超鏈接有反應」的效果也做出來。先從框架結構圖看 CoreText 的位置:
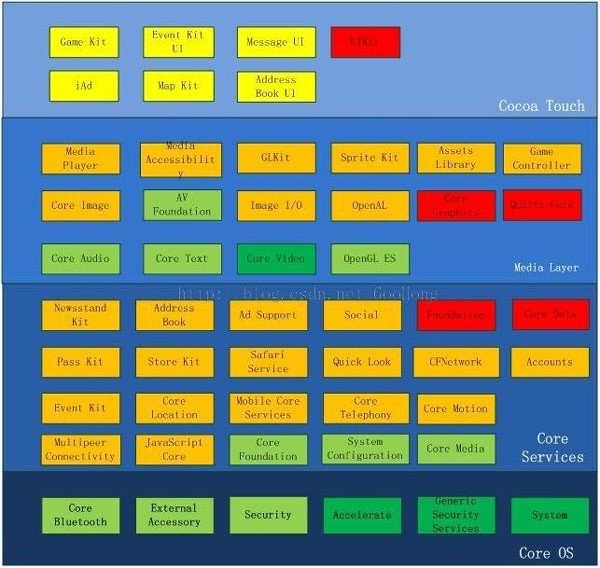
iOS 框架結構圖
CoreText 基礎
圖文混編的原理其實不複雜:先在需要顯示圖片的位置放一個特殊字元佔位,繪製文本時再把圖片畫到這些佔位字元所對應的位置上。要完成這件事,主角是 NSAttributedString。
相較於 NSString,NSAttributedString 多帶了粗體、斜體、底線、背景色等各類文字屬性,每個屬性對應一段字元範圍——也就是說,你可以讓前幾個字是粗體、後幾個字是斜體加底線。iOS 6 之後系統控件已支援設定富文本屬性,但要達到我們想要的混排效果,仍得靠 CoreText 自行繪製。CoreText 繪製過程中最重要的兩個概念是 CTFramesetterRef 與 CTFrameRef:
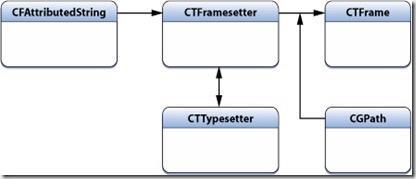
繪製關係
拿到要繪製的富文本字串後,用它建立一個 CTFramesetterRef,這個物件可以理解為 CTFrameRef 的工廠;再傳入一個 CGPathRef,就能建立對應的 CTFrameRef,把富文本渲染到該路徑區域內。由於 CoreText 是 C 語言庫,所有物件都得自己手動釋放:
CGContextRef ctx = UIGraphicsGetCurrentContext(); NSAttributedString * content = [[NSAttributedString alloc] initWithString: @"這是一個測試的富文本,這是一個測試的富文本"]; CTFramesetterRef framesetter = CTFramesetterCreateWithAttributedString((CFAttributedStringRef)content); CGMutablePathRef paths = CGPathCreateMutable(); CGPathAddRect(paths, NULL, CGRectMake(0, 0, 100, 100)); CTFrameRef frame = CTFramesetterCreateFrame(framesetter, CFRangeMake(0, content), paths, NULL); CTFrameDraw(frame, ctx);//繪制文字 // 釋放內存 CFRelease(paths); CFRelease(frame); CFRelease(framesetter);
每個 CTFrameRef 內部含有一或多個 CTLineRef,代表文本中的每一行;每個 CTLineRef 又含有一或多個 CTRunRef。繪製時我們不必關心 CTLineRef 或 CTRunRef 到底對應哪些字元,這些拆解工作系統在更底層已經完成。整體的物件模型如下:
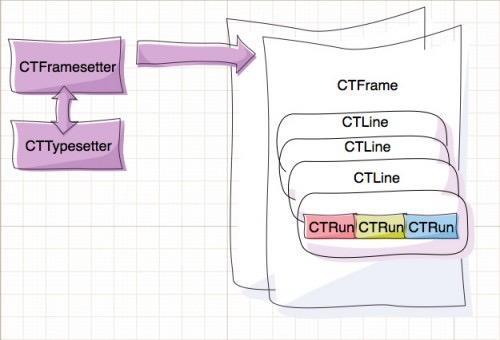
CoreText 物件模型
從 CTFrameRef 取出每一行與字元組的程式碼:
CFArrayRef lines = CTFrameGetLines(frame); CGPoint lineOrigins[CFArrayGetCount(lines)]; CTFrameGetLineOrigins(_frame, CFRangeMake(0, 0), lineOrigins); for (int idx = 0; idx < CFArrayGetCount(lines); idx++) { NSLog(@"第%d行起始坐標%@", idx, NSStringFromCGPoint(lineOrigins[idx])); CTLineRef line = CFArrayGetValueAtIndex(lines, idx); CFArrayRef runs = CTLineGetGlyphRuns(line); CGFloat runAscent; CGFloat runDescent; CGFloat runWidth = CTRunGetTypographicBounds(run, CFRangeMake(0, 0), &runAscent, &runDescent, NULL); NSLog(@"第%d個字符組的寬度為%f", idx, runWidth); }混排的整體思路是:在要插入表情的位置放一個佔位字元,實作自訂的 CTRunDelegateCallbacks 來指定這個佔位字元的寬高與位置,並額外掛一個自訂屬性存放對應的表情圖片名稱;接著遍歷渲染後的文本行與字元組,判斷是否帶有表情屬性,有的話就把圖片畫在佔位字元的位置上。
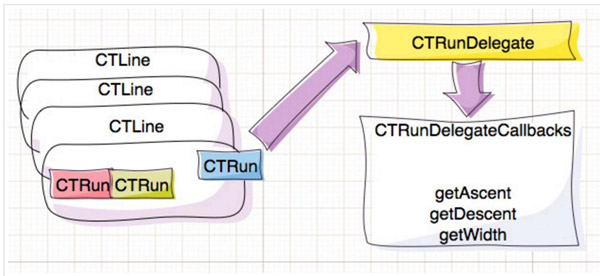
富文本插入表情
建立 CTRunDelegate 以設定字元組尺寸的程式碼:
void RunDelegateDeallocCallback(void * refCon) {} CGFloat RunDelegateGetAscentCallback(void * refCon) { return 20; } CGFloat RunDelegateGetDescentCallback(void * refCon) { return 0; } CGFloat RunDelegateGetWidthCallback(void * refCon) { return 20; } CTRunDelegateCallbacks imageCallbacks; imageCallbacks.version = kCTRunDelegateVersion1; imageCallbacks.dealloc = RunDelegateDeallocCallback; imageCallbacks.getWidth = RunDelegateGetWidthCallback; imageCallbacks.getAscent = RunDelegateGetAscentCallback; imageCallbacks.getDescent = RunDelegateGetDescentCallback; CTRunDelegateRef runDelegate = CTRunDelegateCreate(&imageCallbacks, "這是回調函數的參數");文字排版基礎知識
排版理論向來又長又枯燥,但想把 CoreText 用好,這些概念確實省不掉。
字體
計算機眼中的字體與日常說法不同:它指的是一組相同樣式、相同大小的字形集合,也就是 14 號宋體與 15 號宋體在系統看來是兩種字體;而我們平常講的宋體、楷體,指的是字體類型。
字元與字形
排版本質上是從字元到字形的轉換。字元承載的是文字本身的語意,字形則是這個文字的圖形表現。同一個字元因大小、體形不同會有多種字形;而由於連寫的存在,多個字元也可能只對應一個字形:

連寫對應單個字形
字形描述集
包含以下幾個參數:
1. 邊框(Bounding box):一個盡可能容納整個字形的假想框
2. 基線(Baseline):渲染字形的假想參考線,字母 x、m、s 最下方的位置大致就是它所在的 y 座標
3. 基礎原點(Origin):基線最左側的座標點
4. 行間距(Leading):行與行之間的間距
5. 字間距(Kerning):字與字之間的間距
6. 上行高度(Ascent):字形最高點到基線的距離,為正數;同一行取最大的上行高度
7. 下行高度(Descent):字形最低點到基線的距離,為負數;同一行取最小的下行高度
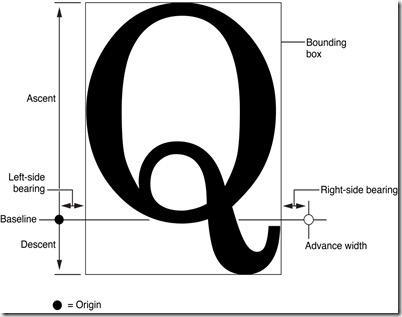
字形描述屬性
下圖中綠色線條是基線,黃色線條代表下行高度,綠線到紅框頂部的距離為上行高度,黃線到紅框底部的距離為行間距。因此行高的算法是 lineHeight = Ascent + |Descent| + Leading。
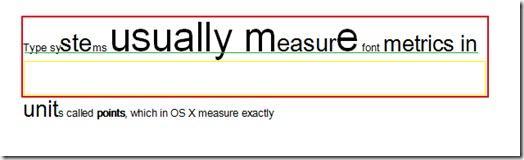
字元描述屬性
圖文混編實作
鋪墊完畢,進入實戰。先看效果:
demo 演示
富文本繪製需要一個 CGContextRef 上下文,因此最省事的做法是建立一個繼承自 UIView 的自訂控件,在 drawRect: 中完成繪製,我把它命名為 LXDTextView。
CoreText 繪製時座標系原點在左下角,所以動手畫之前要先翻轉一次座標系。另外,繪製前必須先把要渲染的富文本組裝好:
- (NSMutableAttributedString *)buildAttributedString { //創建富文本,並且將超鏈接文本設置為藍色+下劃線 NSMutableAttributedString * content = [[NSMutableAttributedString alloc] initWithString: @"這是一個富文本內容"]; NSString * hyperlinkText = @"@這是鏈接"; NSRange range = NSMakeRange(content.length, hyperlinkText.length); [content appendAttributedString: [[NSAttributedString alloc] initWithString: hyperlinkText]]; [content addAttributes: @{ NSForegroundColorAttributeName: [UIColor blueColor] } range: range]; [content addAttributes: @{ NSUnderlineStyleAttributeName: @(NSUnderlineStyleSingle) } range: range]; //創建CTRunDelegateRef並設置回調函數 CTRunDelegateCallbacks imageCallbacks; imageCallbacks.version = kCTRunDelegateVersion1; imageCallbacks.dealloc = RunDelegateDeallocCallback; imageCallbacks.getWidth = RunDelegateGetWidthCallback; imageCallbacks.getAscent = RunDelegateGetAscentCallback; imageCallbacks.getDescent = RunDelegateGetDescentCallback; NSString * imageName = @"emoji"; CTRunDelegateRef runDelegate = CTRunDelegateCreate(&imageCallbacks, (__bridge void *)imageName); //插入空白表情占位符 NSMutableAttributedString * imageAttributedString = [[NSMutableAttributedString alloc] initWithString: @" "]; [imageAttributedString addAttribute: (NSString *)kCTRunDelegateAttributeName value: (__bridge id)runDelegate range: NSMakeRange(0, 1)]; [imageAttributedString addAttribute: @"imageNameKey" value: imageName range: NSMakeRange(0, 1)]; [content appendAttributedString: imageAttributedString]; CFRelease(runDelegate); return content; } - (void)drawRect: (CGRect)rect { //獲取圖形上下文並且翻轉坐標系 CGContextRef ctx = UIGraphicsGetCurrentContext(); CGContextSetTextMatrix(ctx, CGAffineTransformIdentity); CGContextConcatCTM(ctx, CGAffineTransformMake(1, 0, 0, -1, 0, self.bounds.size.height)); NSMutableAttributedString * content = [self buildAttributedString]; //創建CTFramesetterRef和CTFrameRef變量 CTFramesetterRef framesetter = CTFramesetterCreateWithAttributedString((CFAttributedStringRef)content); CGMutablePathRef paths = CGPathCreateMutable(); CGPathAddRect(paths, NULL, self.bounds); CTFrameRef frame = CTFramesetterCreateFrame(framesetter, CFRangeMake(0, content.length), paths, NULL); CTFrameDraw(frame, ctx); //遍歷文本行以及CTRunRef,將表情文本對應的表情圖片繪制到圖形上下文 CFArrayRef lines = CTFrameGetLines(_frame); CGPoint lineOrigins[CFArrayGetCount(lines)]; CTFrameGetLineOrigins(frame, CFRangeMake(0, 0), lineOrigins); for (int idx = 0; idx < CFArrayGetCount(lines); idx++) { CTLineRef line = CFArrayGetValueAtIndex(lines, idx); CGPoint lineOrigin = lineOrigins[idx]; CFArrayRef runs = CTLineGetGlyphRuns(line); //遍歷字符組 for (int index = 0; index < CFArrayGetCount(runs); index++) { CGFloat runAscent; CGFloat runDescent; CGPoint lineOrigin = lineOrigins[idx]; CTRunRef run = CFArrayGetValueAtIndex(runs, index); CGRect runRect; runRect.size.width = CTRunGetTypographicBounds(run, CFRangeMake(0, 0), &runAscent, &runDescent, NULL); runRect = CGRectMake(lineOrigin.x + CTLineGetOffsetForStringIndex(line, CTRunGetStringRange(run).location, NULL), lineOrigin.y - runDescent, runRect.size.width, runAscent + runDescent); //查找表情文本替換表情視圖 NSDictionary * attributes = (NSDictionary *)CTRunGetAttributes(run); NSString * imageName = attributes[@"imageNameKey"]; if (imageName) { UIImage * image = [UIImage imageNamed: imageName]; if (image) { CGRect imageDrawRect; CGFloat imageSize = ceil(runRect.size.height); imageDrawRect.size = CGSizeMake(imageSize, imageSize); imageDrawRect.origin.x = runRect.origin.x + lineOrigin.x; imageDrawRect.origin.y = lineOrigin.y; CGContextDrawImage(ctx, imageDrawRect, image.CGImage); } } } } CFRelease(paths); CFRelease(frame); CFRelease(framesetter); }執行後畫面大致如下:
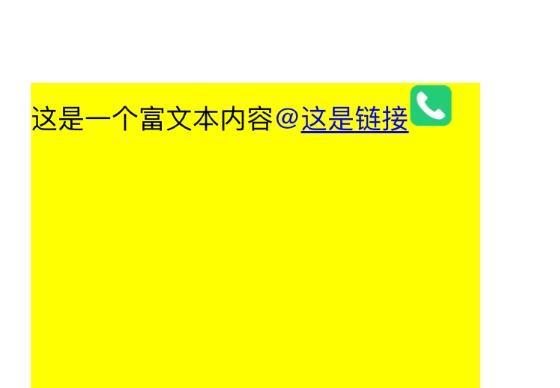
富文本已經像樣了,但點擊超鏈接要如何回應?用「判斷點擊是否落在 rect 內」這種圖片式的做法並不可行,因為超鏈接文字可能正好跨在換行處,對應到多個 rect。CoreText 提供了 CTLineGetStringIndexForPosition(CTLineRef, CGPoint),可以取得點擊座標落在該文本行的哪個字元下標。前提是我們得先知道點到了第幾行,所以渲染時產生的 CTFrameRef 必須存起來。我宣告了一個實例變數保存它;同時把超鏈接文字的位置轉成字串當 key、對應連結當 value,存進一個實例字典。
@implementation LXDTextView { CTFrameRef _frame; NSMutableDictionary * _textTouchMapper; } - (NSMutableAttributedString *)buildattrinbutedstring { //do something... _textTouchMapper[NSStringFromRange(range)] = "https://www.baidu.com"; //do something... } - (void)drawRect: (CGRect)rect { //do something... _frame = frame; //do something... } - (void)touchesEnded: (NSSet*)touches withEvent: (UIEvent *)event { CGPoint touchPoint = [touches.anyObject locationInView: self]; CFArrayRef lines = CTFrameGetLines(_frame); CGPoint origins[CFArrayGetCount(lines)]; for (int idx = 0; idx < CFArrayGetCount(lines); idx++) { CGPoint origin = origins[idx]; CGPathRef path = CTFrameGetPath(_frame); CGRect rect = CGPathGetBoundingBox(path); //將坐標點更改為左上角坐標系原點的坐標 CGFloat y = rect.origin.y + rect.size.height - origin.y; if (touchPoint.y = origin.x && touchPoint.x = range.location && index <= range.location + range.length) { NSLog(@"點擊了圖片鏈接:%@", _textTouchMapper[textRange]); break; } } } @end再跑一次,點擊富文本中的超鏈接,控制台應該會印出對應的訊息。
進一步封裝
功能完成後,接下來要思考如何讓外部把文本與對應關係傳進來。於是在頭檔中對外開兩個字典屬性,一個是「文本—超鏈接」,一個是「文本—表情圖片」:
@interface LXDTextView : UIView /*! * @brief 顯示文本(所有的鏈接文本、圖片名稱都應該放到這裡面) */ @property (nonatomic, copy) NSString * text; /*! * @brief 文本-超鏈接映射 */ @property (nonatomic, strong) NSDictionary * hyperlinkMapper; /*! * @brief 文本-表情映射 */ @property (nonatomic, strong) NSDictionary * emojiTextMapper; @end
buildAttributedString 也要跟著調整。由於富文本裡可能有多個表情,插入佔位符的邏輯值得抽成獨立方法;另外把富文本物件 content 提升為成員變數,程式碼會更好寫:
/*! * @brief 在富文本中插入表情占位符,然後設置好屬性 * * @param imageName 表情圖片的名稱 * @param emojiRange 表情文本在富文本中的位置,用於替換富文本 */ - (void)insertEmojiAttributed: (NSString *)imageName emojiRange: (NSRange)emojiRange { CTRunDelegateCallbacks imageCallbacks; imageCallbacks.version = kCTRunDelegateVersion1; imageCallbacks.dealloc = RunDelegateDeallocCallback; imageCallbacks.getWidth = RunDelegateGetWidthCallback; imageCallbacks.getAscent = RunDelegateGetAscentCallback; imageCallbacks.getDescent = RunDelegateGetDescentCallback; /*! * @brief 插入圖片屬性文本 */ CTRunDelegateRef runDelegate = CTRunDelegateCreate(&imageCallbacks, (__bridge void *)imageName); NSMutableAttributedString * imageAttributedString = [[NSMutableAttributedString alloc] initWithString: " "]; [imageAttributedString addAttribute: (NSString *)kCTRunDelegateAttributeName value: (__bridge id)runDelegate range: NSMakeRange(0, 1)]; [imageAttributedString addAttribute: LXDEmojiImageNameKey value: imageName range: NSMakeRange(0, 1)]; [_content deleteCharactersInRange: emojiRange]; [_content insertAttributedString: imageAttributedString atIndex: emojiRange.location]; CFRelease(runDelegate); }buildAttributedString 也加上了依字典進行替換的邏輯。這裡有個順序上的細節:表情替換必須排在超鏈接替換之前。因為表情最終會被換成一個空格字串,而表情文字長度通常大於 1,先處理表情就不會讓後續查找超鏈接時的位置出錯。
- (void)buildAttributedString { _content = [[NSMutableAttributedString alloc] initWithString: _text attributes: self.textAttributes]; /*! * @brief 獲取所有轉換emoji表情的文本位置 */ for (NSString * emojiText in self.emojiTextMapper) { NSRange range = [_content.string rangeOfString: emojiText]; while (range.location != NSNotFound) { [self insertEmojiAttributed: self.emojiTextMapper[emojiText] emojiRange: range]; range = [_content.string rangeOfString: emojiText]; } } /*! * @brief 獲取所有轉換超鏈接的文本位置 */ for (NSString * hyperlinkText in self.hyperlinkMapper) { NSRange range = [_content.string rangeOfString: hyperlinkText]; while (range.location != NSNotFound) { [self.textTouchMapper setValue: self.hyperlinkMapper[hyperlinkText] forKey: NSStringFromRange(range)]; [_content addAttributes: @{ NSForegroundColorAttributeName: [UIColor blueColor] } range: range]; [_content addAttributes: @{ NSUnderlineStyleAttributeName: @(NSUnderlineStyleSingle) } range: range]; range = [_content.string rangeOfString: hyperlinkText]; } } }順手也能補上換行模式、字體這類段落屬性:
/*! * @brief 設置字體屬性 */ CTParagraphStyleSetting styleSetting; CTLineBreakMode lineBreak = kCTLineBreakByWordWrapping; styleSetting.spec = kCTParagraphStyleSpecifierLineBreakMode; styleSetting.value = &lineBreak; styleSetting.valueSize = sizeof(CTLineBreakMode); CTParagraphStyleSetting settings[] = { styleSetting }; CTParagraphStyleRef style = CTParagraphStyleCreate(settings, 1); NSMutableDictionary * attributes = @{ (id)kCTParagraphStyleAttributeName: (id)style }.mutableCopy; [_content addAttributes: attributes range: NSMakeRange(0, _content.length)]; CTFontRef font = CTFontCreateWithName((CFStringRef)[UIFont systemFontOfSize: 16].fontName, 16, NULL); [_content addAttributes: @{ (id)kCTFontAttributeName: (__bridge id)font } range: NSMakeRange(0, _content.length)]; CFRelease(font); CFRelease(style);渲染流程不會因文本內容而改變,所以 drawRect: 主體幾乎不用動。但若你希望表情也能點,做法和超鏈接一樣:另外維護一個字典,key 是表情的 rect、value 是表情圖片名稱,我把它取名為 emojiTouchMapper。另外別忘了 CoreText 的座標系與常規相反,即便 drawRect: 開頭翻轉過,取到的文本座標仍是依左下角計算。因此需要在遍歷文本行之前先記下內容最頂部的 y 座標,遍歷結束後用它逐一換算,才能得到正確的 frame:
- (void)drawRect: (CGRect)rect { //do something... CGRect imageDrawRect; CGFloat imageSize = ceil(runRect.size.height); imageDrawRect.size = CGSizeMake(imageSize, imageSize); imageDrawRect.origin.x = runRect.origin.x + lineOrigin.x; imageDrawRect.origin.y = lineOrigin.y - lineDescent; CGContextDrawImage(ctx, imageDrawRect, image.CGImage); imageDrawRect.origin.y = topPoint - imageDrawRect.origin.y; self.emojiTouchMapper[NSStringFromCGRect(imageDrawRect)] = imageName; //do something... }最後是點擊結束時的判斷與回調,這裡採用 delegate 模式:
- (void)touchesEnded: (NSSet*)touches withEvent: (UIEvent *)event { CGPoint touchPoint = [touches.anyObject locationInView: self]; CFArrayRef lines = CTFrameGetLines(_frame); CGPoint origins[CFArrayGetCount(lines)]; CTFrameGetLineOrigins(_frame, CFRangeMake(0, 0), origins); CTLineRef line = NULL; CGPoint lineOrigin = CGPointZero; //查找點擊坐標所在的文本行 for (int idx = 0; idx < CFArrayGetCount(lines); idx++) { CGPoint origin = origins[idx]; CGPathRef path = CTFrameGetPath(_frame); CGRect rect = CGPathGetBoundingBox(path); //轉換點擊坐標 CGFloat y = rect.origin.y + rect.size.height - origin.y; if (touchPoint.y = origin.x && touchPoint.x = range.location && index <= range.location + range.length) { if ([_delegate respondsToSelector: @selector(textView:didSelectedHyperlink:)]) { [_delegate textView: self didSelectedHyperlink: self.textTouchMapper[textRange]]; } return; } } //判斷是否點擊表情 if (!_emojiUserInteractionEnabled) { return; } for (NSString * rectString in self.emojiTouchMapper) { CGRect textRect = CGRectFromString(rectString); if (CGRectContainsPoint(textRect, touchPoint)) { if ([_delegate respondsToSelector: @selector(textView:didSelectedEmoji:)]) { [_delegate textView: self didSelectedEmoji: self.emojiTouchMapper[rectString]]; } } } }測試用的呼叫方式:
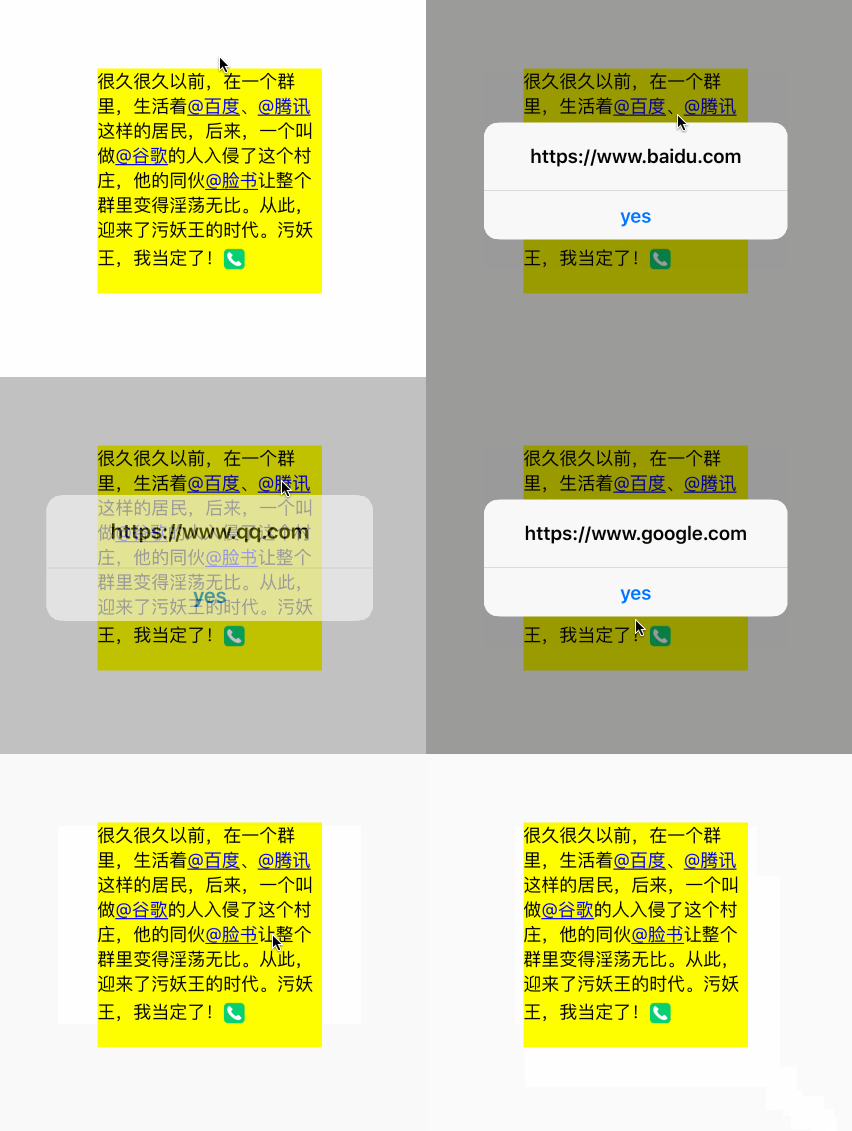
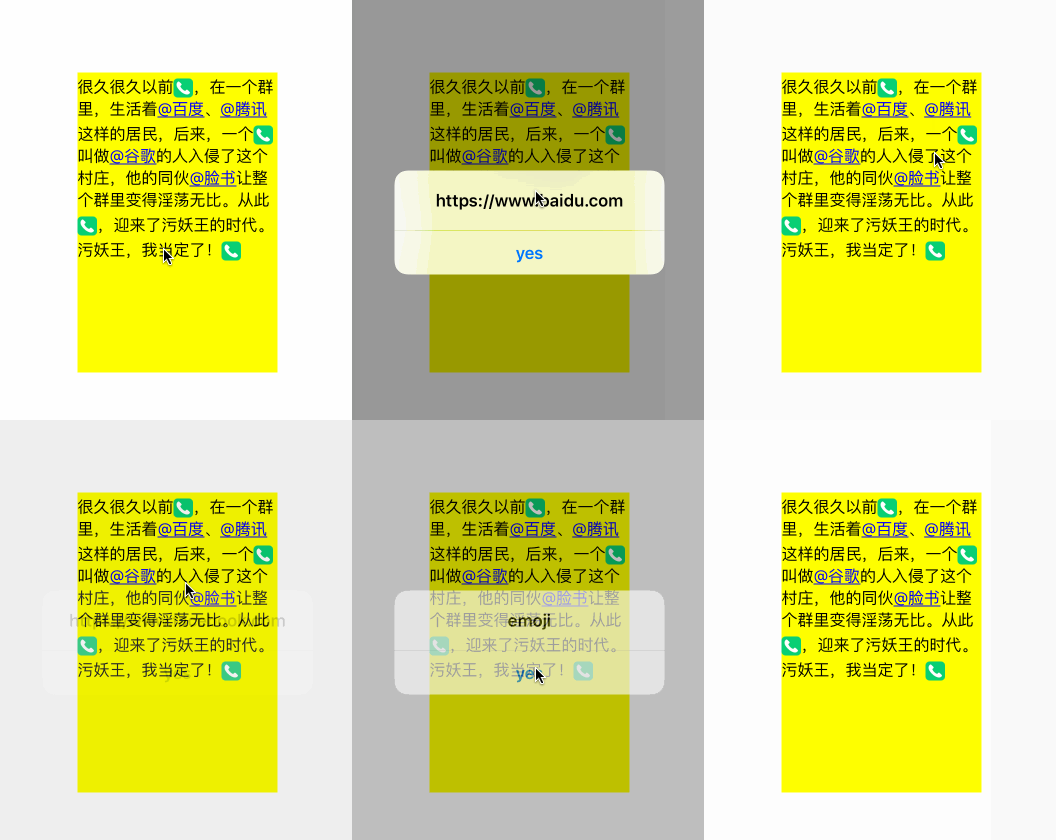
LXDTextView * textView = [[LXDTextView alloc] initWithFrame: CGRectMake(0, 0, 200, 300)]; textView.delegate = self; [self.view addSubview: textView]; textView.emojiUserInteractionEnabled = YES; textView.center = self.view.center; textView.emojiTextMapper = @{ @"[emoji]": @"emoji" }; textView.hyperlinkMapper = @{ @"@百度": "https://www.baidu.com", @"@騰訊": "https://www.qq.com", @"@谷歌": "https://www.google.com", @"@臉書": "https://www.facebook.com", };textView.text = @"很久很久以前[emoji],在一個群裡,生活著@百度、@騰訊這樣的居民,後來,一個[emoji]叫做@谷歌的人入侵了這個村莊,他的同伙@臉書讓整個群裡變得淫蕩無比。從此[emoji],迎來了污妖王的時代。污妖王,我當定了![emoji]";
執行結果:
CoreText
關於 TextKit
CoreText 功能強大,但代碼量與邏輯複雜度也隨之上升。iOS 7 之後蘋果推出了 TextKit,它是建立在 CoreText 之上的高階封裝,代碼簡潔得多。新的 NSTextAttachment 類可以很輕鬆地把圖片塞進富文本:
- (NSAttributedString *)attributedStringWithImageName: (NSString *)imageName { NSTextAttachment * attachment = [[NSTextAttachment alloc] init]; attachment.image = [UIImage imageNamed: imageName]; attachment.bounds = CGRectMake(0, -5, 20, 20); NSAttributedString * attributed = [NSAttributedString attributedStringWithAttachment: attachment]; return attributed; }前面那段 CoreText 的富文本程式碼,用 TextKit 可以濃縮成這樣:
- (NSAttributedString *)attributedString: (NSMutableAttributedString *)attributedString replacingEmojiText: (NSString *)emojiText withImageName: (NSString *)imageName { NSRange range = [attributedString.string rangeOfString: emojiText]; while (range.location != NSNotFound) { [attributedString deleteCharactersInRange: range]; NSAttributedString * imageAttributed = [self attributedStringWithImageName: imageName]; [attributedString insertAttributedString: imageAttributed atIndex: range.location]; range = [attributedString.string rangeOfString: emojiText]; } return attributedString; } - (void)viewDidLoad { [super viewDidLoad]; NSAttributedString * attributed = [self attributedString: [[NSMutableAttributedString alloc] initWithString: content] replacingEmojiText: "[emoji]" withImageName: @"emoji"]; UILabel * label = [[UILabel alloc] initWithFrame: CGRectMake(0, 0, 200, 250)]; label.attributedText = attributed; label.center = self.view.center; label.numberOfLines = 0; [self.view addSubview: label]; }想更深入了解 TextKit,可以參考「認識 TextKit」一文。
結語
CoreText 與 TextKit 誰更強,見仁見智。高階封裝的 TextKit 帶來簡潔,CoreText 則勝在靈活。不過至少在我寫這篇時,還沒找到用 TextKit 實現超鏈接點擊回應的做法。對開發者而言,兩個框架都值得認識,才能應付不同場景。
本文為投稿文章,作者:Sindri 的小巢。
- 上一篇文章: iOS 集合的深拷貝與淺拷貝完全解析
- 下一篇文章: iOS 動畫入門:UIView 動畫完整用法整理