
約束動畫終章:用 layoutIfNeeded 讓 Auto Layout 動起來
前言
光看標題大概猜不到這篇要寫什麼,所以先把成品效果放上來。
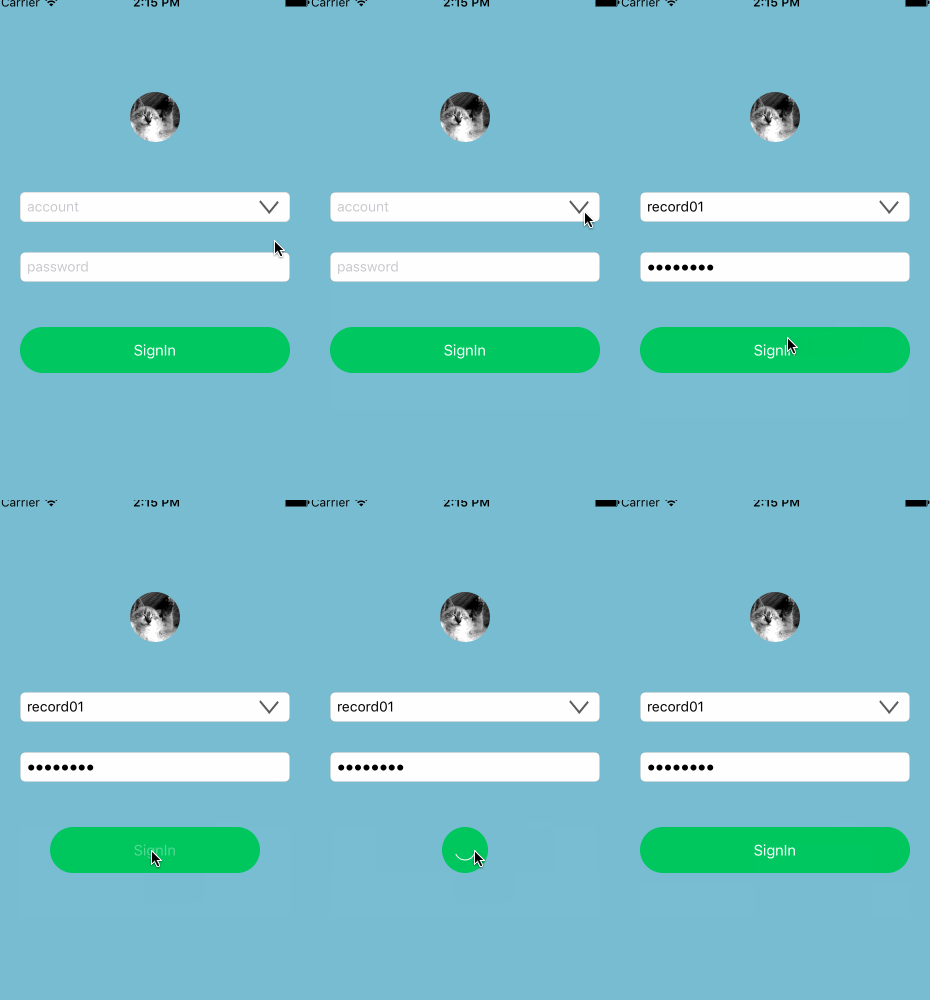
約束動畫並不是什麼高難度技巧。一旦你用熟了約束,總能搆出些有意思的效果。上一篇「autolayout 動畫初體驗」是靠監聽列表視圖的滾動偏移、持續改寫約束值來製造動畫,但那種做法更像是一幀一幀拼介面,過於繁瑣。這次換個思路:直接呼叫 UIView 的重繪製方法。
本文要實現的動畫有三個:
- 賬戶紀錄列表的彈出與收回
- 登錄按鈕的點擊形變
- 登錄按鈕被點擊後的轉圈動畫(不展開細講)
其中轉圈部分是用 CoreAnimation 動畫搭配定時器做的,也正因如此,這篇是約束動畫系列的最後一篇。
準備工作
先把視圖層次理清楚,再開始搭介面。動畫開始前可見的控件一共五個——頭像、賬戶輸入框、下拉按鈕、密碼輸入框、登錄按鈕;另外還有一個平時收在賬戶輸入框下方的紀錄列表。做法很直接:改動列表與賬戶輸入框之間的頂部約束,讓它整體下移露出來。
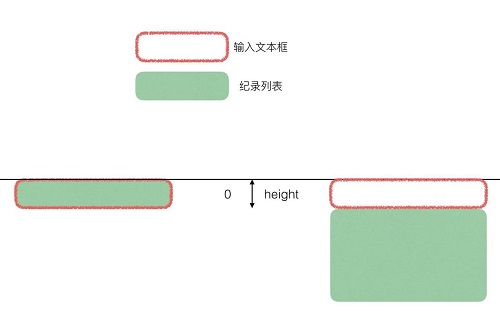
紀錄列表向下移動
需要在程式碼中操作的約束有這些:
- 列表頂部約束 listTopConstraint:控制列表下移出現
- 列表高度約束 listHeightConstraint:製造展開效果
- 賬戶輸入框高度約束 accountHeightConstraint:作為下移量的參考基準
- 登錄按鈕左右間距約束 loginLeftConstraint/loginRightConstraint:改動它們讓按鈕收縮
- 登錄按鈕高度約束 loginHeightConstraint:用來推算收縮後的寬度
除了約束,還需要兩個輔助屬性:
@property(assign, nonatomic) BOOL isAnimating;  // 登錄按鈕動畫狀態
@property(strong, nonatomic) NSArray *records;  // 列表資料源,demo 中放五個字串
為了保證列表展開時不被其他視圖蓋住,層級關係安排如下:
下拉按鈕 > 賬戶輸入框 > 紀錄列表 > 頭像 = 登錄按鈕 = 密碼輸入框
下拉動畫
點擊下拉按鈕會同時觸發兩個動畫:箭頭旋轉 180°,以及列表的展開或隱藏。一般來說我們得自己準備一個 BOOL 標記展開狀態,但作為事件發送者的按鈕本身就自帶 isSelected,直接拿它當開關即可。
- (IBAction)actionToOpenOrCloseList:(UIButton *)sender {
    [self.view endEditing:YES];
    [self animateToRotateArrow:sender.selected];
    sender.isSelected ? [self showRecordList] : [self hideRecordList];
}

- (void)animateToRotateArrow:(BOOL)selected {
    CATransform3D transform = selected ? CATransform3DIdentity
                                       : CATransform3DMakeRotation(M_PI, 0, 0, 1);
    [_dropdownButton setSelected:!selected];
    [UIView animateWithDuration:0.25 animations:^{
        _dropdownButton.layer.transform = transform;
    }];
}
接著改約束值來控制列表的大小與位置,並給展開加上一點彈性:
- (void)showRecordList {
    [UIView animateWithDuration:0.25 delay:0 usingSpringWithDamping:0.4 initialSpringVelocity:5
        options:UIViewAnimationOptionCurveEaseInOut | UIViewAnimationOptionAllowUserInteraction
        animations:^{
            _listTopConstraint.constant = _accountHeightConstraint.constant;
            _listHeightConstraint.constant = _accountHeightConstraint.constant * 5;
        } completion:nil];
}

- (void)hideRecordList {
    [UIView animateWithDuration:0.25 animations:^{
        _listTopConstraint.constant = 0;
        _listHeightConstraint.constant = 0;
    } completion:nil];
}
跑一下,你會發現這絕對不是想要的效果。
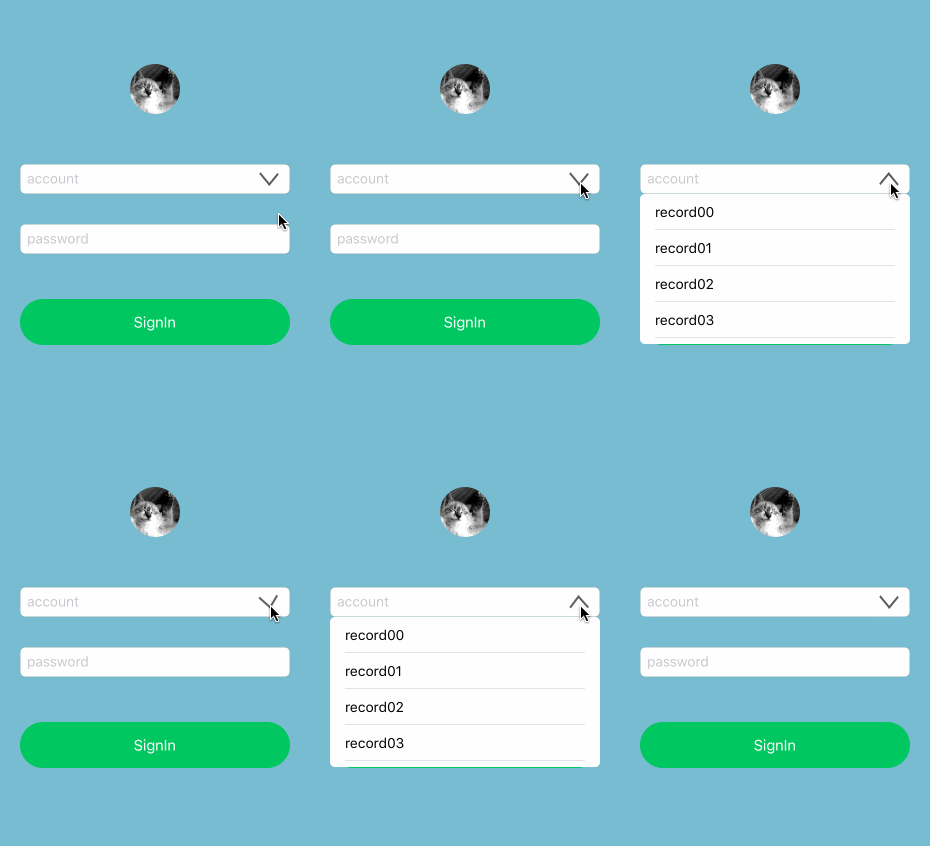
錯誤的動畫
這裡有個關鍵點:在動畫 block 裡直接改一般屬性會乖乖產生動畫,但改約束值時,系統會立刻算出最終布局並直接套用——哪怕這行程式碼寫在 block 裡也一樣。
解法是呼叫 - (void)layoutIfNeeded。它會觸發當前視圖所有子視圖的 layoutSubviews 重新布局。所以順序應該是:先設好約束值,再在動畫 block 裡呼叫 layoutIfNeeded,讓畫面逐幀重繪。
- (void)showRecordList {
    _listTopConstraint.constant = _accountHeightConstraint.constant;
    _listHeightConstraint.constant = _accountHeightConstraint.constant * 5;
    [UIView animateWithDuration:0.25 delay:0 usingSpringWithDamping:0.4 initialSpringVelocity:5
        options:UIViewAnimationOptionCurveEaseInOut | UIViewAnimationOptionAllowUserInteraction
        animations:^{ [self.view layoutIfNeeded]; } completion:nil];
}

- (void)hideRecordList {
    _listTopConstraint.constant = 0;
    _listHeightConstraint.constant = 0;
    [UIView animateWithDuration:0.25 animations:^{
        [self.view layoutIfNeeded];
    } completion:nil];
}
再跑一次,展開與收回終於正常了。
登錄按鈕動畫
老實說,這次 demo 裡我最滿意的就是登錄按鈕點擊後的效果,當然它也是耗時最久的。
按鈕中央要轉圈,這意味著得操作 layer——而這顯然不該塞進 Controller。於是我把登錄按鈕獨立封裝,對外只暴露 - (void)start 與 - (void)stop 兩個介面:
const NSTimeInterval duration = 1.2;

- (void)start {
    [self addAnimate];
    if (_timer) { [_timer invalidate]; }
    _timer = [NSTimer scheduledTimerWithTimeInterval:duration target:self
        selector:@selector(addAnimate) userInfo:nil repeats:YES];
    [UIView animateWithDuration:0.5 animations:^{
        _circle.opacity = 1;
        [self setTitleColor:[UIColor colorWithWhite:1 alpha:0] forState:UIControlStateNormal];
    }];
}

- (void)stop {
    if (_timer) { [_timer invalidate]; }
    [self.circle removeAllAnimations];
    [UIView animateWithDuration:0.5 animations:^{
        _circle.opacity = 0;
        [self setTitleColor:[UIColor colorWithWhite:1 alpha:1] forState:UIControlStateNormal];
    }];
}
轉圈本身建立在定時器加 CoreAnimation 之上,不屬於約束動畫的範疇,這裡不展開,有興趣可到 demo 裡翻實作。
除了轉圈與文字淡入淡出,按鈕自身還要縮小。收縮後它仍舊保持水平居中,所以左右約束的值必須相等;高度不變,寬度逐步逼近高度,最後變成一個正方形。
最直白的算法是這樣:
- (IBAction)actionToSignIn:(UIButton *)sender {
    _isAnimating = !_isAnimating;
    if (_isAnimating) { [_signInButton start]; [self animateToMakeButtonSmall]; }
    else { [_signInButton stop]; [self animateToMakeButtonBig]; }
}

- (void)animateToMakeButtonSmall {
    CGFloat height = _loginHeightConstraint.constant;
    CGFloat screenWidth = CGRectGetWidth(self.view.frame);
    CGFloat spacingConstant = (screenWidth - height) / 2;
    _loginLeftConstraint.constant = _loginRightConstraint.constant = spacingConstant;
    [UIView animateWithDuration:0.15 delay:0 options:UIViewAnimationOptionCurveEaseOut
        animations:^{ [self.view layoutIfNeeded]; } completion:nil];
}

- (void)animateToMakeButtonBig {
    _loginLeftConstraint.constant = _loginRightConstraint.constant = 0;
    [UIView animateWithDuration:0.15 delay:0 options:UIViewAnimationOptionCurveEaseOut
        animations:^{ [self.view layoutIfNeeded]; } completion:nil];
}
效果是對的,但思路是歪的。我們實際的做法是「取高度與父視圖寬度 → 算間距 → 做動畫」,而最初想表達的其實是「按鈕變成正方形 → 保持居中 → 做動畫」。這種顛倒不該被保留。
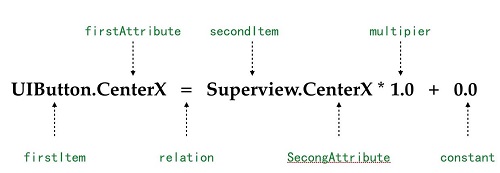
約束公式
先看約束的計算公式,以及各個量在 NSLayoutConstraint 中對應的屬性。比如要建立一條水平居中約束:
NSLayoutConstraint *centerXConstraint = [NSLayoutConstraint
    constraintWithItem:_button                  // firstItem
    attribute:NSLayoutAttributeCenterX          // firstAttribute
    relatedBy:NSLayoutRelationEqual
    toItem:_button.superview                    // secondItem
    attribute:NSLayoutAttributeCenterX          // secondAttribute
    multiplier:1.0                              // multiplier
    constant:0];                                // constant
翻一下 NSLayoutConstraint 的類文件會發現,這些屬性裡只有 constant 可寫。也就是說你沒法用正規手段改 multiplier 來調整寬度比例(KVC 勉強能做,但不該這麼幹)。
因此正確的做法是「移除舊約束 + 建立新約束」:
1、移除登錄按鈕的左右約束
2、加入寬高等比約束
3、加入相對於父視圖的居中約束
iOS 8 之前得靠這幾個方法手忙腳亂地增刪:
- (void)addConstraint:(NSLayoutConstraint *)constraint;
- (void)addConstraints:(NSArray *)constraints;
- (void)removeConstraint:(NSLayoutConstraint *)constraint;
- (void)removeConstraints:(NSArray *)constraints;
iOS 8 之後,NSLayoutConstraint 多了一個 active 屬性,設為 NO 即失效,設為 YES 立刻生效,乾淨多了:
- (void)animateToMakeButtonSmall {
    _loginLeftConstraint.active = NO;
    _loginRightConstraint.active = NO;

    // 寬高比約束
    NSLayoutConstraint *ratioConstraint = [NSLayoutConstraint
        constraintWithItem:_signInButton attribute:NSLayoutAttributeWidth
        relatedBy:NSLayoutRelationEqual
        toItem:_signInButton attribute:NSLayoutAttributeHeight
        multiplier:1. constant:0];
    ratioConstraint.active = YES;
    _loginRatioConstraint = ratioConstraint;

    // 居中約束
    NSLayoutConstraint *centerXConstraint = [NSLayoutConstraint
        constraintWithItem:_signInButton attribute:NSLayoutAttributeCenterX
        relatedBy:NSLayoutRelationEqual
        toItem:_signInButton.superview attribute:NSLayoutAttributeCenterX
        multiplier:1. constant:0.];
    centerXConstraint.active = YES;
    _loginCenterXConstraint = centerXConstraint;

    [UIView animateWithDuration:0.15 delay:0 options:UIViewAnimationOptionCurveEaseIn
        animations:^{ [self.view layoutIfNeeded]; } completion:nil];
}

- (void)animateToMakeButtonBig {
    _loginCenterXConstraint.active = NO;
    _loginRatioConstraint.active = NO;

    NSLayoutConstraint *leftConstraint = [NSLayoutConstraint
        constraintWithItem:_signInButton attribute:NSLayoutAttributeLeading
        relatedBy:NSLayoutRelationEqual
        toItem:_signInButton.superview attribute:NSLayoutAttributeLeading
        multiplier:1. constant:25];
    _loginLeftConstraint = leftConstraint;
    leftConstraint.active = YES;

    NSLayoutConstraint *rightConstraint = [NSLayoutConstraint
        constraintWithItem:_signInButton attribute:NSLayoutAttributeTrailing
        relatedBy:NSLayoutRelationEqual
        toItem:_signInButton.superview attribute:NSLayoutAttributeTrailing
        multiplier:1. constant:-25];
    _loginRightConstraint = rightConstraint;
    rightConstraint.active = YES;

    [UIView animateWithDuration:0.15 delay:0 options:UIViewAnimationOptionCurveEaseOut
        animations:^{ [self.view layoutIfNeeded]; } completion:nil];
}
還有一個容易忽略的細節:一條約束的 active 被設為 NO 之後,即使重新設回 YES 也不會再生效,必須重新建立。
上面用 loginRatioConstraint 與 loginCenterXConstraint 兩個屬性保存每次新建的約束,是為了後續能精準失效。除此之外,也可以直接遍歷約束、按對象與屬性類型判斷:
[_signInButton.constraints enumerateObjectsWithOptions:NSEnumerationReverse usingBlock:^(__kindof NSLayoutConstraint * _Nonnull obj, NSUInteger idx, BOOL * _Nonnull stop) {
    if (obj.firstItem == _signInButton && obj.firstAttribute == NSLayoutAttributeCenterX) {
        obj.active = NO;
    } else if (obj.firstAttribute == NSLayoutAttributeWidth && obj.secondAttribute == NSLayoutAttributeHeight) {
        obj.active = NO;
    }
}];
效果等同於:
_loginCenterXConstraint.active = NO;
_loginRatioConstraint.active = NO;
這種寫法看著囉嗦,但封裝自訂控件時難免會用到。實在嫌麻煩,NSLayoutConstraint 還提供了字串類型的 identifier,可以在 Storyboard 右側屬性欄直接設定:
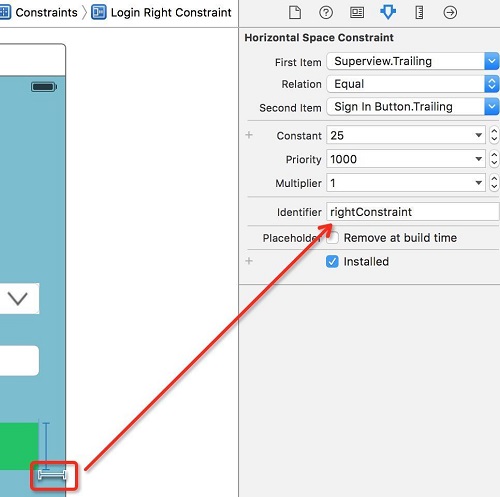
約束id
有了 identifier,判斷就能簡化成這樣:
static NSString *centerXIdentifier = @"centerXConstraint";
static NSString *ratioIdentifier   = @"ratioIdentifier";

// 建立時標記
ratioConstraint.identifier   = ratioIdentifier;
centerXConstraint.identifier = centerXIdentifier;

// 失效時按 id 查找
[_signInButton.constraints enumerateObjectsWithOptions:NSEnumerationReverse usingBlock:^(__kindof NSLayoutConstraint * _Nonnull obj, NSUInteger idx, BOOL * _Nonnull stop) {
    if ([obj.identifier isEqualToString:centerXIdentifier]) {
        obj.active = NO;
    } else if ([obj.identifier isEqualToString:ratioIdentifier]) {
        obj.active = NO;
    }
}];
尾言
距離約束動畫開篇也過了一段時間。對我來說,約束動畫很長一段時間都是知識空白,直到這次動筆才真正上手,收穫不小。同前幾篇一樣,這篇標誌著約束動畫系列的收尾;demo 裡還摻了核心動畫的內容,某種程度上也說明我對約束動畫的理解還算不上深。
但有一點是確定的:掌握約束是 iOS 開發者的基本功。一方面,Interface Builder 的可視化編程已經深度融入我的日常工作,開發效率提升明顯;另一方面,手機尺寸只會越來越多,class size 與 Auto Layout 就是我們適配不同螢幕最可靠的幫手。
本文 demo
文/Sindri的小巢(簡書作者)
原文鏈接:https://www.jianshu.com/p/2a8787919794#