
IBDesignable 並不完美:談談 Category 裡的實時渲染困局

本文為投稿文章,作者:minggo(簡書)
我們似乎早就習慣了「理想很豐滿,現實很骨感」的敘事順序。可要是反過來呢——現實很豐滿,理想卻很骨感,這能接受嗎?現實豐滿沒問題,但理想骨感就不必將就了。
Xcode 就是這樣一個例子。蘋果在 2011 年推出 UIStoryboard,幾年過去,Interface Builder 依然沒有直接提供圓角、邊框這類屬性的設定入口,而是丟出 IBDesignable/IBInspectable 讓開發者自己實作。更尷尬的是,當你想用 Category 一次性解決所有控件的時候,結果偏偏在畫布上不顯示。
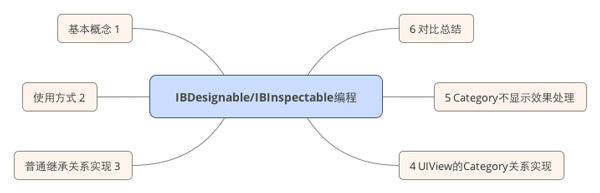
一、我們想要的不多
只有在 Storyboard 裡直接設定圓角、邊框寬度與邊框顏色,並讓 Interface Builder 立刻把渲染結果畫出來,而不是非得跑起來才能看到效果。就這麼簡單。
二、兩個基本概念
IB_DESIGNABLE 的作用,是讓 Xcode 即時渲染該類的圖形介面。當 UIView 或 NSView 的子類被它標記後,Interface Builder 就會在 Storyboard/Xib 的画布上直接畫出視圖,不必等到編譯執行。
IBInspectable 則用來標記屬性,讓支援 KVC 的屬性可以在 Attribute Inspector 面板裡直接設定。
三、基本用法
1. IB_DESIGNABLE 放在 @interface 或 @implementation 上都可以。
IB_DESIGNABLE
@interface IBDesignableImageView : UIImageView
2. 用 IBInspectable 標記屬性,使其可在 Xcode 中調整。
@property(nonatomic, assign) IBInspectable CGFloat cornerRadius;
四、走繼承這條正路
1. 自訂一個繼承 UIImageView 的類
#import <UIKit/UIKit.h>

IB_DESIGNABLE
@interface IBDesignableImageView : UIImageView
@property(nonatomic, assign) IBInspectable CGFloat cornerRadius;
@end
2. 在 .m 裡實作 setter
#import "IBDesignableImageView.h"

@implementation IBDesignableImageView

- (void)setCornerRadius:(CGFloat)cornerRadius {
    _cornerRadius = cornerRadius;   // 別寫成 self.cornerRadius,會造成無限遞迴
    self.layer.masksToBounds = YES;
    self.layer.cornerRadius = cornerRadius;
}

@end
3. 在 Xcode 的 Identity Inspector 裡把 Custom Class 設為 IBDesignableImageView。
4. 到屬性面板設定剛才那個屬性。

類繼承關系實現效果圖
四步搞定,Storyboard 上立刻看得到效果,某種意義上也算是嘗到了實時渲染的甜頭。
五、改用 UIView 的 Category
嘗到好處自然想推廣:既然 UIView 是所有子類的父類,只要給它加上 Category,理論上 UIImageView、UITextField、UIButton 全都能一起受益。
1. 我們期待的畫面
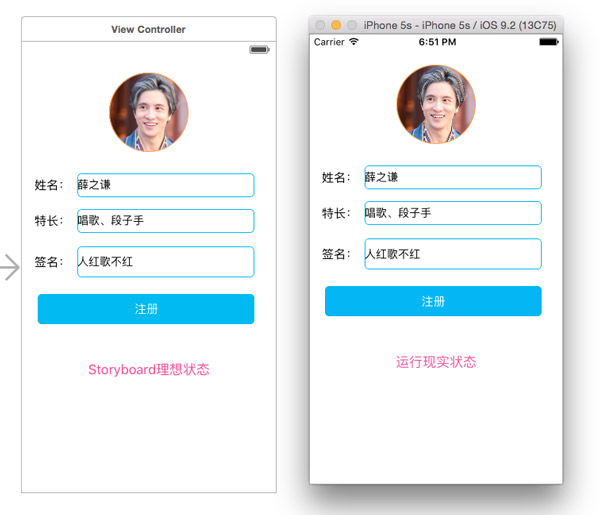
最理想狀態
2. 撰寫 UIView+MGO.h
#import <UIKit/UIKit.h>

IB_DESIGNABLE
@interface UIView (MGO)
@property(nonatomic, assign) IBInspectable CGFloat cornerRadius;
@property(nonatomic, assign) IBInspectable CGFloat borderWidth;
@property(nonatomic, assign) IBInspectable UIColor *borderColor;
@property(nonatomic, assign) IBInspectable CGFloat defineValue;
@end
3. 撰寫 UIView+MGO.m
#import "UIView+MGO.h"
#import <objc/runtime.h>

@implementation UIView (MGO)

- (void)setCornerRadius:(CGFloat)cornerRadius {
    self.layer.masksToBounds = YES;
    self.layer.cornerRadius = cornerRadius;
}

- (void)setBorderColor:(UIColor *)borderColor {
    self.layer.borderColor = borderColor.CGColor;
}

- (void)setBorderWidth:(CGFloat)borderWidth {
    self.layer.borderWidth = borderWidth;
}

- (void)setDefineValue:(CGFloat)defineValue {
    objc_setAssociatedObject(self, @selector(defineValue), @(defineValue), OBJC_ASSOCIATION_ASSIGN);
}

- (CGFloat)cornerRadius { return self.layer.cornerRadius; }
- (CGFloat)borderWidth  { return self.layer.borderWidth; }
- (UIColor *)borderColor { return [UIColor colorWithCGColor:self.layer.borderColor]; }
- (CGFloat)defineValue  { return [objc_getAssociatedObject(self, @selector(defineValue)) floatValue]; }

@end
這段實作有三個容易踩的坑:
1)Category 裡用 IBInspectable 標記的屬性,必須同時具備 setter 與 getter,否則連編譯都過不了。
2)屬性值變化要靠 KVC 觀察,才能得到即時刷新的效果。
3)Category 裡自訂屬性(例如上面的 defineValue)得用 runtime 關聯物件的方式賦值,直接寫 _defineValue = defineValue; 是有語法問題的。
runtime 與 KVC 的細節可以參考《談 Runtime 機制和使用的整體化梳理》與《談 KVC、KVO(重點觀察者模式)機制編程》。
4. 到 Interface Builder 裡設定屬性
屬性面板中可以看到並調整圓角、邊框寬度等項目:
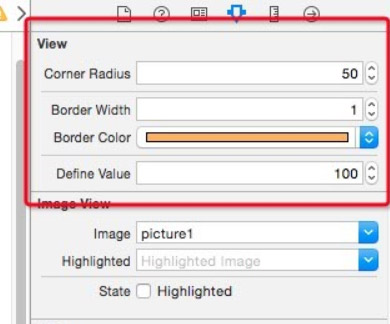
設置UIView(MGO定義出來屬性)
Runtime Attributes 欄裡也會自動帶出剛設定的值:
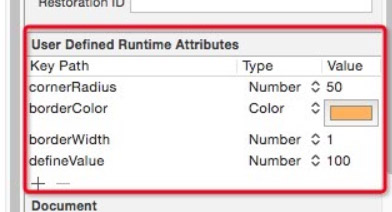
Runtime Attribute顯示屬性值
5. 回到 Storyboard 看看頭像有沒有變
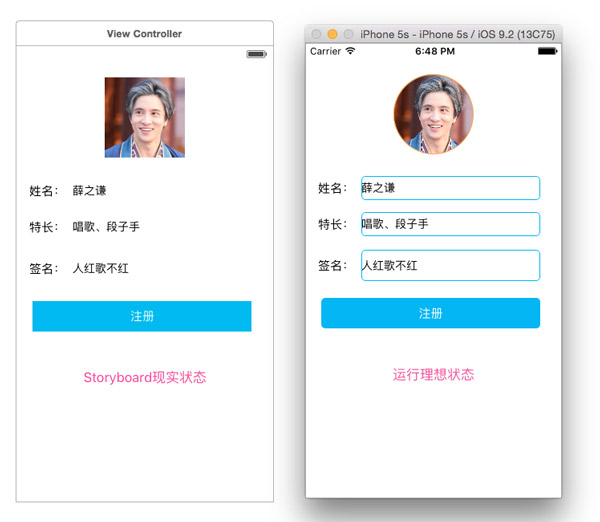
UIView(MGO)展示的效果
結果:畫布上一點變化都沒有,反而是模擬器跑起來完全正確。現實很豐滿,理想很骨感,體現得淋漓盡致。
六、曲線救國:加一層空白子類
於是有了個猜想:Interface Builder 是不是非得看到一個自訂子類寫在 Custom Class 裡,才肯渲染?試試看。
1. 寫一個什麼都不做的 MGOImageView,繼承 UIImageView。
#import <UIKit/UIKit.h>

@interface MGOImageView : UIImageView
@end
2. 實作檔案裡空空如也,只等著繼承 Category 的屬性。
#import "MGOImageView.h"

@implementation MGOImageView
@end
3. 選中 Storyboard 裡的 UIImageView,把 Custom Class 改成 MGOImageView。
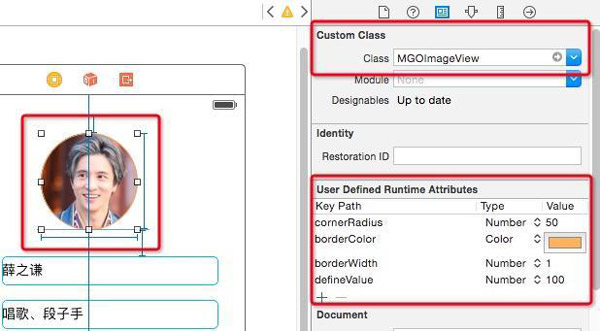
編寫空白MGOImageView嘗試
畫布依舊毫無動靜。既然如此,那就給其他控件也各配一個空白子類,一個個掛到 Custom Class 上。
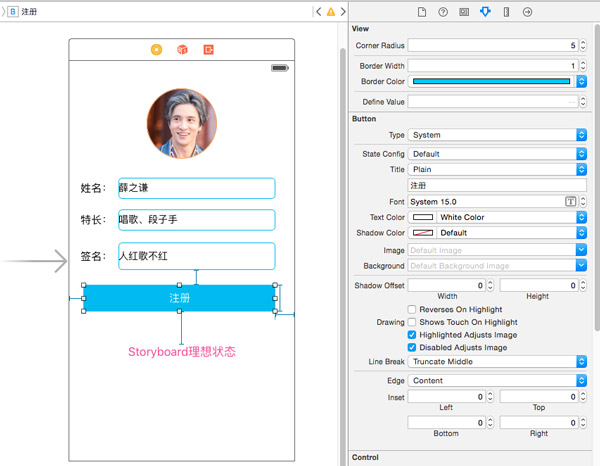
其他控件都添加對應的子類
這次終於生效了。搜尋關鍵字後可以發現,社群裡遇到同樣問題的人不少,普遍結論也是:Category 方案要在 Storyboard 生效,得搭配一個空白子類並指定為 Custom Class。
七、總結
折騰一圈下來,結論只能說是「不完美的 IBDesignable/IBInspectable」。它確實能省下不少重複勞動,但 Category 場景下的渲染缺失讓人無奈。如果讀者手上有更漂亮的解法,非常歡迎分享。
八、源碼下載
地址:https://github.com/minggo620/iOSDesignable.git