
CAShapeLayer 實戰技巧:遮罩、音量控件與圓形進度條

本文授權轉載,作者:@景銘巴巴
一、用 CAShapeLayer 做出複雜遮罩
1.1 案例演示
最近整理一個聊天專案時發現,傳送圖片時需要一個三角形指向效果,用來標示圖片的發送者。但伺服器回傳的只是一張矩形圖片,如何為矩形圖片或 View 加上一層自訂遮罩,就是本文的起點。效果如下,第一張是 View 的遮罩,第二張是 UIImageView 的遮罩。
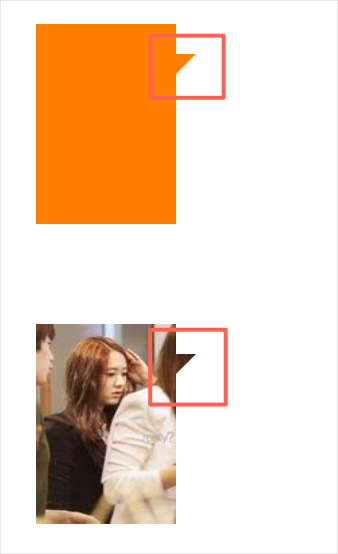
演示圖片
1.2 實現原理
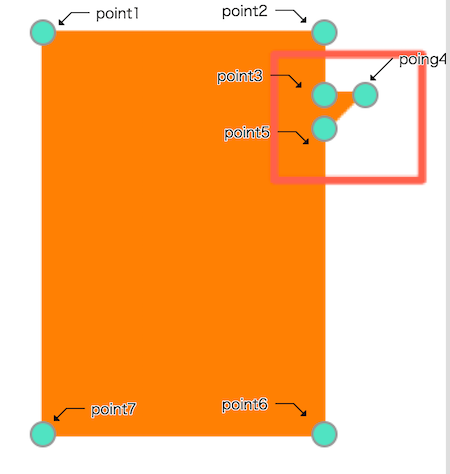
每個 View 的 layer 上都有一個 mask 屬性,專門用來設定該 View 的遮罩,而這個 mask 本身就是一個 layer。因此我們只需要產生一個自訂形狀的 layer,蓋在要遮罩的 View 上即可。問題於是變成:怎麼產生上圖那種不規則形狀的 layer?
CAShapeLayer 可以依據幾個接連的點,圍出一個封閉區域的 layer,如下圖。
1.3 實現代碼
這裡把功能實作成 CAShapeLayer 的 ViewMask 類別。
@implementation CAShapeLayer (ViewMask)

+ (instancetype)createMaskLayerWithView :(UIView *)view {
    CGFloat viewWidth = CGRectGetWidth(view.frame);
    CGFloat viewHeight = CGRectGetHeight(view.frame);
    CGFloat rightSpace = 10.;
    CGFloat topSpace = 15.;

    CGPoint point1 = CGPointMake(0, 0);
    CGPoint point2 = CGPointMake(viewWidth-rightSpace, 0);
    CGPoint point3 = CGPointMake(viewWidth-rightSpace, topSpace);
    CGPoint point4 = CGPointMake(viewWidth, topSpace);
    CGPoint point5 = CGPointMake(viewWidth-rightSpace, topSpace+10.);
    CGPoint point6 = CGPointMake(viewWidth-rightSpace, viewHeight);
    CGPoint point7 = CGPointMake(0, viewHeight);

    UIBezierPath *path = [UIBezierPath bezierPath];
    [path moveToPoint:point1];
    [path addLineToPoint:point2];
    [path addLineToPoint:point3];
    [path addLineToPoint:point4];
    [path addLineToPoint:point5];
    [path addLineToPoint:point6];
    [path addLineToPoint:point7];
    [path closePath];

    CAShapeLayer *layer = [CAShapeLayer layer];
    layer.path = path.CGPath;
    return layer;
}

@end
1.4 呼叫方式
UIView *view = [[UIView alloc] initWithFrame:CGRectMake(40, 50, 80, 100)];
view.backgroundColor = [UIColor orangeColor];
[self.view addSubview:view];

CAShapeLayer *layer = [CAShapeLayer createMaskLayerWithView:view];
view.layer.mask = layer;
二、用 CAShapeLayer 做動態音量控件
2.1 案例演示
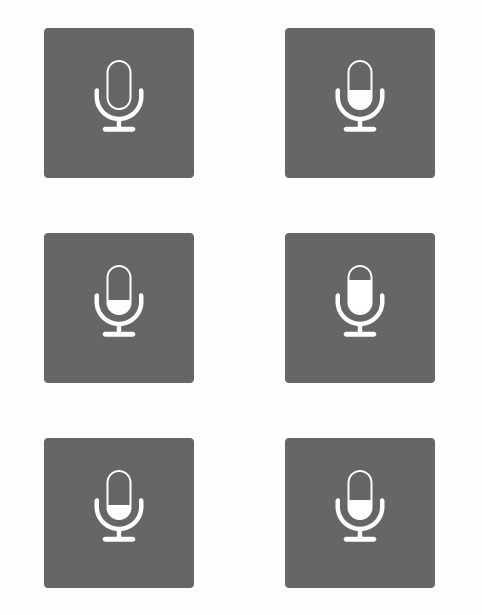
針對「即時顯示語音音量大小」這個需求,我發現很多人的做法是預先放一堆圖片再切換顯示。這樣不但浪費 App 的儲存空間,效率也不高。對於符合某種規律動態變化的圖形,其實可以考慮用程式碼繪製。
2.2 實現原理
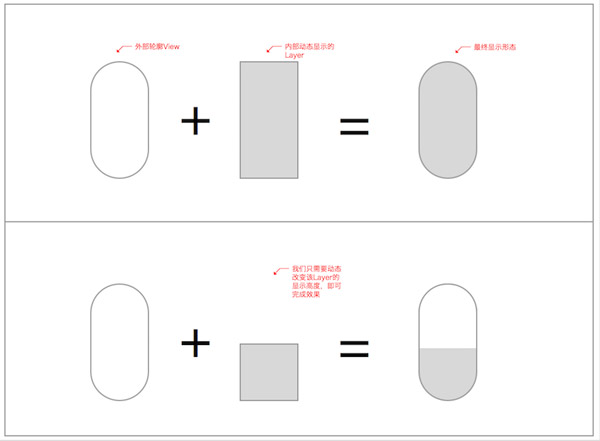
外層輪廓 View 負責控制整體尺寸與圓角效果;內部的 Layer 負責控制動態顯示的高度,它本身是矩形,但當它被加入 View 之後,由於該 View 設定了 _dynamicView.clipsToBounds = YES;,超出輪廓的部分就會被裁掉。
也就是說,我們只需要動態改變內部 Layer 的高度,就能達到這個效果。
2.3 實現代碼
_dynamicView 表示外層輪廓 View,indicateLayer 表示動態顯示的內容 Layer。動態刷新的方法如下:
-(void)refreshUIWithVoicePower :(NSInteger)voicePower {
    CGFloat height = (voicePower) * (CGRectGetHeight(_dynamicView.frame) / TOTAL_NUM);
    [_indicateLayer removeFromSuperlayer];
    _indicateLayer = nil;

    UIBezierPath *path = [UIBezierPath bezierPathWithRoundedRect:CGRectMake(0, CGRectGetHeight(_dynamicView.frame)-height, CGRectGetWidth(_dynamicView.frame), height) cornerRadius:0];
    _indicateLayer = [CAShapeLayer layer];
    _indicateLayer.path = path.CGPath;
    _indicateLayer.fillColor = [UIColor whiteColor].CGColor;
    [_dynamicView.layer addSublayer:_indicateLayer];
}
三、圓形進度條
3.1 案例演示
前陣子有個小需求要做圓形進度條,大概長這樣:

在知道 CAShapeLayer 有 strokeStart 與 strokeEnd 這兩個屬性之前,我的做法是即時移除舊的 CAShapeLayer 再重繪一個新的圓形 layer,效率顯然不怎麼樣。後來看別人的 Demo,才發現用這兩個屬性實作這個效果簡單得驚人。
3.2 屬性詳解
蘋果官方對這兩個屬性的說明是:
/* These values define the subregion of the path used to draw the stroked outline. The values must be in the range [0,1] with zero representing the start of the path and one the end. Values in between zero and one are interpolated linearly along the path length. strokeStart defaults to zero and strokeEnd to one. Both are animatable. */
大意是:這兩個屬性定義了用來繪製描邊的路徑子區域,取值範圍在 0~1 之間,0 代表路徑起點,1 代表終點,中間的值沿路徑長度線性插值。strokeStart 預設為 0,strokeEnd 預設為 1,兩者都支援動畫。
CAShapeLayer *shapeLayer = [CAShapeLayer layer];
shapeLayer.frame = _demoView.bounds;
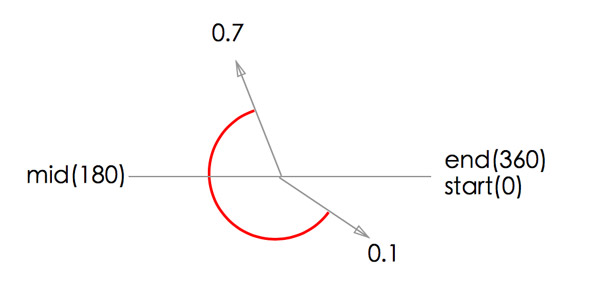
shapeLayer.strokeEnd = 0.7f;
shapeLayer.strokeStart = 0.1f;
UIBezierPath *path = [UIBezierPath bezierPathWithOvalInRect:_demoView.bounds];
shapeLayer.path = path.CGPath;
shapeLayer.fillColor = [UIColor clearColor].CGColor;
shapeLayer.lineWidth = 2.0f;
shapeLayer.strokeColor = [UIColor redColor].CGColor;
[_demoView.layer addSublayer:shapeLayer];
設定 strokeStart = 0.1f、strokeEnd = 0.7f 之後,顯示如下圖。
3.3 圓形進度條實現代碼
CAShapeLayer *shapeLayer = [CAShapeLayer layer];
shapeLayer.frame = _demoView.bounds;
UIBezierPath *path = [UIBezierPath bezierPathWithOvalInRect:_demoView.bounds];
shapeLayer.path = path.CGPath;
shapeLayer.fillColor = [UIColor clearColor].CGColor;
shapeLayer.lineWidth = 2.0f;
shapeLayer.strokeColor = [UIColor redColor].CGColor;
[_demoView.layer addSublayer:shapeLayer];

CABasicAnimation *pathAnima = [CABasicAnimation animationWithKeyPath:@"strokeEnd"];
pathAnima.duration = 3.0f;
pathAnima.timingFunction = [CAMediaTimingFunction functionWithName:kCAMediaTimingFunctionEaseInEaseOut];
pathAnima.fromValue = [NSNumber numberWithFloat:0.0f];
pathAnima.toValue = [NSNumber numberWithFloat:1.0f];
pathAnima.fillMode = kCAFillModeForwards;
pathAnima.removedOnCompletion = NO;
[shapeLayer addAnimation:pathAnima forKey:@"strokeEndAnimation"];
把 strokeEnd 拿來做動畫,就能得到流暢的圓環進度效果,完全不需要重繪——這也是 CAShapeLayer 最值得記住的一個特性。
- 上一篇文章: iOS 動畫(Core Animation)完整總結
- 下一篇文章: iOS 真機測試完整教程(含證書與 P12 檔案)