
實戰:用 MVVM 架構精簡控制器代碼(代碼量減少約 56%)
編輯:iOS 開發基礎
用 MVVM 為控制器「減肥」

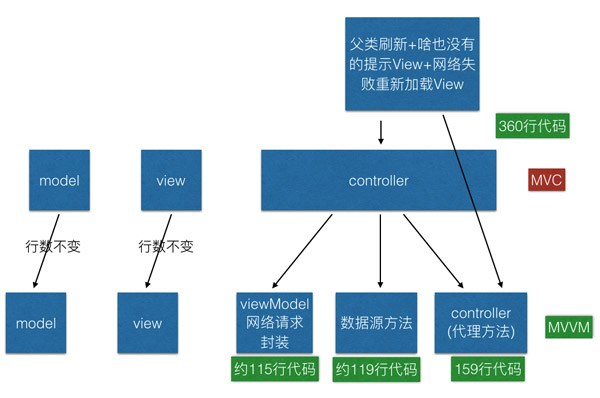
本篇記錄了一次用 MVVM 思想重構控制器的完整實踐。核心成果是:控制器代碼從原來的 360 行精簡到 159 行。
精簡比例 =(360 − 159)/ 360 ≈ 56%
父類:MVC 與 MVVM 前後基本保持不變
父類主要承擔三件事,把這些通用能力沉澱到父類後,子類只需調用極少代碼即可復用:
- 刷新功能:把 MJRefresh 的上拉下拉、沒有更多數據等邏輯封裝到父類,子類調用 3 行代碼即可獲得完整的刷新能力。
- 網絡異常:統一處理網絡失敗時的錯誤提示鏈接,子類一行代碼即可調用。
- 空數據提示:加載完成但列表為空時顯示提示 View(例如購買記錄為空的頁面),子類一行代碼即可接入。
減肥思路
整體代碼量其實增加了 30 多行,但換來的是控制器的清爽——把細節下沉、把職責分離。
具體實現
1)把網絡請求遷移到 ViewModel
改造前,網絡請求代碼直接堆在控制器裡:
- (void)loadDataForCaseDeatailMsg:(NSString*)caseManageId{
    NSMutableDictionary *dict = createMutDict;
    [dict setObject:@"case-info" forKey:@"method"];
    [dict setObject:caseManageId forKey:@"caseManageId"];
    [QTFHttpTool     requestPara:dict                       needHud:YES                     hudView:self.view                     loadingHudText:nil                     errorHudText:nil                     sucess:^(NSDictionary *json){
                                                          BOOL success = (BOOL)[json[@"success"] boolValue];
                                                          if(success){
                                                              QTCaseDetailModel *caseDetailModel = [[QTCaseDetailModel alloc]init];
                                                              caseDetailModel.expertId = json[@"expertId"];
                                                              caseDetailModel.userName = json[@"userName"];
                                                              caseDetailModel.data = [QTCaseDetailMsgModel objectArrayWithKeyValuesArray:json[@"data"]];
                                                              [self gotoChatViewController:caseDetailModel];
                                                          }
                                                      }failur:^(NSError *error){
                                                      }];
}
改造後,控制器只關心自己真正需要的數據,把字典組裝、模型轉換、錯誤處理等細節都交給 ViewModel,5 行就搞定了網絡請求與數據獲取,是不是精簡多了?
- (void)loadDataForCaseDeatailMsg:(NSString*)caseManageId{
    [QTCaseDetailViewModel caseDetailhudView:self.view caseManageId:caseManageId getDataSuccess:^(id item, NSInteger totalPage){
        [self gotoChatViewController:item];
    } getDataFailure:^(NSError *error){}];
}
具體邏輯都在 ViewModel 中實現:添加 hud、完成字典轉模型、對後台數據做錯誤處理與錯誤展示(其中部分能力來自已封裝的底層網絡請求層)。
+ (void)caseDetailhudView:(UIView*)hudView caseManageId:(NSString*)caseManageId getDataSuccess:(GetDataAllSuccessBlock)success getDataFailure:(GetDataFailureBlock)failure{
    NSMutableDictionary *dict = createMutDict;
    [dict setObject:@"case-info" forKey:@"method"];
    [dict setObject:caseManageId forKey:@"caseManageId"];
    [QTFHttpTool     requestPara:dict                       needHud:YES                     hudView:hudView                     loadingHudText:nil                     errorHudText:nil                     sucess:^(NSDictionary *json){
                        BOOL success1 = (BOOL)[json[@"success"] boolValue];
                        if(success1){
                            QTCaseDetailModel *caseDetailModel = [[QTCaseDetailModel alloc]init];
                            caseDetailModel.expertId = json[@"expertId"];
                            caseDetailModel.userName = json[@"userName"];
                            caseDetailModel.data = [QTCaseDetailMsgModel objectArrayWithKeyValuesArray:json[@"data"]];
                            success(caseDetailModel,1);
                        }
                    }failur:^(NSError *error){
                    }];
}
2)把 dataSource 剝離到獨立文件
以前數據源直接寫在控制器裡,現在獨立成 QTArrayDataSource 類,控制器只需持有並調用即可。它同時兼容 UITableView 與 UICollectionView:
/*  本類作用:用以處理 TableView 以及 CollectionView 的數據源  */
#import <UIKit/UIKit.h>
// 用於配置當前 Cell 的數據
// id cell 表示什麼類型的 Cell
// id item 表示什麼類型的模型對象
typedef void (^TableViewCellConfigureBlock)(id cell, id item);

@interface QTArrayDataSource : NSObject
// 參數1:用以數據源的控制,主要是通過改數組來控制當前 tableView 或者 collectionView 顯示 Cell 的數量
// 參數2:當前需要顯示的 cell 的重用標示
// 參數3:用以配置當前 cell 數據的 block
- (id)initWithItems:(NSArray *)anItems
     cellIdentifier:(NSString *)aCellIdentifier
 configureCellBlock:(TableViewCellConfigureBlock)aConfigureCellBlock;
// 通過 indexPath 來獲取當前具體的某一個對象
- (id)itemAtIndexPath:(NSIndexPath *)indexPath;
@end
#import "QTArrayDataSource.h"
#import "QTSpecialCaseCell.h"
@interface QTArrayDataSource ()
// 當前數據數組
@property (nonatomic, strong) NSArray *items;
// 當前 cell 重用標示
@property (nonatomic, copy) NSString *cellIdentifier;
// 當前配置 cell 的 block
@property (nonatomic, copy) TableViewCellConfigureBlock configureCellBlock;
@end

@implementation QTArrayDataSource
- (id)init {
    return nil;
}
- (id)initWithItems:(NSArray *)anItems
     cellIdentifier:(NSString *)aCellIdentifier
 configureCellBlock:(TableViewCellConfigureBlock)aConfigureCellBlock {
    self = [super init];
    if (self) {
        _items = anItems;
        _cellIdentifier = aCellIdentifier;
        _configureCellBlock = [aConfigureCellBlock copy];
    }
    return self;
}
- (id)itemAtIndexPath:(NSIndexPath *)indexPath {
    return self.items[(NSUInteger)indexPath.row];
}
#pragma mark UITableViewDataSource
- (NSInteger)tableView:(UITableView *)tableView numberOfRowsInSection:(NSInteger)section {
    return self.items.count;
}
- (UITableViewCell *)tableView:(UITableView *)tableView cellForRowAtIndexPath:(NSIndexPath *)indexPath {
    UITableViewCell *cell = [tableView dequeueReusableCellWithIdentifier:self.cellIdentifier forIndexPath:indexPath];
    // 獲取當前某一行的對象
    id item = [self itemAtIndexPath:indexPath];
    // 通過調用該 block 配置當前 cell 顯示的內容
    self.configureCellBlock(cell, item);
    return cell;
}
#pragma mark UICollectionDataSource
- (NSInteger)collectionView:(UICollectionView *)collectionView numberOfItemsInSection:(NSInteger)section {
    return self.items.count;
}
- (UICollectionViewCell *)collectionView:(UICollectionView *)collectionView cellForItemAtIndexPath:(NSIndexPath *)indexPath {
    QTSpecialCaseCell *cell = [collectionView dequeueReusableCellWithReuseIdentifier:self.cellIdentifier forIndexPath:indexPath];
    // 獲取當前某一行的對象
    id item = [self itemAtIndexPath:indexPath];
    // 通過調用該 block 配置當前 cell 顯示的內容
    self.configureCellBlock(cell, item);
    return cell;
}
@end
3)在 viewDidLoad 中以協議方式加載數據源
TableViewCellConfigureBlock configureCell = ^(QTSpecialCaseCell *cell, id data){
    [cell configureForCell:data];
};
[_collectionView registerClass:[QTSpecialCaseCell class] forCellWithReuseIdentifier:CellIdentify];
self.arrayDataSource = [[QTArrayDataSource alloc]
                        initWithItems:self.data
                        cellIdentifier:CellIdentify
                        configureCellBlock:configureCell];
self.collectionView.dataSource = self.arrayDataSource;
self.collectionView.delegate = self;
[self refreshOneCreateCollectionView:_collectionView methodSelStr:@"loadData"];
4)仍可繼續探討的部分
- 代理方法尚未剝離,若剝離出來,控制器還能進一步降到 120 行左右;不過代理剝離相對繁瑣,權衡之後暫不處理。
- 創建 collectionView 的代碼也沒有剝離,剝離後大約還能再省 20 行;參考了一些他人文章後,目前認為收益不大,暫不改動。
- 代碼封裝要恰到好處:既不能過度封裝,也不能完全不封裝。
- 上一篇文章: 每日源碼精選:錄音組件快速集成 + ScrollView 多界面管理方案
- 下一篇文章: 使用私有 Pods 封裝個推 SDK 的實務方案