
用 xcconfig 檔配置 iOS App 多環境變數

App 開發幾乎都會牽涉多個環境:Debug、Release,有時還有測試服、預發佈服。切換環境時往往要換伺服器位址、換第三方 SDK 的 App ID。一開始我用最直白的做法——在程式碼裡寫一個變數:
static let isRelease = true
static let serverURL = isRelease ? "prod server url" : "dev server url"
問題很明顯:每次換環境都得改程式碼、重新編譯,改幾次之後很容易忘記自己改到哪一版,甚至誤把測試設定上線。何況實際專案常常不止兩個環境。所以更好的做法是把環境設定從程式碼裡抽出來。
配置方式有好幾種,我選了直觀度最高的一種:使用 xcconfig 檔。
需求
Xcode 預設提供 Debug 與 Release 兩種配置,差異在於:
- Debug:包含較多除錯資訊,不最佳化。
- Release:開啟最佳化,執行速度快很多,打包體積通常也較小。
(網路上常有人說 Release 環境不能中斷點,我自己測試後發現中斷點與這兩者無關,關鍵在於是否啟用最佳化與除錯符號設定。)
我實際會用到三種環境:
- 測試伺服器 + Debug
- 偶爾切換到正式伺服器 + Debug
- 上架(正式伺服器 + Release)
預設的兩種顯然不夠用。
步驟一:新增 Build Configuration
打開專案的 workspace,選中主要 target 的 project,進入 Info 頁籤,找到 Configurations 區塊,點擊下方的「+」。
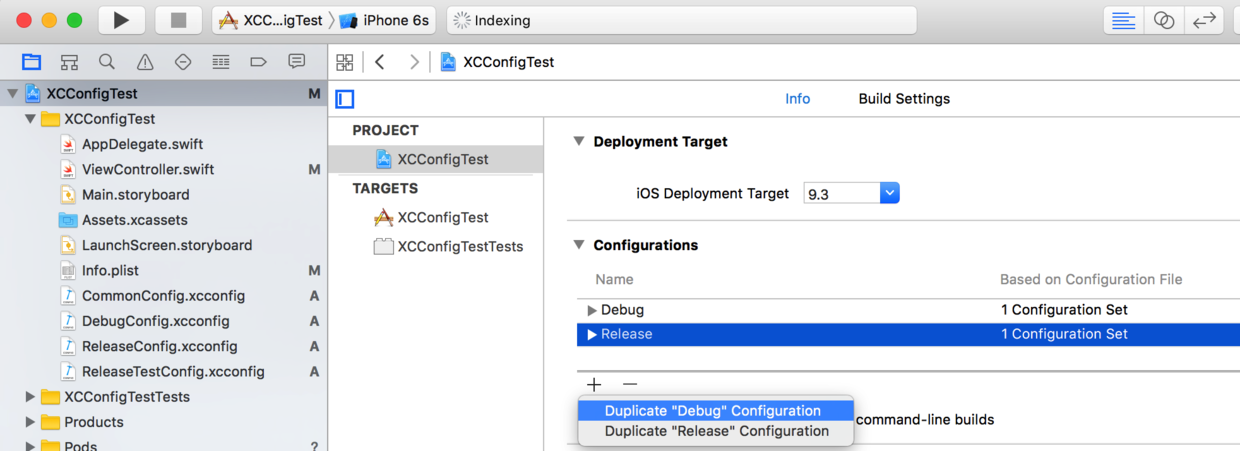
圖中可以看到已存在的 Debug 與 Release。選擇 Duplicate Debug Configuration,命名為 ReleaseTest:
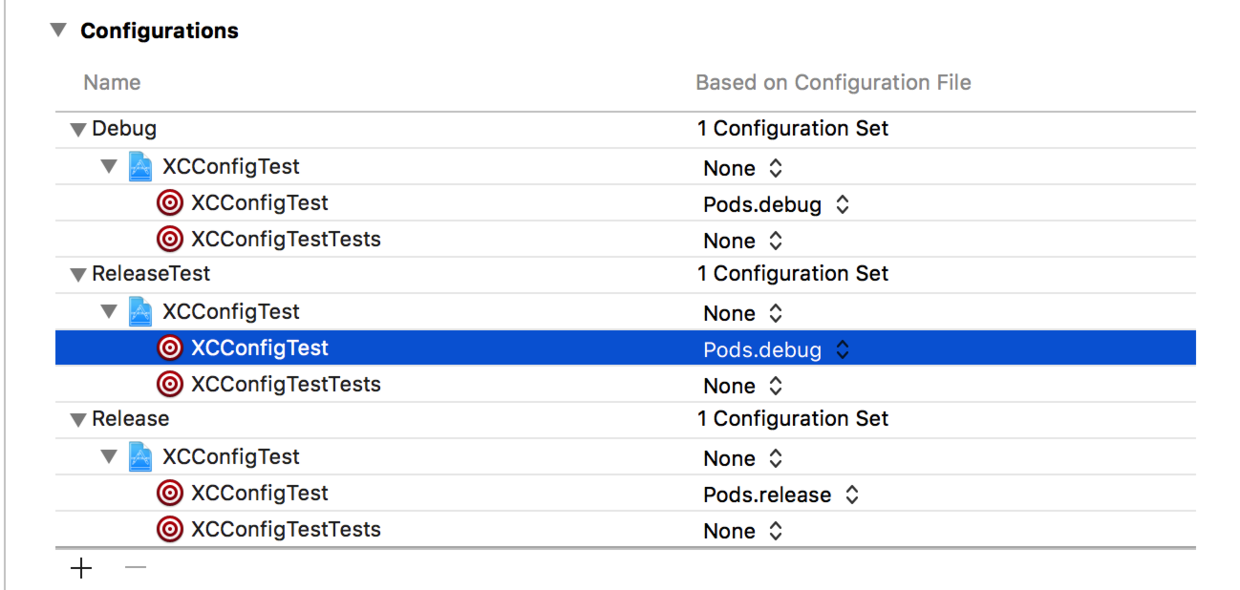
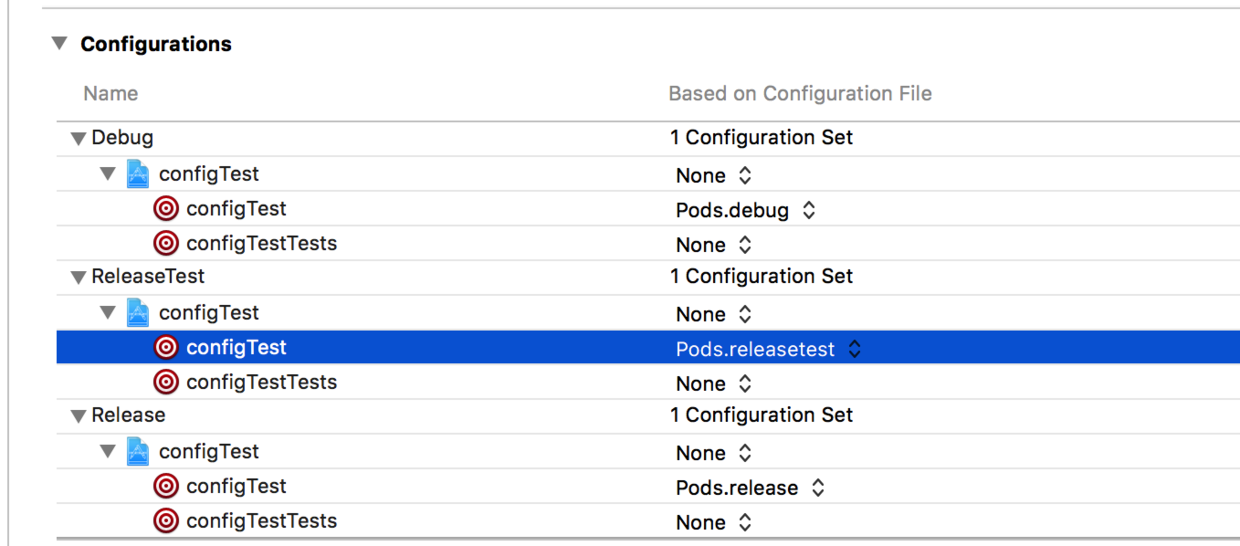
新增後你會發現三個 configuration 各自都有一組對應的 xcconfig。這是因為專案已導入 CocoaPods,這些是 Pods 自動加上去的。但新建的 ReleaseTest 並沒有對應的 Pods 設定檔,此時專案會編譯失敗。
解法是先把新建 configuration 對應的設定檔設為 None:

接著在命令行執行:
pod install
完成後如下圖,Pods 會自動為 ReleaseTest 產生對應的設定檔:
步驟二:建立並配置 xcconfig 檔
File → New,選擇 iOS → Other → Configuration Settings File。
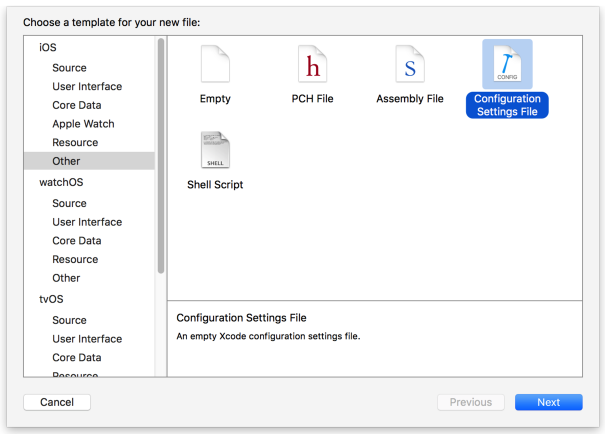
我建立了四個檔案:
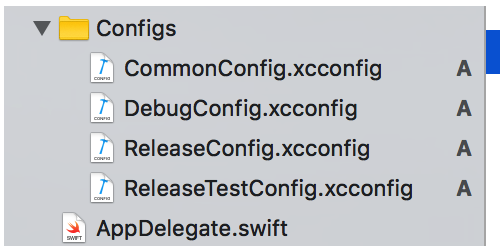
CommonConfig.xcconfig 放共通設定:
BUILD_VERSION = 1.0.0
DebugConfig.xcconfig:
/* 導入公共 config */
#include "CommonConfig.xcconfig"

/* 導入 Pods 對應的 config */
#include "Pods/Target Support Files/Pods/Pods.debug.xcconfig"

APP_DISPLAY_NAME = 測試服
CONFIG_FLAG = DEBUG
ReleaseConfig.xcconfig:
#include "CommonConfig.xcconfig"
#include "Pods/Target Support Files/Pods/Pods.release.xcconfig"

APP_DISPLAY_NAME = 正式服
CONFIG_FLAG = RELEASE
ReleaseTestConfig.xcconfig:
#include "CommonConfig.xcconfig"
#include "Pods/Target Support Files/Pods/Pods.releasetest.xcconfig"

APP_DISPLAY_NAME = 預發佈
CONFIG_FLAG = RELEASE_TEST
其中 #include "Pods/Target Support Files/..." 的路徑可能因專案名稱而異。若不確定,重新執行一次 pod install,CocoaPods 會在訊息中提示正確路徑:
[!] CocoaPods did not set the base configuration of your project because your project
already has a custom config set. In order for CocoaPods integration to work at all,
please either set the base configurations of the target configTest to
Pods/Target Support Files/Pods/Pods.debug.xcconfig
or include the Pods/Target Support Files/Pods/Pods.debug.xcconfig in your build configuration.
接著回到專案設定,把每個 configuration 對應到剛剛建立的檔案:
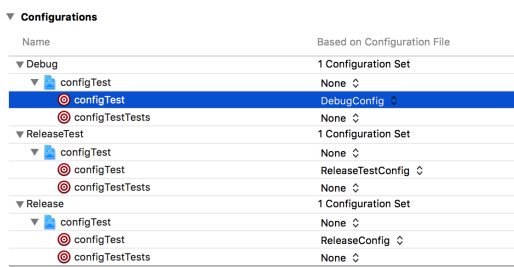
步驟三:設定環境變數
在 Info.plist 中把 Bundle display name 設為:
${APP_DISPLAY_NAME}這樣 App 名稱就會依環境自動變化——測試包和正式包在手機上不會長得一模一樣,也就不會裝錯。

讓程式碼依環境取不同值
Objective-C 專案:Project → Build Settings → Apple LLVM - Preprocessing,在 Preprocessor Macros 加入:
${CONFIG_FLAG}=1
Swift 專案:Project → Build Settings → Swift Compiler - Custom Flags,在 Other Swift Flags 加入:
-D ${CONFIG_FLAG}
之後就能在程式碼中這樣寫:
struct AppConfig {

    private enum AppConfigType {
        case Debug
        case Release
        case ReleaseTest
    }

    private static var currentConfig: AppConfigType {
        #if DEBUG = 1
            return .Debug
        #elseif RELEASE_TEST = 1
            return .ReleaseTest
        #else
            return .Release
        #endif
    }

    static var webServerURL: String {
        switch currentConfig {
        case .Debug:
            return "test url"
        default:
            return "release url"
        }
    }
}
其他需要依環境切換的變數(第三方 SDK 的 key、支付憑證、日誌等級等)都能用同樣方式處理。
步驟四:建立多個 Scheme 方便切換
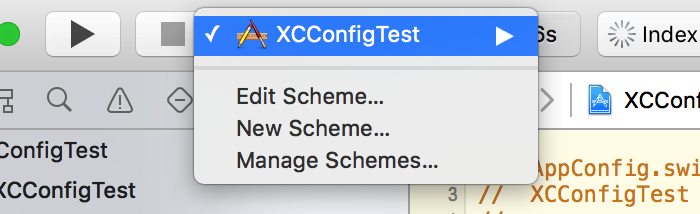
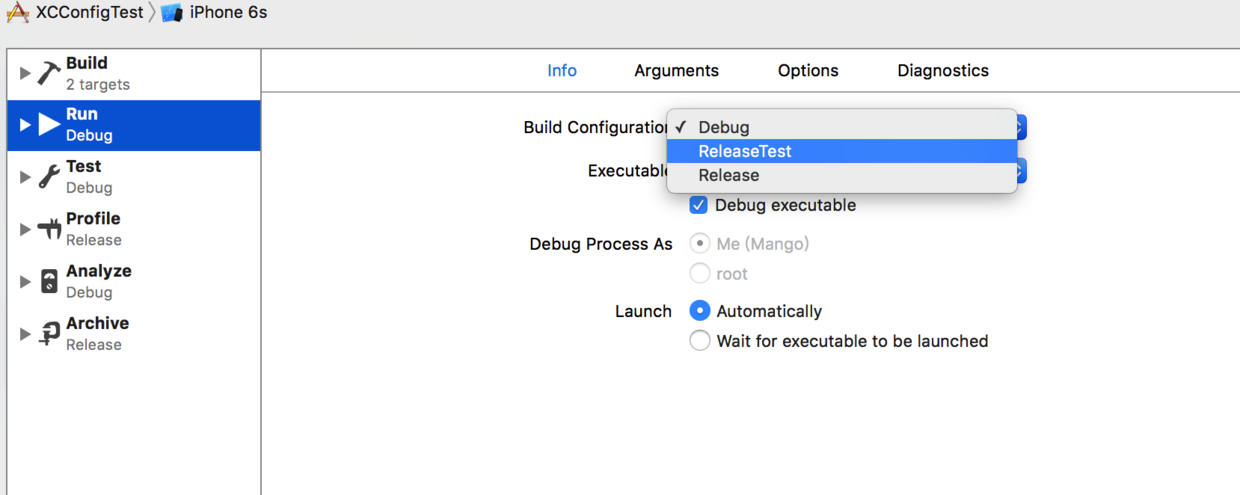
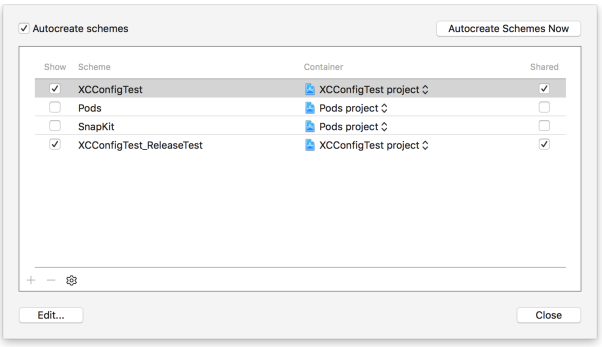
在 scheme 中改變 build configuration 即可切換環境,也可以複製出多個 scheme,讓左上角的下拉選單直接變成環境切換器。


重要:新增的 scheme 必須在 Manage Schemes 中勾選 Shared,否則它只存在於你的本機設定,Git 上的其他同事看不到。
幾個實務提醒
敏感設定不要進 Git。第三方 SDK 的付費憑證、正式環境的 API 金鑰寫進 xcconfig 並提交後,等於公開給所有有倉庫權限的人。這類值建議走 CI 環境變數或 .gitignore 排除的本地檔案。
為不同環境設定不同的 Bundle Identifier。只改顯示名稱的話,測試包與正式包仍無法同時安裝在同一台機器上。把 Debug 系列的 bundle id 加上後綴,就能並存互不打擾,除錯時方便很多。
xcconfig 有繼承順序規則。Target 層級的設定會覆寫專案層級,而 #include 的內容可被後續同名列重新排列。遇到「明明設了卻沒生效」,優先檢查是不是被別處覆寫了。
Demo 與延伸閱讀
可參考 XCConfig 的範例專案,以及「手把手教你給一個 iOS app 配置多個環境變量」這類延伸教學。