
iOS 預加載實戰:從 Threshold 到 ASDK 的智能預加載
前兩次分享分別談了 ASDK 對渲染的優化,以及 ASDK 中的另一套布局模型。這兩個機制各自解決了 iOS 在主執行緒渲染視圖、以及 Auto Layout 的效能問題。這一次要談的,是 ASDK 如何提前向伺服器要資料,做出「看似無限滾動」的體驗。
本文是 ASDK 系列的最後一篇。除了 ASDK 的智能預加載,我也會先介紹幾種常見的預加載做法,方便你橫向比較,挑一個適合自己專案的機制。
網路與效能
靠著渲染與布局上的優化,ASDK 已經能讓應用在使用者瘋狂操作的情況下穩定維持 60 FPS——也就是說,設備的效能已被榨得很乾淨。
但只優化 CPU 與 GPU 是遠遠不夠的。今天的軟體很難找到一個完全沒有網路請求的應用,連記帳軟體都要靠伺服器同步資料以防遺失。所以只在渲染層做優化,體驗不可能到頂,因為網路請求往往是一個應用最耗時、也最昂貴的操作。

把應用看成 CPU 在底層瘋狂做加減法,那麼最耗時的環節其實不是運算本身,而是資源的搬運。
打個不太嚴謹的比方:主廚(CPU)炒一道菜(計算)花不了多少時間,真正耗時的是食材採購與備料(資源搬運)。如果每次開火前幫廚(緩存)已經把食材備齊,出菜速度自然快得多。
而提升資源搬運效率的最佳手段,就是多級緩存:
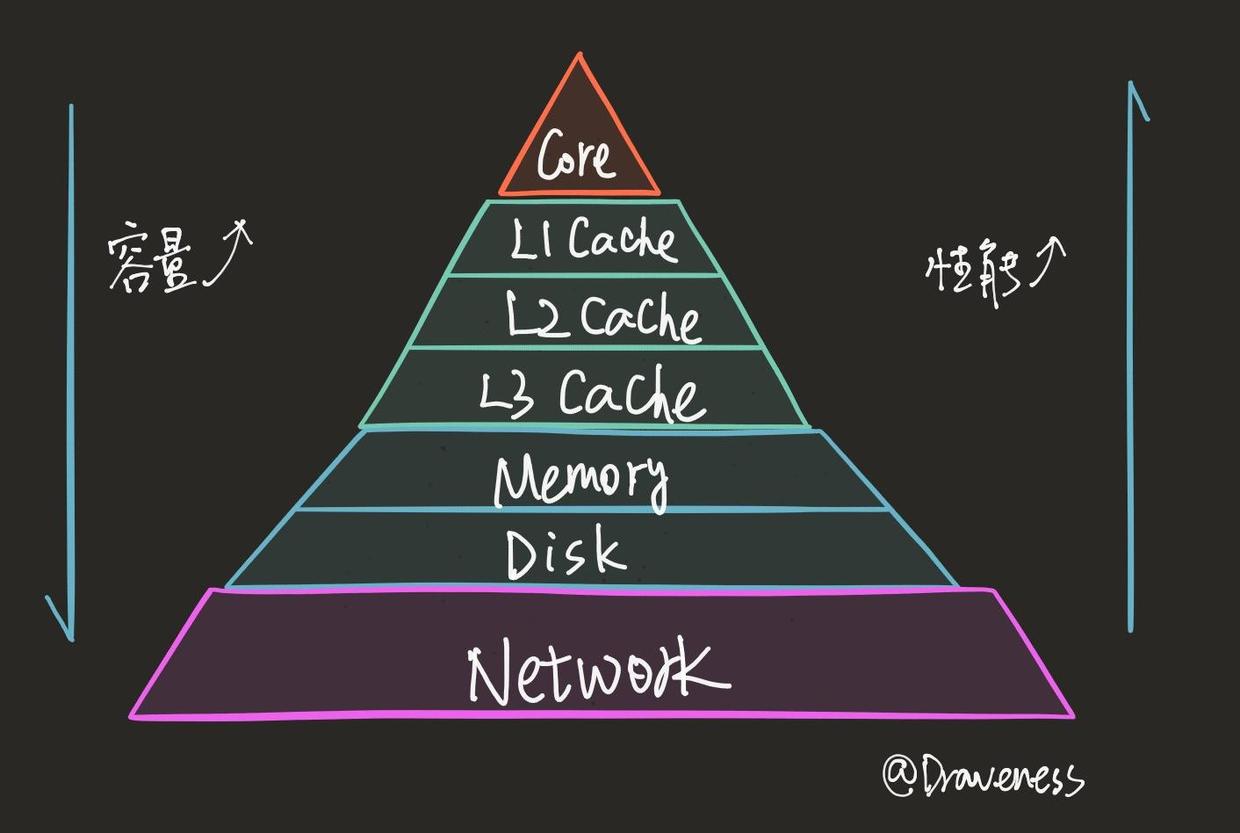
由上而下,容量一路變大,直到 Network 這一層幾乎涵蓋整個網際網路,但存取延遲也直線上升。Core 或三級緩存中的資料可能只需幾個到幾十個時鐘週期,而網路資源的等待時間則遠超這個量級,幾分鐘、幾小時都有可能。
更糟的是,複雜的網路環境(DNS 劫持、404 無法存取等)讓問題雪上加霜。如何加速網路請求,成了行動端與 Web 應用共同的重要課題。
預加載的四種做法
本文要談的方案是預加載:在介面真正需要渲染之前,就透過網路把資源拉進記憶體或磁碟。
預加載不能徹底解決網路慢的問題,它只是把請求提前,從而緩解這個問題。
討論預加載,其實離不開兩個關注點:預加載哪些資源,以及什麼時候發出預加載請求。以下四種方案,都圍繞這兩點展開:
- 無限滾動列表
- Threshold
- 惰性加載
- 智能預加載
無限滾動列表
嚴格說,無限滾動列表並不算預加載,它只是一種分頁顯示方式:每次滾到 UITableView 底部才發請求。放在這裡是作為對照組,看看完全不做預加載時,體驗是什麼樣。

很多客戶端就是這樣做的。這種方式並非不可接受,只是每次滑到底都要等一次網路往返,對流暢度的傷害確實存在。
不過,「讓使用者等幾秒」在某些時刻反而是資產——比如投放廣告。

QQ 空間就是這個思路:廣告基本都放在整個列表的最底端,等你滑到最下面,就能看到你「急需」的租房、租車、同城交友、辦信用卡、只有 iPhone 能玩的遊戲,以及各種奇妙的廣告,簡直完美地解決了日常生活中的種種需求。
Threshold
用門檻值做預加載是最常見的做法,知乎客戶端就是這一類。原理很簡單:用當前 UITableView 的位置除以整個 contentView 的高度,判斷是否該發請求。
let threshold: CGFloat = 0.7
var currentPage = 0

override func scrollViewDidScroll(_ scrollView: UIScrollView) {
    let current = scrollView.contentOffset.y + scrollView.frame.size.height
    let total = scrollView.contentSize.height
    let ratio = current / total
    if ratio >= threshold {
        currentPage += 1
        print("Request page \(currentPage) from server.")
    }
}
上面這段程式碼在頁面滑過 70% 時就發請求。但只有一個問題:當列表很長時會非常明顯。假設使用者一路下滑,共載入了 5 頁:
- Page:當前總頁數
- Total:當前
UITableView的總元素數 - Threshold:網路請求的觸發時機
- Diff:最新一頁實際被瀏覽的比例
門檻設為 70% 時,它指的是「整個列表的 70%」而不是「單頁的 70%」,於是新載入的頁面還沒被看過,應用就已經發出下一次請求了。
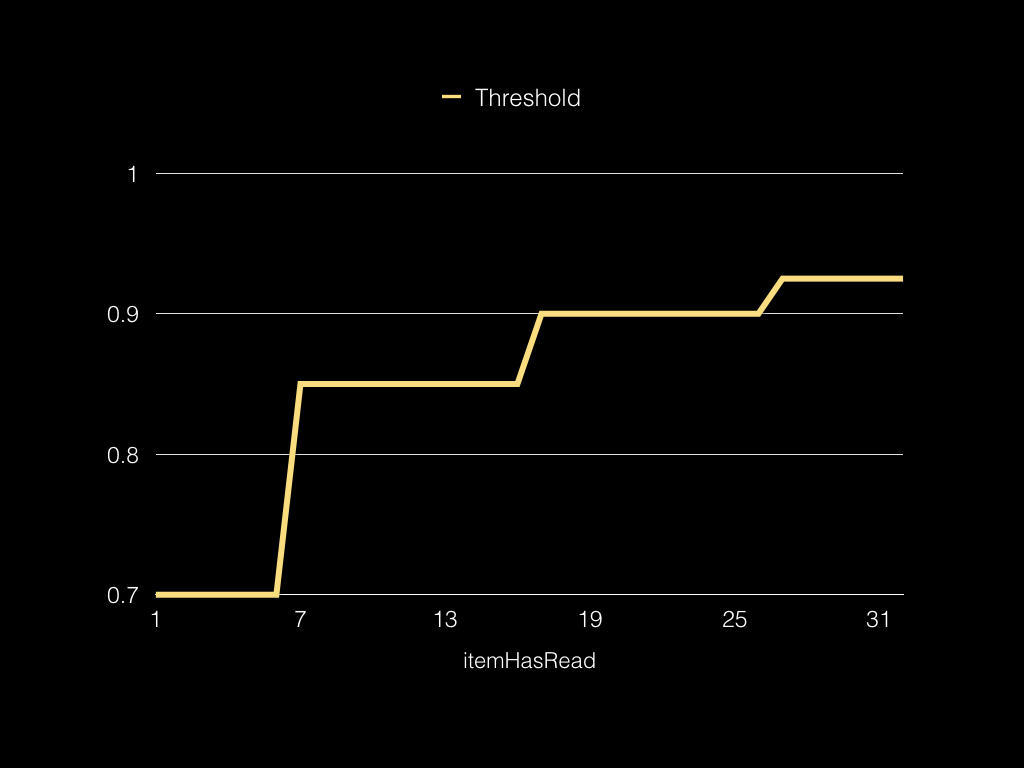
動態門檻
解法並不難:讓門檻隨頁數增長而變化。
let threshold: CGFloat = 0.7
let itemPerPage: CGFloat = 10
var currentPage: CGFloat = 0

override func scrollViewDidScroll(_ scrollView: UIScrollView) {
    let current = scrollView.contentOffset.y + scrollView.frame.size.height
    let total = scrollView.contentSize.height
    let ratio = current / total

    let needRead = itemPerPage * threshold + currentPage * itemPerPage
    let totalItem = itemPerPage * (currentPage + 1)
    let newThreshold = needRead / totalItem

    if ratio >= newThreshold {
        currentPage += 1
        print("Request page \(currentPage) from server.")
    }
}
這樣算出的 newThreshold 會隨頁數動態變化,上面那個問題也就消解了:
惰性加載
門檻法已經能覆蓋大多數場景。但惰性加載更進一步:它有針對性地只載入使用者「真的會看到」的 Cell。
惰性加載的思路是:在使用者滾動時計算出滾動將要停下的區域,只載入該區域內的資源。
使用者快速滑動時,會掠過大量空白條目。既然他並不打算閱讀這些內容,我們也就不必真的去載入它們,只需在 ASTableView/ASCollectionView 中依據滾動的目標區域惰性載入。

這樣做不僅省下了冗餘的網路請求,也省下了視圖渲染與資料綁定的時間。
目標區域可以透過下面的代理方法取得:
let markedView = UIView()
let rowHeight: CGFloat = 44.0

override func scrollViewWillEndDragging(_ scrollView: UIScrollView,
                               withVelocity velocity: CGPoint,
                               targetContentOffset: UnsafeMutablePointer) {
    let targetOffset = targetContentOffset.pointee
    let targetRect = CGRect(origin: targetOffset, size: scrollView.frame.size)

    markedView.frame = targetRect
    markedView.backgroundColor = UIColor.black.withAlphaComponent(0.1)
    tableView.addSubview(markedView)

    var indexPaths: [IndexPath] = []
    let startIndex = Int(targetRect.origin.y / rowHeight)
    let endIndex = Int((targetRect.origin.y + tableView.frame.height) / rowHeight)
    for index in startIndex...endIndex {
        indexPaths.append(IndexPath(row: index, section: 0))
    }
    print("\(targetRect) \(indexPaths)")
}
這段程式碼只是粗略算出目標區域內的
IndexPath集合,並不會真的展開新頁面,同時會用淺黑色把目標區域標記出來。
當然,惰性加載不只是客戶端的事。因為需要「載入特定 offset 的資源」,伺服器也必須提供對應的 API 支援。
它雖然精準,但代價是使用者在滑動過程中會看到大量空白條目——這樣的體驗能不能接受,是另一個需要權衡的問題。
智能預加載
終於來到智能預加載。第一次知道 ASDK 能依滾動方向預加載不同數量的內容時,我覺得相當神奇。
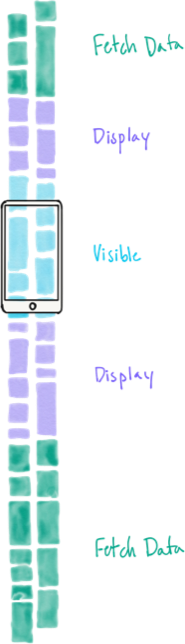
如上圖,ASDK 把正在滾動的 ASTableView/ASCollectionView 劃分為三種狀態:
- Fetch Data
- Display
- Visible
這三種狀態都由 ASDK 管理,每個 ASCellNode 的狀態由 ASRangeController 控制,並對應到一個 ASInterfaceState:
ASInterfaceStatePreload:元素即將顯示到螢幕上,需要從磁碟或網路取資料;ASInterfaceStateDisplay:元素很可能變成可見,需要進行非同步繪製;ASInterfaceStateVisible:元素至少在螢幕上顯示了 1px。
使用者滾動時,ASRangeController 會修改不同區域內元素的狀態:
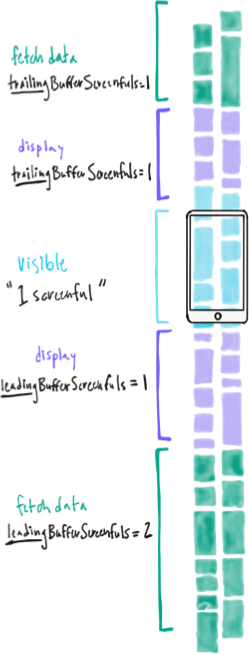
上圖是向下滑動時 ASCellNode 的標記方式。假設當前可見範圍的高度為 1,預設情況下五個區域這樣劃分:
在滾動方向(Leading)上,Fetch Data 區域是非滾動方向(Trailing)的兩倍;ASDK 會依滾動方向的變化即時調整緩衝區位置。向下滑時下方 Fetch Data 是上方的兩倍,向上滑時則相反。
這裡的「兩倍」不是一個固定值。ASDK 會依設備的當前狀態調整各區域大小,但滾動方向的區域總會比非滾動方向更大一些。
智能預加載的價值就在於此:它依當前滾動方向自動調整工作區域,選擇合適的範圍提前觸發資料請求、視圖渲染與非同步布局,讓滾動真正做到流暢。
原理
ASDK 中整個智能預加載由三個部分協同管理:
ASRangeControllerASDataControllerASTableView與ASTableNode
下面按這三塊來拆解。
工作區域的管理
ASRangeController 是 ASTableView 與 ASCollectionView 內部使用的控制器,負責監控可見區域、維護工作區域、觸發網路請求與繪製,以及單元格的非同步布局。
以 ASTableView 為例,滾動時會觸發 scrollViewDidScroll::
- (void)scrollViewDidScroll:(UIScrollView *)scrollView {
    ASInterfaceState interfaceState = [self interfaceStateForRangeController:_rangeController];
    if (ASInterfaceStateIncludesVisible(interfaceState)) {
        [_rangeController updateCurrentRangeWithMode:ASLayoutRangeModeFull];
    }
    ...
}
每個
ASTableView實例都持有一個ASRangeController和一個ASDataController,分別管理工作區域與資料更新。
ASRangeController 最核心的私有方法 _updateVisibleNodeIndexPaths,一般都是被上面這個方法間接調用:
-[ASRangeController updateCurrentRangeWithMode:]
    -[ASRangeController setNeedsUpdate]
        -[ASRangeController updateIfNeeded]
            -[ASRangeController _updateVisibleNodeIndexPaths]
中間的呼叫鏈並不重要,最後這個私有方法的職責是:計算各區域內 Cell 的 NSIndexPath 集合,然後更新對應 Cell 的 ASInterfaceState,觸發相應操作。
先看它的開頭:
- (void)_updateVisibleNodeIndexPaths {
    NSArray *allNodes = [_dataSource completedNodes];
    NSUInteger numberOfSections = [allNodes count];
    NSArray *visibleNodePaths = [_dataSource visibleNodeIndexPathsForRangeController:self];

    ASScrollDirection scrollDirection = [_dataSource scrollDirectionForRangeController:self];
    if (_layoutControllerImplementsSetViewportSize) {
        [_layoutController setViewportSize:[_dataSource viewportSizeForRangeController:self]];
    }
    if (_layoutControllerImplementsSetVisibleIndexPaths) {
        [_layoutController setVisibleNodeIndexPaths:visibleNodePaths];
    }
    ...
}
此時 ASRangeController 的資料源與代理就是 ASTableView,所以程式碼先取出了已完成計算與布局的 ASCellNode,以及可見 Cell 的 NSIndexPath。接著計算 preload 與 display 區域:
- (void)_updateVisibleNodeIndexPaths {
    NSSet *visibleIndexPaths = [NSSet setWithArray:visibleNodePaths];
    NSSet *displayIndexPaths = nil;
    NSSet *preloadIndexPaths = nil;
    NSMutableOrderedSet *allIndexPaths = [[NSMutableOrderedSet alloc] initWithSet:visibleIndexPaths];

    ASLayoutRangeMode rangeMode = _currentRangeMode;
    ASRangeTuningParameters parametersPreload =
        [_layoutController tuningParametersForRangeMode:rangeMode
                                             rangeType:ASLayoutRangeTypePreload];

    if (ASRangeTuningParametersEqualToRangeTuningParameters(parametersPreload, ASRangeTuningParametersZero)) {
        preloadIndexPaths = visibleIndexPaths;
    } else {
        preloadIndexPaths = [_layoutController indexPathsForScrolling:scrollDirection
                                                            rangeMode:rangeMode
                                                            rangeType:ASLayoutRangeTypePreload];
    }
    // displayIndexPaths 的計算與 preloadIndexPaths 非常類似
    [allIndexPaths unionSet:displayIndexPaths];
    [allIndexPaths unionSet:preloadIndexPaths];
    ...
}
預加載與展示用的 ASRangeTuningParameters,是以二維陣列的形式保存在 ASAbstractLayoutController 中的:
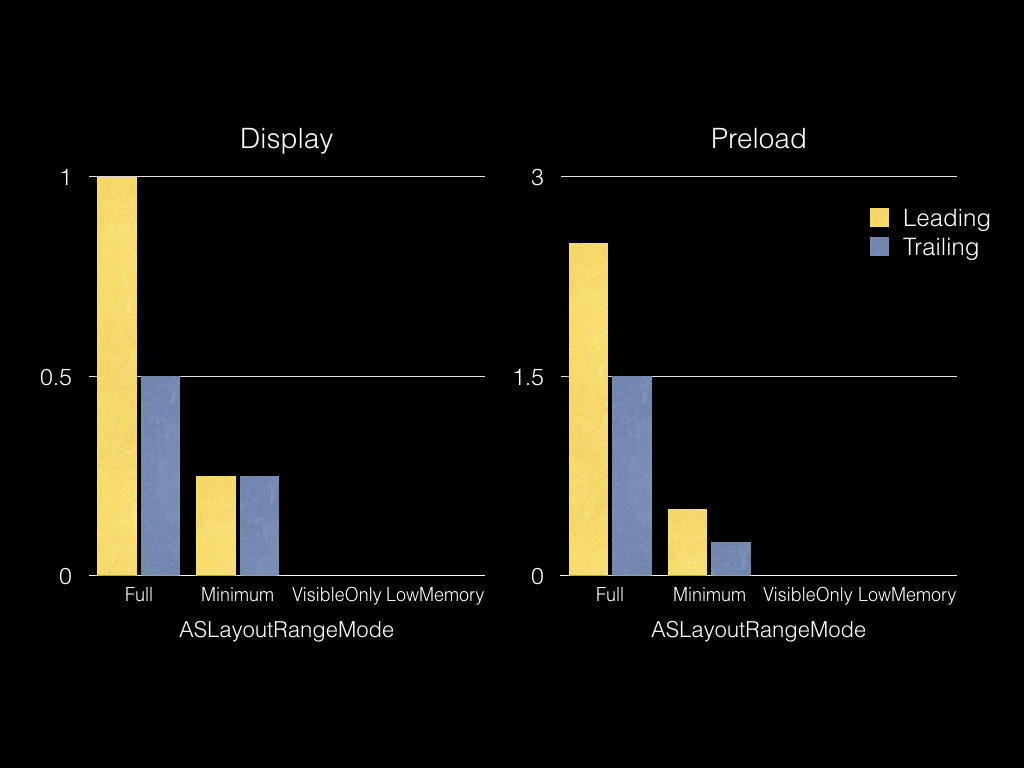
拿到參數之後,ASDK 會透過 ASFlowLayoutController 的 indexPathsForScrolling:rangeMode:rangeType: 取得 NSIndexPath 集合:
- (NSSet *)indexPathsForScrolling:(ASScrollDirection)scrollDirection
                        rangeMode:(ASLayoutRangeMode)rangeMode
                        rangeType:(ASLayoutRangeType)rangeType {
    // 取得 directionalBuffer 與 viewportDirectionalSize
    ASIndexPath startPath = [self findIndexPathAtDistance:
        (-directionalBuffer.negativeDirection * viewportDirectionalSize)
                                  fromIndexPath:_visibleRange.start];
    ASIndexPath endPath = [self findIndexPathAtDistance:
        (directionalBuffer.positiveDirection * viewportDirectionalSize)
                                  fromIndexPath:_visibleRange.end];

    NSMutableSet *indexPathSet = [NSMutableSet set];
    NSArray *completedNodes = [_dataSource completedNodes];

    ASIndexPath currPath = startPath;
    while (!ASIndexPathEqualToIndexPath(currPath, endPath)) {
        [indexPathSet addObject:[NSIndexPath indexPathWithASIndexPath:currPath]];
        currPath.row++;
        while (currPath.row >= [(NSArray *)completedNodes[currPath.section] count]
               && currPath.section < endPath.section) {
            currPath.row = 0;
            currPath.section++;
        }
    }
    [indexPathSet addObject:[NSIndexPath indexPathWithASIndexPath:endPath]];
    return indexPathSet;
}
邏輯很直白:依 ASRangeTuningParameters 算出該滾動方向上的緩衝區大小,在區域內遍歷所有 ASCellNode,落在範圍內的就加入集合。
至此,visibleIndexPaths、displayIndexPaths、preloadIndexPaths 三個集合都準備好了,接下來就是遍歷並更新節點狀態:
- (void)_updateVisibleNodeIndexPaths {
    ...
    for (NSIndexPath *indexPath in allIndexPaths) {
        ASInterfaceState interfaceState = ASInterfaceStateMeasureLayout;
        if (ASInterfaceStateIncludesVisible(selfInterfaceState)) {
            if ([visibleIndexPaths containsObject:indexPath]) {
                interfaceState |= (ASInterfaceStateVisible | ASInterfaceStateDisplay | ASInterfaceStatePreload);
            } else {
                if ([preloadIndexPaths containsObject:indexPath]) {
                    interfaceState |= ASInterfaceStatePreload;
                }
                if ([displayIndexPaths containsObject:indexPath]) {
                    interfaceState |= ASInterfaceStateDisplay;
                }
            }
        }
    }
}
依當前 ASTableView 的狀態,以及 NSIndexPath 落在哪個區域,打開 ASInterfaceState 對應的位元標記。
    NSInteger section = indexPath.section;
    NSInteger row = indexPath.row;
    if (section >= 0 && row >= 0 && section < numberOfSections) {
        if (section != currentSectionIndex) {
            currentSectionNodes = allNodes[section];
            numberOfNodesInSection = [currentSectionNodes count];
            currentSectionIndex = section;
        }
        if (row < numberOfNodesInSection) {
            ASDisplayNode *node = currentSectionNodes[row];
            if (node.interfaceState != interfaceState) {
                BOOL nodeShouldScheduleDisplay = [node shouldScheduleDisplayWithNewInterfaceState:interfaceState];
                [node recursivelySetInterfaceState:interfaceState];
                if (nodeShouldScheduleDisplay) {
                    [self registerForNodeDisplayNotificationsForInterfaceStateIfNeeded:selfInterfaceState];
                    if (_didRegisterForNodeDisplayNotifications) {
                        _pendingDisplayNodesTimestamp = CFAbsoluteTimeGetCurrent();
                    }
                }
            }
        }
    }
這段程式碼會遞歸設定節點的 interfaceState;而當 ASRangeController 的 ASLayoutRangeMode 發生變化時,會發出通知,再次呼叫 _updateVisibleNodeIndexPaths 更新節點狀態。
- (void)scheduledNodesDidDisplay:(NSNotification *)notification {
    CFAbsoluteTime notificationTimestamp =
        ((NSNumber *)notification.userInfo[ASRenderingEngineDidDisplayNodesScheduledBeforeTimestamp]).doubleValue;
    if (_pendingDisplayNodesTimestamp < notificationTimestamp) {
        [[NSNotificationCenter defaultCenter] removeObserver:self
                                                       name:ASRenderingEngineDidDisplayScheduledNodesNotification
                                                     object:nil];
        _didRegisterForNodeDisplayNotifications = NO;
        [self setNeedsUpdate];
    }
}
資料的載入與更新
ASTableNode 既然包裝了 ASTableView,表視圖的資料仍然得由資料源提供,只不過 ASDK 把這套機制做得更複雜:
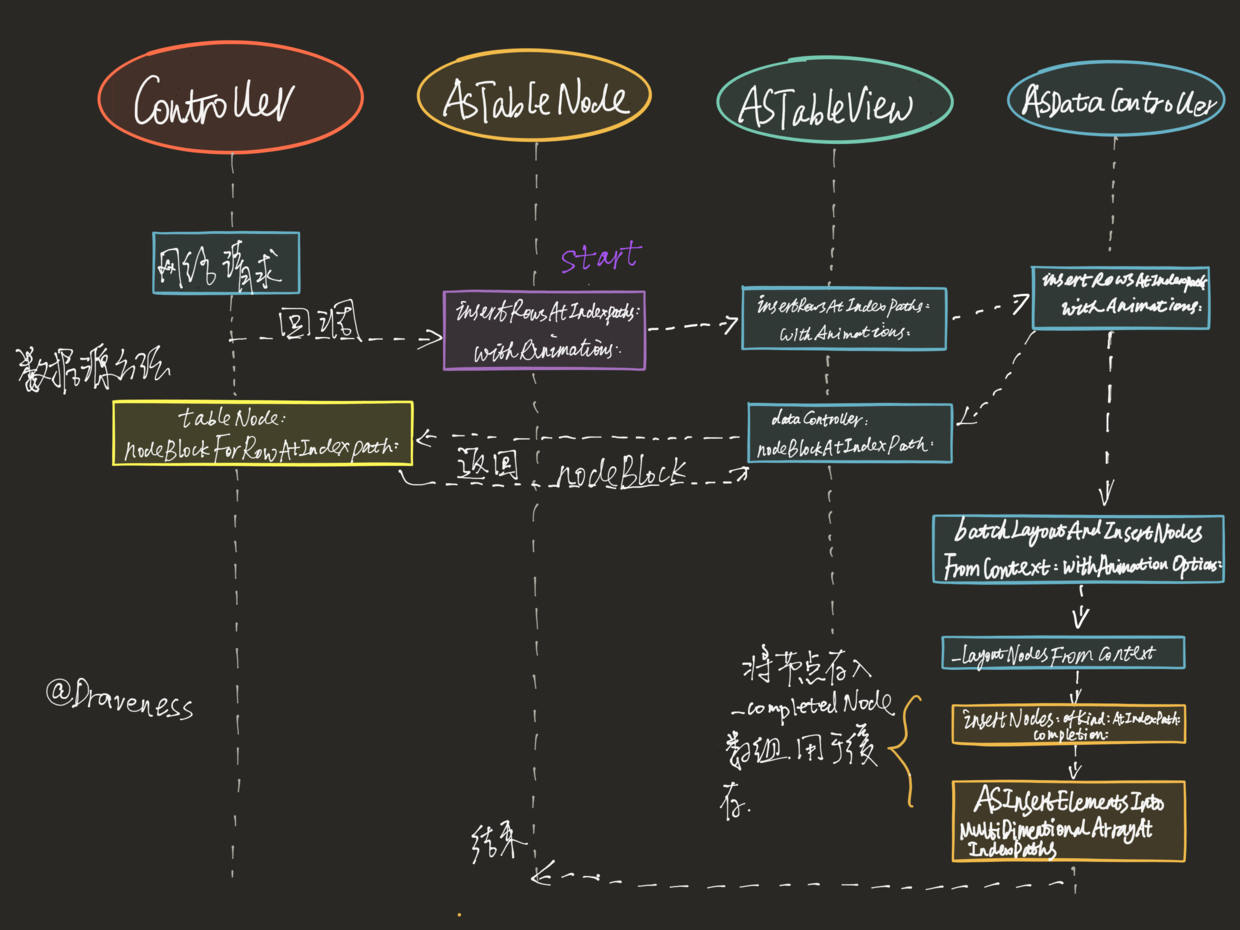
整個流程由四個角色協作:Controller、ASTableNode、ASTableView 與 ASDataController。網路請求返回資料後,會呼叫 ASTableNode 的 API 執行插入行,再由 ASTableView 的同名方法轉交給負責節點資料管理的 ASDataController:
- (void)insertRowsAtIndexPaths:(NSArray *)indexPaths
          withAnimationOptions:(ASDataControllerAnimationOptions)animationOptions {
    dispatch_group_wait(_editingTransactionGroup, DISPATCH_TIME_FOREVER);
    NSArray *sortedIndexPaths = [indexPaths sortedArrayUsingSelector:@selector(compare:)];
    NSMutableArray *contexts = [[NSMutableArray alloc] initWithCapacity:indexPaths.count];

    __weak id environment = [self.environmentDelegate dataControllerEnvironment];
    for (NSIndexPath *indexPath in sortedIndexPaths) {
        ASCellNodeBlock nodeBlock = [_dataSource dataController:self nodeBlockAtIndexPath:indexPath];
        ASSizeRange constrainedSize = [self constrainedSizeForNodeOfKind:ASDataControllerRowNodeKind
                                                            atIndexPath:indexPath];
        [contexts addObject:[[ASIndexedNodeContext alloc] initWithNodeBlock:nodeBlock
                                                                 indexPath:indexPath
                                                      supplementaryElementKind:nil
                                                          constrainedSize:constrainedSize
                                                              environment:environment]];
    }

    ASInsertElementsIntoMultidimensionalArrayAtIndexPaths(_nodeContexts[ASDataControllerRowNodeKind],
                                                          sortedIndexPaths, contexts);

    dispatch_group_async(_editingTransactionGroup, _editingTransactionQueue, ^{
        [self _batchLayoutAndInsertNodesFromContexts:contexts withAnimationOptions:animationOptions];
    });
}
這個方法做了四件事:
- 遍歷所有待插入的
NSIndexPath,從資料源取出對應的ASCellNodeBlock; - 取得每個
NSIndexPath對應的單元大小constrainedSize; - 初始化一批
ASIndexedNodeContext,加入控制器維護的_nodeContexts陣列; - 把節點插入
_completedNodes,供後續緩存與資料源代理方法使用。
ASTableView 會把自己設為資料源代理,最常見的實現長這樣:
- (UITableViewCell *)tableView:(UITableView *)tableView
         cellForRowAtIndexPath:(NSIndexPath *)indexPath {
    _ASTableViewCell *cell = [self dequeueReusableCellWithIdentifier:kCellReuseIdentifier
                                                       forIndexPath:indexPath];
    cell.delegate = self;
    ASCellNode *node = [_dataController nodeAtCompletedIndexPath:indexPath];
    if (node) {
        [_rangeController configureContentView:cell.contentView forCellNode:node];
        cell.node = node;
        cell.backgroundColor = node.backgroundColor;
        cell.selectionStyle = node.selectionStyle;
        cell.clipsToBounds = node.clipsToBounds;
    }
    return cell;
}
元素數量則來自 ASDataController 的 _completedNodes:
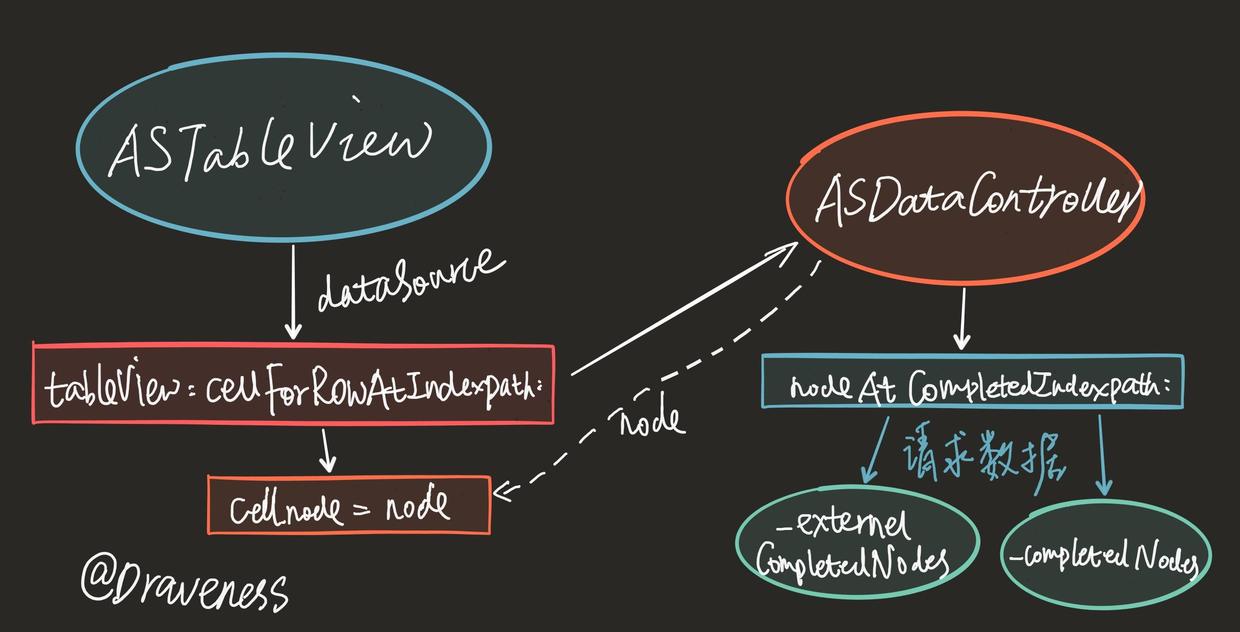
內部的
_externalCompletedNodes與_completedNodes作用基本相同,本文不展開兩者的差異。
當 ASTableView 向資料源索取資料時,ASDK 就從對應的 ASDataController 取回最新的 node,掛到 _ASTableViewCell 上顯示。
ASTableView 與 ASTableNode
兩者的關係,有點像 CALayer 與 UIView——後者都是前者的包裝:
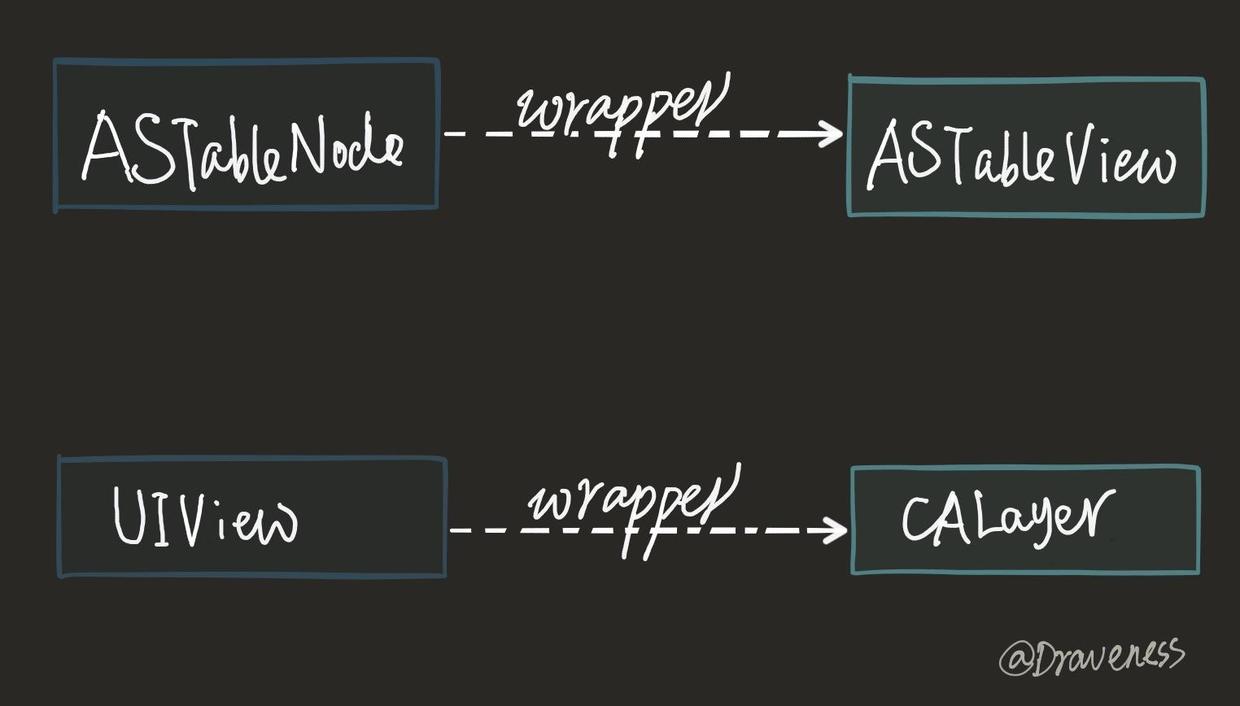
ASTableNode 對外提供了大量介面,內部多半是直接轉調 ASTableView 的對應方法:
- (void)insertSections:(NSIndexSet *)sections withRowAnimation:(UITableViewRowAnimation)animation {
    [self.view insertSections:sections withRowAnimation:animation];
}

- (void)deleteSections:(NSIndexSet *)sections withRowAnimation:(UITableViewRowAnimation)animation {
    [self.view deleteSections:sections withRowAnimation:animation];
}
再往裡看 ASTableView 的實現,你會發現很多方法其實是由 ASDataController 與 ASRangeController 驅動的:
- (void)insertSections:(NSIndexSet *)sections withRowAnimation:(UITableViewRowAnimation)animation {
    if (sections.count == 0) { return; }
    [_dataController insertSections:sections withAnimationOptions:animation];
}

- (void)deleteSections:(NSIndexSet *)sections withRowAnimation:(UITableViewRowAnimation)animation {
    if (sections.count == 0) { return; }
    [_dataController deleteSections:sections withAnimationOptions:animation];
}
從「預加載哪些資源」與「何時發出請求」這兩個維度看,ASDK 在不同工作區域中合理標記了需要預加載的內容,並在節點狀態改變的那一刻就發出請求,體驗上確實相當優秀。
總結
ASDK 的表視圖與智能預加載,是由四個部分共同支撐的:對外只暴露 ASTableNode 的介面,而資料的批量更新、工作區域的管理,全都在幕後由 ASDataController 與 ASRangeController 這兩個控制器協作完成。
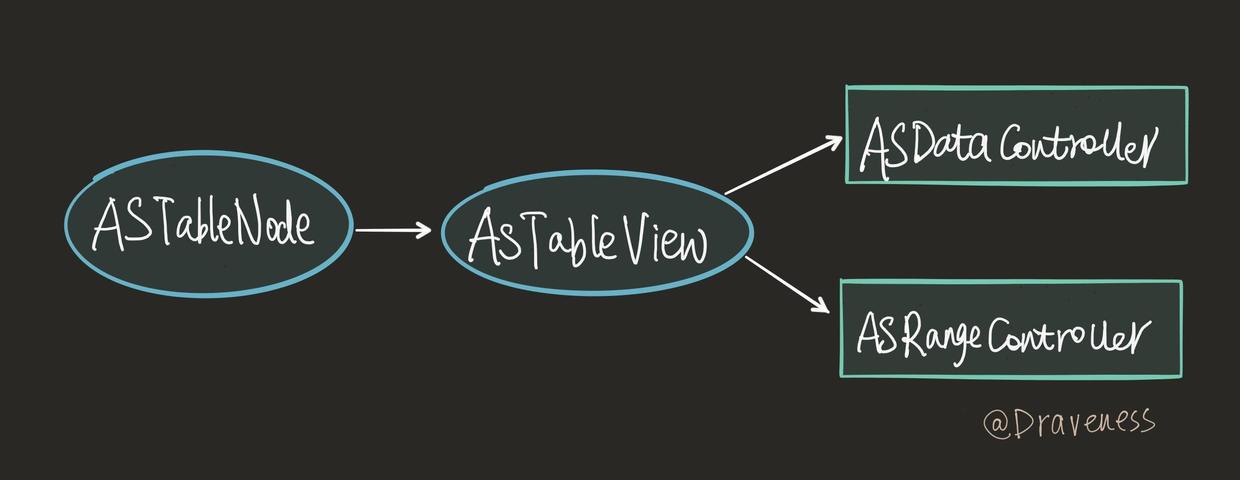
智能預加載的使用成本相對較高,但在我看來,ASDK 對這套機制的實現相當完善,也換來了極好的使用者體驗——代價則是學習曲線。
真要選預加載方案,我建議在 Threshold 與智能預加載之間取捨:
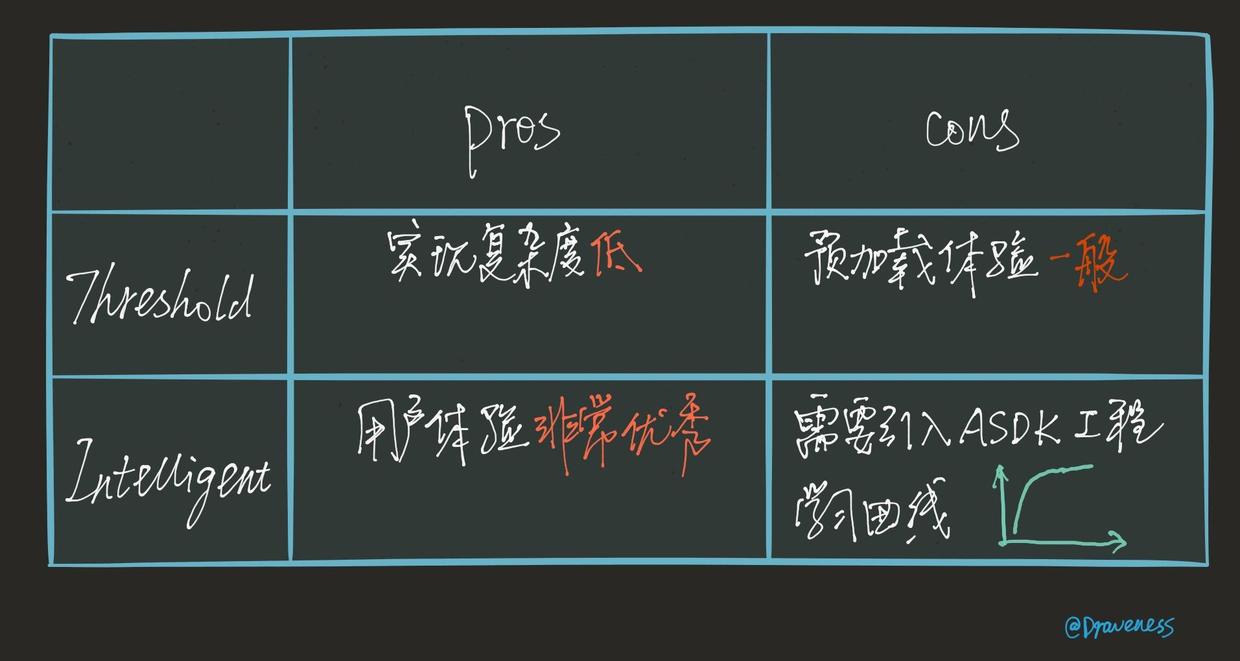
這兩者的選擇,本質上就是「實作複雜度」與「使用者體驗」之間的權衡。