
用 AVPlayer 做遠程音樂播放:十個必踩的技術點

一、前言
這兩天做的小專案涉及遠程音樂播放。因為是第一次碰這類需求,一邊查資料一邊寫,主要涉及的技術點有:
- 如何播放遠程網路音樂
- 如何切換當前正在播放的曲目
- 如何監聽播放器的各種狀態(播放器狀態、播放進度、緩衝進度、播放完成)
- 如何手動控制播放進度
- 如何在後台或鎖屏狀態下持續播放
- 如何在鎖屏介面展示歌曲資訊並遠程操控
如果你正為其中某一項翻資料,希望這篇能給你一些參考。
二、技術方案:AVFoundation 與 AVPlayer
綜合資料與自身經驗,最簡單、最容易上手的方案是 iOS 系統自帶的 AVFoundation 框架。它是 Apple 為多媒體打造的庫,能力很強,專門處理音影片這類複雜場景。本文所有技術點都基於其中的 AVPlayer 類。
AVPlayer 可以理解為一個已封裝好的播放器,用來播放遠端或本地的影片與音訊。本地播放相對簡單,本文聚焦遠程音樂;由於兩者共用同一套 API,掌握了遠程音訊,等於也掌握了遠程影片。
1. 導入框架並建立播放器
- (AVPlayer *)player {
    if (_player == nil) {
        // AVPlayerItem 包裝了音樂資源,初始化時傳入 url
        AVPlayerItem *item = [[AVPlayerItem alloc] initWithURL:[NSURL URLWithString:@"https://xxxxxxxx"]];
        _player = [[AVPlayer alloc] initWithPlayerItem:item];
    }
    return _player;
}
這裡用懶載入把播放器掛成控制器的全域屬性。注意必須強引用,否則被回收之後就再也放不出聲音了。
2. 播放與暫停
[self.player play];   // 開始播放
[self.player pause];  // 停止播放
調用兩個實例方法即可,沒有更多玄機。
3. 切換當前曲目
AVPlayerItem *item = [[AVPlayerItem alloc] initWithURL:[NSURL URLWithString:model.url]];
[self.player replaceCurrentItemWithPlayerItem:item];
上一首、下一首這類切歌行為,就是靠這個方法。
4. 用 KVO 監聽播放器狀態
[self.player.currentItem addObserver:self
                          forKeyPath:@"status"
                             options:NSKeyValueObservingOptionNew
                             context:nil];
拿到播放器的 currentItem,把自己註冊為觀察者,監聽它的 status 屬性。status 是 AVPlayerItemStatus 型別的列舉:
typedef NS_ENUM(NSInteger, AVPlayerItemStatus) {
    AVPlayerItemStatusUnknown,      // 未知狀態
    AVPlayerItemStatusReadyToPlay,  // 準備播放
    AVPlayerItemStatusFailed        // 加載失敗
};
值一旦變化就會觸發回調:
- (void)observeValueForKeyPath:(NSString *)keyPath ofObject:(id)object
                         change:(NSDictionary *)change
                        context:(void *)context {
    if ([keyPath isEqualToString:@"status"]) {
        switch (self.player.status) {
            case AVPlayerStatusUnknown:
                NSLog(@"未知狀態");
                break;
            case AVPlayerStatusReadyToPlay:
                NSLog(@"準備播放");
                break;
            case AVPlayerStatusFailed:
                NSLog(@"加載失敗");
                break;
            default:
                break;
        }
    }
}
只有當 self.player.status == AVPlayerStatusReadyToPlay 時音樂才會正常播放,另外兩種狀態下可以在對應分支給出提示。
這裡要特別強調:被觀察的物件是 self.player.currentItem,而不是 self.player;但回調裡要判斷的卻是 self.player.status。我試過好幾次不這麼寫,結果就是監聽不到狀態變化。
另外,歌曲播完或切歌時,務必記得移除觀察者,否則會 crash:
[self.player.currentItem removeObserver:self forKeyPath:@"status"];
5. 監聽緩衝進度
同樣走 KVO,監聽 AVPlayerItem 的 loadedTimeRanges 屬性:
[self.player.currentItem addObserver:self
                          forKeyPath:@"loadedTimeRanges"
                             options:NSKeyValueObservingOptionNew
                             context:nil];
回調中的計算方式如下:
- (void)observeValueForKeyPath:(NSString *)keyPath ofObject:(id)object
                         change:(NSDictionary *)change
                        context:(void *)context {
    if ([keyPath isEqualToString:@"loadedTimeRanges"]) {
        NSArray *timeRanges = self.player.currentItem.loadedTimeRanges;
        // 本次緩衝的時間範圍
        CMTimeRange timeRange = [timeRanges.firstObject CMTimeRangeValue];
        // 已緩衝總長度
        NSTimeInterval totalLoadTime = CMTimeGetSeconds(timeRange.start) + CMTimeGetSeconds(timeRange.duration);
        // 歌曲總時長
        NSTimeInterval duration = CMTimeGetSeconds(self.player.currentItem.duration);
        // 緩衝百分比
        NSTimeInterval scale = totalLoadTime / duration;
        self.loadTimeProgress.progress = scale;
    }
}
loadedTimeRanges 是一個陣列,元素是本次緩衝的時間範圍。這個範圍用結構體 CMTimeRange 表示,而 OC 的陣列不能直接放結構體,所以被包裝成了 NSValue 物件:
typedef struct {
    CMTime start;     // 本次緩衝的起點
    CMTime duration;  // 本次緩衝持續的時長
} CMTimeRange;
同樣地,播完或切歌時要記得移除觀察者,避免 crash。
6. 監聽播放進度
這一次不用 KVO,AVPlayer 提供了專門的 API:
/**
 監聽音樂播放進度
 @param interval 監聽的時間間隔,決定多久回調一次
 @param queue    隊列,一般傳主隊列
 @param block    回調,會把當前播放時間傳回來
 @return 監聽物件
 */
- (id)addPeriodicTimeObserverForInterval:(CMTime)interval
                                   queue:(nullable dispatch_queue_t)queue
                              usingBlock:(void (^)(CMTime time))block;
使用方式:
__weak typeof(self) weakSelf = self;
self.timeObserver = [self.player addPeriodicTimeObserverForInterval:CMTimeMake(1.0, 1.0)
                                                            queue:dispatch_get_main_queue()
                                                       usingBlock:^(CMTime time) {
    float current = CMTimeGetSeconds(time);       // 當前播放時間
    float total = CMTimeGetSeconds(item.duration); // 總時長
    if (current) {
        float progress = current / total;
        weakSelf.playSlider.value = progress;      // 更新進度條
        weakSelf.currentTime.text = [weakSelf timeFormatted:current];
    }
}];
在 block 裡可以拿到當前播放時間,除以總時長得到比例,再更新介面。這裡又牽涉到 CMTime——一個以分數形式表示時間的結構體:
typedef struct {
    CMTimeValue    value;     // 分子
    CMTimeScale    timescale; // 分母
    CMTimeFlags    flags;     // 位掩碼,標示時間的特定狀態
    CMTimeEpoch    epoch;
} CMTime;
要取秒數,就是分子除以分母;也可以直接用系統函數:
Float64 CMTimeGetSeconds(CMTime time)
播放結束或切歌時,記得移除這個監聽:
if (self.timeObserver) {
    [self.player removeTimeObserver:self.timeObserver];
    self.timeObserver = nil;
}
7. 手動拖動進度條
這是音影片播放的常見功能,AVPlayer 提供了多個 API,這裡只講最簡單的一個:
/** 定位播放時間 @param time 指定的播放時間 */
- (void)seekToTime:(CMTime)time;
- (IBAction)playSliderValueChange:(UISlider *)sender {
    // 根據滑塊值換算成秒
    float time = sender.value * CMTimeGetSeconds(self.player.currentItem.duration);
    [self.player seekToTime:CMTimeMake(time, 1)];
}
8. 監聽播放完成
播放結束時通常要處理一些業務,比如循環播放或自動返回上一頁。做法是把 AVPlayerItem 的完成通知註冊起來:
[[NSNotificationCenter defaultCenter] addObserver:self
                                         selector:@selector(playFinished:)
                                             name:AVPlayerItemDidPlayToEndTimeNotification
                                           object:_player.currentItem];
一曲播完時系統會拋出這個通知,收到後做相應處理即可。
9. 設定後台播放
iOS 上的 App 一旦進入後台就會被凍結,音樂自然也停了。但音樂類 App 屬於被允許後台執行的特例——只不過「在 App 裡放了音樂」並不等於「後台能高枕無憂」,你還得做兩件事。
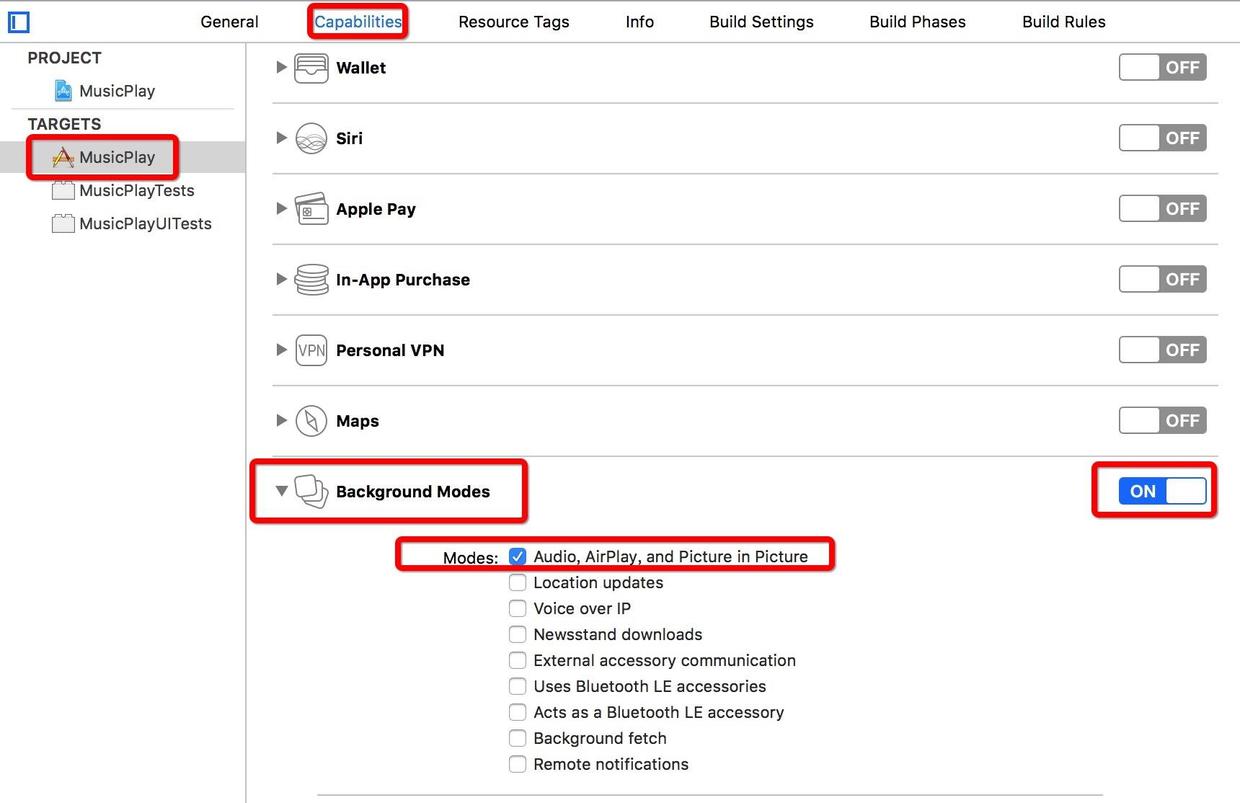
(1)開啟後台模式:Target → Capabilities → Background Modes → 打開開關 → 勾選 Audio, AirPlay, and Picture in Picture。
(2)在啟動時設定音訊工作階段,一般放在 application:didFinishLaunchingWithOptions: 裡:
AVAudioSession *session = [AVAudioSession sharedInstance];
[session setCategory:AVAudioSessionCategoryPlayback error:nil]; // 類型設為播放
[session setActive:YES error:nil];                              // 啟用工作階段
這兩步都設定好,App 進入後台後就能繼續播放。
10. 鎖屏資訊與遠程操控
我們用音樂 App 時,鎖屏介面上依然能看到歌曲資訊、封面,還能直接切歌。實作如下:
- (void)setupLockScreenInfo {
    // 1. 取得鎖屏資訊中心
    MPNowPlayingInfoCenter *playingInfoCenter = [MPNowPlayingInfoCenter defaultCenter];
    NSMutableDictionary *playingInfoDict = [NSMutableDictionary dictionary];

    // 2. 歌曲名與歌手名
    if (self.currentModel.name) {
        [playingInfoDict setObject:self.currentModel.name forKey:MPMediaItemPropertyAlbumTitle];
    }
    if (self.currentModel.artist) {
        [playingInfoDict setObject:self.currentModel.artist forKey:MPMediaItemPropertyArtist];
    }

    // 3. 封面圖
    UIImage *image = [self getMusicImageWithMusicId:self.currentModel];
    if (image) {
        MPMediaItemArtwork *artwork = [[MPMediaItemArtwork alloc] initWithImage:image];
        [playingInfoDict setObject:artwork forKey:MPMediaItemPropertyArtwork];
    }

    // 4. 歌曲總時長
    [playingInfoDict setObject:self.currentModel.detailDuration forKey:MPMediaItemPropertyPlaybackDuration];

    playingInfoCenter.nowPlayingInfo = playingInfoDict;

    // 5. 開啟遠程事件接收,否則無法遠程操控
    [[UIApplication sharedApplication] beginReceivingRemoteControlEvents];
}
這裡有個坑:封面圖不能用非同步方式載入後再設定,那樣是無效的,所以圖片最好先取得、再賦值。
遠程操控的回調:
- (void)remoteControlReceivedWithEvent:(UIEvent *)event {
    switch (event.subtype) {
        case UIEventSubtypeRemoteControlPlay:
            [self.player play];
            break;
        case UIEventSubtypeRemoteControlPause:
            [self.player pause];
            break;
        case UIEventSubtypeRemoteControlNextTrack:
            [self nextBtnAction:nil];
            break;
        case UIEventSubtypeRemoteControlPreviousTrack:
            [self lastBtnAction:nil];
            break;
        default:
            break;
    }
}
三、總結
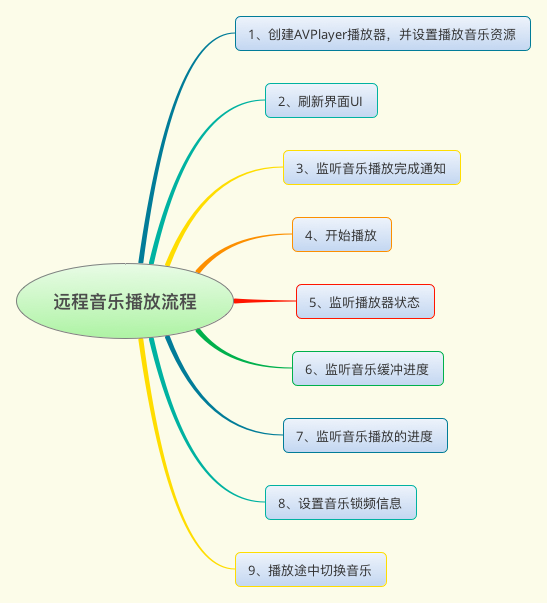
最後畫一張圖,把遠程網路音樂的播放流程串起來:
我照著 QQ 音樂的介面做了一個小 demo,下面是真機的前台與後台播放效果:
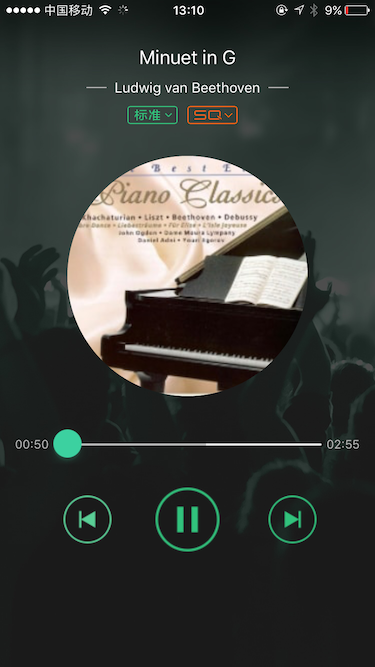
前台播放
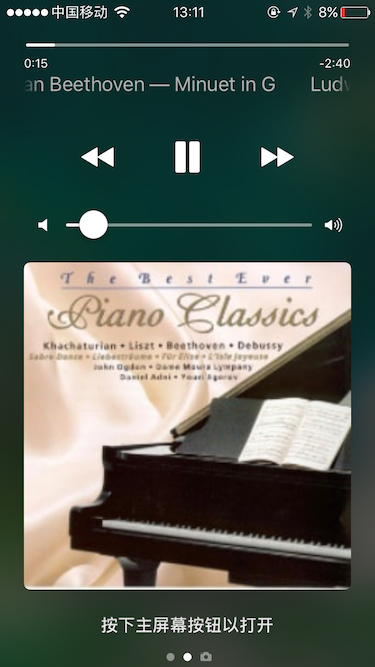
後台播放
GitHub 位址:https://github.com/yedexiong/MsuicPlayDemo.git
四、結語
遠程網路音樂的核心技術點大致寫完了。AVPlayer 還有許多強大能力本文沒能涵蓋,有興趣可以自己往下挖。寫到這裡已經疲憊至極,如果對你有幫助,歡迎按讚與關注。