
用 Xcode Server 搭建持續集成並自動部署到 iTunes Connect 實戰

原文:CI AND AUTOMATIC DEPLOYMENT TO ITUNES CONNECT WITH XCODE SERVER
作者:Miguel Revetria
譯者:CocoaChina——劉行知
這篇文章分享了我們在 Xmartlabs 用 Xcode Server 做持續集成、並自動部署到 iTunes Connect 的實踐經驗,以及踩過的坑。我把解決過程記錄下來,希望幫到遇到類似問題的人。
網上講如何安裝 Xcode Server、創建集成 bot、在 Xcode 裡查看集成結果(問題追蹤、測試覆蓋率等)的文章已經很多。但當你想玩點更複雜的東西時,往往會撞上一堆連錯誤描述都搜不到的問題。
為什麼要自建 CI 服務器
CI 服務器的好處幾乎人盡皆知:自動做靜態分析、跑單元和 UI 測試、構建項目。代碼出問題時,它會把結果通知到引入問題的那個人。Xcode bot 會記錄每次集成的所有新問題與已解決問題;對於新問題,還會列出可能導致問題的一系列提交。
此外,我們不再需要手動折騰部署環境的證書和配置文件,團隊裡任何人都能輕鬆發布新版本。
總的來說,這讓程序員把時間花在功能開發上,而不是集成和部署上,同時把代碼質量風險壓到最低。
安裝 Xcode Server
蘋果官方的《Xcode Server 和持續集成指南》已經把基礎知識講得很清楚,這裡不再重複。
Cocoapods 與 Fastlane
裝好並啟用 Xcode Server 後,下一步是安裝 Cocoapods 和 Fastlane。Fastlane 能幫我們自動化構建、上傳到 iTunes Connect 等一系列重複勞動。
為了避免權限問題,我們只為構建者用戶(builder user)安裝 gem,使用 gem install --user-install。同時要創建符號鏈接,讓 bot 運行時能訪問 Cocoapods 和 Fastlane 的二進制文件。
開始之前,先把 ruby 的 bin 目錄加入構建者的 PATH(版本號請按你系統的 ruby 版本調整):
# It may change depending on the ruby's version on your system
export PATH="$PATH:/var/_xcsbuildd/.gem/ruby/2.0.0/bin"
把這行寫進 ~/.bashrc 和 ~/.bash_login,然後開始安裝:
$ sudo su - _xcsbuildd
$ gem install --user-install cocoapods
$ pod setup
$ ln -s `which pod` /Applications/Xcode.app/Contents/Developer/usr/bin/pod

$ gem install --user-install fastlane
$ ln -s `which fastlane` /Applications/Xcode.app/Contents/Developer/usr/bin/fastlane
郵件通知
Xcode Server 有個很好用的功能:根據集成結果給相關人發郵件。比如項目編譯失敗或測試沒通過,bot 會把郵件發給最後一次提交的人。
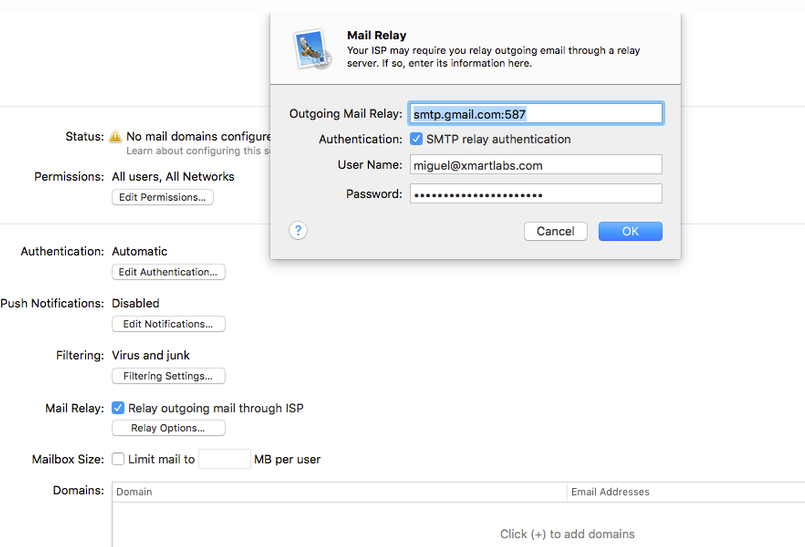
我們用 Gmail 帳號發信,所以需要調整郵件服務設置:先在服務器上啟用郵件服務,勾選「Relay outgoing mail through ISP」,在彈出的對話框中填入 smtp.gmail.com:587,啟用身份驗證並輸入有效憑據。這樣 Xcode Server 就能用你的 Gmail 發郵件了。
創建 bot
Xcode Server 跑起來之後,就可以創建 bot 了。我們為每個項目設立了兩個 bot。
持續集成 bot
它的職責是確保項目能正確構建,並且靜態分析、單元測試和 UI 測試全部通過。每當有 pull request 合入開發分支,它就會被自動觸發,出問題則通知提交者。
創建步驟很簡單:
在 Xcode 項目裡選擇 Product > Create Bot。
跟著向導走就行。設置 git 憑據時可能會卡一下,我們的選擇是創建一個 SSH 密鑰,並讓所有 bot 共用同一把。
集成一次,確認一切正常。
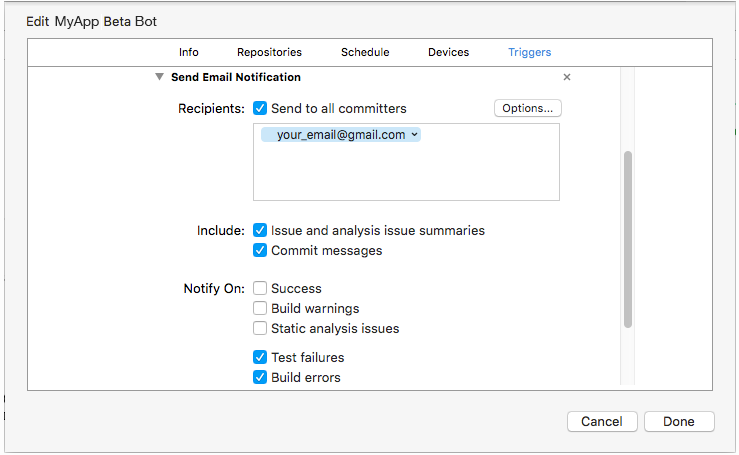
比較貼心的一點是,郵件會發給所有可能導致該問題的提交者,你也可以自行指定額外收件人。
部署型 bot
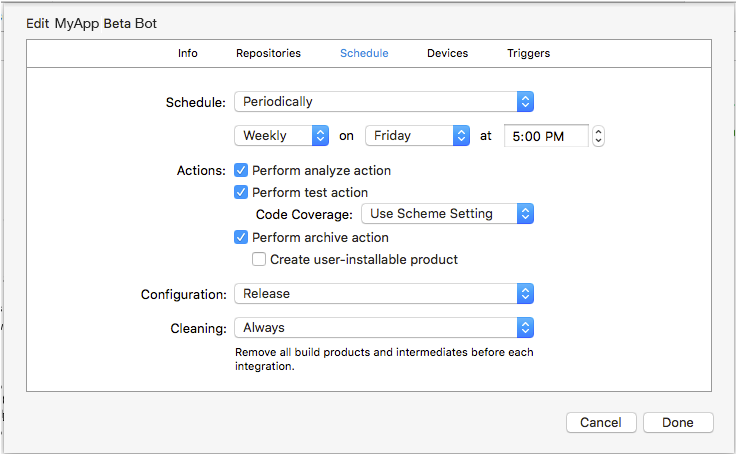
第二個 bot 負責構建並把 IPA 上傳到 iTunes Connect,同時用最新代碼創建並推送新的 git tag,這部分由 Fastlane 完成。由於我們通常每週發一個測試版,所以把它配置成按需運行或每週定時運行。
證書與私鑰
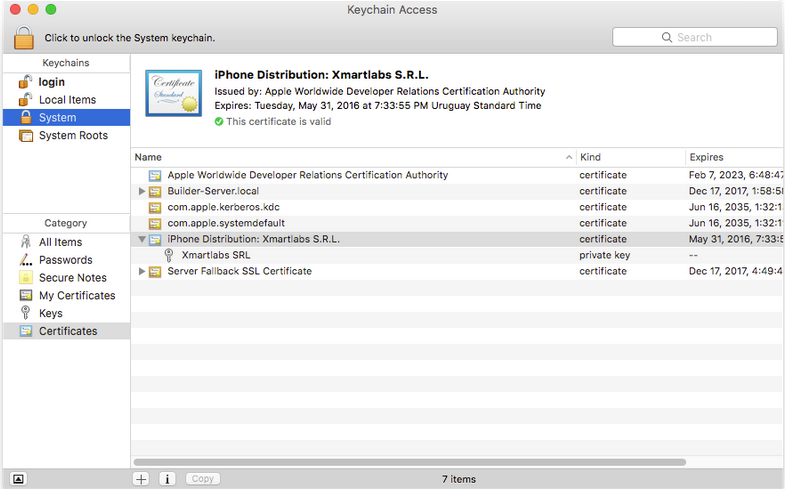
必須確保系統鑰匙串裡已經裝好分發/開發證書及其對應私鑰。
由於 bot 是以 _xcsbuildd 用戶身份運行的,構建 IPA 所需的配置文件必須放到:
/Library/Developer/XcodeServer/ProvisioningProfiles集成前腳本
Xcode 集成允許我們提供集成前和集成後腳本。部署型 bot 開始集成之前,需要執行幾件事:
遞增編譯版本號
下載所需的配置文件
安裝項目依賴庫的正確版本
Fastlane 會從 Appfile 讀取 Apple ID、Bundle Identifier 等信息:
app_identifier "(MY_APP_BUNDLE_ID)"       # The bundle identifier of your app
apple_dev_portal_id "(apple_dev_program_email@server.com)"   # Your Apple email address
itunes_connect_id "(itunes_connect_email@server.com)"

# You can uncomment the lines below and add your own team selection
# in case you are on multiple teams
# team_name "(TEAM_NAME)"
# team_id "(TEAM_ID)"

# To select a team for iTunes Connect use
# itc_team_name "(ITC_TEAM_NAME)"
# itc_team_id "(ITC_TEAM_ID)"
配置文件的下载與安裝由 Fastlane 的 sigh 工具完成,用法很簡單,Appfile 配好之後剩下的交給它:
lane :before_integration do
    # fetch the number of commits in the current branch
    build_number = number_of_commits

    # Set number of commits as the build number in the project's plist file
    # before the bot actually starts building the project.
    set_info_plist_value(
        path: './MyApp-Info.plist',
        key: 'CFBundleVersion',
        value: "#{build_number}"
    )

    # Run `pod install`
    cocoapods

    # Download provisioning profiles and copy them to the correct folder.
    sigh(output_path: '/Library/Developer/XcodeServer/ProvisioningProfiles', skip_install: true)
end
number_of_commits 和 cocoapods 都是 Fastlane 的 action。Appfile 和 Fastfile 都必須放在項目根目錄的 fastlane 文件夾裡。
執行 fastlane before_integration 時,它會連接到 iOS Member Center,依據 Appfile 裡的 bundle id 下載配置說明文件。此外還要把密碼交給 Fastlane,我們通過環境變量 FASTLANE_PASSWORD 傳遞:
$ export FASTLANE_PASSWORD="(APPLE_ID_PASSWORD)"
$ fastlane before_integration
最初我們嘗試用鑰匙串把密碼傳給 sigh,但沒成功,後文會提到。
接著在 bot 的 Triggers 選項卡裡添加一個 before trigger,執行 before_integration lane:
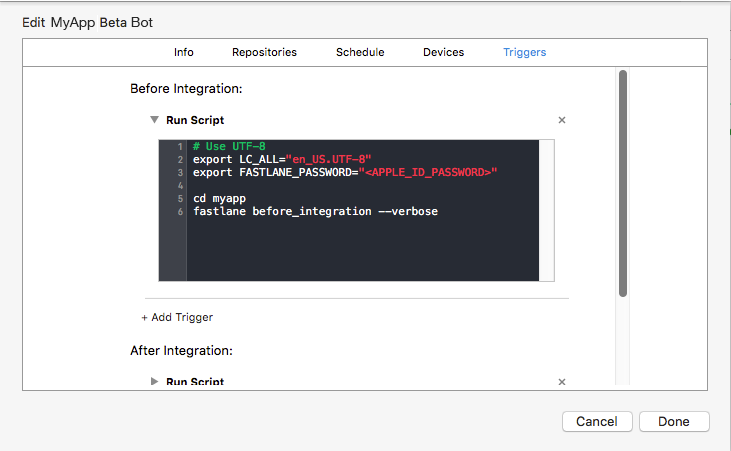
注意:調用 fastlane 之前,我們先切換到了 myapp 文件夾,那是 git 遠程倉庫的名稱。觸發器是在父項目文件夾中運行的。
集成後腳本
bot 完成集成後,我們就能拿到生成的歸檔文件,把它導出為 IPA 並上傳到 iTunes Connect。我們會再寫一個 lane,負責上傳並打 git tag。
先從簡單的開始,暫不上傳:
lane :after_integration do
    plistFile = './MyApp-Info.plist'

    build_number = get_info_plist_value(path: plistFile, key: 'CFBundleVersion')
    version_number = get_info_plist_value(path: plistFile, key: 'CFBundleShortVersionString')

    git_commit(
        path: ["#{plistFile}"],
        message: "Version bump to #{version_number} (#{build_number}) by CI Builder"
    )

    # TODO: upload to iTunes Connect

    add_git_tag(tag: "beta/v#{version_number}_#{build_number}")
    push_to_git_remote
    push_git_tags
end
現在把 IPA 從 bot 生成的歸檔中導出來,並用 Fastlane 的 deliver 上傳:
lane :after_integration do
    plistFile = './MyApp-Info.plist'
    # ...

    ipa_folder = "#{ENV['XCS_DERIVED_DATA_DIR']}/deploy/#{version_number}.#{build_number}/"
    ipa_path = "#{ipa_folder}/#{target}.ipa"
    sh "mkdir -p #{ipa_folder}"

    # Export the IPA from the archive file created by the bot
    sh "xcrun xcodebuild -exportArchive -archivePath \"#{ENV['XCS_ARCHIVE']}\" -exportPath \"#{ipa_path}\" -IDEPostProgressNotifications=YES -DVTAllowServerCertificates=YES -DVTSigningCertificateSourceLogLevel=3 -DVTSigningCertificateManagerLogLevel=3 -DTDKProvisioningProfileExtraSearchPaths=/Library/Developer/XcodeServer/ProvisioningProfiles -exportOptionsPlist './ExportOptions.plist'"

    # Upload the build to iTunes Connect (won't submit for review)
    deliver(
        force: true,
        ipa: ipa_path
    )

    # Keep committing and tagging after export & upload
    # to prevent confirming changes if something went wrong
    add_git_tag(tag: "beta/v#{version_number}_#{build_number}")
    # ...
end
我們沒有直接用 bot 生成 IPA,因為它在觸發器執行期間還不可用;也沒有使用 gym,同樣是鑰匙串權限的問題。
支持多個 Target
我們的項目通常同時有生產環境和多個預發環境 target。每個要上傳到 iTunes Connect 的 target,都需要在 Fastfile 裡有對應的 lane,同時要修改 Appfile,讓不同 lane 使用正確的 app 標識符:
for_platform :ios do
    for_lane :before_integration_staging do
        app_identifier "com.xmartlabs.myapp.staging"
    end
    for_lane :after_integration_staging do
        app_identifier "com.xmartlabs.myapp.staging"
    end
    for_lane :before_integration_production do
        app_identifier "com.xmartlabs.myapp"
    end
    for_lane :after_integration_production do
        app_identifier "com.xmartlabs.myapp"
    end
end

apple_dev_portal_id ""
itunes_connect_id ""
# team_name ""
# team_id ""
設置 apple_dev_portal_id 和 itunes_connect_id,可以讓我們用不同帳號抓取配置文件、分別上傳到 iTunes Connect。
經過一些重構之後,Fastfile 大致長這樣:
require './libs/utils.rb'

fastlane_version '1.63.1'
default_platform :ios

platform :ios do
    before_all do
        ENV["SLACK_URL"] ||= "https://hooks.slack.com/services/#####/#####/#########"
    end

    after_all do |lane|
    end

    error do |lane, exception|
        reset_git_repo(force: true)
        slack(
            message: "Failed to build #{ENV['XL_TARGET']}: #{exception.message}",
            success: false
        )
    end

    desc 'Do basic setup, as installing cocoapods dependencies and fetching profiles, before start integration.'
    lane :before_integration do
        ensure_git_status_clean
        plist_file = ENV['XL_TARGET_PLIST_FILE']
        increase_build_number(plist_file)   # custom action in libs/utils.rb
        cocoapods
        sigh(output_path: '/Library/Developer/XcodeServer/ProvisioningProfiles', skip_install: true)
    end

    desc 'Required tasks before integrate the staging app.'
    lane :before_integration_staging do
        ENV['XL_TARGET_PLIST_FILE'] = './MyAppStaging-Info.plist'
        before_integration
    end

    desc 'Required tasks before build the production app.'
    lane :before_integration_production do
        ENV['XL_TARGET_PLIST_FILE'] = './MyApp-Info.plist'
        before_integration
    end

    desc 'Submit a new Beta Build to Apple iTunes Connect'
    lane :after_integration do
        branch = ENV['XL_BRANCH']
        deliver_flag = ENV['XL_DELIVER_FLAG'].to_i
        plist_file = ENV['XL_TARGET_PLIST_FILE']
        tag_base_path = ENV['XL_TAG_BASE_PATH']
        tag_base_path = "#{tag_base_path}/" unless tag_base_path.nil? || tag_base_path == ''
        tag_link = ENV['XL_TAG_LINK']
        target = ENV['XL_TARGET']

        build_number = get_info_plist_value(path: plist_file, key: 'CFBundleVersion')
        version_number = get_info_plist_value(path: plist_file, key: 'CFBundleShortVersionString')

        ENV['XL_VERSION_NUMBER'] = "#{version_number}"
        ENV['XL_BUILD_NUMBER'] = "#{build_number}"

        tag_path = "#{tag_base_path}release_#{version_number}_#{build_number}"
        tag_link = "#{tag_link}#{tag_path}"

        update_changelog({
            name: tag_path,
            version: version_number,
            build: build_number,
            link: tag_link
        })

        ENV['XL_TAG_LINK'] = "#{tag_link}"
        ENV['XL_TAG_PATH'] = "#{tag_path}"

        sh "git config user.name 'CI Builder'"
        sh "git config user.email 'builder@server.com'"

        git_commit(
            path: ["./CHANGELOG.md", plist_file],
            message: "Version bump to #{version_number} (#{build_number}) by CI Builder"
        )

        if deliver_flag != 0
            ipa_folder = "#{ENV['XCS_DERIVED_DATA_DIR']}/deploy/#{version_number}.#{build_number}/"
            ipa_path = "#{ipa_folder}/#{target}.ipa"
            sh "mkdir -p #{ipa_folder}"
            sh "xcrun xcodebuild -exportArchive -archivePath \"#{ENV['XCS_ARCHIVE']}\" -exportPath \"#{ipa_path}\" -IDEPostProgressNotifications=YES -DVTAllowServerCertificates=YES -DVTSigningCertificateSourceLogLevel=3 -DVTSigningCertificateManagerLogLevel=3 -DTDKProvisioningProfileExtraSearchPaths=/Library/Developer/XcodeServer/ProvisioningProfiles -exportOptionsPlist './ExportOptions.plist'"
            deliver(force: true, ipa: ipa_path)
        end

        add_git_tag(tag: tag_path)
        push_to_git_remote(local_branch: branch)
        push_git_tags

        slack(message: "#{ENV['XL_TARGET']} #{ENV['XL_VERSION_NUMBER']}.#{ENV['XL_BUILD_NUMBER']} successfully released and tagged to #{ENV['XL_TAG_LINK']}")
    end

    desc "Deploy a new version of MyApp Staging to the App Store"
    lane :after_integration_staging do
        ENV['XL_BRANCH'] = current_branch
        ENV['XL_DELIVER_FLAG'] ||= '1'
        ENV['XL_TAG_BASE_PATH'] = 'beta'
        ENV['XL_TARGET_PLIST_FILE'] = './MyApp Staging-Info.plist'
        ENV['XL_TARGET'] = 'MyApp Staging'
        ENV['XL_TAG_LINK'] = 'https://github.com/xmartlabs/MyApp/releases/tag/'
        after_integration
    end

    desc "Deploy a new version of MyApp to the App Store"
    lane :after_integration_production do
        ENV['XL_BRANCH'] = current_branch
        ENV['XL_DELIVER_FLAG'] ||= '1'
        ENV['XL_TARGET_PLIST_FILE'] = './MyApp-Info.plist'
        ENV['XL_TARGET'] = 'MyApp'
        ENV['XL_TAG_LINK'] = 'https://github.com/company/MyApp/releases/tag/'
        after_integration
    end
end
關於這個 Fastfile 的幾點說明:
為生產與預發環境分別定義 before_integration lane,以便 Appfile 設置正確的 app 標識符。
編譯、版本控制與部署操作都封裝在 after_integration lane 裡,讓 staging 和 production 的 lane 只需設置不同參數後內部調用。
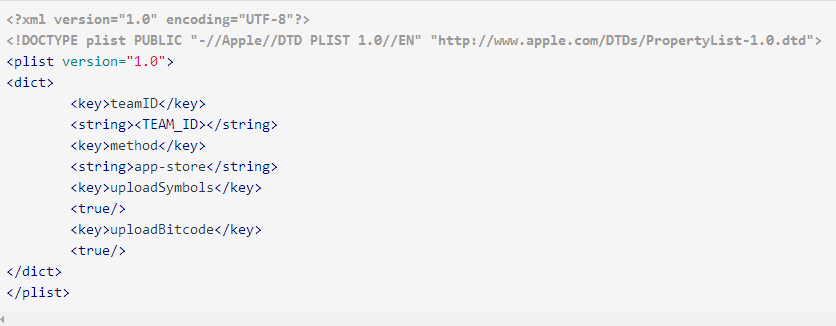
ensure_git_status_clean會檢查 bot 工作目錄是否有改動,有則讓構建失敗,確保工作副本與遠程倉庫完全一致。由於我們會在 after_integration 裡修改本地文件,一旦中途出錯就需要全部重置,所以 error 塊裡加了reset_git_repo。xcrun xcodebuild -exportArchive需要通過-exportOptionsPlist指定配置文件,我們在 fastlane 文件夾裡放了 ExportOptions.plist。
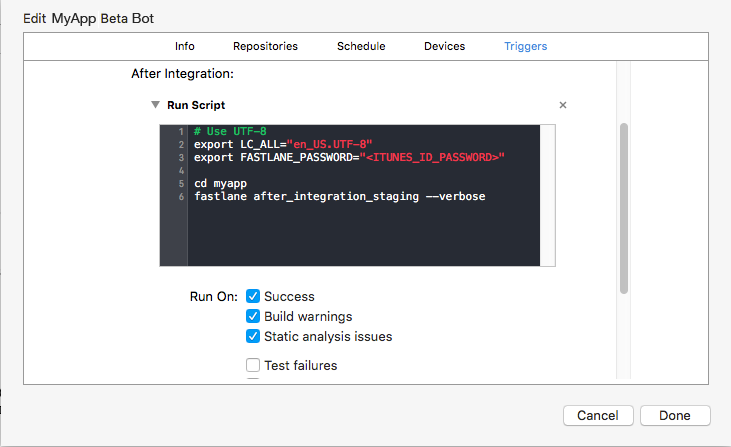
最後一步,添加一個集成後觸發器,執行 after_integration_staging lane:
這些 Fastlane 文件的模板可以在 xmartlabs 的 Fastlane-CI-Files 倉庫裡找到。
故障排除
搭建過程中我們遇到不少網上搜不到答案的問題,於是整理了一份清單,希望能幫到同樣卡住的人。
把開發者密碼傳給 Fastlane 工具
sigh 會嘗試把密碼存到鑰匙串,未提供時再從鑰匙串讀取。但當 sigh 從 bot 觸發器運行時這招不管用,因為觸發器命令無法訪問 bot 用戶的鑰匙串。我們嘗試先解鎖鑰匙串再跑:
# Try to unlock the keychain to be accessed by fastlane actions
$ security -v unlock-keychain -p `cat /Library/Developer/XcodeServer/SharedSecrets/PortalKeychainSharedSecret` /Library/Developer/XcodeServer/Keychains/Portal.keychain

# Will download profiles using sigh
$ fastlane before_integration_staging
結果日誌裡依然報錯,最終我們放棄鑰匙串方案,改成把密碼存為系統環境變量。

CocoaPods 無法更新依賴
[!] Unable to satisfy the following requirements:
- `SwiftDate` required by `Podfile`
- `SwiftDate (= 3.0.2)` required by `Podfile.lock`
Podfile 裡的依賴聲明看起來沒問題,懷疑是 pods 在用戶目錄下更新倉庫時遇到了權限問題。我們的解法是把 CocoaPods 卸掉重裝:
$ sudo rm -fr /var/_xcsbuildd/.cocoapods
$ sudo su - _xcsbuildd
$ gem install --user-install cocoapods
$ pod setup
$ ln -s `which pod` /Applications/Xcode.app/Contents/Developer/usr/bin/pod
Sigh 與 Gym 無法訪問鑰匙串
運行 gym 或 sigh 時會看到類似這樣的報錯:
security: SecKeychainAddInternetPassword: User interaction is not allowed.對策有兩個:
無法讀取存儲的登錄密碼,必須用 FASTLANE_PASSWORD 環境變量把密碼傳給 sigh。
gym 無法訪問鑰匙串裡的分發證書,所以改用
xcrun xcodebuild來生成 IPA。
證書與私鑰
請確認:它們必須安裝在系統鑰匙串中,Xcode Bot 才能訪問;並且在鑰匙串訪問裡修改證書和私鑰的訪問控制,允許 codesign 和 security 這兩個程序讀取。
Xcode Server 裡選不中 Xcode
把 Xcode 升級到 7.2.1 之後,我們能在 Server 裡選中它,但隨後 Xcode 服務被禁用了,再選時會提示「您必須同意 xcode 軟件許可協議的條款」。蘋果論壇的相關討論給出了方案,執行:
$ sudo /Applications/Xcode.app/Contents/Developer/usr/bin/xcscontrol --initialize即可恢復選擇。
IPA not available
編譯完成後,bot 構建的 IPA 會被拷貝到:
/Library/Developer/XcodeServer/IntegrationAssets/$XCS_BOT_ID-$XCS_BOT_NAME/$XCS_INTEGRATION_NUMBER/$TARGET_NAME.ipa但在集成後觸發器跑完之前,它都不可用。
沒有定義 XCS_ARCHIVE
只有當 bot 被設置為執行歸檔操作時,環境變量 XCS_ARCHIVE 才會被定義。
使用自定義 SSH Key
我們需要提交 changelog 和版本號的改動,這要求 _xcsbuildd 用戶對倉庫有訪問權限。如果你更偏好用 SSH 訪問 git 服務器,就需要把有效密鑰放進構建者的 .ssh 目錄。注意這把密鑰不能設置密碼,否則觸發器會停在等待輸入密碼的環節。
切換到構建者身份:
$ sudo su - _xcsbuildd把有效密鑰拷貝到
~/.ssh修改
~/.bash_login,讓密鑰自動加載到 ssh agent:
$ echo 'eval "$(ssh-agent -s)"' >> ~/.bash_login
$ echo 'ssh-add ~/.ssh/id_rsa_github' >> ~/.bash_login
修改
~/.ssh/config,指定訪問倉庫時使用哪把密鑰:
    Host github.com
        HostName github.com
        IdentityFile ~/.ssh/id_rsa_github
這也有助於拉取 git 子模塊。
Invalid Signature
如果上傳到 iTunes Connect 時報類似「Invalid Signature. A sealed resource is missing or invalid.」的錯誤,通常是因為 export archive 命令沒有配置 -exportOptionsPlist 參數。把它加上並確認路徑正確即可。完整錯誤信息如下:
parameter ErrorMessage = ERROR ITMS-90035: "Invalid Signature. A sealed resource is missing
or invalid. Make sure you have signed your application with a distribution certificate,
not an ad hoc certificate or a development certificate. Verify that the code signing
settings in Xcode are correct at the target level (which override any values at the
project level). Additionally, make sure the bundle you are uploading was built using
a Release target in Xcode, not a Simulator target. If you are certain your code
signing settings are correct, choose "Clean All" in Xcode, delete the "build"
directory in the Finder, and rebuild your release target."- 上一篇文章: 設計模式筆記(七):用組合模式統一「菜單」與「菜品」
- 下一篇文章: iOS 腳本打包與持續集成實踐全梳理