程序員的浪漫:寫一個自定義圖片濾鏡生成器
編輯:iOS 開發基礎
前言
女孩子大多喜歡用美圖工具修圖。無事時,我專門給某人寫了個自定義圖片濾鏡生成器,裝到手機上就能用自己的顏色矩陣渲染照片。app 獨一無二,雖簡亦繁。
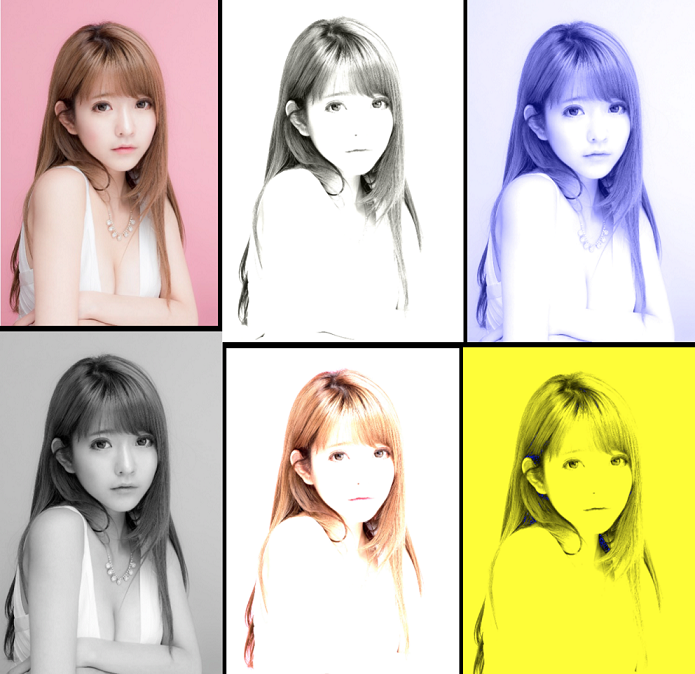
JH 定律:
魔鏡:最漂亮的女人是你老婆。
魔鏡:程序員不是木頭人。
核心技術
圖片濾鏡的基本思路如下:
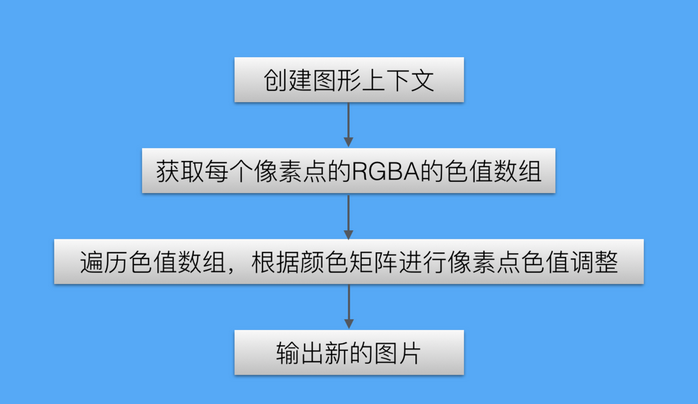
核心技術流程圖
具體實現
一、建立圖像處理工具類
該類提供一個圖像處理方法:傳入原始圖像與一個顏色矩陣,返回處理後的圖像。
@interface JHFeilterManager : NSObject

@property (nonatomic, copy) imageBlock imageBLOCK;

- (UIImage *)createImageWithImage:(UIImage *)inImage colorMatrix:(const float *)f;

@end
二、獲取圖像每個像素點的 RGBA 數組
這個 C 方法返回一個指針,指向一塊數組內存,數組中每四個元素依次對應一個像素的 R、G、B、A 值(0–255)。這裡用 unsigned char,是因為它的取值範圍恰好就是 0–255。
static unsigned char *RequestImagePixelData(UIImage * inImage){
    CGImageRef img = [inImage CGImage];
    CGSize size = [inImage size];

    // 創建 RGBA 位圖上下文
    CGContextRef cgctx = CreateRGBABitmapContex(img);
    CGRect rect = {{0, 0}, {size.width, size.height}};

    // 將目標圖像繪制到指定上下文,本質是寫入上下文內的 bitmapData
    CGContextDrawImage(cgctx, rect, img);

    unsigned char *data = CGBitmapContextGetData(cgctx);

    // 釋放上下文
    CGContextRelease(cgctx);
    cgctx = NULL;

    return data;
}
三、按顏色矩陣調整單個像素的 RGBA
傳入四個數值指針與一個顏色矩陣,就地改寫指針指向的值。
static void changeRGB(int *red, int *green, int *blue, int *alpha, const float *f) {
    int redV   = *red;
    int greenV = *green;
    int blueV  = *blue;
    int alphaV = *alpha;

    // 顏色矩陣重新計算
    *red   = f[0]  * redV   + f[1]  * greenV + f[2]  * blueV   + f[3]  * alphaV  + f[4];
    *green = f[5]  * redV   + f[6]  * greenV + f[7]  * blueV   + f[8]  * alphaV  + f[9];
    *blue  = f[10] * redV   + f[11] * greenV + f[12] * blueV   + f[11] * alphaV  + f[14];
    *alpha = f[15] * redV   + f[16] * greenV + f[17] * blueV   + f[18] * alphaV  + f[19];

    // 邊界裁剪
    *red   < 0   ? (*red   = 0)   : (0);
    *red   > 255 ? (*red   = 255) : (0);
    *green < 0   ? (*green = 0)   : (0);
    *green > 255 ? (*green = 255) : (0);
    *blue  < 0   ? (*blue  = 0)   : (0);
    *blue  > 255 ? (*blue  = 255) : (0);
    *alpha < 0   ? (*alpha = 0)   : (0);
    *alpha > 255 ? (*alpha = 255) : (0);
}
四、遍歷所有像素並逐一調整色值
注意!!!
在下面的方法裡,不要急著釋放 malloc 出來的 bitmapData 內存指針。有些朋友以為把內存地址交給位圖上下文後就能立刻 free,但實際上,後續圖像渲染階段仍然要讀這塊內存,提前釋放會導致位圖上下文數據失效、出圖失敗。
我之前讀過的幾篇博客索性就不釋放了,結果是內存洩漏——處理幾張高清圖時,手機內存輕鬆衝到 1G 以上,App 直接崩潰。正確做法是先用一個全局(或更合理的作用域)指針持有它,並在合適的時機釋放。
該方法傳入原始圖片與顏色矩陣,矩陣決定渲染效果,因此更換矩陣即可得到不同濾鏡。
- (UIImage *)createImageWithImage:(UIImage *)inImage colorMatrix:(const float *)f {
    /* 圖片位圖像素值數組 */
    unsigned char *imgPixel = RequestImagePixelData(inImage);

    CGImageRef inImageRef = [inImage CGImage];
    /* 獲取像素的橫向與縱向個數 */
    long w = CGImageGetWidth(inImageRef);
    long h = CGImageGetHeight(inImageRef);

    int wOff  = 0;
    int pixOff = 0;

    /* 遍歷修改位圖像素值 */
    for (long y = 0; y < h; y++) {
        pixOff = wOff;
        for (long x = 0; x < w; x++) {
            int red   = (unsigned char)imgPixel[pixOff];
            int green = (unsigned char)imgPixel[pixOff + 1];
            int blue  = (unsigned char)imgPixel[pixOff + 2];
            int alpha = (unsigned char)imgPixel[pixOff + 3];

            changeRGB(&red, &green, &blue, &alpha, f);

            imgPixel[pixOff]       = red;
            imgPixel[pixOff + 1]   = green;
            imgPixel[pixOff + 2]   = blue;
            imgPixel[pixOff + 3]   = alpha;

            pixOff += 4;
        }
        wOff += w * 4;
    }

    NSInteger dataLength = w * h * 4;

    // 創建輸出圖像相關參數
    CGDataProviderRef provider = CGDataProviderCreateWithData(NULL, imgPixel, dataLength, NULL);
    if (!provider) {
        NSLog(@"創建輸出圖像相關參數失敗!");
    } else {
        // 每個像素點每個顏色的空間大小,單位 bit
        int bitsPerComponent = 8;
        // 每個像素的空間大小,單位 bit
        int bitsPerPixel = 32;
        // 每一行占用的位元組數
        ItemCount bytesPerRow = 4 * w;
        // 創建 RGBA 色彩空間
        CGColorSpaceRef colorSpaceRef = CGColorSpaceCreateDeviceRGB();
        // 位圖組成信息
        CGBitmapInfo bitmapInfo = kCGBitmapByteOrderDefault;
        // 圖像渲染參數,使用默認值
        CGColorRenderingIntent rederingIntent = kCGRenderingIntentDefault;

        // 創建輸出圖像:寬、高、每分量位數、每行位元組數、色彩空間、位圖信息、數據提供者
        CGImageRef imageRef = CGImageCreate(w, h, bitsPerComponent, bitsPerPixel, bytesPerRow,
                                            colorSpaceRef, bitmapInfo, provider, NULL, NO, rederingIntent);
        if (!imageRef) {
            NSLog(@"創建輸出圖像失敗");
        } else {
            UIImage *my_image = [UIImage imageWithCGImage:imageRef];

            CFRelease(imageRef);
            CGColorSpaceRelease(colorSpaceRef);
            CGDataProviderRelease(provider);

            if (_imageBLOCK) {
                _imageBLOCK(my_image);
            }

            NSData *data = UIImageJPEGRepresentation(my_image, 1.0);
            // 在此釋放位圖內存
            free(bitmap);

            return [UIImage imageWithData:data];
        }
    }
    return nil;
}
五、UI 搭建
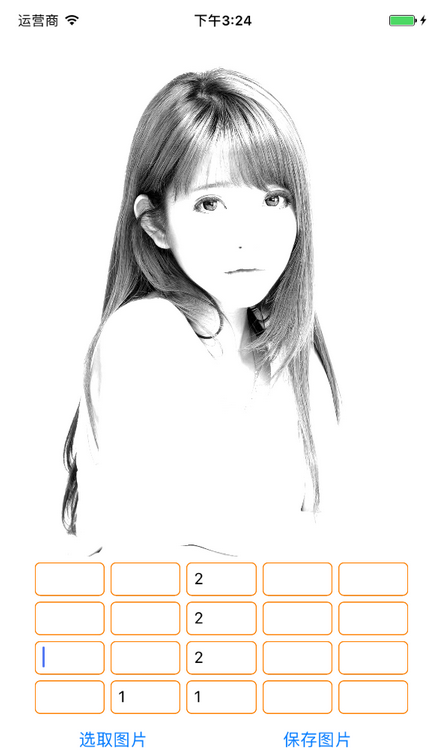
界面非常簡單:一張大圖、20 個顏色矩陣录入框、兩個按鈕,代碼不再贅述。需要的話可以下載 demo 自己試試,覺得不錯順手點個 star。
成果展示
成型的 demo 就是這個樣子: