
iOS 自動布局框架 Masonry 使用指南:從基礎 API 到實戰示例
如今 iOS 開發中,大多數頁面已經轉向 Interface Builder 搭建 UI。但在一些交互變化複雜的頁面,純代碼仍然是更合適的選擇;何況還有不少老項目本身就沿用了純代碼開發的方式。
另一方面,iPhone 與 iPad 的屏幕尺寸越來越多。雖然開發者只需按 point 而非 pixel 布局,但如果每遇到一個尺寸就在代碼裡寫死坐標、層層判斷,維護起來會非常吃力。
所以純代碼做 UI,通常都會搭配自動化布局框架來做屏幕適配。蘋果官方提供的方案有 VFL、UIViewAutoresizing、Auto Layout、Size Classes 等。其中 Auto Layout 使用頻率最高,但它也有明顯短板:直接寫 NSLayoutConstraint 時,代碼量大且高度重複,以至於不少人寧願不用。
後來 GitHub 上出現了基於 NSLayoutConstraint 封裝的第三方框架 Masonry,用起来非常方便。本文就詳細講解 Masonry 的使用。
Masonry 介紹
本文著重介紹 Masonry 的概念與用法,並輔以示例,暫不涉及內部實現原理(鏈式語法的解析留待後續專文)。
什麼是 Masonry
Masonry 是對系統 NSLayoutConstraint 的一層封裝,以鏈式編程的方式對外提供 API。系統 Auto Layout 支持的操作它都支持,功能上有過之而無不及。
鏈式寫法讓代碼讀起來清晰直白,寫完後行數還很少。過去用 NSLayoutConstraint 要寫一大片的布局,用 Masonry 往往一行就能搞定。
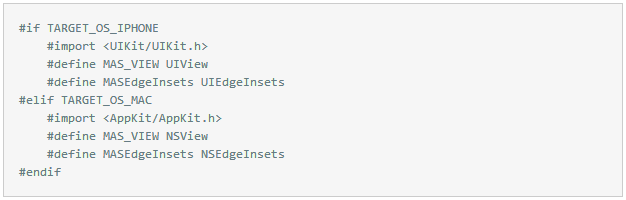
Masonry 同時支持 macOS 與 iOS 兩個平台。在 MASUtilities.h 中可以看到它通過宏定義區分兩個平台各自的關鍵字:
GitHub 地址:https://github.com/SnapKit/Masonry
集成方式
Masonry 支持 CocoaPods,在 Podfile 中加入:
pod 'Masonry'
學習建議
純代碼和 Interface Builder 我都用過,也積累了一些經驗。對初學者而言,我的建議是:先把 Interface Builder 方式的 Auto Layout 學透,體會蘋果對自動布局的規則設計與背後思想,再把這套思想遷移到純代碼上。這樣入手更容易,也能少踩很多坑。
約束的本質是給視圖布局打標記。設置好約束後,運行時系統會依據約束計算 frame 並渲染。因此在純代碼場景下,約束是否正確只能以運行結果和打印的 log 為準。
Masonry 的坑
- 添加約束之前必須先執行 addSubview,否則會崩潰。
- 初學者最常犯的錯誤集中在兩類:約束衝突與約束缺失。這兩種問題都可以通過調試和 log 排查。
- Interface Builder 中約束寫錯會即時以紅色或黃色警告提示,而 Masonry 不會直觀呈現,只能在運行時崩潰或列印異常 log 中發現——這是手寫 Auto Layout 的固有缺點。
唯一的解法還是多寫。純代碼布局的經驗積累起來之後,用起来會越來越順手。
Masonry 基礎用法
常用 API
mas_makeConstraints()   添加約束
mas_remakeConstraints() 移除已有約束,重新添加
mas_updateConstraints() 更新約束

equalTo()               參數為對象類型,一般是視圖對象或 mas_width 這類坐標系對象
mas_equalTo()           功能相同,但參數可傳基礎數據類型,可理解為更強版的 equalTo

width()                 表示寬度,例如代表 view 的寬度
mas_width()             用來獲取值
Auto Boxing
如上所示,equalTo、width 這類方法在某些場景下需要加 mas_ 前綴,開發時要注意區分。
如果在引入 Masonry.h 之前先聲明下面兩個宏,就再也不必糾結前綴:
// 定義這個常量,開發中就不再需要使用 "mas_" 前綴
#define MAS_SHORTHAND

// 定義這個常量,Masonry 會自動把基礎數據類型裝箱為對象類型
#define MAS_SHORTHAND_GLOBALS
修飾語句
為了讓鏈式代碼更易讀,Masonry 額外提供了 and 與 with 兩個方法。它們內部什麼都不做,只是把 self 原樣返回,純粹服務於可讀性,不影響執行:
make.top.and.bottom.equalTo(self.containerView).with.offset(padding);
內部實現就是:
- (MASConstraint *)with {
    return self;
}
更新約束與布局
約束更新相關的四個 API:
- (void)updateConstraintsIfNeeded   若有標記為需要重新布局的約束,則立即重新布局,內部會調用 updateConstraints
- (void)updateConstraints          重寫此方法,在內部實現自定義布局過程
- (BOOL)needsUpdateConstraints     當前是否需要重新布局,內部判斷有無被標記的約束
- (void)setNeedsUpdateConstraints  標記需要重新布局
UIView 重新布局相關的三個 API:
- (void)setNeedsLayout   標記為需要重新布局
- (void)layoutIfNeeded  若當前視圖被標記,則內部調用 layoutSubviews 重新布局
- (void)layoutSubviews  重寫此方法,在內部完成重新布局
Masonry 的本質
Masonry 就是對系統 Auto Layout 的封裝,內部大量 API 都是對系統 API 的二次包裝:
typedef NS_OPTIONS(NSInteger, MASAttribute) {
    MASAttributeLeft      = 1 << NSLayoutAttributeLeft,
    MASAttributeRight     = 1 << NSLayoutAttributeRight,
    MASAttributeTop       = 1 << NSLayoutAttributeTop,
    MASAttributeBottom    = 1 << NSLayoutAttributeBottom,
    MASAttributeLeading   = 1 << NSLayoutAttributeLeading,
    MASAttributeTrailing  = 1 << NSLayoutAttributeTrailing,
    MASAttributeWidth     = 1 << NSLayoutAttributeWidth,
    MASAttributeHeight    = 1 << NSLayoutAttributeHeight,
    MASAttributeCenterX   = 1 << NSLayoutAttributeCenterX,
    MASAttributeCenterY   = 1 << NSLayoutAttributeCenterY,
    MASAttributeBaseline  = 1 << NSLayoutAttributeBaseline,
};
常用示例
設置內邊距
/**
 讓 yellowView 與 self.view 等大,並留出 10 的內邊距。
 注意:由於 UIView 坐標系的原點在左上角,right 和 bottom 需要取反,
 所以不能寫成 make.edges.equalTo(self.view).with.offset(10);
 否則 right、bottom 兩個方向會出問題。
 除 offset() 外,還有針對不同坐標系的 centerOffset()、sizeOffset()、valueOffset() 等方法。
 */
[self.yellowView mas_makeConstraints:^(MASConstraintMaker *make) {
    make.left.equalTo(self.view).with.offset(10);
    make.top.equalTo(self.view).with.offset(10);
    make.right.equalTo(self.view).with.offset(-10);
    make.bottom.equalTo(self.view).with.offset(-10);
}];
用 insets 可以更省事:
// 與上面的例子等價,只是改用 insets()
[self.blueView mas_makeConstraints:^(MASConstraintMaker *make) {
    // 下、右不需要寫負號,insets 內部已經幫我們取反
    make.edges.equalTo(self.view).with.insets(UIEdgeInsetsMake(10, 10, 10, 10));
}];
更新約束
// 設置 greenView 的 center 與 size
[self.greenView mas_makeConstraints:^(MASConstraintMaker *make) {
    make.center.equalTo(self.view);
    // 這裡用 mas_equalTo 傳入 CGSize 結構體
    make.size.mas_equalTo(CGSizeMake(300, 300));
}];

// 延遲兩秒更新約束,便於直觀觀察變化
dispatch_after(dispatch_time(DISPATCH_TIME_NOW, (int64_t)(2.f * NSEC_PER_SEC)), dispatch_get_main_queue(), ^{
    [self.greenView mas_updateConstraints:^(MASConstraintMaker *make) {
        make.centerX.equalTo(self.view).offset(100);
        make.size.mas_equalTo(CGSizeMake(100, 100));
    }];
});
大於等於 / 小於等於約束
[self.textLabel mas_makeConstraints:^(MASConstraintMaker *make) {
    make.center.equalTo(self.view);
    // 寬度小於等於 200
    make.width.lessThanOrEqualTo(@200);
    // 高度大於等於 10
    make.height.greaterThanOrEqualTo(@(10));
}];
配合多行文本還需要一個屬性:
self.textLabel.numberOfLines = 0;
使用基礎數據類型作為參數
/**
 想直接傳基礎數據類型,Masonry 提供了 "mas_xx" 形式的宏。
 這些宏會把傳入的基礎類型轉為 NSNumber,這個過程稱為 Auto Boxing。
 "mas_xx" 系列宏內部都由 MASBoxValue() 實現,
 主要包括 mas_equalTo()、mas_offset() 以及大於等於、小於等於四個。
 */
[self.redView mas_makeConstraints:^(MASConstraintMaker *make) {
    make.center.equalTo(self.view);
    make.width.mas_equalTo(100);
    make.height.mas_equalTo(100);
}];
設置約束優先級
/**
 Masonry 提供了 priorityLow()、priorityMedium()、priorityHigh() 三個默認方法,
 也可以通過 priority() 自定義數值。
 */
[self.redView mas_makeConstraints:^(MASConstraintMaker *make) {
    make.center.equalTo(self.view);
    make.width.equalTo(self.view).priorityLow();
    make.width.mas_equalTo(20).priorityHigh();
    make.height.equalTo(self.view).priority(200);
    make.height.mas_equalTo(100).priority(1000);
}];
框架同時定義了幾個優先級常量,最大值為 1000:
static const MASLayoutPriority MASLayoutPriorityRequired = UILayoutPriorityRequired;
static const MASLayoutPriority MASLayoutPriorityDefaultHigh = UILayoutPriorityDefaultHigh;
static const MASLayoutPriority MASLayoutPriorityDefaultMedium = 500;
static const MASLayoutPriority MASLayoutPriorityDefaultLow = UILayoutPriorityDefaultLow;
static const MASLayoutPriority MASLayoutPriorityFittingSizeLevel = UILayoutPriorityFittingSizeLevel;
設置約束比例
// 當前約束值乘以倍數,例如 redView 寬度是 self.view 的 0.2 倍
[self.redView mas_makeConstraints:^(MASConstraintMaker *make) {
    make.center.equalTo(self.view);
    make.height.mas_equalTo(30);
    make.width.equalTo(self.view).multipliedBy(0.2);
}];
小練習
子視圖等高
/**
 給 equalTo() 傳入一個數組,即可讓數組中的子視圖與當前 make 對應的視圖等高。
 注意:設置邊距時應使用 insets 而不是 offset,
 因為 offset 設置 right、bottom 時需要負數,統一取值會出錯。
 */
CGFloat padding = LXZViewPadding;

[self.redView mas_makeConstraints:^(MASConstraintMaker *make) {
    make.left.right.top.equalTo(self.view).insets(UIEdgeInsetsMake(padding, padding, 0, padding));
    make.bottom.equalTo(self.blueView.mas_top).offset(-padding);
}];

[self.blueView mas_makeConstraints:^(MASConstraintMaker *make) {
    make.left.right.equalTo(self.view).insets(UIEdgeInsetsMake(0, padding, 0, padding));
    make.bottom.equalTo(self.yellowView.mas_top).offset(-padding);
}];

// 關鍵在於把三個視圖放進 height 的數組,讓它們高度相等
[self.yellowView mas_makeConstraints:^(MASConstraintMaker *make) {
    make.left.right.bottom.equalTo(self.view).insets(UIEdgeInsetsMake(0, padding, padding, padding));
    make.height.equalTo(@[self.blueView, self.redView]);
}];
子視圖垂直居中
/**
 要求:兩個視圖相對於父視圖垂直居中,視圖之間以及與父視圖的邊距均為 10,
 高度為 150,兩個視圖寬度相等。
 */
CGFloat padding = 10.f;

[self.blueView mas_makeConstraints:^(MASConstraintMaker *make) {
    make.centerY.equalTo(self.view);
    make.left.equalTo(self.view).mas_offset(padding);
    make.right.equalTo(self.redView.mas_left).mas_offset(-padding);
    make.width.equalTo(self.redView);
    make.height.mas_equalTo(150);
}];

[self.redView mas_makeConstraints:^(MASConstraintMaker *make) {
    make.centerY.equalTo(self.view);
    make.right.equalTo(self.view).mas_offset(-padding);
    make.width.equalTo(self.blueView);
    make.height.mas_equalTo(150);
}];
UITableView 動態 Cell 高度
動態 Cell 高度一直是 iOS 列表開發的痛點。實現方式有很多,差別主要在複雜度與性能。
如果不計性能,用估算高度的方式最省事:無論純代碼還是 Interface Builder,兩行代碼就能完成自適應。
做法:把 tableView 的 rowHeight 設為 UITableViewAutomaticDimension,告訴系統 Cell 高度不固定、需要自行計算;再設置 estimatedRowHeight 給出一個預估值。
原理:tableView 創建後,系統先按 estimatedRowHeight 撐出一個初始 contentSize;Cell 真正顯示時再取得實際高度並刷新 contentSize。
- (void)tableViewConstraints {
    [self.tableView mas_makeConstraints:^(MASConstraintMaker *make) {
        make.edges.equalTo(self.view);
    }];
}

- (NSInteger)tableView:(UITableView *)tableView numberOfRowsInSection:(NSInteger)section {
    return self.dataList.count;
}

- (MasonryTableViewCell *)tableView:(UITableView *)tableView cellForRowAtIndexPath:(NSIndexPath *)indexPath {
    MasonryTableViewCell *cell = [tableView dequeueReusableCellWithIdentifier:LXZTableViewCellIdentifier];
    [cell reloadViewWithText:self.dataList[indexPath.row]];
    return cell;
}

// 注意:這個代理方法與直接返回 Cell 高度的 heightForRowAtIndexPath: 不同。
// 它會把所有 Cell 的高度都預估出來,而不只是可見 Cell,因此性能消耗較大。
// 也就是說,設置 estimatedRowHeight 與使用這個代理方法,最終的性能開銷其實是同一量級。
- (CGFloat)tableView:(UITableView *)tableView estimatedHeightForRowAtIndexPath:(NSIndexPath *)indexPath {
    return 50.f;
}

- (UITableView *)tableView {
    if (!_tableView) {
        _tableView = [[UITableView alloc] initWithFrame:CGRectZero style:UITableViewStylePlain];
        _tableView.delegate = self;
        _tableView.dataSource = self;
        // 開啟自動高度
        _tableView.rowHeight = UITableViewAutomaticDimension;
        [_tableView registerClass:[MasonryTableViewCell class] forCellReuseIdentifier:LXZTableViewCellIdentifier];
        [self.view addSubview:_tableView];
    }
    return _tableView;
}
UIScrollView 自動布局
常聽人說 UIScrollView 很麻煩,我倒沒覺得有那麼複雜(並非刻意裝),說麻煩的人大概是沒認真試過。
先記住一個關鍵技巧:給 UIScrollView 添加的約束定義的是它自身的 frame,而 contentSize 定義的是內部可滾動區域;對 UIScrollView 執行 addSubview,實際是把子視圖加到 contentView 上。所以加在子視圖上的約束,作用的對象是 contentView。想通這一層,scrollView 的約束就一點都不難了。
方案一:提前設置 contentSize
// 提前設置好 contentSize,並設置 scrollView 自身的約束
self.scrollView.contentSize = CGSizeMake(1000, 1000);
[self.scrollView mas_makeConstraints:^(MASConstraintMaker *make) {
    make.edges.equalTo(self.view);
}];

// 雖然 redView 的 getter 內部已經執行過 addSubview,
// 但 UIView 始終以最後一次添加的父視圖為準
[self.scrollView addSubview:self.redView];
[self.redView mas_makeConstraints:^(MASConstraintMaker *make) {
    make.left.top.equalTo(self.scrollView);
    make.width.height.mas_equalTo(200);
}];

[self.scrollView addSubview:self.blueView];
[self.blueView mas_makeConstraints:^(MASConstraintMaker *make) {
    make.left.equalTo(self.redView.mas_right);
    make.top.equalTo(self.scrollView);
    make.width.height.equalTo(self.redView);
}];

[self.scrollView addSubview:self.greenView];
[self.greenView mas_makeConstraints:^(MASConstraintMaker *make) {
    make.left.equalTo(self.scrollView);
    make.top.equalTo(self.redView.mas_bottom);
    make.width.height.equalTo(self.redView);
}];
這種方式的前提是必須事先知道 contentSize 有多大。
方案二:contentSize 自動伸縮
做法是多加一層 containerView 作為內容容器:scrollView 的子視圖全部掛到 containerView 上並與它建立約束,再由 containerView 撐開 contentView,從而動態決定 contentSize。
// scrollView 自身約束
[self.scrollView mas_makeConstraints:^(MASConstraintMaker *make) {
    make.edges.equalTo(self.view);
}];

CGFloat padding = LXZViewPadding;

// containerView 的四周都要約束,以確定其邊界
[self.containerView mas_makeConstraints:^(MASConstraintMaker *make) {
    make.edges.equalTo(self.scrollView).insets(UIEdgeInsetsMake(padding, padding, padding, padding));
}];

[self.containerView addSubview:self.greenView];
[self.greenView mas_makeConstraints:^(MASConstraintMaker *make) {
    make.top.left.equalTo(self.containerView).offset(padding);
    make.size.mas_equalTo(CGSizeMake(250, 250));
}];

[self.containerView addSubview:self.redView];
[self.redView mas_makeConstraints:^(MASConstraintMaker *make) {
    make.top.equalTo(self.containerView).offset(padding);
    make.left.equalTo(self.greenView.mas_right).offset(padding);
    make.size.equalTo(self.greenView);
    make.right.equalTo(self.containerView).offset(-padding);
}];

[self.containerView addSubview:self.yellowView];
[self.yellowView mas_makeConstraints:^(MASConstraintMaker *make) {
    make.left.equalTo(self.containerView).offset(padding);
    make.top.equalTo(self.greenView.mas_bottom).offset(padding);
    make.size.equalTo(self.greenView);
    make.bottom.equalTo(self.containerView).offset(-padding);
}];
- 上一篇文章: 程序員的浪漫:寫一個自定義圖片濾鏡生成器
- 下一篇文章: 浮動布局:用 CSS float 的思路解決 iOS 不規則界面排列