
iOS 學習筆記 23|音效與音樂播放:AudioToolbox 與 AVAudioPlayer 實戰
編輯:iOS 程式設計技術
一、iOS 音頻的兩種形態
從使用形式上看,iOS 的音頻播放可以分成音效與音樂兩類:
- 音效:短音頻,通常不需要控制進度與循環,用
AudioToolbox.framework實現; - 音樂:較長的音頻,往往要求精確控制播放狀態,用
AVFoundation.framework實現。

二、音效:AudioToolbox
AudioToolbox.framework 是一套基於 C 語言的框架,原理是把短音頻注册到系統聲音服務(SystemSoundService),交由系統去播。
系統聲音服務的限制
- 音頻時長不能超過 30 秒;
- 數據格式必須是 PCM 或 IMA4,現在的文件基本都符合;
- 文件格式必須是 CAF、AIF、WAV 之一(實測部分 MP3 也能放)。
使用步驟
- 導入框架並添加頭文件:
#import <AudioToolbox/AudioToolbox.h>- 取得音效文件的
URL; - 把音效加入系統聲音服務,換回一個唯一標識 ID:
void AudioServicesCreateSystemSoundID(
    CFURLRef inFileURL,          /* 音效文件 URL,需把 NSURL 橋接為 CFURLRef */
    SystemSoundID *outSystemSoundID /* 返回音效的唯一標識 ID */
);- 若需要監聽播放完成,綁定一個 C 回調函數:
void AudioServicesAddSystemSoundCompletion(
    SystemSoundID inSystemSoundID,   /* 音效 ID */
    CFRunLoopRef inRunLoop,          /* 所處的 run loop,一般傳 NULL */
    CFStringRef inRunLoopMode,       /* run loop 模式,一般傳 NULL */
    void (*)(SystemSoundID, void*) inCompletionRoutine, /* 回調函數指針 */
    void *inClientData               /* 回調函數的參數 */
);- 開始播放,有兩種模式:
/* 普通播放 */
void AudioServicesPlaySystemSound(SystemSoundID inSystemSoundID);
/* 播放並附帶震動提醒 */
void AudioServicesPlayAlertSound(SystemSoundID inSystemSoundID);
實作
- (void)viewDidLoad {
    [super viewDidLoad];
    [self playSoundEffect:@"bellTone.wav"];
}

#pragma mark - 音效
/* C 語言回調函數:第一個參數是音效 ID,第二個是任意傳遞的上下文參數 */
void soundCompleteCallBack(SystemSoundID soundID, void *clientData) {
    NSLog(@"播放完成");
}

- (void)playSoundEffect:(NSString *)name {
    NSString *filePath = [[NSBundle mainBundle] pathForResource:name ofType:nil];
    NSURL *fileUrl = [NSURL fileURLWithPath:filePath];
    SystemSoundID soundID = 0;
    // 註冊進系統聲音服務,NSURL 需橋接為 CFURLRef
    AudioServicesCreateSystemSoundID((__bridge CFURLRef)(fileUrl), &soundID);
    AudioServicesAddSystemSoundCompletion(soundID, NULL, NULL, soundCompleteCallBack, NULL);
    AudioServicesPlaySystemSound(soundID);
}
三、音樂:AVAudioPlayer
音頻文件較大、又需要精細控制時,就要換用 AVFoundation.framework。它支持多種音頻格式,播放能力由 AVAudioPlayer 承擔。
常用屬性
@property (readonly, getter=isPlaying) BOOL playing; // 是否正在播放
@property NSTimeInterval currentTime;   // 已播放時長
@property (readonly) NSTimeInterval duration; // 總時長
@property float volume;                 // 音量
@property float rate;                   // 播放速率,默認 1.0
@property (readonly) NSURL *url;        // 音樂文件 URL
常用方法
- (instancetype)initWithContentsOfURL:(NSURL *)url error:(NSError **)outError;
- (BOOL)prepareToPlay;              /* 預先把文件加載進緩衝區 */
- (BOOL)play;                       /* 開始播放 */
- (BOOL)playAtTime:(NSTimeInterval)time; /* 從指定時間開始播放 */
- (void)pause;                      /* 中斷,之後可用 play 續播 */
- (void)stop;                       /* 終止,無法續播 */
常用代理方法
/* 播放完成 */
- (void)audioPlayerDidFinishPlaying:(AVAudioPlayer *)player successfully:(BOOL)flag;
/* 解碼出錯 */
- (void)audioPlayerDecodeErrorDidOccur:(AVAudioPlayer *)player error:(NSError *)error;
使用步驟
- 導入
AVFoundation.framework:#import <AVFoundation/AVFoundation.h> - 取得音樂文件的本地路徑 URL(不支持網絡 URL);
- 創建
AVAudioPlayer,配置屬性與代理; - 調用
prepareToPlay預加載; - 用
play播放、pause中斷; - 實現
AVAudioPlayerDelegate,處理播放完成的邏輯。
做一個簡易音樂播放器
需求很樸素:能循環、能中斷、能切歌、能看到進度。
#import "ViewController.h"
#import <AVFoundation/AVFoundation.h>

@interface ViewController () <AVAudioPlayerDelegate>
@property (nonatomic, strong) NSArray *musicArray;   // 歌單
@property (nonatomic, strong) IBOutlet UIProgressView *progress; // 進度條
@property (nonatomic, strong) AVAudioPlayer *audioPlayer;
@property (nonatomic, strong) NSTimer *timer;        // 用來刷新進度
@property (nonatomic, strong) IBOutlet UILabel *titleLabel;
@property (nonatomic, assign) NSInteger selectMusic; // 當前歌曲下標
@end

@implementation ViewController

- (void)viewDidLoad {
    [super viewDidLoad];
    self.musicArray = @[@"大夢想家", @"江南", @"酒干倘賣無",
                        @"泡沫", @"夏洛特煩惱", @"演員"];
    // 每 0.5 秒刷新一次進度條
    self.timer = [NSTimer scheduledTimerWithTimeInterval:0.5
                                                  target:self
                                                selector:@selector(updataProgress)
                                                userInfo:nil
                                                 repeats:YES];
    [self initAudioPlayerWithNumber:0];
    [self.audioPlayer play];
}

- (void)initAudioPlayerWithNumber:(NSInteger)num {
    if (num >= self.musicArray.count) { return; }
    NSString *name = self.musicArray[num];
    NSString *filePath = [[NSBundle mainBundle] pathForResource:name ofType:@"mp3"];
    // 必須用 fileURLWithPath,AVAudioPlayer 不接受 HTTP URL
    NSURL *fileUrl = [NSURL fileURLWithPath:filePath];
    NSError *error = nil;
    AVAudioPlayer *audioPlayer = [[AVAudioPlayer alloc] initWithContentsOfURL:fileUrl error:&error];
    if (error) {
        NSLog(@"初始化播放器失敗:%@", error.localizedDescription);
        return;
    }
    audioPlayer.numberOfLoops = 0;   // 0 表示不循環
    audioPlayer.delegate = self;
    [audioPlayer prepareToPlay];     // 只加載,不播放
    self.selectMusic = num;
    self.audioPlayer = audioPlayer;
    self.titleLabel.text = name;
}

/* 進度刷新 */
- (void)updataProgress {
    CGFloat progress = self.audioPlayer.currentTime / self.audioPlayer.duration;
    [self.progress setProgress:progress animated:YES];
}

- (IBAction)musicPlay:(id)sender {
    if (![self.audioPlayer isPlaying]) {
        [self.audioPlayer play];
        self.timer.fireDate = [NSDate distantPast]; // 恢復定時器
    }
}

- (IBAction)musicPause:(id)sender {
    if ([self.audioPlayer isPlaying]) {
        [self.audioPlayer pause];
        self.timer.fireDate = [NSDate distantFuture]; // 掛起定時器
    }
}

- (IBAction)next:(id)sender {
    self.selectMusic = (self.selectMusic + 1) % self.musicArray.count;
    [self initAudioPlayerWithNumber:self.selectMusic];
    [self.audioPlayer play];
}

#pragma mark - AVAudioPlayerDelegate
- (void)audioPlayerDidFinishPlaying:(AVAudioPlayer *)player successfully:(BOOL)flag {
    [self next:nil]; // 自動下一首
}
@end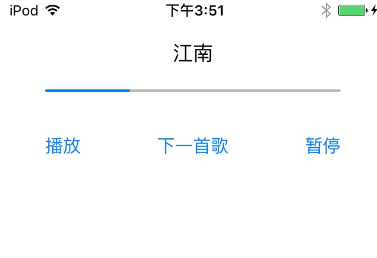
界面確實夠簡陋。如果每首歌再配一張封面圖,切歌時把圖換掉當背景,觀感會好很多。
四、後台播放音樂
上面這個播放器有個大問題:App 一進後台,音樂就跟著停了。要解決它,需要兩步。
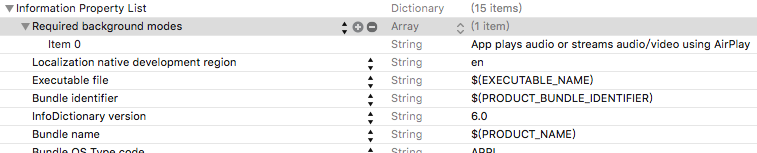
1. 在 Info.plist 中声明後台運行模式
添加字段 Required background modes,並勾選 App plays audio or streams audio/video using AirPlay。
2. 通過音頻會話声明播放類型
AVAudioSession *audioSession = [AVAudioSession sharedInstance];
// 声明為「播放」類別,這才是允許後台繼續播的關鍵
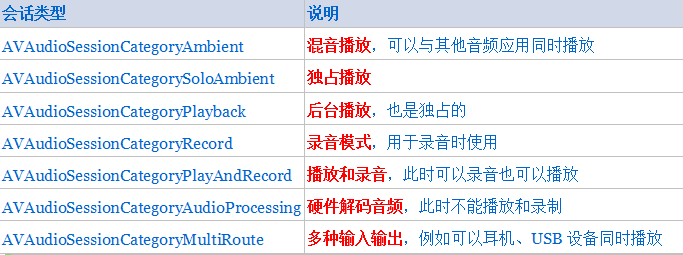
[audioSession setCategory:AVAudioSessionCategoryPlayback error:NULL];
[audioSession setActive:YES error:NULL]; // 激活會話
AVAudioSession 除了後台播放,還有若干其他模式可選:
3. 只需改動初始化方法
- (void)initAudioPlayerWithNumber:(NSInteger)num {
    if (num >= self.musicArray.count) { return; }
    NSString *name = self.musicArray[num];
    NSString *filePath = [[NSBundle mainBundle] pathForResource:name ofType:@"mp3"];
    NSURL *fileUrl = [NSURL fileURLWithPath:filePath];
    NSError *error = nil;
    AVAudioPlayer *audioPlayer = [[AVAudioPlayer alloc] initWithContentsOfURL:fileUrl error:&error];
    if (error) {
        NSLog(@"初始化播放器失敗:%@", error.localizedDescription);
        return;
    }
    audioPlayer.numberOfLoops = 0;
    audioPlayer.delegate = self;
    [audioPlayer prepareToPlay];

    // 關鍵新增:配置並激活音頻會話
    AVAudioSession *audioSession = [AVAudioSession sharedInstance];
    [audioSession setCategory:AVAudioSessionCategoryPlayback error:NULL];
    [audioSession setActive:YES error:NULL];

    self.selectMusic = num;
    self.audioPlayer = audioPlayer;
    self.titleLabel.text = name;
}
這樣鎖屏、切到後台,音樂都能繼續放。有問題歡迎在評論區提出,好建議我都會採納。