
自製書架頁面:客製化 UITableViewCell 的三按鈕排版
電子書或閱讀類 App 都需要一個「書架」畫面,通常是一格到三格的封面牆。本文示範如何用自訂的 UITableViewCell,在每一列裡放三個按鈕當作書封,並處理好點擊時如何回推「我點的是第幾列第幾本」。
效果與結構

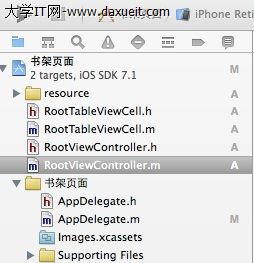
自訂 Cell:RootTableViewCell.h
cell 內含三個按鈕,分別代表一列中的左、中、右三個書位:
#import <UIKit/UIKit.h>

@interface RootTableViewCell : UITableViewCell

@property (nonatomic, strong) UIButton *bookLeft;
@property (nonatomic, strong) UIButton *bookMiddle;
@property (nonatomic, strong) UIButton *bookRight;

@end
RootTableViewCell.m
在初始化方法中,先放一張背景底圖,再把三個按鈕依比例排上去。每個按鈕都設了 tag(1、2、3),方便之後判斷位置:
#import "RootTableViewCell.h"

@implementation RootTableViewCell

@synthesize bookLeft;
@synthesize bookMiddle;
@synthesize bookRight;

- (id)initWithStyle:(UITableViewCellStyle)style reuseIdentifier:(NSString *)reuseIdentifier
{
    self = [super initWithStyle:style reuseIdentifier:reuseIdentifier];
    if (self) {
        UIImageView *imageview = [[UIImageView alloc] initWithFrame:CGRectMake(0, 0, 320, 416 / 3)];
        imageview.image = [UIImage imageNamed:@"BookShelfCell.png"];
        [self addSubview:imageview];

        bookLeft = [UIButton buttonWithType:UIButtonTypeCustom];
        bookLeft.frame = CGRectMake(10, 10, 280 / 3, 376 / 3 - 20);
        bookLeft.tag = 1;

        bookMiddle = [UIButton buttonWithType:UIButtonTypeCustom];
        bookMiddle.frame = CGRectMake(20 + 280 / 3, 10, 280 / 3, 376 / 3 - 20);
        bookMiddle.tag = 2;

        bookRight = [UIButton buttonWithType:UIButtonTypeCustom];
        bookRight.frame = CGRectMake(30 + 280 / 3 * 2, 10, 280 / 3, 376 / 3 - 20);
        bookRight.tag = 3;

        [self addSubview:bookLeft];
        [self addSubview:bookMiddle];
        [self addSubview:bookRight];
    }
    return self;
}

@end
RootViewController.h
#import <UIKit/UIKit.h>

@interface RootViewController : UIViewController <UITableViewDataSource, UITableViewDelegate>
{
    NSMutableArray *dataArray;
    UITableView *myTableView;
}
@end
RootViewController.m
- (void)viewDidLoad
{
    [super viewDidLoad];
    [self initBackGroundView];
}

#pragma mark - functions

- (void)initBackGroundView
{
    self.title = @"書架頁面";
    dataArray = [[NSMutableArray alloc] initWithObjects:@"1", @"2", @"3", @"4", @"5",
                                                       @"6", @"7", @"8", @"9", nil];
    myTableView = [[UITableView alloc] initWithFrame:CGRectMake(0, 0, 320, 416)
                                               style:UITableViewStylePlain];
    myTableView.delegate = self;
    myTableView.dataSource = self;
    [self.view addSubview:myTableView];
}

#pragma mark - UITableViewDelegate

- (NSInteger)tableView:(UITableView *)tableView numberOfRowsInSection:(NSInteger)section
{
    return 3;
}

- (CGFloat)tableView:(UITableView *)tableView heightForRowAtIndexPath:(NSIndexPath *)indexPath
{
    return 376 / 3;
}

- (UITableViewCell *)tableView:(UITableView *)tableView
         cellForRowAtIndexPath:(NSIndexPath *)indexPath
{
    RootTableViewCell *cell = [tableView dequeueReusableCellWithIdentifier:@"ID"];
    if (cell == nil) {
        cell = [[RootTableViewCell alloc] initWithStyle:UITableViewCellStyleValue1
                                       reuseIdentifier:@"ID"];
    }
    cell.tag = indexPath.row;

    [cell.bookLeft addTarget:self action:@selector(buttonClick:) forControlEvents:UIControlEventTouchUpInside];
    [cell.bookMiddle addTarget:self action:@selector(buttonClick:) forControlEvents:UIControlEventTouchUpInside];
    [cell.bookRight addTarget:self action:@selector(buttonClick:) forControlEvents:UIControlEventTouchUpInside];

    [cell.bookLeft setBackgroundImage:
        [UIImage imageNamed:[NSString stringWithFormat:@"%@.jpg",
                             [dataArray objectAtIndex:indexPath.row * 3]]]
                     forState:UIControlStateNormal];
    [cell.bookMiddle setBackgroundImage:
        [UIImage imageNamed:[NSString stringWithFormat:@"%@.jpg",
                             [dataArray objectAtIndex:indexPath.row * 3 + 1]]]
                   forState:UIControlStateNormal];
    [cell.bookRight setBackgroundImage:
        [UIImage imageNamed:[NSString stringWithFormat:@"%@.jpg",
                             [dataArray objectAtIndex:indexPath.row * 3 + 2]]]
                  forState:UIControlStateNormal];

    NSLog(@"--cell.tag--%i", cell.tag);
    return cell;
}

#pragma mark - doClickActions

- (void)buttonClick:(UIButton *)btn
{
    RootTableViewCell *cell = (RootTableViewCell *)[[btn superview] superview];
    NSIndexPath *path = [myTableView indexPathForCell:cell];
    NSLog(@"--點擊圖片時,所在的坐標-(%i,%i)--", path.row, btn.tag);
}
幾個值得改進的地方
把 addTarget 移到 cell 內部。 目前每次 cellForRowAtIndexPath: 被呼叫都會重複註冊一次 target-action。雖然 UIKit 不會因此重複觸發,但這是不必要的開銷。更乾淨的做法是在 RootTableViewCell 的初始化裡完成註冊,並透過一個 block 或 delegate 把點擊事件往上拋。
用 indexPathForCell 取代 superview 鏈。 範例中 [[btn superview] superview] 是為了拿到 cell,但這種寫法對視圖階層的變動很脆弱(只要多包一層就失效)。更穩定的方式是用 [btn convertRect:btn.bounds toView:tableView] 配合 indexPathForRowAtPoint:,或直接在 cell 上開一個 NSInteger index 屬性並在配置時賦值。
九宮格其實更適合用 UICollectionView。 用 TableView 實作多欄排列,需要自己算 row * 3 這種索引換算,資料筆數不是 3 的倍數時還會越界。若版面是規則網格,改用 UICollectionView 搭配自訂 layout 會直觀得多,也免去了手動計算 frame 的麻煩。
frame 寫死不宜上 production。 320 × 416 這類固定數值在現代多尺寸螢幕上會跑版,建議改用 Auto Layout 或至少依 bounds 比例計算。
- 上一篇文章: 為頁面跳轉加上翻轉動畫
- 下一篇文章: Xcode 6 之後,模擬器的 App 資料夾搬到哪去了?