
點擊縮圖放大瀏覽:用 Vertigo 實作流暢的圖片縮放動畫
編輯:iOS 技巧大全
相簿類 App 裡「點一下照片就放大到全螢幕」的過場動畫,是使用者最有感的細節之一。自己實作需要處理 frame 插值與 dismiss 動畫,但其實有現成的第三方庫可用。本文示範以 Vertigo 搭配自訂的 transitioningDelegate 完成這個效果。
效果預覽
初始畫面:

點擊後:

專案結構:
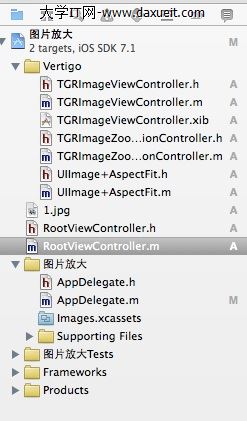
RootViewController.h
#import <UIKit/UIKit.h>

@interface RootViewController : UIViewController <UIViewControllerTransitioningDelegate>
{
    UIImageView *imageView;
}
@end
RootViewController.m
#import "RootViewController.h"
#import "TGRImageViewController.h"
#import "TGRImageZoomAnimationController.h"

- (void)viewDidLoad {
    [super viewDidLoad];

    imageView = [[UIImageView alloc] initWithFrame:CGRectMake(50, 100, 200, 200)];
    imageView.image = [UIImage imageNamed:@"1.jpg"];
    [self.view addSubview:imageView];

    // 在圖片上疊一顆透明按鈕接收點擊
    UIButton *btn = [[UIButton alloc] initWithFrame:CGRectMake(50, 100, 200, 200)];
    btn.backgroundColor = [UIColor clearColor];
    [btn addTarget:self action:@selector(doClickButton:) forControlEvents:UIControlEventTouchUpInside];
    btn.imageView.contentMode = UIViewContentModeScaleAspectFill;
    [self.view addSubview:btn];
}

- (void)doClickButton:(UIButton *)btn {
    TGRImageViewController *viewController =
        [[TGRImageViewController alloc] initWithImage:imageView.image];
    viewController.transitioningDelegate = self;   // 關鍵:交給自訂的動畫控制器
    [self presentViewController:viewController animated:NO completion:nil];
}
重點說明
- transitioningDelegate 是整個效果的關鍵。iOS 7 之後,只要把 presented 與 presenting 的 transitioningDelegate 指向同一個物件,就能完全接管轉場動畫,而不必動到 Modal 的預設行為。
- 此範例中
presentViewController:animated:傳的是NO,因為動畫已由 TGRImageZoomAnimationController 自行驅動,交給系統反而會重複。 - 為什麼要疊一顆透明 UIButton 而不是直接幫 UIImageView 加手勢?因為 UIImageView 預設
userInteractionEnabled為 NO,用按鈕是最省事的做法;若想更精簡,改用UITapGestureRecognizer並記得把 imageView 的 userInteractionEnabled 設為 YES 即可。 - Vertigo 需要在專案中引入對應的第三方庫;若不想引入額外依賴,也可自行實作
UIViewControllerAnimatedTransitioning,核心就是取來源 imageView 的 frame 作為動畫起點。
- 上一篇文章: SQLite 終端指令速查:從建表到多表關聯查詢
- 下一篇文章: NSLog 的兩輸出目的地與 description 方法的關係