
Objective-C Runtime 系統梳理:消息、方法交換與字典轉模型
一、Runtime 簡介
RunTime 即「運行時」,指的是 Objective-C 在運行階段的一系列機制,其中最核心的是消息機制。
對比一下 C 語言與 Objective-C 的差異:
- C 語言中,函數調用在編譯期就決定了調用哪個函數,屬於靜態綁定。
- Objective-C 的方法調用屬於動態調用過程,編譯時並不能決定真正執行哪個函數,只有在運行時才會依據方法名找到對應實現並調用。
這帶來一個有意思的現象:在編譯階段,OC 可以調用任何已聲明的方法,即使它尚未實現也不會報錯;而 C 語言調用未實現的函數則直接編譯失敗。
二、Runtime 的作用
1. 發送消息
方法調用的本質,就是讓對象發送消息,對應的 C 函數是 objc_msgSend。命名以 objc 開頭,是因為只有對象才能發送消息。
使用消息機制需要導入 #import <objc/message.h>。想直觀查看編譯器生成的實際代碼,可以用 clang -rewrite-objc main.m。
// 創建 person 對象
Person *p = [[Person alloc] init];

// 調用對象方法
[p eat];
// 本質:讓對象發送消息
objc_msgSend(p, @selector(eat));

// 調用類方法有兩種寫法
// 第一種:通過類名調用
[Person eat];
// 第二種:通過類對象調用
[[Person class] eat];
// 用類名調用類方法時,底層會自動把類名轉換為類對象
// 本質:讓類對象發送消息
objc_msgSend([Person class], @selector(eat));
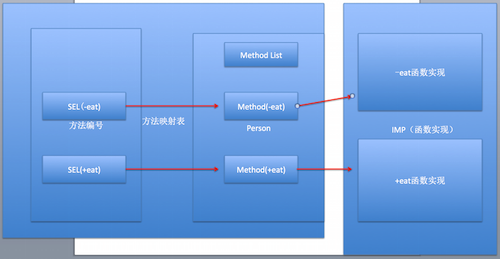
消息機制的原理是:對象根據方法編號 SEL 去方法映射表中查找對應的方法實現。
2. 交換方法
典型使用場景:系統自帶方法功能不夠用,需要給它擴展一些能力,同時又希望保留原有功能。
常見做法有兩種:一是繼承系統類並重寫方法;二是使用 Runtime 交換方法實現。後者侵入性更小。
@implementation ViewController

- (void)viewDidLoad {
    [super viewDidLoad];

    // 需求:給 imageNamed 方法增加功能,
    // 每次加載圖片時判斷是否加載成功。
    // 步驟一:寫一個分類,定義能加載圖片並打印日誌的方法
    // + (instancetype)imageWithName:(NSString *)name;

    // 步驟二:交換 imageNamed 和 imageWithName 的實現,
    // 這樣調用 imageNamed 時,間接執行的是 imageWithName 的實現
    UIImage *image = [UIImage imageNamed:@"123"];
}

@end

@implementation UIImage (Image)

// 分類加載到內存時會自動調用
+ (void)load {
    // 獲取兩個方法的 Method 地址
    Method imageWithName = class_getClassMethod(self, @selector(imageWithName:));
    Method imageName     = class_getClassMethod(self, @selector(imageNamed:));

    // 交換方法實現
    method_exchangeImplementations(imageWithName, imageName);
}

// 注意:不要在分類中重寫系統方法 imageNamed,
// 那會直接覆蓋掉系統原有功能,而且分類中無法調用 super。
// 交換之後,這個方法裡調用 imageWithName,實際執行的是原生的 imageNamed
+ (instancetype)imageWithName:(NSString *)name {
    // 關鍵:這裡看似調用 imageWithName,實際走的是原生的 imageNamed
    UIImage *image = [self imageWithName:name];
    if (image == nil) {
        NSLog(@"加載空的圖片");
    }
    return image;
}

@end
交換的原理可以用兩張示意圖理解:
交換之前: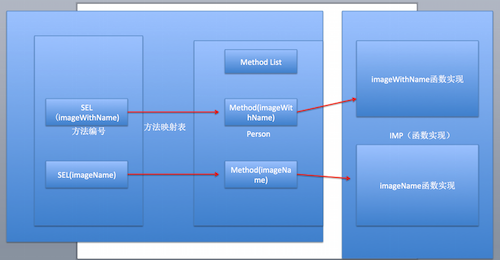
交換之後: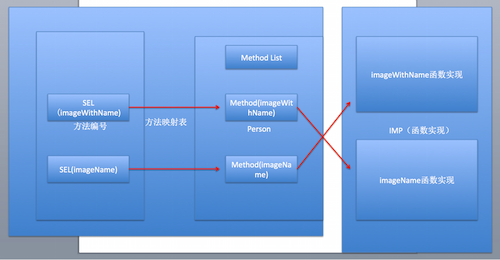
本質就是把兩個方法在映射表中所對應的 IMP(函數指針)互相調換位置。
3. 動態添加方法
使用場景:如果一個類方法非常多,加載到內存時需要為每個方法建立映射表,本身就比較耗資源。此時可以採用「用到時再動態添加」的策略。
經典面試題「你有沒有使用過 performSelector」,考察的其實就是對動態添加方法的掌握。
@implementation ViewController

- (void)viewDidLoad {
    [super viewDidLoad];

    Person *p = [[Person alloc] init];
    // 默認 Person 並未實現 eat 方法,直接 performSelector 調用會崩潰
    // 而動態添加方法之後就不會出問題
    [p performSelector:@selector(eat)];
}

@end

@implementation Person

// 方法實現的函數簽名:默認有兩個隱式參數
// v 表示返回 void,@ 表示第一個參數是對象(self),: 表示第二個參數是 SEL(_cmd)
void eat(id self, SEL sel) {
    NSLog(@"%@ %@", self, NSStringFromSelector(sel));
}

// 當對象調用未實現的方法時會走這裡,並把方法列表傳進來。
// 正好可以用來判斷:這個未實現的方法是不是我們想動態添加的
+ (BOOL)resolveInstanceMethod:(SEL)sel {
    if (sel == @selector(eat)) {
        // 動態添加 eat 方法
        // 參數1:給哪個類添加方法
        // 參數2:添加的方法編號 SEL
        // 參數3:方法實現的函數地址
        // 參數4:函數類型編碼 "v@:"
        class_addMethod(self, @selector(eat), eat, "v@:");
    }
    return [super resolveInstanceMethod:sel];
}

@end
4. 給分類添加屬性
原理:給一個類聲明屬性,本質並不是把值的內存空間加到類的內存結構裡,而是建立「對象 → 值」的關聯關係(Associated Object)。這也是為什麼分類中不能有實例變量,但可以用關聯對象模擬屬性。
@implementation ViewController

- (void)viewDidLoad {
    [super viewDidLoad];

    // 給系統的 NSObject 類動態添加 name 屬性
    NSObject *objc = [[NSObject alloc] init];
    objc.name = @"小碼哥";
    NSLog(@"%@", objc.name);
}

@end

// 定義關聯的 key
static const char *key = "name";

@implementation NSObject (Property)

- (NSString *)name {
    // 根據關聯的 key 取出關聯的值
    return objc_getAssociatedObject(self, key);
}

- (void)setName:(NSString *)name {
    // 參數1:給哪個對象添加關聯
    // 參數2:關聯的 key
    // 參數3:關聯的 value
    // 參數4:關聯策略
    objc_setAssociatedObject(self, key, name, OBJC_ASSOCIATION_RETAIN_NONATOMIC);
}

@end
5. 字典轉模型
設計模型是字典轉模型的第一步。模型屬性通常需要與字典中的 key 一一對應,但一個個手寫屬性實在太慢。能否根據字典自動生成對應的屬性代碼?可以通過 Runtime 遍歷字典來實現。
自動生成屬性代碼:
@implementation NSObject (Log)

// 自動打印屬性字符串
+ (void)resolveDict:(NSDictionary *)dict {

    NSMutableString *strM = [NSMutableString string];

    // 遍歷字典,把 key 取出來生成對應的屬性代碼
    [dict enumerateKeysAndObjectsUsingBlock:^(id _Nonnull key, id _Nonnull obj, BOOL * _Nonnull stop) {

        // 類型經常變化,抽出來判斷
        NSString *type;
        if ([obj isKindOfClass:NSClassFromString(@"__NSCFString")]) {
            type = @"NSString";
        } else if ([obj isKindOfClass:NSClassFromString(@"__NSCFArray")]) {
            type = @"NSArray";
        } else if ([obj isKindOfClass:NSClassFromString(@"__NSCFNumber")]) {
            type = @"int";
        } else if ([obj isKindOfClass:NSClassFromString(@"__NSCFDictionary")]) {
            type = @"NSDictionary";
        }

        // 拼接屬性字符串
        NSString *str;
        if ([type containsString:@"NS"]) {
            str = [NSString stringWithFormat:@"@property (nonatomic, strong) %@ *%@;", type, key];
        } else {
            str = [NSString stringWithFormat:@"@property (nonatomic, assign) %@ %@;", type, key];
        }

        // 每生成一條屬性就換行
        [strM appendFormat:@"\n%@\n", str];
    }];

    NSLog(@"%@", strM);
}

@end
方式一:KVC
@implementation Status

+ (instancetype)statusWithDict:(NSDictionary *)dict {
    Status *status = [[self alloc] init];
    [status setValuesForKeysWithDictionary:dict];
    return status;
}

@end
KVC 方案的關鍵前提:模型屬性必須與字典 key 完全對應。一旦不匹配,系統就會調用 setValue:forUndefinedKey: 並拋出異常。
解決辦法是在模型中重寫這個方法,把系統行為覆蓋掉:
- (void)setValue:(id)value forUndefinedKey:(NSString *)key {
    // 空實現即可屏蔽報錯
}
方式二:Runtime
思路:利用運行時遍歷模型中的所有屬性,根據屬性名去字典中查找對應的 key,取出值賦給屬性。做法是在 NSObject 上寫一個分類,之後所有模型都能直接調用。
@implementation ViewController

- (void)viewDidLoad {
    [super viewDidLoad];

    // 解析 plist 文件
    NSString *filePath = [[NSBundle mainBundle] pathForResource:@"status.plist" ofType:nil];
    NSDictionary *statusDict = [NSDictionary dictionaryWithContentsOfFile:filePath];
    NSArray *dictArr = statusDict[@"statuses"];

    // 也可以先自動生成屬性字符串:
    // [NSObject resolveDict:dictArr[0][@"user"]];

    _statuses = [NSMutableArray array];
    for (NSDictionary *dict in dictArr) {
        Status *status = [Status modelWithDict:dict];
        [_statuses addObject:status];
    }

    NSLog(@"%@ %@", _statuses, [_statuses[0] user]);
}

@end

@implementation NSObject (Model)

+ (instancetype)modelWithDict:(NSDictionary *)dict {
    // 0. 創建對應的對象
    id objc = [[self alloc] init];

    // 1. 用 class_copyIvarList 獲取類中的所有成員變量
    //    Ivar 即「成員變量」,返回的是一個 ivar 數組
    unsigned int count = 0;
    Ivar *ivarList = class_copyIvarList(self, &count);

    for (int i = 0; i < count; i++) {
        Ivar ivar = ivarList[i];

        // 2. 獲取成員變量名
        NSString *name = [NSString stringWithUTF8String:ivar_getName(ivar)];

        // 3. 處理變量名 -> 字典 key(去掉開頭的下劃線)
        NSString *key = [name substringFromIndex:1];

        // 4. 根據 key 去字典中取值
        id value = dict[key];

        // 5. 二級轉換:如果 value 是字典,也需要轉成模型
        if ([value isKindOfClass:[NSDictionary class]]) {
            // 模型的類名就是成員變量的類型
            // 類型編碼形如 @"\"User\"",需要裁剪出 User
            NSString *type = [NSString stringWithUTF8String:ivar_getTypeEncoding(ivar)];

            NSRange range = [type rangeOfString:@"\""];
            type = [type substringFromIndex:range.location + range.length];
            range = [type rangeOfString:@"\""];
            type = [type substringToIndex:range.location];

            Class modelClass = NSClassFromString(type);
            if (modelClass) {
                value = [modelClass modelWithDict:value];
            }
        }

        // 6. 三級轉換:如果 value 是數組,且數組元素也是字典
        if ([value isKindOfClass:[NSArray class]]) {
            // 判斷模型有沒有實現「數組中字典對應的模型」協議
            if ([self respondsToSelector:@selector(arrayContainModelClass)]) {
                id idSelf = self;
                NSString *type = [idSelf arrayContainModelClass][key];
                Class classModel = NSClassFromString(type);

                NSMutableArray *arrM = [NSMutableArray array];
                for (NSDictionary *dict in value) {
                    id model = [classModel modelWithDict:dict];
                    [arrM addObject:model];
                }
                value = arrM;
            }
        }

        // 7. 有值才賦值
        if (value) {
            [objc setValue:value forKey:key];
        }
    }

    return objc;
}

@end
小結
Runtime 的能力很強,但強大的工具伴隨着相應的風險:method_exchangeImplementations 容易讓調用鏈變得難以追蹤,objc_setAssociatedObject 使用不當會造成內存洩露,class_addMethod 濫用則會讓代碼可讀性急劇下降。建議把這些技巧用在「確實沒有更好方案」的場景,並在代碼中寫清楚註釋說明意圖。