
iOS 開發:Swift 以 AVFoundation 實作條碼掃描(含鏡頭拉近)
編輯:iOS 7 技巧
本文示範如何用 Swift 與 AVFoundation 掃描一維條碼,並針對「條碼太小導致讀不出來」的常見問題,示範以程式拉近鏡頭焦距的解法。
一、條碼(一維碼)的掃描讀取
先前寫過一篇介紹相機掃描二維碼的文章。若要把同一套程式改成讀取條碼,只需調整 metadataObjectTypes 的設定:
self.output.metadataObjectTypes = [AVMetadataObjectTypeEAN13Code,
    AVMetadataObjectTypeEAN8Code, AVMetadataObjectTypeCode128Code,
    AVMetadataObjectTypeCode39Code,AVMetadataObjectTypeCode93Code]
二、拉近鏡頭改善讀取效果
有使用者反映,當條碼尺寸過小時(例如手錶上顯示的付款條碼)常常辨識不出來。解法就跟支付寶、QQ 的做法一樣:透過程式調整鏡頭焦距,把畫面內容放大,讓機器更容易判讀。
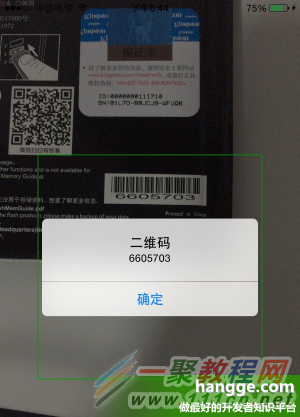
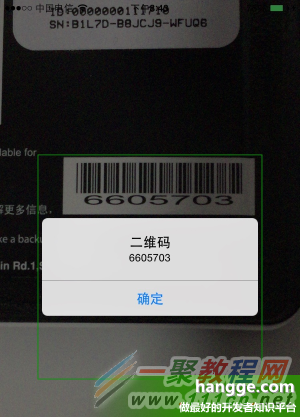
下圖左為原始大小,右為放大 1.5 倍後的效果:
import UIKit
import AVFoundation

class ViewController: UIViewController, AVCaptureMetadataOutputObjectsDelegate,
    UIAlertViewDelegate{

    var scanRectView:UIView!
    var device:AVCaptureDevice!
    var input:AVCaptureDeviceInput!
    var output:AVCaptureMetadataOutput!
    var session:AVCaptureSession!
    var preview:AVCaptureVideoPreviewLayer!

    override func viewDidLoad() {
        super.viewDidLoad()

        fromCamera()
    }

    //通過攝像頭掃描
    func fromCamera() {
        do{
            self.device = AVCaptureDevice.defaultDeviceWithMediaType(AVMediaTypeVideo)

            self.input = try AVCaptureDeviceInput(device: device)

            self.output = AVCaptureMetadataOutput()
            output.setMetadataObjectsDelegate(self, queue: dispatch_get_main_queue())

            self.session = AVCaptureSession()
            if UIScreen.mainScreen().bounds.size.height < 500 {
                self.session.sessionPreset = AVCaptureSessionPreset640x480
            }else{
                self.session.sessionPreset = AVCaptureSessionPresetHigh
            }

            self.session.addInput(self.input)
            self.addOutput(self.output)

            self.output.metadataObjectTypes = [AVMetadataObjectTypeEAN13Code,
                AVMetadataObjectTypeEAN8Code, AVMetadataObjectTypeCode128Code,
                AVMetadataObjectTypeCode39Code,AVMetadataObjectTypeCode93Code]

            //計算中間可探測區域
            let windowSize:CGSize = UIScreen.mainScreen().bounds.size;
            let scanSize:CGSize = CGSizeMake(windowSize.width*3/4,
                windowSize.width*3/4);
            var scanRect:CGRect = CGRectMake((windowSize.width-scanSize.width)/2,
                (windowSize.height-scanSize.height)/2, scanSize.width, scanSize.height);
            //計算rectOfInterest 注意x,y交換位置
            scanRect = CGRectMake(scanRect.origin.y/windowSize.height,
                scanRect.origin.x/windowSize.width,
                scanRect.size.height/windowSize.height,
                scanRect.size.width/windowSize.width);
            //設置可探測區域
            self.output.rectOfInterest = scanRect

            self.preview = AVCaptureVideoPreviewLayer(session:self.session)
            self.preview.videoGravity = AVLayerVideoGravityResizeAspectFill
            self.preview.frame = UIScreen.mainScreen().bounds
            self.view.layer.insertSublayer(self.preview, atIndex:0)

            //添加中間的探測區域綠框
            self.scanRectView = UIView();
            self.view.addSubview(self.scanRectView)
            self.scanRectView.frame = CGRectMake(0, 0, scanSize.width, scanSize.height);
            self.scanRectView.center = CGPointMake(
                CGRectGetMidX(UIScreen.mainScreen().bounds),
                CGRectGetMidY(UIScreen.mainScreen().bounds));
            self.scanRectView.layer.borderColor = UIColor.greenColor().CGColor
            self.scanRectView.layer.borderWidth = 1;

            //開始捕獲
            self.session.startRunning()

            //放大
            do {
                try self.device!.lockForConfiguration()
            } catch _ {
                NSLog("Error: lockForConfiguration.");
            }
            self.device!.videoZoomFactor = 1.5
            self.device!.unlockForConfiguration()

        }catch _ as NSError{
            //打印錯誤消息
            let errorAlert = UIAlertView(title: "提醒",
                message: "請在iPhone的\"設置-隱私-相機\"選項中,允許本程序訪問您的相機",
                delegate: self,
                cancelButtonTitle: "確定")
            errorAlert.show()
        }
    }

    //攝像頭捕獲
    func captureOutput(captureOutput: AVCaptureOutput!,
        didOutputMetadataObjects metadataObjects: [AnyObject]!,
        fromConnection connection: AVCaptureConnection!) {

        var stringValue:String?
        if metadataObjects.count > 0 {
            let metadataObject = metadataObjects[0]
                as! AVMetadataMachineReadableCodeObject
            stringValue = metadataObject.stringValue

            if stringValue != nil{
                self.session.stopRunning()
            }
        }
        self.session.stopRunning()
        //輸出結果
        let alertView = UIAlertView(title: "二維碼", message: stringValue,
            delegate: self, cancelButtonTitle: "確定")
        alertView.show()
    }

    //消息框確認後消失
    func alertView(alertView: UIAlertView, willDismissWithButtonIndex buttonIndex: Int) {
        //繼續掃描
        self.session.startRunning()
    }

    override func didReceiveMemoryWarning() {
        super.didReceiveMemoryWarning()
    }
}
縮放的关键在于 videoZoomFactor:修改前必須先 lockForConfiguration() 取得設定權,改完再 unlockForConfiguration() 釋放,否則會拋出例外。實務上可依條碼實際尺寸動態調整倍率,例如 1.5 到 2 之間,避免畫面糊掉反而降低辨識率。
- 上一篇文章: Swift 下拉刷新時,依狀態顯示不同提示文字
- 下一篇文章: Swift 整合友盟統計:為 App 加入數據分析能力