
iOS 開發之路——微博主體骨架搭建
編輯:iOS 相關教學
最終效果圖:
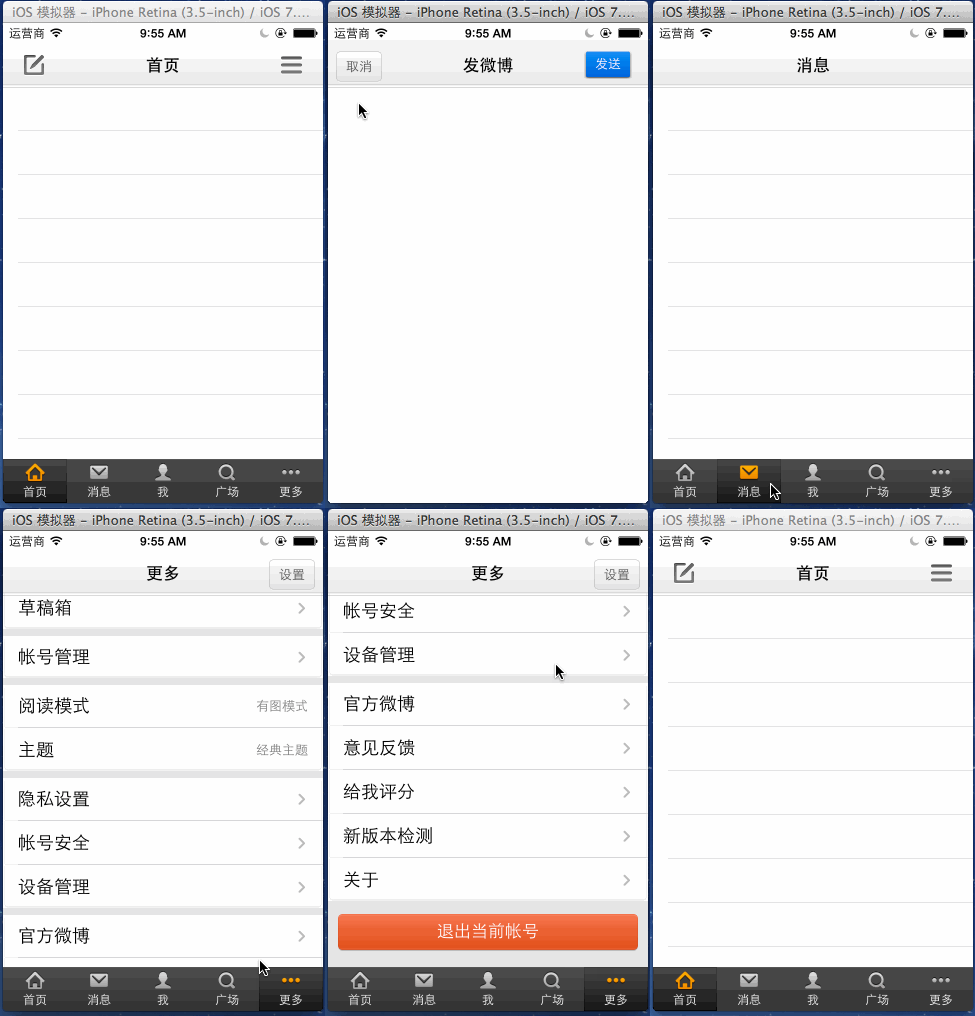
主控制器的結構可以切成兩塊:下方是 Dock 選單欄,上方是承載不同子控制器的內容區。子控制器最好統一用 UINavigationController 包一層,這樣每個頁籤就自帶導航列、左鍵、標題與右鍵,不必各自實作。
另外提醒一個常被忽略的細節:控件無法點擊或點了沒反應,通常不外乎 userInteractionEnabled 設為 NO、hidden 為 YES、alpha 過低,或是背景設成透明色。
BeyondViewController.m
//
//  BeyondViewController.m
//  20_帥哥no微博
//

#import "BeyondViewController.h"
#import "Dock.h"
#import "DockBtn.h"
#import "Column.h"

// 主控制器下方 Dock 的高度
#define kDockHeight 44

@interface BeyondViewController () {
    // 從 plist 載入的欄目物件陣列
    NSMutableArray *_columns;
    // 主控制器下方的 Dock 選單欄
    Dock *_dock;
    // 記錄當前選中的子控制器,方便切換時移除舊 view
    UIViewController *_currentChildVC;
}

@end

@implementation BeyondViewController

- (BOOL)prefersStatusBarHidden {
    return NO;
}

- (void)viewDidLoad {
    [super viewDidLoad];

    // 0. 從 plist 載入欄目資料,逐筆轉成欄目物件
    _columns = [NSMutableArray array];
    NSBundle *mainBundle = [NSBundle mainBundle];
    NSString *fullPath = [mainBundle pathForResource:@"ColumnList.plist" ofType:nil];
    NSArray *arr = [NSArray arrayWithContentsOfFile:fullPath];
    for (NSDictionary *dict in arr) {
        Column *column = [Column columnWithDict:dict];
        [_columns addObject:column];
    }

    // 1. 把 dock 加到主控制器下方
    [self addDock];

    // 2. 一次建立所有子控制器,用導航控制器包裝後掛到 childViewControllers
    [self createAllChildViewControllers];

    // 3. 預設選中第 0 個
    [self changeChildViewAtIndex:0 andChildVCClassName:@"HomeViewController"];

    // 4. 一次設定全域導航列的視覺主題
    [self setGlobalNavigationItemColorTheme];
}

#pragma mark - 添加 dock

- (void)addDock {
    _dock = [[Dock alloc] init];

    // 監聽 Dock 內部按鈕的點擊
    // 注意用 __unsafe_unretained 避開 block 對 self 的循環持有
    __unsafe_unretained BeyondViewController *beyond = self;
    _dock.btnClickBlock = ^(DockBtn *btn) {
        [beyond changeChildViewAtIndex:btn.tag andChildVCClassName:btn.viewControllerClassName];
    };

    _dock.frame = CGRectMake(0,
                             self.view.frame.size.height - kDockHeight,
                             self.view.frame.size.width,
                             kDockHeight);

    [self.view addSubview:_dock];

    // 遍歷欄目陣列,批量加入 DockBtn
    for (Column *column in _columns) {
        [_dock addDockBtnWithIconName:column.columnImgName
                                title:column.columnName
               viewControllerClassName:column.columnClassName];
    }

    // 預設選中第 0 個
    [_dock setDockBtnClickedAtIndex:0];
}

// 切換子視圖:參數 1 是索引,參數 2 是子控制器的類名
- (void)changeChildViewAtIndex:(int)index andChildVCClassName:(NSString *)viewControllerClassName {
    NSLog(@"點擊了 %@", viewControllerClassName);

    if (self.childViewControllers.count > 0) {
        // 先取出新的子控制器,若它就是當前這一個,直接返回
        UIViewController *childVC = [self childViewControllers][index];
        if (childVC == _currentChildVC) return;

        // 移除先前子控制器的 view
        [_currentChildVC.view removeFromSuperview];

        // 加入新的子控制器 view
        // 必須先移除舊 view,否則重複 addSubview 只會把它移到最上層
        childVC.view.frame = CGRectMake(0, 20, 320, 416);
        [self.view addSubview:childVC.view];

        // 更新當前子控制器,供下次移除使用
        _currentChildVC = childVC;
    }
}

#pragma mark - 建立所有子控制器(首頁、訊息、我、廣場、更多)

- (void)createAllChildViewControllers {
    for (Column *column in _columns) {
        Class c = NSClassFromString(column.columnClassName);
        UIViewController *childVC = nil;

        if ([NSStringFromClass(c) isEqualToString:@"MoreViewController"]) {
            // 特別注意:MoreViewController 繼承自 UITableViewController,
            // 若想要 grouped 樣式,必須在建立時就指定
            childVC = [[c alloc] initWithStyle:UITableViewStyleGrouped];
        } else {
            childVC = [[c alloc] init];
        }

        childVC.navigationItem.title = column.columnName;

        // 呼叫重寫後的版本,讓每個子控制器都被導航控制器包裝
        [self addChildViewController:childVC];
    }
}

#pragma mark - 重寫父類方法

// 統一在加入子控制器時包裝成導航控制器
- (void)addChildViewController:(UIViewController *)childVC {
    UINavigationController *nav = [[UINavigationController alloc] initWithRootViewController:childVC];
    [super addChildViewController:nav];
}

#pragma mark - 全域導航列主題

- (void)setGlobalNavigationItemColorTheme {
    // 1. 導航列本體:操作 appearance 等同操作全 App 的導航列
    UINavigationBar *navBar = [UINavigationBar appearance];
    [navBar setBackgroundImage:[UIImage imageStretchedWithName:@"navigationbar_background.png"]
                 forBarMetrics:UIBarMetricsDefault];

    [UIApplication sharedApplication].statusBarStyle = UIStatusBarStyleLightContent;

    // 標題文字屬性用字典設定
    NSMutableDictionary *navigationBarTitleDict = [NSMutableDictionary dictionary];
    [navigationBarTitleDict setObject:[UIColor darkGrayColor] forKey:NSForegroundColorAttributeName];
    // 字典不能放結構體,陰影要用 NSValue 包裝
    [navigationBarTitleDict setObject:[NSValue valueWithUIOffset:UIOffsetZero]
                                forKey:NSShadowAttributeName];
    [navBar setTitleTextAttributes:navigationBarTitleDict];

    // 2. 導航列上的 item
    UIBarButtonItem *barBtnItem = [UIBarButtonItem appearance];

    [barBtnItem setBackgroundImage:[UIImage imageNamed:@"navigationbar_button_background.png"]
                         forState:UIControlStateNormal
                        barMetrics:UIBarMetricsDefault];
    [barBtnItem setBackgroundImage:[UIImage imageNamed:@"navigationbar_button_background_pushed.png"]
                         forState:UIControlStateHighlighted
                        barMetrics:UIBarMetricsDefault];
    [barBtnItem setBackgroundImage:[UIImage imageNamed:@"navigationbar_button_background_disable.png"]
                         forState:UIControlStateDisabled
                        barMetrics:UIBarMetricsDefault];

    NSMutableDictionary *barItemTitleDict = [NSMutableDictionary dictionary];
    [barItemTitleDict setValue:[UIColor darkGrayColor] forKey:NSForegroundColorAttributeName];
    [barItemTitleDict setValue:[UIFont systemFontOfSize:13] forKey:NSFontAttributeName];

    [barBtnItem setTitleTextAttributes:barItemTitleDict forState:UIControlStateNormal];
    [barBtnItem setTitleTextAttributes:barItemTitleDict forState:UIControlStateHighlighted];
}

@end
Dock.h
//
//  Dock.h
//

// Dock 就是主控制器下方那條 bar,由一個個 DockBtn 組成
#import <UIKit/UIKit.h>

@class DockBtn;

@interface Dock : UIView

// 加入一個項目:圖標名、標題、對應子控制器的類名
- (void)addDockBtnWithIconName:(NSString *)iconName
                         title:(NSString *)title
       viewControllerClassName:(NSString *)viewControllerClassName;

// Dock 內某個按鈕被點擊時觸發
@property (copy, nonatomic) void (^btnClickBlock)(DockBtn *);

// 用程式碼決定哪一個 DockBtn 被點擊,參數是索引
- (void)setDockBtnClickedAtIndex:(int)index;

@end
Dock.m
//
//  Dock.m
//

#import "Dock.h"
#import "DockBtn.h"

@interface Dock() {
    // 記錄當前選中的 DockBtn
    DockBtn *_currentDockBtn;
}

@end

@implementation Dock

// init 內部會呼叫 initWithFrame
- (id)initWithFrame:(CGRect)frame {
    self = [super initWithFrame:frame];
    if (self) {
        // 用分類方法,傳 imageName 即可平鋪背景
        self.backgroundColor = [UIColor colorWithPatternImageNamed:@"tabbar_background.png"];
    }
    return self;
}

// 對外提供的介面:加入一個 DockBtn
- (void)addDockBtnWithIconName:(NSString *)iconName
                         title:(NSString *)title
       viewControllerClassName:(NSString *)viewControllerClassName {
    DockBtn *dockBtn = [DockBtn buttonWithType:UIButtonTypeCustom];
    [self addSubview:dockBtn];

    [dockBtn setTitle:title forState:UIControlStateNormal];

    // 設定正常與選中狀態的圖片,並取回圖片尺寸
    [dockBtn setBtnImgForNormalAndSelectedWithName:iconName];

    [dockBtn setViewControllerClassName:viewControllerClassName];

    // 監聽點擊:事件先傳給 Dock,再由 Dock 觸發 block 回到主控制器。
    // 原因是 dockBtn 是在 Dock 內部建立的,主控制器並不知道它的存在。
    [dockBtn addTarget:self
                action:@selector(dockBtnClick:)
      forControlEvents:UIControlEventTouchDown];

    // 每次新增按鈕後重新平均分布
    [self setDockBtnFrames];
}

// 讓 Dock 內所有按鈕平均分布
- (void)setDockBtnFrames {
    int dockBtnNum = self.subviews.count;

    CGFloat dockBtnWidth = self.frame.size.width / dockBtnNum;
    CGFloat dockBtnHeight = self.frame.size.height;

    for (int i = 0; i < dockBtnNum; i++) {
        DockBtn *btn = self.subviews[i];
        btn.frame = CGRectMake(i * dockBtnWidth, 0, dockBtnWidth, dockBtnHeight);

        // 初始化時把第 0 個(首頁)設為選中
        if (i == 0) {
            btn.selected = YES;
            _currentDockBtn = btn;
        }

        // 綁定 tag 作為索引,點擊時才知道按了哪一個
        btn.tag = i;
    }
}

// 點擊處理:切換選中狀態,並把事件往上拋
- (void)dockBtnClick:(DockBtn *)btn {
    _currentDockBtn.selected = NO;
    btn.selected = YES;
    _currentDockBtn = btn;

    if (_btnClickBlock) {
        // 把 DockBtn 傳回去,主控制器能從中讀到對應的控制器類名
        _btnClickBlock(btn);
    }
}

// 用程式碼模擬點擊某一個 DockBtn
- (void)setDockBtnClickedAtIndex:(int)index {
    // 健壯性判斷
    if (index < 0 || index >= self.subviews.count) return;

    DockBtn *btn = self.subviews[index];
    [self dockBtnClick:btn];
}

@end
DockBtn.h
//
//  DockBtn.h
//

// 一個 DockBtn 代表 Dock 上的一個按鈕,
// 它記著自己對應的子控制器類名,例如首頁按鈕存的就是 HomeViewController
#import <UIKit/UIKit.h>

@interface DockBtn : UIButton

@property (nonatomic, copy) NSString *viewControllerClassName;

@end
DockBtn.m
//
//  DockBtn.m
//

#import "DockBtn.h"

#define kBtnContentWidth   contentRect.size.width
#define kBtnContentHeight  contentRect.size.height
#define kImageHeightRatio  0.6
#define kLabelHeightRatio  (1 - kImageHeightRatio)

@implementation DockBtn

// 通用屬性一律寫在建構方法裡
- (id)initWithFrame:(CGRect)frame {
    self = [super initWithFrame:frame];
    if (self) {
        // 1. 文字屬性:居中、字級
        self.titleLabel.textAlignment = NSTextAlignmentCenter;
        self.titleLabel.font = [UIFont systemFontOfSize:12];

        // 2. 圖片屬性:等比例縮放,並取消預設的高亮變色
        self.imageView.contentMode = UIViewContentModeScaleAspectFit;
        self.adjustsImageWhenHighlighted = NO;

        // 3. 選中時的背景
        [self setBgImgForSelected:@"tabbar_slider.png"];
    }
    return self;
}

#pragma mark - 重寫父類方法

// 這裡只需要一般與選中兩種狀態的圖,因此覆寫掉高亮時的變色行為
- (void)setHighlighted:(BOOL)highlighted {
    // 刻意留空
}

#pragma mark - 圖片區域(圖在上,居中)

- (CGRect)imageRectForContentRect:(CGRect)contentRect {
    // 要居中,最簡潔的做法是讓圖片寬度與按鈕同寬
    return CGRectMake(0, 0, kBtnContentWidth, kBtnContentHeight * kImageHeightRatio);
}

#pragma mark - 文字區域(文字在下,居中)

- (CGRect)titleRectForContentRect:(CGRect)contentRect {
    // 文字 y 位於圖片下緣再上移 5
    CGFloat labelY = kBtnContentHeight * kImageHeightRatio - 5;
    CGFloat labelHeight = kBtnContentHeight - labelY;
    return CGRectMake(0, labelY, kBtnContentWidth, labelHeight);
}

@end
模型 Column.h
//
//  Column.h
//

// 一個 Column 模型對應 Dock 上的一個按鈕
#import <Foundation/Foundation.h>

@interface Column : NSObject

@property (nonatomic, copy) NSString *columnName;      // 欄目名稱
@property (nonatomic, copy) NSString *columnImgName;   // 欄目圖片名稱
@property (nonatomic, copy) NSString *columnClassName; // 對應控制器的類名

// UI 控件用 weak,字串用 copy,其他物件用 strong

// 建構函式
+ (Column *)columnNamed:(NSString *)columnName
                imgName:(NSString *)columnImgName
              className:(NSString *)columnClassName;

// 類方法:字典轉物件,類似 JavaBean 的一次性填充
+ (Column *)columnWithDict:(NSDictionary *)dict;

// 物件方法:設定屬性後回傳自己
- (Column *)initWithDict:(NSDictionary *)dict;

@end
模型 Column.m
//
//  Column.m
//

#import "Column.h"

@implementation Column

+ (Column *)columnNamed:(NSString *)columnName
                imgName:(NSString *)columnImgName
              className:(NSString *)columnClassName {
    // 用 self 是為了兼容子類
    Column *column = [[self alloc] init];
    column.columnName = columnName;
    column.columnImgName = columnImgName;
    column.columnClassName = columnClassName;
    return column;
}

+ (Column *)columnWithDict:(NSDictionary *)dict {
    return [[self alloc] initWithDict:dict];
}

- (Column *)initWithDict:(NSDictionary *)dict {
    // 必須先呼叫父類的 init
    if (self = [super init]) {
        [self setValuesForKeysWithDictionary:dict];
    }
    return self;
}

@end
Dock 上五個欄目按鈕的資料來源是 ColumnList.plist:
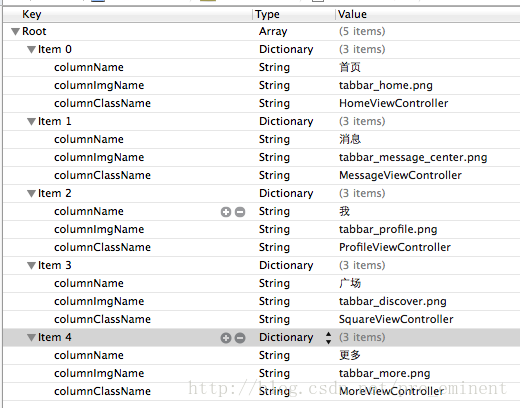
這套骨架最值得沿用的一點,是把「欄目」抽象成資料:plist 裡多一行,畫面上就多一個頁籤,控制器的建立、快取與切換全都不用動。另外,DockBtn 重寫 imageRectForContentRect: 與 titleRectForContentRect: 來決定圖文比例,也比用兩張切圖拼貼來得乾淨。
- 上一篇文章: iOS 開發之路——實作啟動時的新功能引導頁
- 下一篇文章: iOS 開發之路——微博「更多」頁面的實作細節