
iOS 開發之路——微博「更多」頁面的實作細節
編輯:iOS 相關教學
最終效果圖:
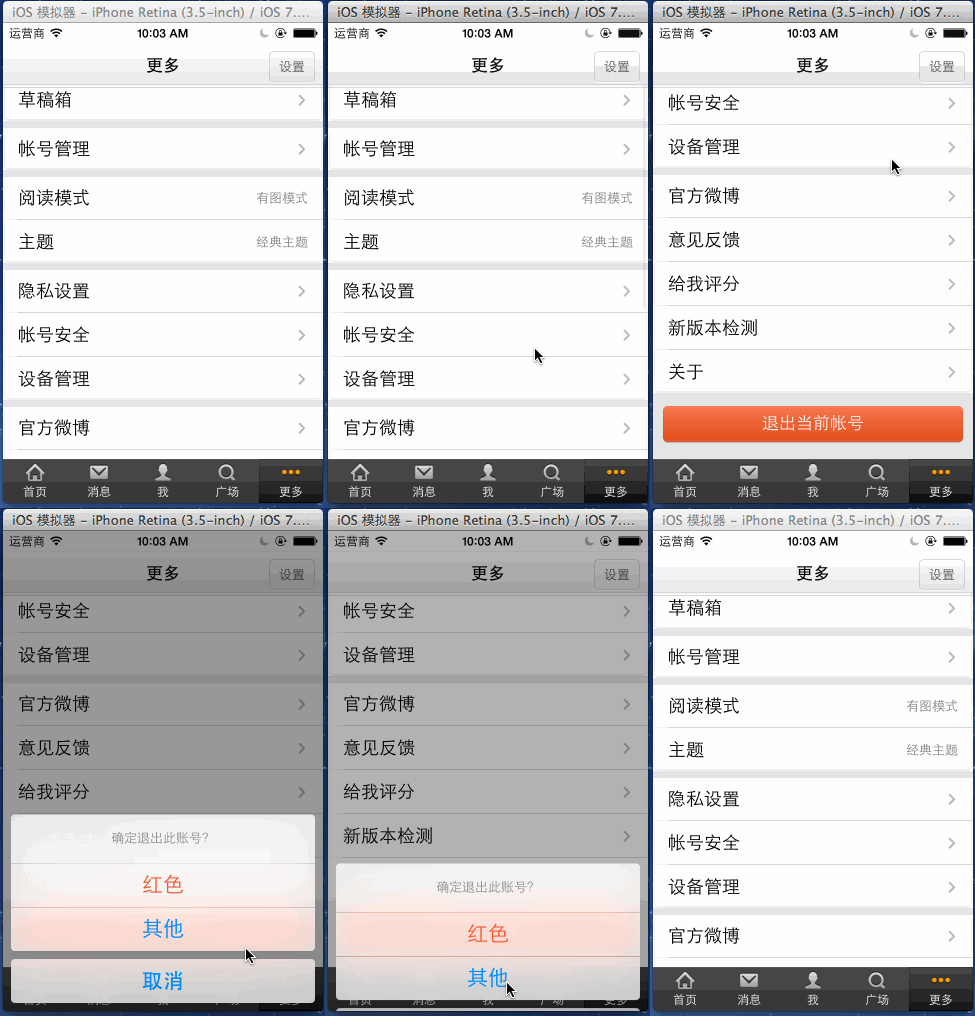
「更多」頁看起來樸素,但細節不少:grouped 樣式的背景要換掉得先清掉自帶的條紋 backgroundView、每組的首尾要換不同圓角圖、右側附屬視圖有的顯示箭頭有的顯示文字,最後還要在列表底部墊一段空白,避免誤觸退出鈕。
MoreViewController.m
//
//  MoreViewController.m
//  20_帥哥no微博
//

#import "MoreViewController.h"

@interface MoreViewController () {
    // more.plist 的根是字典,其中一組 key 是 zh_CN,對應的值是陣列:
    // 陣列長度代表有幾個分組,每個元素本身又是一個陣列(該組的各列)
    NSArray *_groups;
}

@end

@implementation MoreViewController

- (void)viewDidLoad {
    [super viewDidLoad];

    // 1. 設定導航列右側的「設定」按鈕
    [self setRightBarButtonItem];

    // 2. 載入 more.plist
    [self loadPlistOfMore];

    // 3. 設定 tableView 的全域背景
    [self setTableViewGlobalBg];

    // 4. 在列表最底部加上退出按鈕
    [self addEixtBtnAtBottom];
}

// 1. 導航列右側按鈕
- (void)setRightBarButtonItem {
    self.navigationItem.rightBarButtonItem =
        [[UIBarButtonItem alloc] initWithTitle:@"設置"
                                         style:UIBarButtonItemStylePlain
                                        target:self
                                        action:@selector(settings)];
}

// 2. 載入 more.plist
- (void)loadPlistOfMore {
    NSURL *url = [[NSBundle mainBundle] URLForResource:@"more" withExtension:@"plist"];
    _groups = [NSDictionary dictionaryWithContentsOfURL:url][@"zh_CN"];
}

// 3. 設定 tableView 的全域背景
- (void)setTableViewGlobalBg {
    // 清除 iOS 7 中 tableView 頂部多出的空白
    self.automaticallyAdjustsScrollViewInsets = NO;

    // 重點:grouped 樣式想換背景,必須先清掉條紋狀的 backgroundView,
    // 才能設定自己的背景色
    self.tableView.backgroundView = nil;
    self.tableView.backgroundColor = kGlobalBg;

    // 縮小各分組之間的間距
    self.tableView.sectionHeaderHeight = 0;
    self.tableView.sectionFooterHeight = 5;
}

// 4. 建立退出按鈕並掛到 tableFooterView
- (void)addEixtBtnAtBottom {
    // tableFooterView 的寬度固定是 320,只有高度可調
    UIView *footerView = [[UIView alloc] init];
    footerView.frame = CGRectMake(0, 0, 320, 60);
    self.tableView.tableFooterView = footerView;

    UIButton *btnExit = [UIButton buttonWithType:UIButtonTypeCustom];
    // 按鈕是加在 footerView 裡,座標相對於 footerView
    btnExit.frame = CGRectMake(10, 5, 300, 40);
    btnExit.titleLabel.font = [UIFont systemFontOfSize:17];

    [btnExit addTarget:self
                action:@selector(exitBtnClick)
      forControlEvents:UIControlEventTouchUpInside];

    [btnExit setBtnBgImgForNormalAndHighightedWithName:@"common_button_red.png"];

    // 按鈕文字取最後一組的第一列
    NSString *btnTitle = [_groups lastObject][0][@"name"];
    [btnExit setTitle:btnTitle forState:UIControlStateNormal];

    // 這段墊高就是為了避免使用者點 Dock 時誤觸退出鈕
    [self.tableView.tableFooterView addSubview:btnExit];
}

- (void)settings {
    NSLog(@"點擊了設置按鈕");
}

// 點擊退出
- (void)exitBtnClick {
    // cancelButtonTitle 是黑色
    // destructiveButtonTitle 是紅色
    // otherButtonTitles 是灰白色
    UIActionSheet *actionSheet = [[UIActionSheet alloc]
        initWithTitle:@"確定退出此賬號?"
        delegate:nil
        cancelButtonTitle:@"取消"
        destructiveButtonTitle:@"紅色"
        otherButtonTitles:@"其他", nil];

    // 建議顯示到 window 上,避免控制器的 view 未佔滿視窗而點不中
    [actionSheet showInView:self.view.window];
}

- (void)setting {
    NSLog(@"設置");
}

- (void)tableView:(UITableView *)tableView didSelectRowAtIndexPath:(NSIndexPath *)indexPath {
    [tableView deselectRowAtIndexPath:indexPath animated:YES];
}

#pragma mark - 資料來源

// 最後一組是特別的退出按鈕,不進入列表
- (NSInteger)numberOfSectionsInTableView:(UITableView *)tableView {
    return _groups.count - 1;
}

- (NSInteger)tableView:(UITableView *)tableView numberOfRowsInSection:(NSInteger)section {
    NSArray *rows = _groups[section];
    return rows.count;
}

- (UITableViewCell *)tableView:(UITableView *)tableView cellForRowAtIndexPath:(NSIndexPath *)indexPath {
    static NSString *cellID = @"beyond";

    // 1. 先從重用池取
    UITableViewCell *cell = [tableView dequeueReusableCellWithIdentifier:cellID];
    if (cell == nil) {
        cell = [[UITableViewCell alloc] initWithStyle:UITableViewCellStyleDefault
                                     reuseIdentifier:cellID];

        // 清掉文字標籤的背景
        cell.textLabel.backgroundColor = [UIColor clearColor];

        // 讓高亮時的文字顏色與一般狀態相同,避免變色
        cell.textLabel.highlightedTextColor = cell.textLabel.textColor;

        // 重點:建立時就把背景 view 與選中背景 view 初始化好
        cell.backgroundView = [[UIImageView alloc] init];
        cell.selectedBackgroundView = [[UIImageView alloc] init];
    }

    // 2. 設定獨一無二的內容
    cell.textLabel.text = _groups[indexPath.section][indexPath.row][@"name"];

    // 3. 依所在位置挑選背景圖
    UIImageView *bgImgView = (UIImageView *)cell.backgroundView;
    UIImageView *selectedBgImgView = (UIImageView *)cell.selectedBackgroundView;

    NSArray *rows = _groups[indexPath.section];
    int rowNum = rows.count;
    NSString *name = nil;

    if (rowNum == 1) {
        // 該組只有一列:四角都圓
        name = @"common_card_background.png";
    } else if (indexPath.row == 0) {
        // 該組的第一列:上半圓角
        name = @"common_card_top_background.png";
    } else if (indexPath.row == rowNum - 1) {
        // 該組的最後一列:下半圓角
        name = @"common_card_bottom_background.png";
    } else {
        // 中間列:無圓角
        name = @"common_card_middle_background.png";
    }

    bgImgView.image = [UIImage imageStretchedWithName:name];
    selectedBgImgView.image =
        [UIImage imageStretchedWithName:[name fileNameInsertSuffixBeforeExtension:@"_highlighted"]];

    // 4. 最右側的指示器:文字與圖片兩種情況
    if (indexPath.section == 2) {
        // 第 2 組顯示文字說明
        UILabel *label = [[UILabel alloc] init];
        label.backgroundColor = [UIColor clearColor];
        label.font = [UIFont systemFontOfSize:13];
        label.textColor = [UIColor grayColor];
        label.textAlignment = NSTextAlignmentRight;
        label.bounds = CGRectMake(0, 0, 100, 30);

        // 第 1 列顯示「有圖模式」,第 2 列顯示「經典主題」
        label.text = (indexPath.row == 0) ? @"有圖模式" : @"經典主題";

        cell.accessoryView = label;
    } else {
        // 其他組顯示向右的箭頭
        cell.accessoryView = [[UIImageView alloc] initWithImage:[UIImage imageNamed:@"common_icon_arrow.png"]];
    }

    return cell;
}

@end
「更多」頁面的資料來源 more.plist
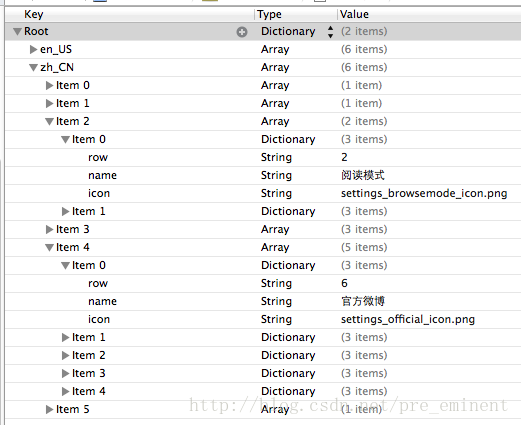
這一頁的設計思路很值得借鑑:把分組與各列文字全部交給 plist,程式碼只負責依「該組共幾列、目前是第幾列」判斷該用哪張背景切圖。如此一來,往後調整選單項目完全不必碰程式碼,只要改設定檔即可。