
iOS 圖片瀏覽實作:點擊單張圖片全屏預覽與雙指縮放
網路上關於圖片全屏預覽的分享不少,有些方案功能確實強大,但多數時候我們真正需要的只是一個乾淨可用的基礎版本。下面這份實作聚焦在兩件事:點擊縮圖後平滑放大至全屏,以及雙指捏合縮放。放大後呈現的是同一張原圖,尚未做清晰度切換等高階處理——如果你要接入高清圖,只需在動畫結束後替換 image 即可。
核心思路
整個效果可以拆成四個環節:
- 為縮圖掛上單擊手勢,點擊時觸發放大流程。
- 建立一個鋪滿全屏的 UIScrollView 作為黑色背景,把一份 imageView 複製上去,起始 frame 對齊原本縮圖的位置。
- 用動畫把這個 imageView 的 frame 放大到依螢幕寬度等比縮放後的尺寸,並垂直居中。
- 點擊背景時反向播放動畫,縮回原始 frame 後把背景移除。
之所以用 UIScrollView 而不是普通 UIView 當容器,是因為它自帶 viewForZoomingInScrollView: 的縮放能力,省下自己處理捏合手勢的工夫。
完整程式碼
//
//  ViewController.m
//  XWZoomImageView
//
//  Created by xiao on 15/11/13.
//  Copyright © 2015年 xiao. All rights reserved.
//

#import "ViewController.h"

@interface ViewController () <UIScrollViewDelegate>
@property (weak, nonatomic) IBOutlet UIImageView *picView;
@property (weak, nonatomic) UIScrollView *scrollView;
@property (weak, nonatomic) UIImageView *lastImageView;
@property (nonatomic, assign) CGRect originalFrame;
@property (nonatomic, assign) BOOL isDoubleTap;
@end

@implementation ViewController

- (void)viewDidLoad
{
    [super viewDidLoad];
    self.picView.userInteractionEnabled = YES;

    // 加入單擊手勢
    UITapGestureRecognizer *tap = [[UITapGestureRecognizer alloc] initWithTarget:self
                                                                        action:@selector(showZoomImageView:)];
    [self.picView addGestureRecognizer:tap];
}

- (void)showZoomImageView:(UITapGestureRecognizer *)tap
{
    if (![(UIImageView *)tap.view image]) {
        return;
    }

    // 用 scrollView 作為背景
    UIScrollView *bgView = [[UIScrollView alloc] init];
    bgView.frame = [UIScreen mainScreen].bounds;
    bgView.backgroundColor = [UIColor blackColor];

    // 點擊背景即可關閉
    UITapGestureRecognizer *tapBg = [[UITapGestureRecognizer alloc] initWithTarget:self
                                                                          action:@selector(tapBgView:)];
    [bgView addGestureRecognizer:tapBg];

    UIImageView *picView = (UIImageView *)tap.view;
    UIImageView *imageView = [[UIImageView alloc] init];
    imageView.image = picView.image;
    // 起始位置對齊原本的縮圖
    imageView.frame = [bgView convertRect:picView.frame fromView:self.view];
    [bgView addSubview:imageView];

    [[[UIApplication sharedApplication] keyWindow] addSubview:bgView];

    self.lastImageView = imageView;
    self.originalFrame = imageView.frame;
    self.scrollView = bgView;

    // 最大放大倍率
    self.scrollView.maximumZoomScale = 1.5;
    self.scrollView.delegate = self;

    [UIView animateWithDuration:0.5 animations:^{
        CGRect frame = imageView.frame;
        frame.size.width = bgView.frame.size.width;
        frame.size.height = frame.size.width * (imageView.image.size.height / imageView.image.size.width);
        frame.origin.x = 0;
        frame.origin.y = (bgView.frame.size.height - frame.size.height) * 0.5;
        imageView.frame = frame;
    }];
}

- (void)tapBgView:(UITapGestureRecognizer *)tapBgRecognizer
{
    self.scrollView.contentOffset = CGPointZero;

    [UIView animateWithDuration:0.5 animations:^{
        self.lastImageView.frame = self.originalFrame;
        tapBgRecognizer.view.backgroundColor = [UIColor clearColor];
    } completion:^(BOOL finished) {
        [tapBgRecognizer.view removeFromSuperview];
        self.scrollView = nil;
        self.lastImageView = nil;
    }];
}

// 回傳可縮放的視圖
- (UIView *)viewForZoomingInScrollView:(UIScrollView *)scrollView
{
    return self.lastImageView;
}

@end
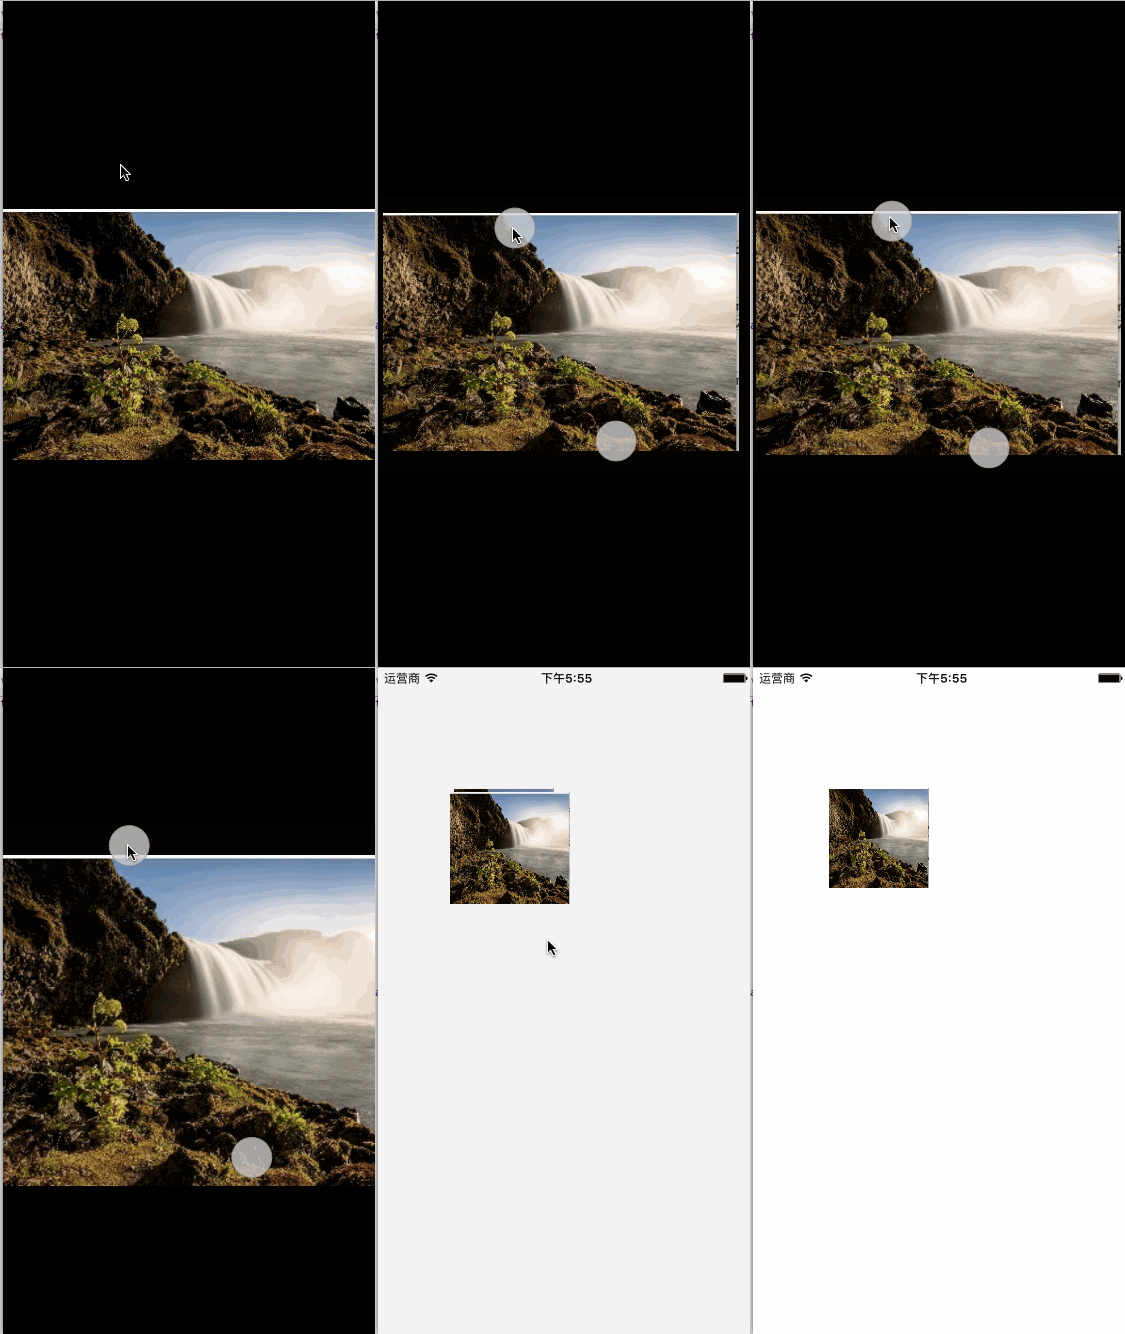
效果大致如下:
另一種實作:封裝成獨立類別
如果希望這段能力可以在專案各處重複使用,把它收斂到一個類別中會更清爽。這個版本用半透明黑色遮罩取代純黑背景,並透過 tag 定位 imageView:
//
//  ZoomImage.h
//

#import <UIKit/UIKit.h>

@interface ZoomImage : NSObject

/**
 *  @brief 點擊圖片放大,再次點擊縮小
 *
 *  @param oldImageView 頭像所在的 imageView
 */
+ (void)showImage:(UIImageView*)avatarImageView;

@end
//
//  ZoomImage.m
//

#import "ZoomImage.h"

static CGRect oldframe;

@implementation ZoomImage

+ (void)showImage:(UIImageView*)avatarImageView
{
    UIImage *image = avatarImageView.image;

    // 取得根窗口
    UIWindow *window = [UIApplication sharedApplication].keyWindow;

    UIView *backgroundView = [[UIView alloc] initWithFrame:CGRectMake(0, 0, WIDTH, HEIGHT)];
    oldframe = [avatarImageView convertRect:avatarImageView.bounds toView:window];

    backgroundView.backgroundColor = [UIColor blackColor];
    backgroundView.alpha = 0.5;

    UIImageView *imageView = [[UIImageView alloc] initWithFrame:oldframe];
    imageView.image = image;
    imageView.tag = 1;

    [backgroundView addSubview:imageView];
    [window addSubview:backgroundView];

    // 點擊圖片縮小的手勢
    UITapGestureRecognizer *tap = [[UITapGestureRecognizer alloc] initWithTarget:self
                                                                        action:@selector(hideImage:)];
    [backgroundView addGestureRecognizer:tap];

    [UIView animateWithDuration:0.3 animations:^{
        imageView.frame = CGRectMake(0,
            ([UIScreen mainScreen].bounds.size.height
             - image.size.height * [UIScreen mainScreen].bounds.size.width / image.size.width) / 2,
            [UIScreen mainScreen].bounds.size.width,
            image.size.height * [UIScreen mainScreen].bounds.size.width / image.size.width);
        backgroundView.alpha = 1;
    }];
}

+ (void)hideImage:(UITapGestureRecognizer *)tap
{
    UIView *backgroundView = tap.view;
    UIImageView *imageView = (UIImageView *)[tap.view viewWithTag:1];

    [UIView animateWithDuration:0.3 animations:^{
        imageView.frame = oldframe;
        backgroundView.alpha = 0;
    } completion:^(BOOL finished) {
        [backgroundView removeFromSuperview];
    }];
}

@end
幾個實作細節值得留意
為什麼要保存 originalFrame。關閉動畫需要知道「縮回去該到哪裡」。用 static 變數或物件屬性存下縮圖的原始 frame,動畫才有終點。
手勢的可衝突性。背景 scrollView 上同時掛了「點擊關閉」手勢,而 scrollView 本身又要處理縮放手勢。實測單擊與捏合不會互相干擾,但如果你的場景裡圖片本身也需要單擊觸發其他行為,建議加上 requireGestureRecognizerToFail: 或自訂 gestureRecognizer 的 shouldRecognizeSimultaneously 邏輯來約束。
高解析度切換。若網路條件允許,可以在放大動畫的 completion 中異步載入高解析度版本再替換 image,使用者視覺上會感覺「越放大越清晰」,體驗更好。
橫向手勢關閉。目前只實作了點擊關閉。若想加入目前主流的「下拉關閉」,可以在背景 scrollView 上監聽 scrollViewDidScroll:,當 contentOffset.y 超過閾值時縮小背景透明度並跟手縮放 imageView。