
iOS 多線程核心課題:線程間通信與線程安全的實戰解析
編輯:iOS 相關教學
一、線程間通信
在一個進程裡,線程很少是孤立存在的。多數時候,好幾個線程需要彼此協作、互相傳遞資料,這就是線程間通信。
它通常體現在兩個場景上:一個線程把資料交給另一個線程;或者某個線程做完一段特定任務後,把後續工作轉交給另一個線程接手。
兩個關鍵方法
- (void)performSelectorOnMainThread:(SEL)aSelector withObject:(id)arg waitUntilDone:(BOOL)wait;
- (void)performSelector:(SEL)aSelector onThread:(NSThread *)thr withObject:(id)arg waitUntilDone:(BOOL)wait;
前者把方法調度回主線程執行,後者則可以指定任意一條目標線程。
實戰範例:非同步下載圖片
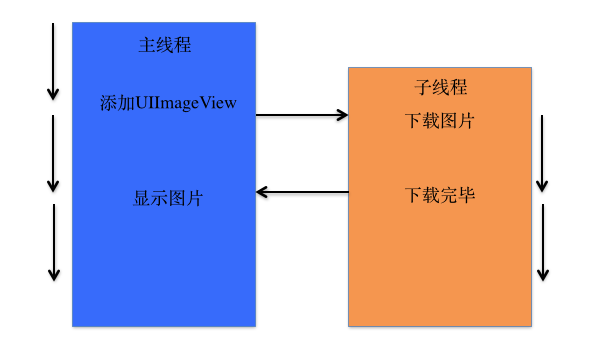
經典套路是:在子線程下載,回到主線程更新 UI。
//
//  YYViewController.m
//  06-NSThread04-線程間通信
//
#import "YYViewController.h"

@interface YYViewController ()
@property (weak, nonatomic) IBOutlet UIImageView *iconView;
@end
@implementation YYViewController

- (void)viewDidLoad
{
    [super viewDidLoad];
}

- (void)touchesBegan:(NSSet *)touches withEvent:(UIEvent *)event
{
    // 在子線程中呼叫 download 下載圖片
    [self performSelectorInBackground:@selector(download) withObject:nil];
}

- (void)download
{
    // 1. 根據 URL 下載圖片
    NSURL *urlstr = [NSURL URLWithString:@"fdsf"];

    // 把圖片轉為二進位資料(這一步比較耗時)
    NSData *data = [NSData dataWithContentsOfURL:urlstr];

    // 把資料轉還原成圖片
    UIImage *image = [UIImage imageWithData:data];

    // 2. 回到主線程設定圖片
    [self performSelectorOnMainThread:@selector(settingImage:)
                          withObject:image
                       waitUntilDone:NO];
}

// 設定並顯示圖片
- (void)settingImage:(UIImage *)image
{
    self.iconView.image = image;
}

@end
回主線程的方式不止一種,下面這個版本示範三種等效寫法:
//
//  YYViewController.m
//  06-NSThread04-線程間通信
//
#import "YYViewController.h"
#import <NSData.h>

@interface YYViewController ()
@property (weak, nonatomic) IBOutlet UIImageView *iconView;
@end
@implementation YYViewController

- (void)viewDidLoad
{
    [super viewDidLoad];
}

- (void)touchesBegan:(NSSet *)touches withEvent:(UIEvent *)event
{
    // 在子線程中呼叫 download 下載圖片
    [self performSelectorInBackground:@selector(download) withObject:nil];
}

- (void)download
{
    // 1. 根據 URL 下載圖片
    NSURL *urlstr = [NSURL URLWithString:@"fdsf"];

    // 把圖片轉為二進位資料(這一步比較耗時)
    NSData *data = [NSData dataWithContentsOfURL:urlstr];

    // 把資料轉還原成圖片
    UIImage *image = [UIImage imageWithData:data];

    // 2. 回到主線程設定圖片

    // 寫法一
    // [self performSelectorOnMainThread:@selector(settingImage:) withObject:image waitUntilDone:NO];

    // 寫法二
    // [self.imageView performSelector:@selector(setImage:) onThread:[NSThread mainThread]
    //                       withObject:image waitUntilDone:NO];

    // 寫法三:直接對目標控件派送訊息
    [self.iconView performSelectorOnMainThread:@selector(setImage:)
                                   withObject:image
                                waitUntilDone:NO];
}

// 設定顯示圖片
// - (void)settingImage:(UIImage *)image
// {
//     self.iconView.image = image;
// }

@end
二、線程安全
問題從哪裡來:資源共享
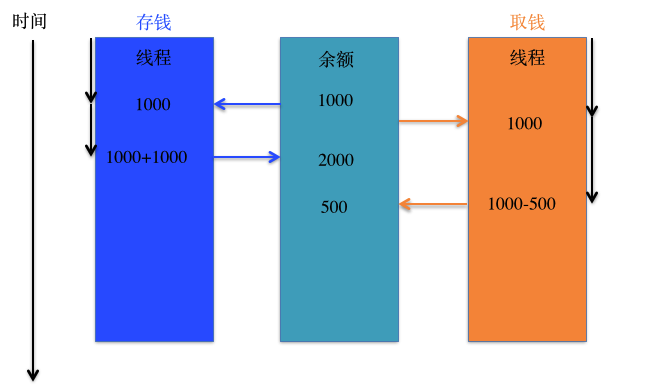
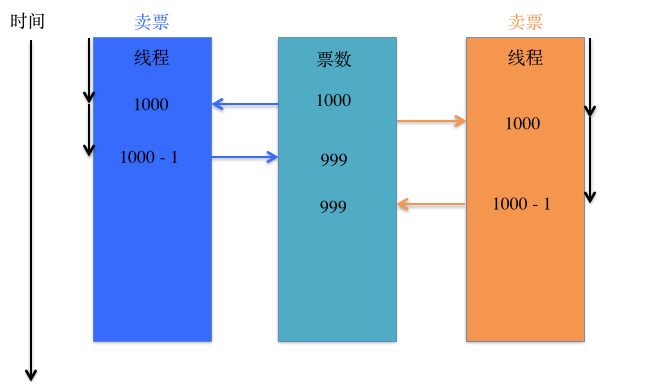
一份資源可能被多個線程同時存取——同一個物件、同一個變數、同一個檔案。當多個線程搶著讀寫同一塊資源時,資料錯亂與資料安全問題就隨之而來。
下面兩張圖呈現的就是典型的出錯現場:
用售票這個耳熟能詳的例子來重現問題:
//
//  YYViewController.m
//  05-線程安全
//
#import "YYViewController.h"

@interface YYViewController ()
// 剩餘票數
@property (nonatomic, assign) int leftTicketsCount;
@property (nonatomic, strong) NSThread *thread1;
@property (nonatomic, strong) NSThread *thread2;
@property (nonatomic, strong) NSThread *thread3;
@end
@implementation YYViewController

- (void)viewDidLoad
{
    [super viewDidLoad];

    // 預設 10 張票
    self.leftTicketsCount = 10;

    // 開啟多個線程,模擬多位售票員同時售票
    self.thread1 = [[NSThread alloc] initWithTarget:self selector:@selector(sellTickets) object:nil];
    self.thread1.name = @"售票員A";

    self.thread2 = [[NSThread alloc] initWithTarget:self selector:@selector(sellTickets) object:nil];
    self.thread2.name = @"售票員B";

    self.thread3 = [[NSThread alloc] initWithTarget:self selector:@selector(sellTickets) object:nil];
    self.thread3.name = @"售票員C";
}

- (void)sellTickets
{
    while (1) {
        // 1. 先檢查票數
        int count = self.leftTicketsCount;
        if (count > 0) {
            // 刻意暫停一小段時間,放大競爭窗口
            [NSThread sleepForTimeInterval:0.002];

            // 2. 票數 -1
            self.leftTicketsCount = count - 1;

            // 取得當前線程
            NSThread *current = [NSThread currentThread];
            NSLog(@"%@--賣了一張票,還剩餘 %d 張票", current, self.leftTicketsCount);
        } else {
            // 票賣完了,退出線程
            [NSThread exit];
        }
    }
}

- (void)touchesBegan:(NSSet *)touches withEvent:(UIEvent *)event
{
    // 開啟線程
    [self.thread1 start];
    [self.thread2 start];
    [self.thread3 start];
}

@end
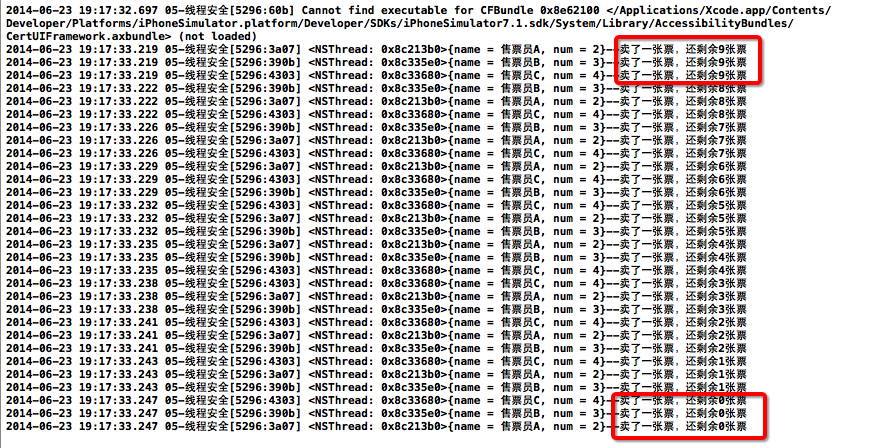
實際的輸出結果:
問題癥結
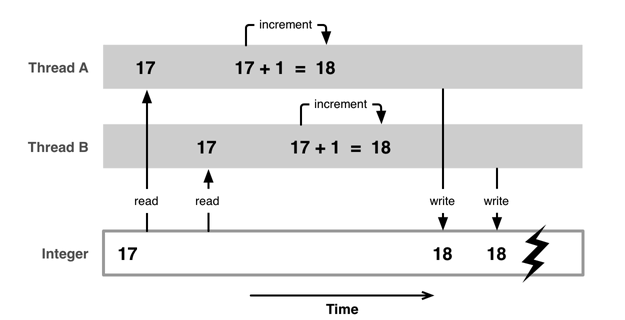
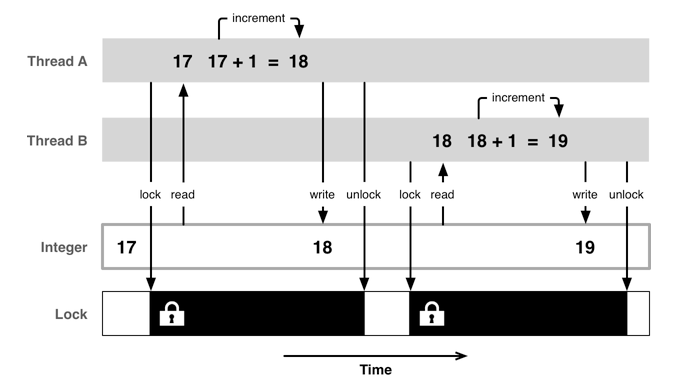
關鍵在於「讀取 → 判斷 → 寫回」這三個動作並不是不可分割的整體。三個售票員可能同時讀到 count 為 5,各自判斷通過後,各自把 4 寫回去——結果賣出了三張票,票數卻只減少了一張。這就是所謂的執行緒不安全的資料競爭。
解法:互斥鎖
Objective-C 提供了簡潔的 @synchronized 語法:
@synchronized(鎖物件) {
    // 需要加鎖保護的程式碼
}
注意:同一份需要保護的程式碼只能使用一把鎖,用多把鎖不會產生任何保護效果。
//
//  YYViewController.m
//  05-線程安全
//
#import "YYViewController.h"

@interface YYViewController ()
// 剩餘票數
@property (nonatomic, assign) int leftTicketsCount;
@property (nonatomic, strong) NSThread *thread1;
@property (nonatomic, strong) NSThread *thread2;
@property (nonatomic, strong) NSThread *thread3;
@end
@implementation YYViewController

- (void)viewDidLoad
{
    [super viewDidLoad];

    // 預設 10 張票
    self.leftTicketsCount = 10;

    // 開啟多個線程,模擬多位售票員同時售票
    self.thread1 = [[NSThread alloc] initWithTarget:self selector:@selector(sellTickets) object:nil];
    self.thread1.name = @"售票員A";

    self.thread2 = [[NSThread alloc] initWithTarget:self selector:@selector(sellTickets) object:nil];
    self.thread2.name = @"售票員B";

    self.thread3 = [[NSThread alloc] initWithTarget:self selector:@selector(sellTickets) object:nil];
    self.thread3.name = @"售票員C";
}

- (void)sellTickets
{
    while (1) {
        @synchronized(self) { // 只能有一把鎖

            // 1. 先檢查票數
            int count = self.leftTicketsCount;
            if (count > 0) {
                // 暫停一段時間
                [NSThread sleepForTimeInterval:0.002];

                // 2. 票數 -1
                self.leftTicketsCount = count - 1;

                // 取得當前線程
                NSThread *current = [NSThread currentThread];
                NSLog(@"%@--賣了一張票,還剩餘 %d 張票", current, self.leftTicketsCount);
            } else {
                // 退出線程
                [NSThread exit];
            }
        }
    }
}

- (void)touchesBegan:(NSSet *)touches withEvent:(UIEvent *)event
{
    // 開啟線程
    [self.thread1 start];
    [self.thread2 start];
    [self.thread3 start];
}

@end
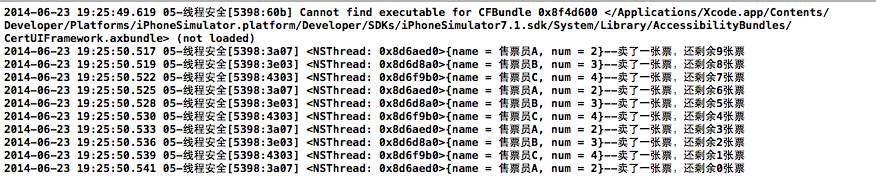
加鎖之後的執行結果:
互斥鎖的取捨。優點很明確:能有效杜絕多線程搶奪資源造成的資料安全問題。缺點同樣明顯:需要消耗大量 CPU 資源。
使用前提。只有在多條線程搶奪同一塊資源時才需要它。相關術語叫「線程同步」,也就是讓多條線程按順序執行任務——互斥鎖正是線程同步技術的一種應用。
三、原子與非原子屬性
Objective-C 宣告屬性時可以在 nonatomic 與 atomic 之間選擇:
- atomic:原子屬性,會為 setter 加鎖。這也是預設值。
- nonatomic:非原子屬性,不為 setter 加鎖。
atomic 的加鎖原理,展開來看就是:
@property (assign, atomic) int age;

- (void)setAge:(int)age
{
    @synchronized(self) {
        _age = age;
    }
}
該怎麼選?
- atomic:線程安全,但要消耗較多資源。
- nonatomic:非線程安全,適合記憶體受限的行動裝置。
iOS 開發的實務建議:
- 所有屬性一律宣告為 nonatomic。
- 盡量從架構上避免多線程搶奪同一份資源。
- 把加鎖、資源競爭的業務邏輯交給伺服器端處理,減輕行動客戶端的負擔。