
iOS 開發技巧:引導用戶跳轉系統設置重新授予定位等權限
編輯:iOS 相關教學
iOS 8 以後有一個常被忽略的能力——與 App 設置項建立深層鏈接。用戶可以按照 App 的需要,去系統設置裡開啟位置、通知、聯絡人、相機、日曆、健康等各項授權。
遺憾的是,大多數 App 在被拒絕權限後,只是簡單彈出一個「請進入 設置 > 隱私 > 位置 > 開啟 OUR_APP」的文字提示,讓用戶自己去層層菜單裡翻找。相比之下,Twitter 的提示對話框就做得更貼心——它直接提供一個按鈕,一鍵跳到設置頁。
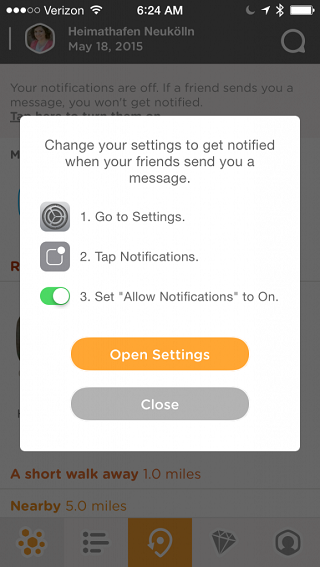
作為一名時常因此感到煩躁的用戶,我特別希望更多開發者能建立這種直接的深層鏈接,因為它的實現成本實在很低。
下面以一個日曆相關的 App 為例,演示如何在「權限被拒」的警告框裡加入一個跳轉設置的選項:
func showEventsAcessDeniedAlert() {
    let alertController = UIAlertController(title: "Sad Face Emoji!", message: "The calendar permission was not authorized. Please enable it in Settings to continue.", preferredStyle: .Alert)
    let settingsAction = UIAlertAction(title: "Settings", style: .Default) { (alertAction) in
        // 關鍵就在這幾行
        if let appSettings = NSURL(string: UIApplicationOpenSettingsURLString) {
            UIApplication.sharedApplication().openURL(appSettings)
        }
    }
    alertController.addAction(settingsAction)
    let cancelAction = UIAlertAction(title: "Cancel", style: .Cancel, handler: nil)
    alertController.addAction(cancelAction)
    presentViewController(alertController, animated: true, completion: nil)
}
真正實現深層鏈接的,其實只有這三行:
if let appSettings = NSURL(string: UIApplicationOpenSettingsURLString) {
    UIApplication.sharedApplication().openURL(appSettings)
}
當用戶拒絕授權後,就能像 Swarm 那樣,引導用戶一鍵回到設置界面。
僅僅加上這三行代碼,就能在使用權限這個關鍵環節大幅提升用戶體驗。以我自己為例,曾經因為日曆未被授權而無法繼續使用某個 App,那種卡住的感覺非常糟糕。因此,讓「修改權限」變得輕鬆,對用戶和開發者都是雙贏,這套思路同樣適用於許多其他場景。
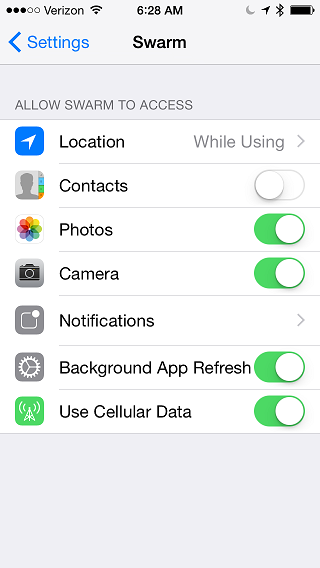
值得一提的是,這個方法在 iOS 9 上體驗更佳——設置界面會出現一個返回按鈕,讓用戶能直接跳回你的 App,全程無需手動切換。既然如此省事,實在沒有理由不用上它。
以上就是關於引導 iOS 用戶重新授權、開啟定位等功能的簡要介紹,希望能給你的用戶帶來更順暢的體驗。