
iOS UI 開發實戰:九宮格坐標推演與字典轉模型的完整重構
九宮格是 iOS 入門階段最經典的練習題之一,它同時涵蓋了布局計算、數據加載、控件組合與動畫。更進一步,我們還可以借這個例子把「字典轉模型」的重構過程完整走一遍——這才是工程化思維真正開始發力的地方。
第一部分:九宮格坐標計算
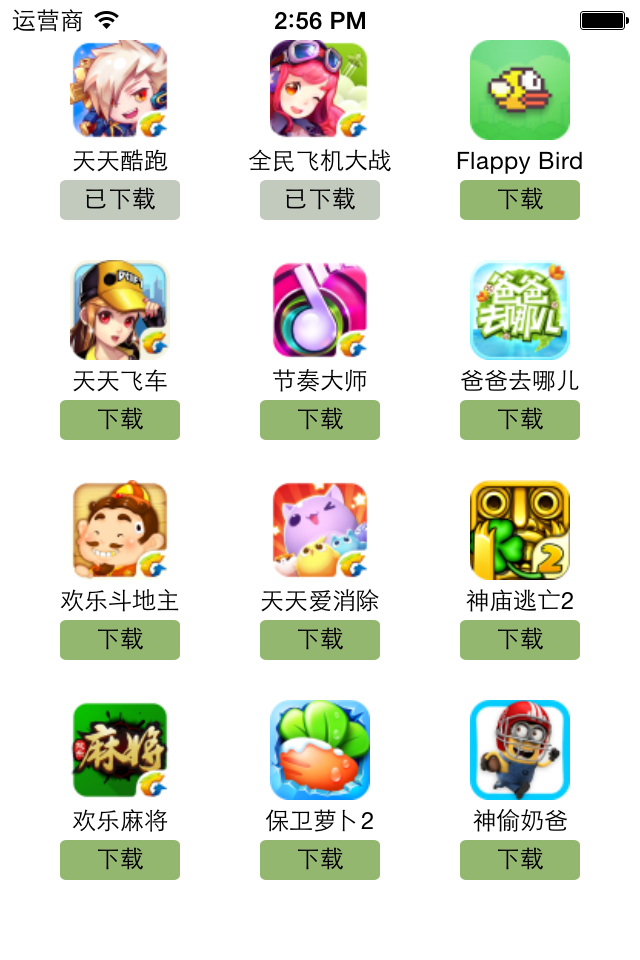
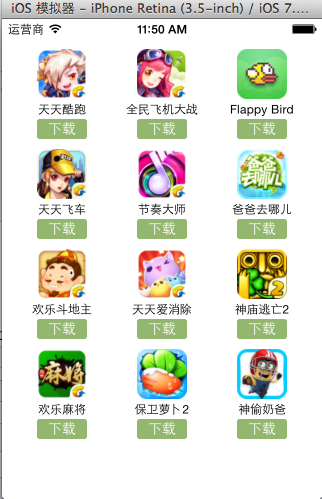
目標布局如下:
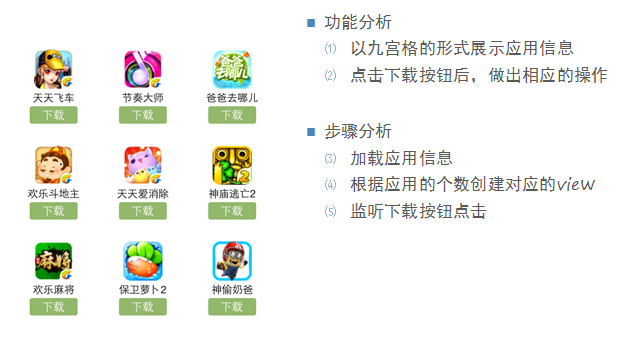
解題關鍵是找出規律。把每一格的 x、y 坐標列出來對照:
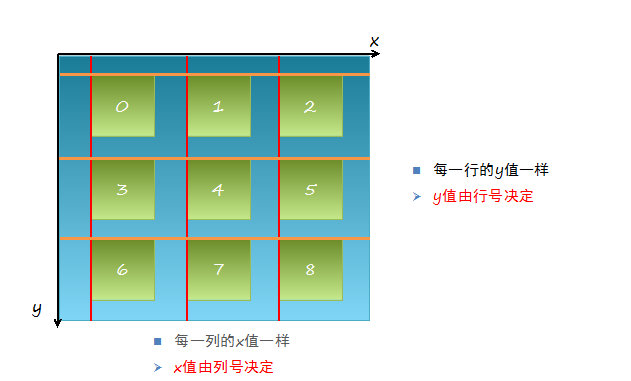
不難發現,只要知道「第幾行、第幾列」,坐標就能用一次簡單的線性公式算出來。
實現思路
- 明確每一塊用什麼 view。
- 理清父子關係:每個視圖只有一個父視圖,但可以有眾多子視圖。
- 先手寫幾個格子驗證思路,再改用 for 循環批量創建。
- 加載 app 數據,根據數據個數決定生成多少格。
- 往格子內部添加子控件(圖標、標籤、按鈕)。
- 為子控件裝配數據。
代碼示例
#import "YYViewController.h"

@interface YYViewController ()
@property (nonatomic, strong) NSArray *apps;
@end

@implementation YYViewController

// 1. 懶加載數據
- (NSArray *)apps
{
    if (!_apps)
    {
        NSString *path = [[NSBundle mainBundle] pathForResource:@"app.plist" ofType:nil];
        _apps = [NSArray arrayWithContentsOfFile:path];
    }
    return _apps;
}

- (void)viewDidLoad
{
    [super viewDidLoad];

    // 2. 布局設計
    int totalCol = 3;          // 三列
    CGFloat appViewW = 80;
    CGFloat appViewH = 90;

    // 左右與間距共用同一個 margin,讓整體均勻分佈
    CGFloat margin = (self.view.frame.size.width - totalCol * appViewW) / (totalCol + 1);

    int count = self.apps.count;
    for (int i = 0; i < count; i++)
    {
        int row = i / totalCol;   // 行號:1/3=0, 2/3=0, 3/3=1
        int loc = i % totalCol;   // 列號

        CGFloat appViewX = margin + (margin + appViewW) * loc;
        CGFloat appViewY = margin + (margin + appViewH) * row;

        // 創建容器視圖
        UIView *appView = [[UIView alloc] initWithFrame:CGRectMake(appViewX, appViewY,
                                                                  appViewW, appViewH)];
        [self.view addSubview:appView];

        // 子視圖一:圖標
        UIImageView *appImageView = [[UIImageView alloc] initWithFrame:CGRectMake(0, 0, 80, 50)];
        UIImage *appImage = [UIImage imageNamed:self.apps[i][@"icon"]];
        appImageView.image = appImage;
        appImageView.contentMode = UIViewContentModeScaleAspectFit;
        [appView addSubview:appImageView];

        // 子視圖二:名稱
        UILabel *appLabel = [[UILabel alloc] initWithFrame:CGRectMake(0, 50, 80, 20)];
        appLabel.text = self.apps[i][@"name"];
        appLabel.textAlignment = NSTextAlignmentCenter;
        appLabel.font = [UIFont systemFontOfSize:12.0];
        [appView addSubview:appLabel];

        // 子視圖三:下載按鈕
        UIButton *appBtn = [UIButton buttonWithType:UIButtonTypeCustom];
        appBtn.frame = CGRectMake(10, 70, 60, 20);
        [appBtn setBackgroundImage:[UIImage imageNamed:@"buttongreen"]
                          forState:UIControlStateNormal];
        [appBtn setBackgroundImage:[UIImage imageNamed:@"buttongreen_highlighted"]
                          forState:UIControlStateHighlighted];
        [appBtn setTitle:@"下載" forState:UIControlStateNormal];
        appBtn.titleLabel.font = [UIFont systemFontOfSize:12.0];
        [appview addSubview:appBtn];

        [appBtn addTarget:self action:@selector(click) forControlEvents:UIControlEventTouchUpInside];
    }
}

- (void)click
{
    // 用 block 動畫做提示,好處是可以在 completion 中善後
    UILabel *animLabel = [[UILabel alloc] initWithFrame:CGRectMake(self.view.center.x - 100,
                                                                  self.view.center.y + 20,
                                                                  200, 40)];
    animLabel.text = @"下載成功";
    animLabel.font = [UIFont systemFontOfSize:12.0];
    animLabel.backgroundColor = [UIColor brownColor];
    animLabel.alpha = 0;
    [self.view addSubview:animLabel];

    [UIView animateWithDuration:4.0 animations:^{
        animLabel.alpha = 1;
    } completion:^(BOOL finished) {
        // 動畫結束後的清理工作寫在這裡
    }];
}

@end
相比早期的 beginAnimations 首尾式動畫,block 動畫的優勢在於能直接拿到 completion 回調,做動畫後的資源清理非常方便。
第二部分:字典轉模型
先看看「能跑但有問題」的代碼
數據來源是一個 plist:
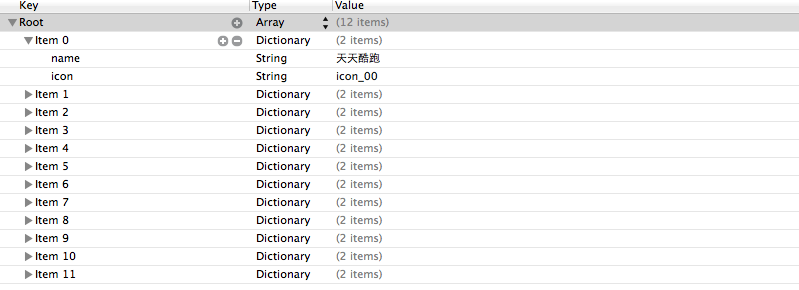
最初版本的實現把 NSDictionary 直接扔給控制器使用:
@interface LFViewController ()
@property (nonatomic, strong) NSArray *appList;
@end

@implementation LFViewController

- (NSArray *)appList
{
    if (!_appList)
    {
        NSBundle *bundle = [NSBundle mainBundle];
        NSString *path = [bundle pathForResource:@"app.plist" ofType:nil];
        _appList = [NSArray arrayWithContentsOfFile:path];
        NSLog(@"%@", _appList);
    }
    return _appList;
}

- (void)viewDidLoad
{
    [super viewDidLoad];

    int totalCol = 3;
    CGFloat viewW = 80;
    CGFloat viewH = 90;

    CGFloat marginX = (self.view.bounds.size.width - totalCol * viewW) / (totalCol + 1);
    CGFloat marginY = 10;
    CGFloat startY = 20;

    for (int i = 0; i < self.appList.count; i++)
    {
        int row = i / totalCol;
        int col = i % totalCol;

        CGFloat x = marginX + (viewW + marginX) * col;
        CGFloat y = startY + marginY + (viewH + marginY) * row;

        UIView *appView = [[UIView alloc] initWithFrame:CGRectMake(x, y, viewW, viewH)];
        [self.view addSubview:appView];

        // 0> 直接從字典按 key 取值
        NSDictionary *dict = self.appList[i];

        // 1> UIImageView
        UIImageView *imageView = [[UIImageView alloc] initWithFrame:CGRectMake(0, 0, viewW, 50)];
        imageView.image = [UIImage imageNamed:dict[@"icon"]];
        imageView.contentMode = UIViewContentModeScaleAspectFit;
        [appView addSubview:imageView];

        // 2> UILabel
        UILabel *label = [[UILabel alloc] initWithFrame:CGRectMake(0, imageView.bounds.size.height,
                                                                  viewW, 20)];
        label.text = dict[@"name"];
        label.font = [UIFont systemFontOfSize:12.0];
        label.textAlignment = NSTextAlignmentCenter;
        [appView addSubview:label];

        // 3> UIButton
        UIButton *button = [UIButton buttonWithType:UIButtonTypeCustom];
        button.frame = CGRectMake(15, 70, viewW - 30, 20);
        [button setTitle:@"下載" forState:UIControlStateNormal];
        button.titleLabel.font = [UIFont systemFontOfSize:14.0];

        [button setBackgroundImage:[UIImage imageNamed:@"buttongreen"]
                          forState:UIControlStateNormal];
        [button setBackgroundImage:[UIImage imageNamed:@"buttongreen_highlighted"]
                          forState:UIControlStateHighlighted];
        [appView addSubview:button];
    }
}

@end
問題在哪裡
上面代碼中,我們是直接通過字符串 key 取值:
dict[@"name"] = @"Jack";
NSString *name = dict[@"name"];
這些 key 全靠手敲,編輯器沒有任何智能提示。一旦拼錯,編譯器不會報錯也不會警告,只會靜靜地讓你拿到 nil,埋下難以排查的隱患。而且控制器被迫和原始數據結構緊密耦合,數據來源一變,業務代碼就得跟著改。
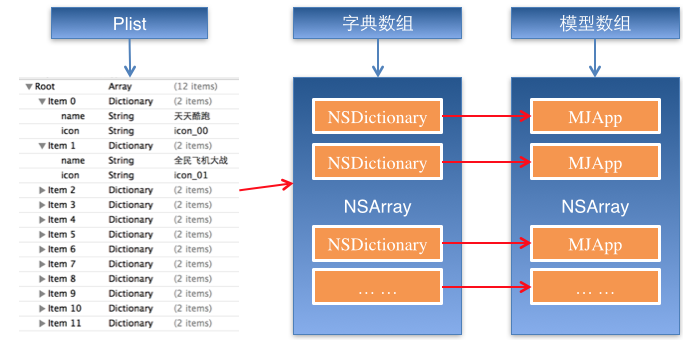
字典轉模型的好處
- 降低代碼耦合度,控制器不再直接面對字典。
- 所有字段映射的代碼集中在一處,出錯幾率大幅下降。
- 使用模型屬性時有類型檢查與代碼提示,編碼效率更高。
- 調用方完全不需要關心數據內部結構。
約定俗成的做法是在模型中提供兩個構造入口:
- (instancetype)initWithDict:(NSDictionary *)dict;
+ (instancetype)xxxWithDict:(NSDictionary *)dict;
此外,合理地把只該讀的字段聲明為 readonly,可以進一步收緊耦合。
重構後的模型類
頭文件:
#import <Foundation/Foundation.h>

@interface LFAppInfo : NSObject

// 應用程序名稱
@property (nonatomic, copy) NSString *name;

// 應用程序圖標名稱
@property (nonatomic, copy) NSString *icon;

// 圖像:readonly 只會生成 getter,不會生成帶下劃線的成員變量
@property (nonatomic, strong, readonly) UIImage *image;

// instancetype 會讓編譯器檢查實例化對象的準確類型
// 它只能用於返回值類型,不能作為參數類型
- (instancetype)initWithDict:(NSDictionary *)dict;

/** 工廠方法 */
+ (instancetype)appInfoWithDict:(NSDictionary *)dict;

@end
實現文件:
#import "LFAppInfo.h"

@interface LFAppInfo ()
{
    UIImage *_imageABC;
}
@end

@implementation LFAppInfo

- (instancetype)initWithDict:(NSDictionary *)dict
{
    self = [super init];
    if (self)
    {
        self.name = dict[@"name"];
        self.icon = dict[@"icon"];
    }
    return self;
}

+ (instancetype)appInfoWithDict:(NSDictionary *)dict
{
    return [[self alloc] initWithDict:dict];
}

// 圖像對象按需創建並緩存,避免重複加載
- (UIImage *)image
{
    if (!_imageABC)
    {
        _imageABC = [UIImage imageNamed:self.icon];
    }
    return _imageABC;
}

@end
控制器相應地變得清爽很多:
- (NSArray *)appList
{
    if (!_appList)
    {
        NSBundle *bundle = [NSBundle mainBundle];
        NSString *path = [bundle pathForResource:@"app.plist" ofType:nil];
        NSArray *array = [NSArray arrayWithContentsOfFile:path];

        // 遍歷數組,把字典逐個轉成模型對象
        NSMutableArray *arrayM = [NSMutableArray array];
        for (NSDictionary *dict in array)
        {
            [arrayM addObject:[LFAppInfo appInfoWithDict:dict]];
        }
        _appList = arrayM;
    }
    return _appList;
}
取值部分則從 dict[@"icon"] 變成了 appInfo.image,dict[@"name"] 變成了 appInfo.name,鍵名寫錯的風險徹底消失。
更進一步:讓模型自己負責加載
讀 plist 這件事其實也屬於模型的職責。把它收進模型類方法裡:
+ (NSArray *)questions
{
    NSArray *array = [NSArray arrayWithContentsOfFile:
                      [[NSBundle mainBundle] pathForResource:@"questions.plist" ofType:nil]];

    NSMutableArray *arrayM = [NSMutableArray array];
    for (NSDictionary *dict in array)
    {
        [arrayM addObject:[LFQuestion questionWithDict:dict]];
    }
    return arrayM;
}
控制器的懶加載就只剩一行:
- (NSArray *)questions
{
    if (!_questions)
    {
        _questions = [LFQuestion questions];
    }
    return _questions;
}
用 KVC 進一步簡化賦值
模型內部的字段賦值也可以交給鍵值編碼(Key Value Coding)來完成。Cocoa 的這一招允許你間接修改對象的屬性:
- (instancetype)initWithDict:(NSDictionary *)dict
{
    self = [super init];
    if (self)
    {
        [self setValue:dict[@"answer"] forKeyPath:@"answer"];
        [self setValue:dict[@"icon"]   forKeyPath:@"icon"];
        [self setValue:dict[@"title"]  forKeyPath:@"title"];
        [self setValue:dict[@"options"]forKeyPath:@"options"];
    }
    return self;
}
而 setValuesForKeysWithDictionary: 可以把上面這幾行直接濃縮成一句:
- (instancetype)initWithDict:(NSDictionary *)dict
{
    self = [super init];
    if (self)
    {
        // 注意:使用 KVC 要求模型的每個屬性都必須在字典中存在
        // 屬性可以比字典的鍵多,但不能少,否則會拋出異常
        [self setValuesForKeysWithDictionary:dict];
    }
    return self;
}
補充:兩個易混淆的知識點
readonly 屬性:它只禁止修改指針地址,對象自身的屬性依然可以改。聲明 readonly 時只生成 getter,不會生成帶下劃線的成員變量,所以通常要自己在 class extension 裡手動聲明 ivar 來存值。
instancetype 與 id 的區別:兩者在類型表達上都能代表任意對象;但 instancetype 只能用在返回值位置,不能當參數類型;而它比 id 多出的關鍵能力,是會讓編譯器去校驗返回值的真實類型,寫錯時能提前報警。