
iOS 自定義 UICollectionView 布局:打造彈簧捲動與圓形排列的瀑布流
電商類 App 展示商品,瀑布流幾乎是標配。相比 UITableView 或直接用 UIScrollView 手搓,基於 UICollectionView 做自定義布局是投入產出比最高的方案。
常見的三種實現路徑:
- UITableView——能做但很彆扭,實際項目中很少用。
- UIScrollView——完全手動,工作量最大。
- UICollectionView——主流選擇,通過自定義 Layout 就能實現各種奇形怪狀的排列。
一、UICollectionView 基礎對比
它與 UITableView 有著大量相似之處:都靠 data source 提供數據,都靠 delegate 響應交互,都支援自定義 cell 與 cell 重用,也都繼承自 UIScrollView 因而自帶滾動能力。
差異在於布局機制:UICollectionView 必須配備一個 UICollectionViewLayout 對象(最常用的是 UICollectionViewFlowLayout)來決定 cell 的擺放方式。只要繼承 UICollectionViewLayout,就能完全接管滾動方向與元素位置。
其中 UICollectionViewFlowLayout 就是所謂的「流水布局」,是實務中最常被直接使用的一種。
二、自定義布局要重寫的方法
布局初始化——在這裡完成所有預計算工作:
- (void)prepareLayout
{
    // 通常在此完成布局的初始化
}
尺寸變化時是否重新布局:
- (BOOL)shouldInvalidateLayoutForBoundsChange:(CGRect)newBounds
{
    // 默認返回 YES
}
提供布局屬性——這是自定義布局的核心:
- (nullable NSArray<__kindof UICollectionViewLayoutAttributes *> *)
        layoutAttributesForElementsInRect:(CGRect)rect
{
    // 返回 rect 區域內所有元素的布局屬性
}

- (nullable UICollectionViewLayoutAttributes *)
        layoutAttributesForItemAtIndexPath:(NSIndexPath *)indexPath
{
    // 返回指定 indexPath 元素的布局屬性
}
控制停止滾動時的偏移量——做「吸附」效果必須靠它:
- (CGPoint)targetContentOffsetForProposedContentOffset:(CGPoint)proposedContentOffset
                                  withScrollingVelocity:(CGPoint)velocity
{
    // 返回值即 UICollectionView 最終停留的位置
}
三、示例:兩種布局的切換
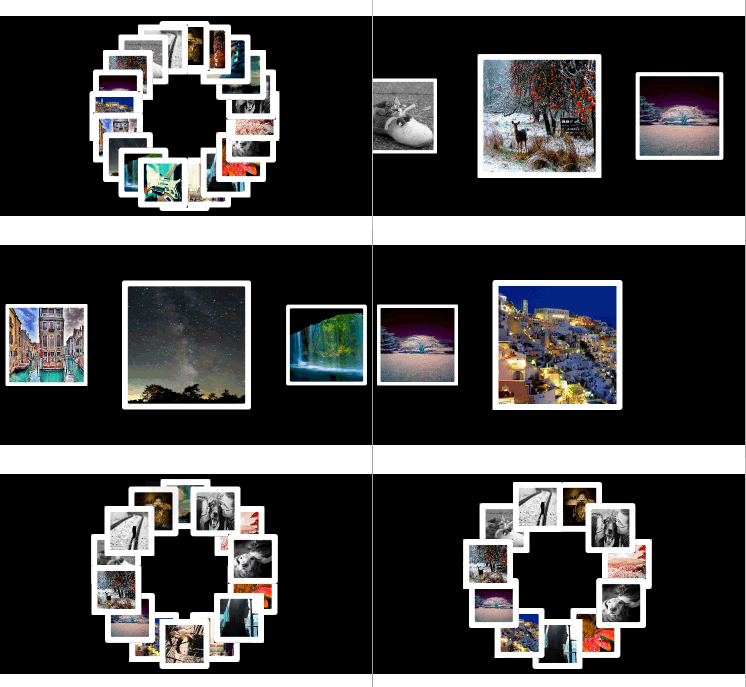
實現思路:用 UICollectionView 承載內容;寫兩個自定義布局(橫向流水布局與圓形布局);點擊 cell 時將其刪除;監聽控制器 view 的觸摸事件來切換布局。
橫向流水布局
初始化時設置滾動方向與左右內邊距,讓首尾元素能停在正中央:
- (void)prepareLayout
{
    [super prepareLayout];

    // 橫向滾動
    self.scrollDirection = UICollectionViewScrollDirectionHorizontal;

    // 左右內邊距各留半屏,使首尾元素可以居中
    CGFloat inset = (self.collectionView.frame.size.width - self.itemSize.width) * 0.5;
    self.sectionInset = UIEdgeInsetsMake(0, inset, 0, inset);
}

- (BOOL)shouldInvalidateLayoutForBoundsChange:(CGRect)newBounds
{
    return YES;
}
根據每個元素距離屏幕中心的遠近做縮放,這就是「近大遠小」的立體感來源:
- (nullable NSArray<UICollectionViewLayoutAttributes *> *)
        layoutAttributesForElementsInRect:(CGRect)rect
{
    NSArray *array = [super layoutAttributesForElementsInRect:rect];

    // 以 contentView 左上角為原點,計算 collectionView 的中點
    CGFloat centerX = self.collectionView.contentOffset.x
                      + self.collectionView.frame.size.width * 0.5;

    for (UICollectionViewLayoutAttributes *attribute in array)
    {
        // 距離中點的距離
        CGFloat delta = ABS(attribute.center.x - centerX);

        // 距離越遠,比例越小
        CGFloat scale = 1 - delta / self.collectionView.bounds.size.width;

        attribute.transform = CGAffineTransformMakeScale(scale, scale);
    }

    return [array copy];
}
停止滾動時吸附到最近的中心元素:
- (CGPoint)targetContentOffsetForProposedContentOffset:(CGPoint)proposedContentOffset
                                  withScrollingVelocity:(CGPoint)velocity
{
    CGRect rect;
    rect.origin.x = proposedContentOffset.x;
    rect.origin.y = 0;
    rect.size = self.collectionView.frame.size;

    NSArray *array = [super layoutAttributesForElementsInRect:rect];
    CGFloat centerX = proposedContentOffset.x
                      + self.collectionView.frame.size.width * 0.5;

    // 找出距離中點最近的那個元素
    CGFloat minDelta = MAXFLOAT;
    for (UICollectionViewLayoutAttributes *attribute in array)
    {
        CGFloat delta = attribute.center.x - centerX;
        if (ABS(minDelta) > ABS(delta))
        {
            minDelta = delta;
        }
    }

    proposedContentOffset.x += minDelta;
    return proposedContentOffset;
}
圓形布局
先用一個數組緩存所有元素的布局屬性,避免每次都被重複計算:
@property (nonatomic, strong) NSMutableArray *attrsArray;

- (NSMutableArray *)attrsArray
{
    if (_attrsArray == nil)
    {
        _attrsArray = [NSMutableArray array];
    }
    return _attrsArray;
}
- (void)prepareLayout
{
    [super prepareLayout];

    // 清除舊的布局屬性
    [self.attrsArray removeAllObjects];

    NSInteger count = [self.collectionView numberOfItemsInSection:0];
    for (NSInteger i = 0; i < count; i++)
    {
        NSIndexPath *indexPath = [NSIndexPath indexPathForItem:i inSection:0];
        UICollectionViewLayoutAttributes *attrs =
            [self layoutAttributesForItemAtIndexPath:indexPath];
        [self.attrsArray addObject:attrs];
    }
}

- (nullable UICollectionViewLayoutAttributes *)
        layoutAttributesForItemAtIndexPath:(nonnull NSIndexPath *)indexPath
{
    NSInteger count = [self.collectionView numberOfItemsInSection:0];

    // 圓半徑與圓心
    CGFloat radius = 70;
    CGFloat oX = self.collectionView.frame.size.width * 0.5;
    CGFloat oY = self.collectionView.frame.size.height * 0.5;

    UICollectionViewLayoutAttributes *attrs =
        [UICollectionViewLayoutAttributes layoutAttributesForCellWithIndexPath:indexPath];
    attrs.size = CGSizeMake(50, 50);

    if (count == 1)
    {
        // 只有一個元素時直接放圓心,避免除零
        attrs.center = CGPointMake(oX, oY);
    }
    else
    {
        // 按索引均分 2π
        CGFloat angle = (2 * M_PI / count) * indexPath.item;
        CGFloat centerX = oX + radius * sin(angle);
        CGFloat centerY = oY + radius * cos(angle);
        attrs.center = CGPointMake(centerX, centerY);
    }

    return attrs;
}

- (nullable NSArray<UICollectionViewLayoutAttributes *> *)
        layoutAttributesForElementsInRect:(CGRect)rect
{
    return self.attrsArray;
}
通過 xib 自定義 cell
@property (nonatomic, copy) NSString *imageName;

- (void)awakeFromNib
{
    // 用 Layer 給圖片加白邊與圓角
    self.imageView.layer.borderColor = [UIColor whiteColor].CGColor;
    self.imageView.layer.borderWidth = 6;
    self.imageView.layer.cornerRadius = 3;
}

- (void)setImageName:(NSString *)imageName
{
    _imageName = [imageName copy];
    self.imageView.image = [UIImage imageNamed:imageName];
}
準備圖片數據
@property (nonatomic, strong) NSMutableArray *imageNames;

- (NSMutableArray *)imageNames
{
    if (_imageNames == nil)
    {
        NSMutableArray *imageNames = [NSMutableArray array];
        for (NSInteger i = 0; i < 20; i++)
        {
            NSString *imageName = [NSString stringWithFormat:@"%zd", i + 1];
            [imageNames addObject:imageName];
        }
        _imageNames = imageNames;
    }
    return _imageNames;
}
創建 collectionView
用弱引用屬性持有它,方便後續替換布局:
@property (nonatomic, weak) UICollectionView *collectionView;

- (void)setupCollectionView
{
    CGFloat collectionViewW = self.view.bounds.size.width;
    CGFloat collectionViewH = 200;
    CGRect frame = CGRectMake(0, 150, collectionViewW, collectionViewH);

    LYPCircleLayout *layout = [[LYPCircleLayout alloc] init];

    UICollectionView *collectionView =
        [[UICollectionView alloc] initWithFrame:frame collectionViewLayout:layout];
    self.collectionView = collectionView;

    collectionView.dataSource = self;
    collectionView.delegate = self;

    [self.view addSubview:collectionView];
}
數據源方法
/** 重用標識 */
static NSString *const ID = @"photo";

- (void)viewDidLoad
{
    [super viewDidLoad];
    [self setupCollectionView];

    // 通過 xib 註冊 cell
    [self.collectionView registerNib:[UINib nibWithNibName:NSStringFromClass([LYPPhotoCell class])
                                                 bundle:nil]
              forCellWithReuseIdentifier:ID];
}

- (NSInteger)collectionView:(nonnull UICollectionView *)collectionView
     numberOfItemsInSection:(NSInteger)section
{
    return self.imageNames.count;
}

- (UICollectionViewCell *)collectionView:(nonnull UICollectionView *)collectionView
                  cellForItemAtIndexPath:(nonnull NSIndexPath *)indexPath
{
    // 緩存池有就取,沒有則自動創建
    LYPPhotoCell *cell = [collectionView dequeueReusableCellWithReuseIdentifier:ID
                                                                    forIndexPath:indexPath];
    cell.imageName = self.imageNames[indexPath.item];
    return cell;
}
點擊刪除
- (void)collectionView:(nonnull UICollectionView *)collectionView
  didSelectItemAtIndexPath:(nonnull NSIndexPath *)indexPath
{
    [self.imageNames removeObjectAtIndex:indexPath.item];
    [self.collectionView deleteItemsAtIndexPaths:@[indexPath]];
}
切換布局
- (void)touchesBegan:(nonnull NSSet<UITouch *> *)touches withEvent:(nullable UIEvent *)event
{
    // 判斷當前布局類型,在兩者之間切換
    if ([self.collectionView.collectionViewLayout isKindOfClass:[LYPLineLayout class]])
    {
        // 流水布局 → 圓形布局
        [self.collectionView setCollectionViewLayout:[[LYPCircleLayout alloc] init]
                                            animated:YES];
    }
    else
    {
        // 圓形布局 → 流水布局
        LYPLineLayout *layout = [[LYPLineLayout alloc] init];
        // 不設置 itemSize 時會走自動計算尺寸
        layout.itemSize = CGSizeMake(130, 130);
        [self.collectionView setCollectionViewLayout:layout animated:YES];
    }
}
把「元素該放在哪」這件事完全交給 Layout 對象,是 UICollectionView 最值得投入學習的一點。掌握了 layoutAttributes 與 targetContentOffset 這兩個抓手,輪播、瀑布流、卡片堆疊這類效果都能自己寫出來。
- 上一篇文章: iOS 實作:跳轉系統短信界面完成短信發送功能
- 下一篇文章: iOS UI 開發實戰:九宮格坐標推演與字典轉模型的完整重構