
iOS 封裝自定義瀑布流布局:以代理模式設計 UICollectionViewLayout
編輯:iOS 相關教學
一、為什麼要封裝
高頻使用的控件或功能,值得抽成獨立的類反覆用。封裝得好的類有個明顯特徵:不依賴外部上下文,直接拖進專案就能用。而要做到這一點,代理設計模式幾乎是必備工具。
二、代理設計模式的三個角色
客戶類(通常作為代理):把業務邏輯委託出去,自己不關心細節。
代理協議:定義需要實現的業務邏輯,把要求整理成一份方法清單,區分必須實現與可選實現,是代理對象必須遵循的規則。
代理角色:遵守協議、實現必須方法,可以透過協議方法完成業務邏輯,也能附加自己的處理。
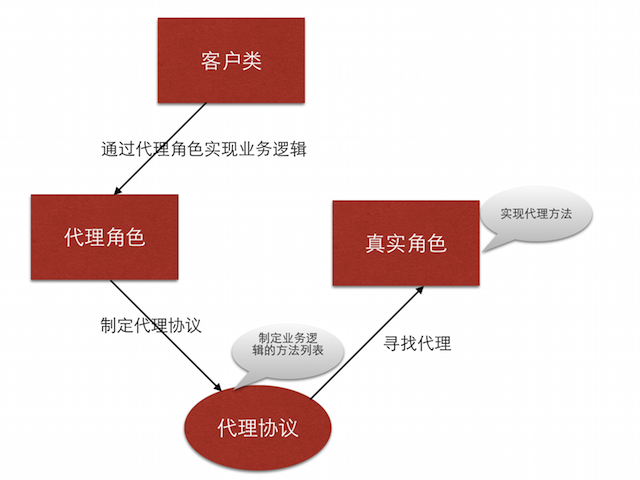
文字描述畢竟抽象,對照上圖看會清楚很多:客戶類持有代理協議類型的引用,具體實現由外部注入,於是同一份布局代碼可以服務無數個不同需求的頁面。
三、自定義布局的業務分析

每個 cell 的布局計算邏輯稍微複雜,附上思維導圖:
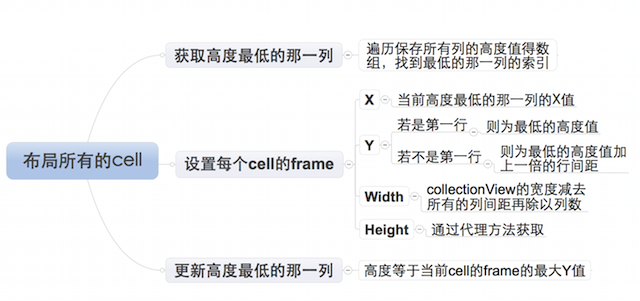
四、接口設計:哪些該可選,哪些必須實現
封裝的核心判斷標準是「這個值能不能有合理預設」。
可選接口(有預設值,代理不實現就用預設):列數、列間距、行間距、內邊距。
必須實現的接口:每個元素的高度。寬度可以從列數和列間距推算,高度卻完全取決於業務內容,無法猜測。
五、封裝步驟
1. 定義代理協議
@class LYPWaterFlowLayout;

@protocol LYPWaterFlowLayoutDelegate <NSObject>

// 必須實現
@required
/** 獲取瀑布流每個元素的高度 */
- (CGFloat)waterFlowLayout:(LYPWaterFlowLayout *)waterFlowLayout
             heightForItemAtIndex:(NSInteger)index
                        itemWith:(CGFloat)itemWith;

// 可選實現
@optional
/** 列數 */
- (NSInteger)columnCountInWaterFlowLayout:(LYPWaterFlowLayout *)waterFlowLayout;
/** 列間距 */
- (CGFloat)columnMarginInWaterFlowLayout:(LYPWaterFlowLayout *)waterFlowLayout;
/** 行間距 */
- (CGFloat)rowMarginInWaterFlowLayout:(LYPWaterFlowLayout *)waterFlowLayout;
/** 內邊距 */
- (UIEdgeInsets)edgeInsetsInWaterFlowLayout:(LYPWaterFlowLayout *)waterFlowLayout;

@end
2. 聲明代理屬性
@interface LYPWaterFlowLayout : UICollectionViewLayout

@property (nonatomic, weak) id<LYPWaterFlowLayoutDelegate> delegate;

@end
代理必須用 weak,否則容易與對方形成循環引用。
3. 為可選屬性準備預設值
/** 默認列數 */
static const NSInteger LYPDefaultColumnCount = 3;
/** 默認列間距 */
static const CGFloat LYPDefaultColumMargin = 10;
/** 默認行間距 */
static const CGFloat LYPDefaultRowMargin = 10;
/** 默認內邊距 */
static const UIEdgeInsets LYPDefaultEdgeInsets = {10, 10, 10, 10};
4. 用 respondsToSelector 做降級
- (NSInteger)columnCount
{
    // 代理實現了可選方法,用代理給的值
    if ([self.delegate respondsToSelector:@selector(columnCountInWaterFlowLayout:)]) {
        return [self.delegate columnCountInWaterFlowLayout:self];
    }
    // 否則退回預設
    return LYPDefaultColumnCount;
}
其餘三個屬性的取值方式幾乎一致,不再重複。
5. 準備成員屬性並懶加載
/** 所有 cell 的布局屬性 */
@property (nonatomic, strong) NSMutableArray *attrsArray;
/** 每一列當前的累積高度 */
@property (nonatomic, strong) NSMutableArray *columnHeights;
- (NSMutableArray *)attrsArray {
    if (_attrsArray == nil) {
        _attrsArray = [NSMutableArray array];
    }
    return _attrsArray;
}

- (NSMutableArray *)columnHeights {
    if (_columnHeights == nil) {
        _columnHeights = [NSMutableArray array];
    }
    return _columnHeights;
}
6. 重寫 prepareLayout
這個方法在每次布局前呼叫,必須先清乾淨上一次的狀態,否則復用時會殘留髒數據:
- (void)prepareLayout
{
    [super prepareLayout];

    // 重置各列高度
    [self.columnHeights removeAllObjects];
    for (NSInteger i = 0; i < self.columnCount; i++) {
        self.columnHeights[i] = @(self.edgeInsets.top);
    }

    // 重置布局屬性
    [self.attrsArray removeAllObjects];

    // 逐個計算 cell 的布局屬性
    NSInteger count = [self.collectionView numberOfItemsInSection:0];
    for (NSInteger i = 0; i < count; i++) {
        NSIndexPath *indexPath = [NSIndexPath indexPathForItem:i inSection:0];
        UICollectionViewLayoutAttributes *attrs = [self layoutAttributesForItemAtIndexPath:indexPath];
        [self.attrsArray addObject:attrs];
    }
}
7. 返回全部布局屬性
- (nullable NSArray<UICollectionViewLayoutAttributes *> *)layoutAttributesForElementsInRect:(CGRect)rect
{
    return self.attrsArray;
}
8. 核心:計算單個 cell 的 frame
- (nullable UICollectionViewLayoutAttributes *)layoutAttributesForItemAtIndexPath:(nonnull NSIndexPath *)indexPath
{
    UICollectionViewLayoutAttributes *attrs =
        [UICollectionViewLayoutAttributes layoutAttributesForCellWithIndexPath:indexPath];

    // 計算寬度:總寬減去左右內邊距與列間距,再平均分配
    CGFloat collectionViewWidth = self.collectionView.frame.size.width;
    CGFloat width = (collectionViewWidth
                     - self.edgeInsets.left
                     - self.edgeInsets.right
                     - (self.columnCount - 1) * self.columMargin) / self.columnCount;

    // 高度由代理提供
    CGFloat height = [self.delegate waterFlowLayout:self
                                heightForItemAtIndex:indexPath.item
                                            itemWith:width];

    // 找出當前最矮的那一列
    NSInteger destColumn = 0;
    CGFloat minColumnHeight = [self.columnHeights[0] doubleValue];
    for (NSInteger i = 1; i < self.columnCount; i++) {
        CGFloat columnHeight = [self.columnHeights[i] doubleValue];
        if (minColumnHeight > columnHeight) {
            minColumnHeight = columnHeight;
            destColumn = i;
        }
    }

    // 計算位置
    CGFloat x = self.edgeInsets.left + destColumn * (width + self.columMargin);
    CGFloat y = minColumnHeight;

    // 第一行不需要加行間距
    if (y != self.edgeInsets.top) {
        y += self.rowMargin;
    }

    attrs.frame = CGRectMake(x, y, width, height);

    // 更新該列的累積高度
    self.columnHeights[destColumn] = @(CGRectGetMaxY(attrs.frame));

    return attrs;
}
「找最矮列 → 放入 → 更新該列高度」這三步,就是瀑布流有別於網格布局的全部秘密。
9. 計算滾動內容尺寸
- (CGSize)collectionViewContentSize
{
    CGFloat maxColumnHeight = [self.columnHeights[0] doubleValue];
    for (NSInteger i = 1; i < self.columnCount; i++) {
        CGFloat columnHeight = [self.columnHeights[i] doubleValue];
        if (maxColumnHeight < columnHeight) {
            maxColumnHeight = columnHeight;
        }
    }

    return CGSizeMake(0, maxColumnHeight + self.rowMargin);
}
封裝完成後,使用方只需要實現一個必須方法、按需實現幾個可選方法,就能得到一個完全定制化的瀑布流,布局代碼本身一行都不用改——這就是代理模式帶來的複用價值。