
iOS 圖片瀏覽器實作:從基礎版到 plist 驅動的重構
圖片瀏覽器是入門階段很值得做一遍的練習:它同時涵蓋控件建立、事件響應、狀態管理與數據和代碼分離。本文按「先跑通、再優化」的順序,把同一個功能迭代四版。
一、需求分析
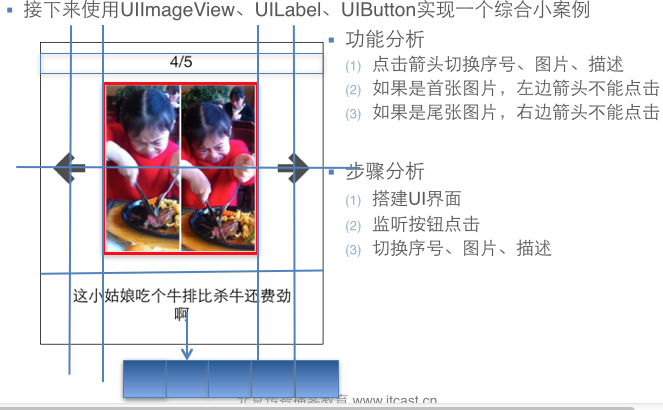
界面拆開來看:
需要讀寫屬性的控件——序號標籤、圖片視圖、描述標籤、左右兩個按鈕;
需要監聽事件的對象——左右兩個按鈕。
二、第一版:先讓它跑起來
#import "YYViewController.h"

#define POTOIMGW   200
#define POTOIMGH   300
#define POTOIMGX   60
#define POTOIMGY   50

@interface YYViewController ()

@property(nonatomic,strong) UILabel     *firstlab;
@property(nonatomic,strong) UILabel     *lastlab;
@property(nonatomic,strong) UIImageView *icon;
@property(nonatomic,strong) UIButton    *leftbtn;
@property(nonatomic,strong) UIButton    *rightbtn;

-(void)change;
@property(nonatomic, assign) int i;

@end

@implementation YYViewController

- (void)viewDidLoad
{
    [super viewDidLoad];
    self.i = 0;

    // 頂部序號標籤
    UILabel *headlab = [[UILabel alloc] initWithFrame:CGRectMake(20, 10, 300, 30)];
    [headlab setTextAlignment:NSTextAlignmentCenter];
    [headlab setTextColor:[UIColor blackColor]];
    [self.view addSubview:headlab];
    self.firstlab = headlab;

    // 圖片視圖
    UIImageView *potoimg = [[UIImageView alloc] initWithFrame:CGRectMake(POTOIMGX, POTOIMGY, POTOIMGW, POTOIMGH)];
    potoimg.image = [UIImage imageNamed:@"biaoqingdi"];
    [self.view addSubview:potoimg];
    self.icon = potoimg;

    // 底部描述標籤
    UILabel *desclab = [[UILabel alloc] initWithFrame:CGRectMake(20, 400, 300, 30)];
    [desclab setTextAlignment:NSTextAlignmentCenter];
    [self.view addSubview:desclab];
    self.lastlab = desclab;

    // 左鍵
    UIButton *leftbtn = [UIButton buttonWithType:UIButtonTypeCustom];
    leftbtn.frame = CGRectMake(0, self.view.center.y, 40, 40);
    [leftbtn setBackgroundImage:[UIImage imageNamed:@"left_normal"]     forState:UIControlStateNormal];
    [leftbtn setBackgroundImage:[UIImage imageNamed:@"left_highlighted"] forState:UIControlStateHighlighted];
    [self.view addSubview:leftbtn];
    self.leftbtn = leftbtn;
    [leftbtn addTarget:self action:@selector(leftclick:) forControlEvents:UIControlEventTouchUpInside];

    // 右鍵
    UIButton *rightbtn = [UIButton buttonWithType:UIButtonTypeCustom];
    rightbtn.frame = CGRectMake(POTOIMGX + POTOIMGW + 10, self.view.center.y, 40, 40);
    [rightbtn setBackgroundImage:[UIImage imageNamed:@"right_normal"]      forState:UIControlStateNormal];
    [rightbtn setBackgroundImage:[UIImage imageNamed:@"right_highlighted"] forState:UIControlStateHighlighted];
    [self.view addSubview:rightbtn];
    self.rightbtn = rightbtn;
    [rightbtn addTarget:self action:@selector(rightclick:) forControlEvents:UIControlEventTouchUpInside];

    // 初始化顯示
    [self change];
}

-(void)change
{
    [self.firstlab setText:[NSString stringWithFormat:@"%d/5", self.i + 1]];

    switch (self.i) {
        case 0:
            self.lastlab.text = @"什麼表情都弱爆了!";
            self.icon.image = [UIImage imageNamed:@"biaoqingdi"];
            break;
        case 1:
            self.lastlab.text = @"病例";
            self.icon.image = [UIImage imageNamed:@"bingli"];
            break;
        case 2:
            self.lastlab.text = @"烏龜";
            self.icon.image = [UIImage imageNamed:@"wangba"];
            break;
        case 3:
            self.lastlab.text = @"吃牛扒";
            self.icon.image = [UIImage imageNamed:@"chiniupa"];
            break;
        case 4:
            self.lastlab.text = @"蛋疼!";
            self.icon.image = [UIImage imageNamed:@"danteng"];
            break;
    }

    // 第一張時左鍵失效,最後一張時右鍵失效
    self.leftbtn.enabled  = (self.i != 0);
    self.rightbtn.enabled = (self.i != 4);
}

// 右鍵
-(void)rightclick:(UIButton *)btn
{
    self.i++;
    [self change];
}

// 左鍵
-(void)leftclick:(UIButton *)btn
{
    self.i--;
    [self change];
}

@end
這版能跑,但問題很明顯:圖片名和描述文字散落在 switch 各個分支裡,想加第 6 張圖就得再寫一個 case,而且要同時改 %d/5 裡的 5 和左右鍵的邊界判斷 4。這種「一處改動牽動多處」的結構,就是重構的信號。
三、第二版:用字典取代 switch
把「圖片名」和「描述」綁成一個數據對象,用數組統一管理:
@interface YYViewController ()
// ... 其他屬性同上
@property(nonatomic,strong) NSArray *array;
@end
-(void)change
{
    self.icon.image     = [UIImage imageNamed:self.array[self.i][@"name"]];
    self.lastlab.text   = self.array[self.i][@"desc"];
    [self.firstlab setText:[NSString stringWithFormat:@"%d/5", self.i + 1]];

    self.leftbtn.enabled  = (self.i != 0);
    self.rightbtn.enabled = (self.i != 4);
}
數據準備可以放在 viewDidLoad 裡:
NSDictionary *dict1 = @{@"name": @"biaoqingdi", @"desc": @"什麼表情都弱爆了!"};
NSDictionary *dict2 = @{@"name": @"bingli",     @"desc": @"病例"};
NSDictionary *dict3 = @{@"name": @"wangba",     @"desc": @"烏龜"};
NSDictionary *dict4 = @{@"name": @"chiniupa",   @"desc": @"吃牛扒"};
NSDictionary *dict5 = @{@"name": @"danteng",    @"desc": @"蛋疼"};

self.array = @[dict1, dict2, dict3, dict4, dict5];
但這樣一來又產生新問題:這段數據準備和 [self change] 有嚴格的先後順序要求,代碼執行順序稍一調整就崩。這種隱性耦合同樣不夠健康。
四、第三版:懶加載
把數據準備收進 getter,需要的時候才創建,順序問題自然消失:
// array 的 getter
-(NSArray *)array
{
    NSLog(@"需要獲取數組");

    if (_array == nil) {
        NSLog(@"實例化數組");

        NSDictionary *dict1 = @{@"name": @"biaoqingdi", @"desc": @"什麼表情都弱爆了!"};
        NSDictionary *dict2 = @{@"name": @"bingli",     @"desc": @"病例"};
        NSDictionary *dict3 = @{@"name": @"wangba",     @"desc": @"烏龜"};
        NSDictionary *dict4 = @{@"name": @"chiniupa",   @"desc": @"吃牛扒"};
        NSDictionary *dict5 = @{@"name": @"danteng",    @"desc": @"蛋疼"};

        _array = @[dict1, dict2, dict3, dict4, dict5];
    }

    return _array;
}
只有第一次呼叫時 _array 為 nil,才會走實例化,之後都直接返回成員變量,只執行一次。同理,各個子視圖也應該寫成懶加載:
- (UIImageView *)icon
{
    if (!_icon) {
        CGFloat imageW = 200;
        CGFloat imageX = (320 - imageW) / 2;
        CGFloat imageH = 200;
        CGFloat imageY = 80;

        _icon = [[UIImageView alloc] initWithFrame:CGRectMake(imageX, imageY, imageW, imageH)];
        [self.view addSubview:_icon];
    }
    return _icon;
}
注意懶加載的屬性必須用 strong,否則對象會在 getter 返回後立刻被釋放。
五、第四版:改用 plist 分離數據
前三版還有個共同毛病:數據寫死在代碼裡。內容一改就得重新編譯,策劃或設計師也無法參與。把數據搬到 plist 就能解耦。
-(NSArray *)array
{
    if (_array == nil) {
        NSString *path = [[NSBundle mainBundle] pathForResource:@"data" ofType:@"plist"];
        _array = [[NSArray alloc] initWithContentsOfFile:path];
        NSLog(@"%@", path);
    }
    return _array;
}
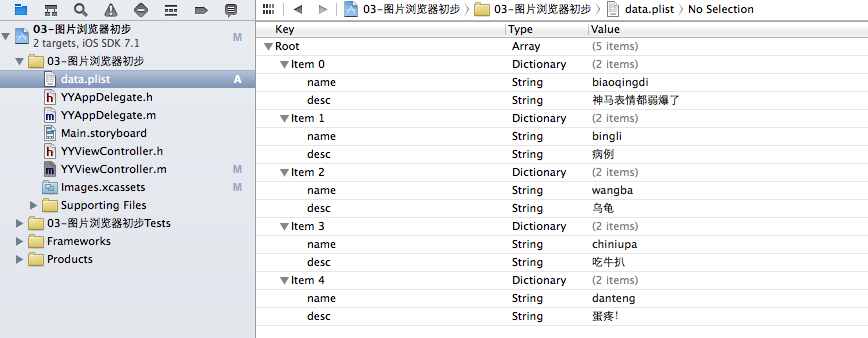
plist 結構如下圖,本質上就是一份蘋果定義好格式的 XML:
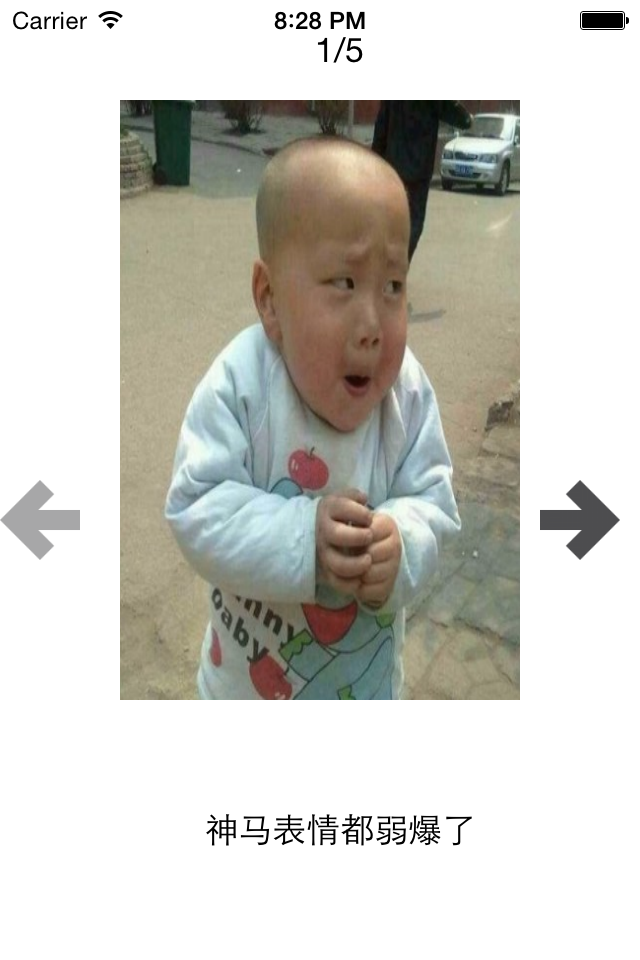
實際運行效果:
一個實用的小結論:凡是方法名裡帶 File 的 API,參數通常都要傳完整路徑。這也是為什麼取值前一定要先 pathForResource:ofType: 拿 bundle 內的絕對路徑。
六、這次重構的價值在哪
回顧整個過程,其實是在反覆回答同一個問題:變化點在哪裡,就把它隔離出去。
1. 先完成基本功能;
2. 發現 switch 讓「加一張圖」變成多處改動 → 用字典把數據集中;
3. 發現代碼順序成了隱性依賴 → 用懶加載消除時序耦合;
4. 發現數據還在代碼裡 → 用 plist 做數據與視圖分離。
最後補三個容易被忽略的知識點:一是方法調用的堆疊順序會直接影響初始化結果,寫代碼前先在腦中過一遍調用鏈;二是 plist 本質是 XML,可以手動編輯,適合放靜態配置;三是 bundle 是只讀資源包,從裡面讀出的檔案不能就地修改,要寫就必須先拷到 Documents 或 Library 目錄。