
iOS Sandbox 沙盒機制入門:目錄結構、路徑獲取與文件讀寫
一、iOS 沙盒機制
iOS 的應用只能訪問為自己創建的這塊區域,無法訪問其他區域。應用的各類非代碼文件都存在這個目錄下,包括圖片、plist 屬性文件、bundle、nib 文件等,這塊區域被稱為沙盒(SandBox)。
核心規則很簡單:
- 每個應用都有屬於自己的存儲空間,也就是沙盒。
- 應用只能訪問自己的沙盒,不能訪問其他區域。
- 如果應用需要做文件操作,就必須把文件放在沙盒裡。數據庫文件尤其要注意:在模擬器上或許能直接讀取工程裡的文件,但要在真機上正常使用,必須先把數據庫拷貝到沙盒中。
二、找到沙盒路徑
方法一:在代碼中打印
NSLog(@"沙盒路徑:%@", NSHomeDirectory());
打印結果中的星號部分為字母或數字,這就是沙盒路徑:
/Users/apple/Library/Application Support/iPhone Simulator/6.1/Applications/******-****-****-****-************
打開 Finder,選擇「前往」→「前往文件夾」(快捷鍵 command + shift + G),貼上打印出來的路徑即可。
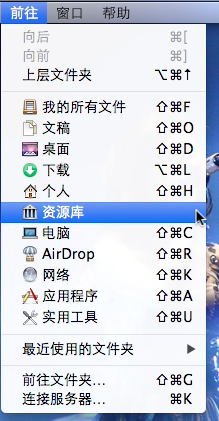
方法二:從 Finder 進入資源庫
打開 Finder,選擇「前往」並按住 option 鍵,進入資源庫:
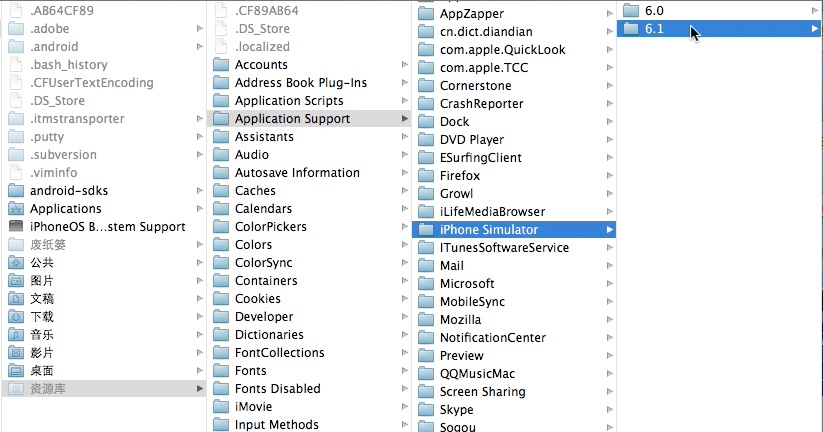
依次進入 Application Support → iPhone Simulator → 選擇模擬器版本,就能看到各個應用的沙盒目錄:
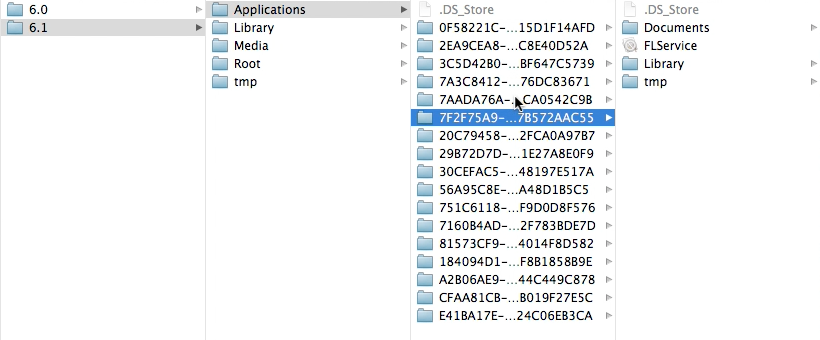
選中其中一個目錄,即可看到以程序名命名的 .app 文件:
三、目錄結構
沙盒默認包含 documents、Library、tmp 三個目錄,以及應用的 .app 文件。各目錄職責如下:
- Documents:存放應用的數據文件,如下載或生成的文件、數據庫文件。iTunes/iCloud 備份會包含此目錄。
- Library:存儲應用的默認設置與狀態信息。
- Library/Caches:存放緩存文件,應用退出時不會刪除,但備份時不包含此目錄。
- tmp:存放隨時創建的臨時文件。
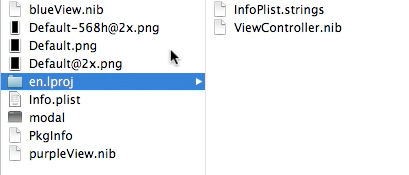
帶圖標的 .app 文件:選中後顯示包內容,可以看到存儲的圖標、nib 文件、屬性列表等。
四、在沙盒中寫文件
在 Documents 目錄下新建一個 plist 文件(寫圖片等其他文件方式相同):
// 獲取 Documents 文件夾目錄
NSString *rootPath = [NSSearchPathForDirectoriesInDomains(NSDocumentDirectory,
                                                          NSUserDomainMask, YES) objectAtIndex:0];

// 設定 plist 的路徑
NSString *plistPath = [rootPath stringByAppendingPathComponent:@"new.plist"];

// 然後在 plist 中寫入內容
NSString *error;
// 序列化一個值 "OK"
id plist = [NSPropertyListSerialization dataFromPropertyList:@"OK"
                                                    format:NSPropertyListXMLFormat_v1_0
                                          errorDescription:&error];

if(plist) {
    NSLog(@"No error creating XML data.");
    [plist writeToFile:plistPath atomically:YES];
}
else {
    NSLog(@"%@", error);
    [error release];
}
運行後,Documents 目錄下就會出現一個 new.plist 文件:

文件中有一個值 OK。也可以寫入數組、字典等類型,只需把上面的 "OK" 換成對應的 id 類型對象即可。

五、把文件拷貝到沙盒
下面把一個 public.xml 拷貝到 Documents 下。其他文件同理,只需改文件名與類型即可。數據庫文件尤其要注意,一定要拷貝到沙盒才能正常使用。
另外要留意:這個源文件不能是電腦上的任意文件,必須先加入工程的 Bundle 中。
// 獲取 Documents 路徑
NSString *documentsPath = [NSSearchPathForDirectoriesInDomains(NSDocumentDirectory,
                                                               NSUserDomainMask, YES) lastObject];

// 設定要拷貝文件的路徑及名稱
NSString *xmlSandBoxPath = [documentsPath stringByAppendingPathComponent:@"public.xml"];

NSFileManager *fileManager = [NSFileManager defaultManager];

// 判斷文件是否已經存在
BOOL isExisting = [fileManager fileExistsAtPath:xmlSandBoxPath];

if (!isExisting) {
    // 本地無此文件,則將 Bundle 中的文件拷貝到沙盒目錄
    NSString *xmlFilePath = [[NSBundle mainBundle] pathForResource:@"public" ofType:@"xml"];
    NSError *err;
    [fileManager copyItemAtPath:xmlFilePath toPath:xmlSandBoxPath error:&err];
}
執行之後,Documents 路徑下就有這個文件了:

以上就是 iOS 沙盒機制的入門整理,希望對大家有所幫助。
- 上一篇文章: 百度雲推送接入圖文教程(iOS):從證書配置到自定義跳轉
- 下一篇文章: iOS 登錄註冊模塊開發實踐:如何高效交付並避開那些坑