
iOS 簡單畫板開發案例:Quartz2D 手勢繪圖與截屏保存
編輯:iOS 相關教學
最近在學習 Quartz2D,順手做了一個簡單的畫板,把實作過程記錄下來。這個案例涵蓋幾個很實用的技術點:手勢畫線、截屏、圖片繪製、相簿選圖,以及把畫板內容保存成圖片。
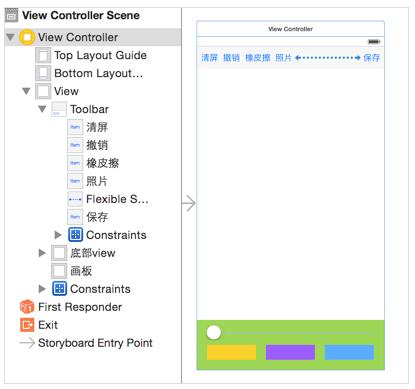
先在 storyboard 上布局好控件與約束,最終效果如下:
一、自定義 DrawView
畫板可能從 xib 載入,也可能用程式碼建立,因此兩個初始化入口都要實作:
#import <UIKit/UIKit.h>

@interface DrawView : UIView

/** 線寬 */
@property (nonatomic, assign) NSInteger lineWidth;
/** 顏色 */
@property (nonatomic, strong) UIColor *pathColor;
/** 圖片 */
@property (nonatomic, strong) UIImage *image;

- (void)clear;
- (void)undo;

@end
- (void)awakeFromNib {
    [self setUp];
}

- (instancetype)initWithFrame:(CGRect)frame {
    if (self == [super initWithFrame:frame]) {
        [self setUp];
    }
    return self;
}

// 自定義初始化方法
- (void)setUp {
    // 添加拖動手勢
    UIPanGestureRecognizer *pan = [[UIPanGestureRecognizer alloc] initWithTarget:self action:@selector(pan:)];
    [self addGestureRecognizer:pan];
    // 預設線寬
    _lineWidth = 2;
}
二、自定義 UIBezierPath 以支援顏色
系統原生的 UIBezierPath 沒有辦法直接設定路徑顏色,所以這裡自己寫一個子類:
#import <UIKit/UIKit.h>

@interface DrawPath : UIBezierPath
@property (nonatomic, strong) UIColor *pathColor;
@end
三、手指移動時繪製線條
@interface DrawView ()

@property (nonatomic, strong) DrawPath *path;
/** 保存所有路徑的陣列 */
@property (nonatomic, strong) NSMutableArray *pathArr;

@end

// 懶加載
- (NSMutableArray *)pathArr {
    if (_pathArr == nil) {
        _pathArr = [NSMutableArray array];
    }
    return _pathArr;
}
- (void)pan:(UIPanGestureRecognizer *)pan {
    // 取得手指在畫板上的位置
    CGPoint startP = [pan locationInView:self];

    if (pan.state == UIGestureRecognizerStateBegan) {
        _path = [[DrawPath alloc] init];
        _path.lineWidth = _lineWidth;
        _path.pathColor = _pathColor;
        // 注意:不能等到手指抬起才加入陣列,
        // 因為重繪時需要遍歷陣列畫線,那時候路徑還不在裡面
        [_pathArr addObject:_path];
        [_path moveToPoint:startP];   // 設定起點
    }

    [_path addLineToPoint:startP];    // 連線
    [self setNeedsDisplay];           // 觸發重繪
}
四、重繪時把所有路徑畫出來
- (void)drawRect:(CGRect)rect {
    for (DrawPath *path in self.pathArr) {
        if ([path isKindOfClass:[UIImage class]]) {
            // 畫圖
            UIImage *image = (UIImage *)path;
            [image drawInRect:rect];
        } else {
            // 畫線
            [path.pathColor set];
            [path stroke];
        }
    }
}

// 把圖片加入畫板
- (void)setImage:(UIImage *)image {
    _image = image;
    [self.pathArr addObject:image];
    [self setNeedsDisplay];   // 重繪後才會顯示
}

// 把陣列操作封裝在畫板內部
- (void)clear {
    [self.pathArr removeAllObjects];
    [self setNeedsDisplay];
}

- (void)undo {
    [self.pathArr removeLastObject];
    [self setNeedsDisplay];
}
把「所有繪製內容都存在一個陣列裡,重繪時全部重畫一次」這個設計想通,畫板的清空與復原就只是陣列操作而已,非常直觀。
五、控制器中的按鈕事件
@interface ViewController () <UIImagePickerControllerDelegate, UINavigationControllerDelegate>
@property (weak, nonatomic) IBOutlet DrawView *drawView;
@end
- (IBAction)clear:(id)sender {
    [_drawView clear];
}

- (IBAction)undo:(id)sender {
    [_drawView undo];
}

- (IBAction)eraser:(id)sender {
    // 擦除的小技巧:把線條顏色設成畫板背景色,線寬加大
    _drawView.pathColor = _drawView.backgroundColor;
    _drawView.lineWidth = 20;
}

- (IBAction)changeLineWidth:(UISlider *)sender {
    _drawView.lineWidth = sender.value;
}

- (IBAction)changeColor:(UIButton *)sender {
    _drawView.pathColor = sender.backgroundColor;
}

- (IBAction)pickPhoto:(id)sender {
    UIImagePickerController *picker = [[UIImagePickerController alloc] init];
    picker.sourceType = UIImagePickerControllerSourceTypeSavedPhotosAlbum;
    picker.delegate = self;
    [self presentViewController:picker animated:YES completion:nil];
}

- (void)imagePickerController:(UIImagePickerController *)picker
didFinishPickingMediaWithInfo:(NSDictionary<NSString *, id> *)info {
    UIImage *image = info[UIImagePickerControllerOriginalImage];

    ImageHandleView *handleView = [[ImageHandleView alloc] initWithFrame:self.drawView.bounds];
    handleView.handleCompletionBlock = ^(UIImage *image) {
        _drawView.image = image;
    };
    [self.drawView addSubview:handleView];
    handleView.image = image;

    [self dismissViewControllerAnimated:YES completion:nil];
}
六、保存畫板到相簿
- (IBAction)save:(id)sender {
    [UIView animateWithDuration:0.15 animations:^{
        // 開啟位圖上下文
        UIGraphicsBeginImageContextWithOptions(_drawView.bounds.size, NO, 0);
        CGContextRef ctx = UIGraphicsGetCurrentContext();
        // 把畫板的圖層渲染到上下文
        [_drawView.layer renderInContext:ctx];
        UIImage *image = UIGraphicsGetImageFromCurrentImageContext();
        UIGraphicsEndImageContext();

        // 保存到相簿
        UIImageWriteToSavedPhotosAlbum(image, self, @selector(image:didFinishSavingWithError:contextInfo:), nil);
        self.drawView.alpha = 0;
    } completion:^(BOOL finished) {
        [UIView animateWithDuration:0.15 animations:^{
            self.drawView.alpha = 1;
        }];
    }];
}

// 保存完成後的回呼方法,方法簽名必須完全一致
- (void)image:(UIImage *)image didFinishSavingWithError:(NSError *)error contextInfo:(void *)contextInfo {
    NSLog(@"保存成功");
}
七、處理相簿選來的照片:ImageHandleView
從相簿選完圖片後,圖片雖然顯示在畫板上,但還沒有被渲染進 layer。此時使用者需要對圖片進行移動、縮放、旋轉,而 UIImage 本身不支援這些操作,UIImageView 才行。解法是寫一個專門處理圖片的 view,內部放一個 UIImageView:
#import <UIKit/UIKit.h>

@interface ImageHandleView : UIView
/** 圖片 */
@property (nonatomic, strong) UIImage *image;
/** 回呼 block */
@property (nonatomic, strong) void (^handleCompletionBlock)(UIImage *image);
@end
#import "ImageHandleView.h"

@interface ImageHandleView () <UIGestureRecognizerDelegate>
@property (nonatomic, weak) UIImageView *imageView;
@end

@implementation ImageHandleView

// 防止圖片上的觸摸事件被畫板攔截
- (UIView *)hitTest:(CGPoint)point withEvent:(UIEvent *)event {
    return _imageView;
}

- (UIImageView *)imageView {
    if (_imageView == nil) {
        UIImageView *imageV = [[UIImageView alloc] initWithFrame:self.bounds];
        _imageView = imageV;
        _imageView.userInteractionEnabled = YES;
        [self setUpGestureRecognizer];
        [self addSubview:imageV];
    }
    return _imageView;
}

#pragma mark - 添加手勢

- (void)setUpGestureRecognizer {
    UIPanGestureRecognizer *pan = [[UIPanGestureRecognizer alloc] initWithTarget:self action:@selector(pan:)];
    [_imageView addGestureRecognizer:pan];

    UIRotationGestureRecognizer *rotation = [[UIRotationGestureRecognizer alloc] initWithTarget:self action:@selector(rotation:)];
    rotation.delegate = self;
    [_imageView addGestureRecognizer:rotation];

    UIPinchGestureRecognizer *pinch = [[UIPinchGestureRecognizer alloc] initWithTarget:self action:@selector(pinch:)];
    pinch.delegate = self;
    [_imageView addGestureRecognizer:pinch];

    UILongPressGestureRecognizer *longPress = [[UILongPressGestureRecognizer alloc] initWithTarget:self action:@selector(longPress:)];
    [_imageView addGestureRecognizer:longPress];
}

#pragma mark - 平移

- (void)pan:(UIPanGestureRecognizer *)pan {
    CGPoint tranp = [pan translationInView:self.imageView];
    self.imageView.transform = CGAffineTransformTranslate(self.imageView.transform, tranp.x, tranp.y);
    [pan setTranslation:CGPointZero inView:self.imageView];   // 復位
}

#pragma mark - 旋轉

- (void)rotation:(UIRotationGestureRecognizer *)rotation {
    self.imageView.transform = CGAffineTransformRotate(self.imageView.transform, rotation.rotation);
    rotation.rotation = 0;   // 復位
}

#pragma mark - 縮放

- (void)pinch:(UIPinchGestureRecognizer *)pinch {
    self.imageView.transform = CGAffineTransformScale(self.imageView.transform, pinch.scale, pinch.scale);
    pinch.scale = 1;   // 復位
}

#pragma mark - 長按確認

- (void)longPress:(UILongPressGestureRecognizer *)longPress {
    if (longPress.state == UIGestureRecognizerStateBegan) {
        // 用閃一下的方式提示「正在處理」
        [UIView animateWithDuration:0.25 animations:^{
            self.imageView.alpha = 0;
        } completion:^(BOOL finished) {
            [UIView animateWithDuration:0.25 animations:^{
                self.imageView.alpha = 1;
            } completion:^(BOOL finished) {
                // 開啟位圖上下文,把處理後的結果烘成新圖片
                UIGraphicsBeginImageContextWithOptions(self.bounds.size, NO, 0);
                CGContextRef ctx = UIGraphicsGetCurrentContext();
                [self.layer renderInContext:ctx];
                UIImage *image = UIGraphicsGetImageFromCurrentImageContext();
                UIGraphicsEndImageContext();

                if (_handleCompletionBlock) {
                    _handleCompletionBlock(image);
                }
                [self removeFromSuperview];
            }];
        }];
    }
}

#pragma mark - 手勢代理

- (BOOL)gestureRecognizer:(UIGestureRecognizer *)gestureRecognizer
shouldRecognizeSimultaneouslyWithGestureRecognizer:(UIGestureRecognizer *)otherGestureRecognizer {
    return YES;   // 允許同時觸發多個手勢,縮放與旋轉才能並用
}

- (void)setImage:(UIImage *)image {
    _image = image;
    self.imageView.image = image;
}

@end
這裡有一個設計上的關鍵決定:長按完成後,處理過的圖片需要設回畫板 drawView,但如果在 ImageHandleView 中直接 import 畫板類別,耦合性會太強。因此改用 Block 把生成的 image 先保留下來,由控制器在建立 handleView 時注入回呼,再赋值給 drawView,這樣兩個類彼此獨立, reuse 起來也更容易。
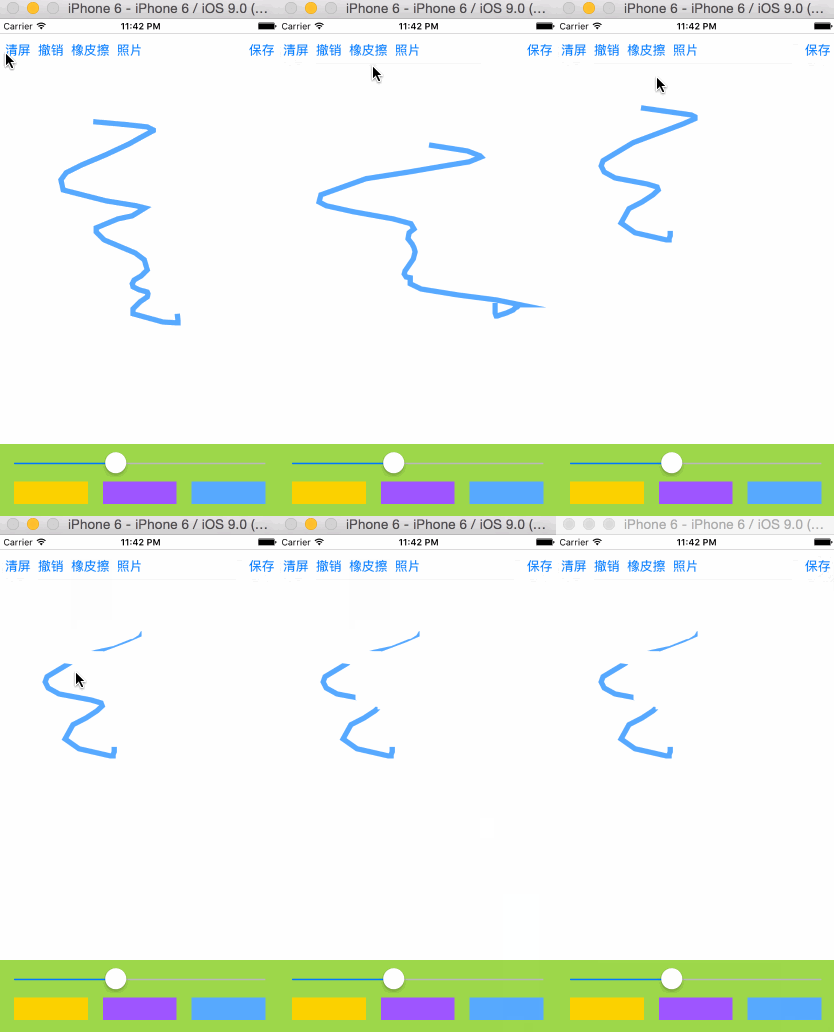
最終效果如下:
- 上一篇文章: iOS 時鐘開發案例:用 CALayer 隱式動畫做時分秒針
- 下一篇文章: iOS 仿郵箱大師的九宮格手勢密碼解鎖實作