
iOS 元件封裝實戰:用自動佈局與 Block 回呼打造自訂表情鍵盤
自訂鍵盤是 iOS 面試中的高頻題,因為它同時考驗了資料模型、視圖封裝、自動佈局與跨層通訊等能力。本文以一個表情鍵盤為例,完整走過從目錄結構規劃到元件組裝的全流程。
整體涉及到的技術點包括:MVC 架構、iOS 自動佈局、自訂元件的封裝與重用、Block 回呼,以及 CoreData(SQLite)的持久化。功能本身不複雜,但要把每個零件都設計得可獨立重用、彼此低耦合,才是這篇的價值所在。
專案結構規劃
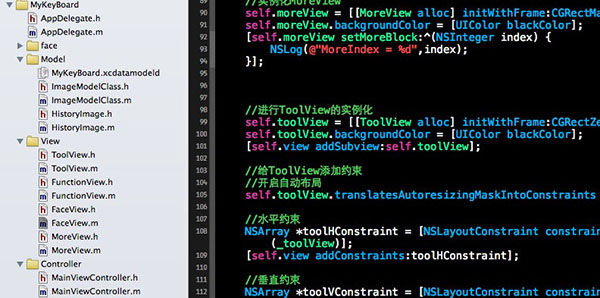
我依據自己對 MVC 的理解來組織目錄:
- Face:存放表情圖片資源
- Model:封裝從 SQLite 讀寫歷史表情的元件
- View:自訂的鍵盤相關視圖
- Controller:負責把各元件組裝起來
功能上分成兩頁:「全部表情」由 plist 檔驅動,「常用表情」則是使用者用過的表情,存入 SQLite 並依時間降序排列。「More」是預留給未來擴充的接口。
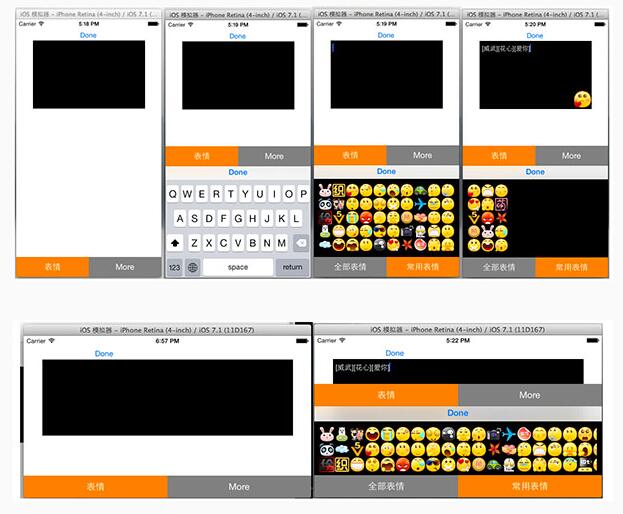
由於自訂鍵盤全程使用自動佈局,因此橫屏與不同尺寸螢幕都能正確呈現,這也是這個範例相較於硬寫 frame 的版本最大的改進。
一、View 層:自訂視圖元件
View 資料夾存放的是自訂元件。因為是自訂的,storyboard 完全幫不上忙,所有 UI 都得靠程式碼建立。這看似麻煩,卻換來兩個關鍵好處:元件具備真正的可重用性,且與其他元件的耦合降到最低,非常有利於團隊協作。封裝時的原則是:把外界可能用到的接口預留出來,並把該回傳的資料確實回傳。
1. FaceView:單一格表情
FaceView 負責顯示一個表情頭像。使用時傳入圖片與對應文字(例如【哈哈】),點擊後透過 block 把 image 與文字回傳給上層。
FaceView.h:
#import <UIKit/UIKit.h>

// 宣告表情對應的 block,用於把點擊的表情圖片與文字傳到上層視圖
typedef void (^FaceBlock)(UIImage *image, NSString *imageText);

@interface FaceView : UIView

// 圖片對應的文字
@property (nonatomic, strong) NSString *imageText;

// 表情圖片
@property (nonatomic, strong) UIImage *headerImage;

// 設定 block 回呼
- (void)setFaceBlock:(FaceBlock)block;

// 一次設定圖片與文字
- (void)setImage:(UIImage *)image ImageText:(NSString *)text;

@end
FaceView.m:
#import "FaceView.h"

@interface FaceView ()

@property (strong, nonatomic) FaceBlock block;
@property (strong, nonatomic) UIImageView *imageView;

@end

@implementation FaceView

// 初始化圖片
- (id)initWithFrame:(CGRect)frame {
    // 固定 face 尺寸為 30×30
    frame.size.height = 30;
    frame.size.width = 30;

    self = [super initWithFrame:frame];
    if (self) {
        self.imageView = [[UIImageView alloc] initWithFrame:CGRectMake(0, 0, 30, 30)];
        [self addSubview:self.imageView];
    }
    return self;
}

- (void)setFaceBlock:(FaceBlock)block {
    self.block = block;
}

- (void)setImage:(UIImage *)image ImageText:(NSString *)text {
    // 顯示圖片
    [self.imageView setImage:image];

    // 把圖片與文字存起來,供點擊時回傳
    self.headerImage = image;
    self.imageText = text;
}

// 點擊時回呼
- (void)touchesEnded:(NSSet *)touches withEvent:(UIEvent *)event {
    UITouch *touch = [touches anyObject];
    CGPoint point = [touch locationInView:self];

    // 判斷觸摸結束點是否仍在圖片範圍內
    if (CGRectContainsPoint(self.bounds, point)) {
        // 回呼,把頭像資訊傳到上層
        self.block(self.headerImage, self.imageText);
    }
}

@end
程式碼說明:核心就是 block 回呼的運用,本質上是一個自帶點擊事件回報的自訂按鈕。相比繼承 UIButton 再掛 target-action,block 寫法讓「觸發點」與「處理邏輯」的距離更近,也免去為每個實例建立獨立方法的麻煩。
2. FunctionView:表情容器
FunctionView 把 FaceView 與 UIScrollView 組裝起來,負責載入並鋪排表情。實例化時用自動佈局設定 ScrollView 與底部按鈕的位置。
FunctionView.h(保留對外接口與回呼用的 block,plistFileName 用於指定資源檔名):
#import <UIKit/UIKit.h>

// 定義對應的 block 類型,用於資料雙向溝通
typedef void (^FunctionBlock)(UIImage *image, NSString *imageText);

@interface FunctionView : UIView

// 資源檔名
@property (nonatomic, strong) NSString *plistFileName;

// 接收 block 塊
- (void)setFunctionBlock:(FunctionBlock)block;

@end
FunctionView.m 的關鍵片段如下。「全部表情」從 plist 載入,「常用表情」則從資料庫查詢:
#import "FunctionView.h"
#import "FaceView.h"
#import "ImageModelClass.h"
#import "HistoryImage.h"

@interface FunctionView ()

@property (strong, nonatomic) FunctionBlock block;

// 暫存 FaceView 回呼的表情與文字
@property (strong, nonatomic) UIImage *headerImage;
@property (strong, nonatomic) NSString *imageText;

// 用來陳列表情的 ScrollView
@property (strong, nonatomic) UIScrollView *headerScrollView;

// 資料模型,用於取得歷史表情
@property (strong, nonatomic) ImageModelClass *imageModel;

@end

@implementation FunctionView

- (id)initWithFrame:(CGRect)frame {
    self = [super initWithFrame:frame];
    if (self) {
        // 建立資料模型
        self.imageModel = [[ImageModelClass alloc] init];

        // 「全部表情」按鈕
        UIButton *faceButton = [[UIButton alloc] initWithFrame:CGRectZero];
        faceButton.backgroundColor = [UIColor grayColor];
        [faceButton setTitle:@"全部表情" forState:UIControlStateNormal];
        [faceButton setShowsTouchWhenHighlighted:YES];
        [faceButton addTarget:self action:@selector(tapButton1:) forControlEvents:UIControlEventTouchUpInside];
        [self addSubview:faceButton];

        // 「常用表情」按鈕
        UIButton *moreButton = [[UIButton alloc] initWithFrame:CGRectZero];
        moreButton.backgroundColor = [UIColor orangeColor];
        [moreButton setTitle:@"常用表情" forState:UIControlStateNormal];
        [moreButton setShowsTouchWhenHighlighted:YES];
        [moreButton addTarget:self action:@selector(tapButton2:) forControlEvents:UIControlEventTouchUpInside];
        [self addSubview:moreButton];

        // 開啟自動佈局
        faceButton.translatesAutoresizingMaskIntoConstraints = NO;
        moreButton.translatesAutoresizingMaskIntoConstraints = NO;

        // 水平約束:兩顆按鈕等寬並填滿寬度
        NSArray *buttonH = [NSLayoutConstraint constraintsWithVisualFormat:@"H:|[faceButton][moreButton(==faceButton)]|"
                                                                   options:0
                                                                   metrics:0
                                                                     views:NSDictionaryOfVariableBindings(faceButton, moreButton)];
        [self addConstraints:buttonH];

        // 垂直約束:兩顆按鈕貼底,高度 44
        NSArray *button1V = [NSLayoutConstraint constraintsWithVisualFormat:@"V:[faceButton(44)]|"
                                                                   options:0
                                                                   metrics:0
                                                                     views:NSDictionaryOfVariableBindings(faceButton)];
        [self addConstraints:button1V];

        NSArray *button2V = [NSLayoutConstraint constraintsWithVisualFormat:@"V:[moreButton(44)]|"
                                                                   options:0
                                                                   metrics:0
                                                                     views:NSDictionaryOfVariableBindings(moreButton)];
        [self addConstraints:button2V];

        // 預設顯示全部表情
        [self tapButton1:nil];
    }
    return self;
}

- (void)setFunctionBlock:(FunctionBlock)block {
    self.block = block;
}

// 點擊「全部表情」
- (void)tapButton1:(id)sender {
    // 從 plist 載入資源
    NSBundle *bundle = [NSBundle mainBundle];
    NSString *path = [bundle pathForResource:self.plistFileName ofType:@"plist"];
    NSArray *headers = [NSArray arrayWithContentsOfFile:path];

    if (headers.count == 0) {
        NSLog(@"訪問的 plist 文件不存在");
    } else {
        [self header:headers];
    }
}

// 點擊「常用表情」
- (void)tapButton2:(id)sender {
    // 從資料庫查詢所有圖片
    NSArray *imageData = [self.imageModel queryAll];

    NSMutableArray *headers = [NSMutableArray arrayWithCapacity:imageData.count];
    HistoryImage *tempData;

    for (int i = 0; i < imageData.count; i++) {
        tempData = imageData[i];

        // 轉換成 header: 方法所需的資料格式
        NSMutableDictionary *dic = [NSMutableDictionary dictionaryWithCapacity:2];
        [dic setObject:tempData.imageText forKey:@"chs"];

        UIImage *image = [UIImage imageWithData:tempData.headerImage];
        [dic setObject:image forKey:@"png"];

        [headers addObject:dic];
    }

    [self header:headers];
}

// 負責把圖片鋪排到 ScrollView 上
- (void)header:(NSArray *)headers {
    [self.headerScrollView removeFromSuperview];

    self.headerScrollView = [[UIScrollView alloc] initWithFrame:CGRectZero];
    [self addSubview:self.headerScrollView];

    // 給 scrollView 加上約束
    self.headerScrollView.translatesAutoresizingMaskIntoConstraints = NO;

    // 水平約束:左右各留 10
    NSArray *scrollH = [NSLayoutConstraint constraintsWithVisualFormat:@"H:|-10-[_headerScrollView]-10-|"
                                                               options:0
                                                               metrics:0
                                                                 views:NSDictionaryOfVariableBindings(_headerScrollView)];
    [self addConstraints:scrollH];

    // 垂直約束:頂部留 10,底部留 50 給按鈕
    NSArray *scrolV = [NSLayoutConstraint constraintsWithVisualFormat:@"V:|-10-[_headerScrollView]-50-|"
                                                               options:0
                                                               metrics:0
                                                                 views:NSDictionaryOfVariableBindings(_headerScrollView)];
    [self addConstraints:scrolV];

    CGFloat scrollHeight = (self.frame).size.height - 60;

    // 依圖片數量計算 contentSize 寬度
    CGFloat width = (headers.count / (scrollHeight / 30)) * 30;
    self.headerScrollView.contentSize = CGSizeMake(width, scrollHeight);
    self.headerScrollView.pagingEnabled = YES;

    CGFloat x = 0;
    CGFloat y = 0;

    // 逐一貼上表情
    for (int i = 0; i < headers.count; i++) {
        UIImage *image;
        if ([headers[i][@"png"] isKindOfClass:[NSString class]]) {
            // plist 中存的是檔名
            image = [UIImage imageNamed:headers[i][@"png"]];
        } else {
            // 資料庫中存的是 NSData 轉出的 UIImage
            image = headers[i][@"png"];
        }

        NSString *imageText = headers[i][@"chs"];

        // 計算位置:先填滿一列再換行
        y = (i % (int)(scrollHeight / 30)) * 30;
        x = (i / (int)(scrollHeight / 30)) * 30;

        FaceView *face = [[FaceView alloc] initWithFrame:CGRectMake(x, y, 0, 0)];
        [face setImage:image ImageText:imageText];

        // 承接 FaceView 的回呼,繼續往上層傳
        __weak __block FunctionView *copy_self = self;
        [face setFaceBlock:^(UIImage *image, NSString *imageText) {
            copy_self.block(image, imageText);
        }];

        [self.headerScrollView addSubview:face];
    }

    [self.headerScrollView setNeedsDisplay];
}

@end
程式碼說明:
1. 無論資料來自 plist 還是資料庫,都先統一轉成 @{@"png": 圖片, @"chs": 文字} 的字典陣列,再由同一個 header: 方法負責渲染。這個小設計讓「全部」與「常用」兩頁共用同一套排版邏輯。
2. 為適配不同螢幕尺寸,所有元件都加上約束而非寫死 frame。
3. block 一層層往上傳遞時,內層使用 __weak __block 的 copy_self 避開循環引用——這在巢狀 block 中是必須的防護措施。
3. ToolView:底部工具列
ToolView 就是鍵盤上方那條類似 TabBar 的工具列。當自訂鍵盤彈出時,它會移動到鍵盤正上方的位置。同樣為了適配多種螢幕,這裡也採用自動佈局。
ToolView.h:
ToolView.m:
#import "ToolView.h"

@interface ToolView ()

// 承接外部傳入的 block
@property (nonatomic, strong) ToolIndex myBlock;

@end

@implementation ToolView

- (id)initWithFrame:(CGRect)frame {
    self = [super initWithFrame:frame];
    if (self) {
        // 1. 表情按鈕
        UIButton *faceButton = [[UIButton alloc] initWithFrame:CGRectZero];
        faceButton.backgroundColor = [UIColor orangeColor];
        [faceButton setTitle:@"表情" forState:UIControlStateNormal];
        [faceButton setShowsTouchWhenHighlighted:YES];
        [faceButton addTarget:self action:@selector(tapFaceButton:) forControlEvents:UIControlEventTouchUpInside];
        [self addSubview:faceButton];

        // 2. 更多按鈕
        UIButton *moreButton = [[UIButton alloc] initWithFrame:CGRectZero];
        moreButton.backgroundColor = [UIColor grayColor];
        [moreButton setTitle:@"More" forState:UIControlStateNormal];
        [moreButton setShowsTouchWhenHighlighted:YES];
        [moreButton addTarget:self action:@selector(tapMoreButton:) forControlEvents:UIControlEventTouchUpInside];
        [self addSubview:moreButton];

        // 3. 用約束讓兩顆按鈕填滿整個 toolView
        faceButton.translatesAutoresizingMaskIntoConstraints = NO;
        moreButton.translatesAutoresizingMaskIntoConstraints = NO;

        // 水平約束
        NSArray *buttonH = [NSLayoutConstraint constraintsWithVisualFormat:@"H:|[faceButton][moreButton(==faceButton)]|"
                                                                   options:0
                                                                   metrics:0
                                                                     views:NSDictionaryOfVariableBindings(faceButton, moreButton)];
        [self addConstraints:buttonH];

        // 垂直約束
        NSArray *button1V = [NSLayoutConstraint constraintsWithVisualFormat:@"V:|[faceButton]|"
                                                                   options:0
                                                                   metrics:0
                                                                     views:NSDictionaryOfVariableBindings(faceButton)];
        [self addConstraints:button1V];

        NSArray *button2V = [NSLayoutConstraint constraintsWithVisualFormat:@"V:|[moreButton]|"
                                                                   options:0
                                                                   metrics:0
                                                                     views:NSDictionaryOfVariableBindings(moreButton)];
        [self addConstraints:button2V];
    }
    return self;
}

- (void)setToolIndex:(ToolIndex)toolBlock {
    self.myBlock = toolBlock;
}

// 點擊表情按鈕
- (void)tapFaceButton:(id)sender {
    self.myBlock(1);
}

// 點擊 more 按鈕
- (void)tapMoreButton:(id)sender {
    self.myBlock(2);
}

@end
程式碼說明:主要是 block 回呼的應用與約束設定。這裡有個設計判斷值得說明:ToolView 並不知道自己被點擊後該做什麼,它只負責把 index 往外丟。具體行為(切換鍵盤、顯示更多面板)由 Controller 決定。這種「元件只廣播事件、不做決策」的分工,是良好封裝的關鍵。
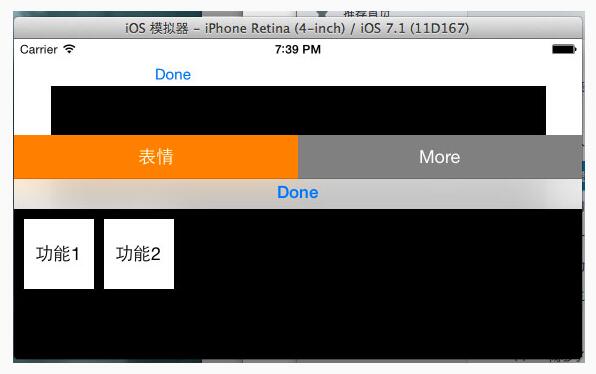
MoreView 的封裝方式與上述相同,此處不再重複貼上程式碼,僅附上執行效果:
二、Model 層:CoreData 持久化
先定義資料模型。這裡的 time 欄位記錄使用時間,用於後續的降序排序:

接著撰寫 ImageModelClass,把資料操作封裝起來。
ImageModelClass.h(對外接口):
#import <Foundation/Foundation.h>
#import <CoreData/CoreData.h>
#import "HistoryImage.h"

@interface ImageModelClass : NSObject

// 保存資料
- (void)save:(NSData *)image ImageText:(NSString *)imageText;

// 查詢所有圖片
- (NSArray *)queryAll;

@end
ImageModelClass.m(透過 CoreData 操作 SQLite):
#import "ImageModelClass.h"

@interface ImageModelClass ()

@property (nonatomic, strong) NSManagedObjectContext *manager;

@end

@implementation ImageModelClass

- (instancetype)init {
    self = [super init];
    if (self) {
        // 透過 AppDelegate 取得 managedObjectContext
        UIApplication *application = [UIApplication sharedApplication];
        id delegate = application.delegate;
        self.manager = [delegate managedObjectContext];
    }
    return self;
}

// 儲存表情
- (void)save:(NSData *)image ImageText:(NSString *)imageText {
    if (image != nil) {
        NSArray *result = [self search:imageText];
        HistoryImage *myImage;

        if (result.count == 0) {
            // 不存在則新增
            myImage = [NSEntityDescription insertNewObjectForEntityForName:NSStringFromClass([HistoryImage class])
                                                   inManagedObjectContext:self.manager];
            myImage.imageText = imageText;
            myImage.headerImage = image;
            myImage.time = [NSDate date];
        } else {
            // 已存在則只更新時間,讓它排到最前面
            myImage = result[0];
            myImage.time = [NSDate date];
        }

        // 儲存實體
        NSError *error = nil;
        if (![self.manager save:&error]) {
            NSLog(@"保存出錯 %@", [error localizedDescription]);
        }
    }
}

// 依文字查找
- (NSArray *)search:(NSString *)image {
    NSArray *result;

    // 建立查詢條件
    NSFetchRequest *fetchRequest = [[NSFetchRequest alloc]
                                    initWithEntityName:NSStringFromClass([HistoryImage class])];

    // 加入謂詞
    NSPredicate *predicate = [NSPredicate predicateWithFormat:@"imageText=%@", image];
    [fetchRequest setPredicate:predicate];

    // 執行查詢
    NSError *error = nil;
    result = [self.manager executeFetchRequest:fetchRequest error:&error];
    if (error) {
        NSLog(@"查詢錯誤:%@", [error localizedDescription]);
    }
    return result;
}

// 查詢全部,依時間降序
- (NSArray *)queryAll {
    NSFetchRequest *fetchRequest = [[NSFetchRequest alloc]
                                    initWithEntityName:NSStringFromClass([HistoryImage class])];

    // 設定排序規則:time 遞減,最近使用的排最前面
    NSSortDescriptor *sortDescriptor = [[NSSortDescriptor alloc] initWithKey:@"time" ascending:NO];
    [fetchRequest setSortDescriptors:@[sortDescriptor]];

    NSError *error = nil;
    NSArray *result = [self.manager executeFetchRequest:fetchRequest error:&error];
    if (error) {
        NSLog(@"查詢錯誤:%@", [error localizedDescription]);
    }
    return result;
}

@end
程式碼說明:保存時先查詢該表情是否已存在——存在就更新時間戳(讓它浮到最前),不存在才新增。這個「upsert」邏輯寫在 Model 層而非 Controller 層,是恰當的職責劃分;寫到這裡難免讓人聯想到用 Hibernate 操作資料庫的畫面。
三、Controller 層:組裝所有元件
MainViewController 的延展宣告:
@interface MainViewController ()

// 自訂元件
@property (nonatomic, strong) ToolView *toolView;
@property (nonatomic, strong) FunctionView *functionView;
@property (nonatomic, strong) MoreView *moreView;

// 系統元件
@property (strong, nonatomic) IBOutlet UITextView *myTextView;
@property (strong, nonatomic) IBOutlet UIImageView *imageView;
@property (strong, nonatomic) NSDictionary *keyBoardDic;

// 資料模型
@property (strong, nonatomic) ImageModelClass *imageMode;

@end
viewDidLoad 中完成元件初始化與 block 回呼的綁定:
- (void)viewDidLoad {
    [super viewDidLoad];

    // 建立資料模型
    self.imageMode = [[ImageModelClass alloc] init];

    // 建立 FunctionView
    self.functionView = [[FunctionView alloc] initWithFrame:CGRectMake(0, 0, 320, 216)];
    self.functionView.backgroundColor = [UIColor blackColor];
    self.functionView.plistFileName = @"emoticons";   // 指定資源檔名

    __weak __block MainViewController *copy_self = self;

    // 接收表情並顯示,同時寫入資料庫
    [self.functionView setFunctionBlock:^(UIImage *image, NSString *imageText) {
        NSString *str = [NSString stringWithFormat:@"%@%@", copy_self.myTextView.text, imageText];
        copy_self.myTextView.text = str;
        copy_self.imageView.image = image;

        // 把用過的表情存進 sqlite
        NSData *imageData = UIImagePNGRepresentation(image);
        [copy_self.imageMode save:imageData ImageText:imageText];
    }];

    // 建立 MoreView
    self.moreView = [[MoreView alloc] initWithFrame:CGRectMake(0, 0, 0, 0)];
    self.moreView.backgroundColor = [UIColor blackColor];
    [self.moreView setMoreBlock:^(NSInteger index) {
        NSLog(@"MoreIndex = %d", index);
    }];

    // 建立 ToolView
    self.toolView = [[ToolView alloc] initWithFrame:CGRectZero];
    self.toolView.backgroundColor = [UIColor blackColor];
    [self.view addSubview:self.toolView];

    // 為 ToolView 加上約束
    self.toolView.translatesAutoresizingMaskIntoConstraints = NO;

    // 水平約束:填滿寬度
    NSArray *toolHConstraint = [NSLayoutConstraint constraintsWithVisualFormat:@"H:|[_toolView]|"
                                                                       options:0
                                                                       metrics:0
                                                                         views:NSDictionaryOfVariableBindings(_toolView)];
    [self.view addConstraints:toolHConstraint];

    // 垂直約束:高度 44,貼齊底部
    NSArray *toolVConstraint = [NSLayoutConstraint constraintsWithVisualFormat:@"V:[_toolView(44)]|"
                                                                       options:0
                                                                       metrics:0
                                                                         views:NSDictionaryOfVariableBindings(_toolView)];
    [self.view addConstraints:toolVConstraint];

    // 回呼 ToolView 的點擊事件
    [self.toolView setToolIndex:^(NSInteger index) {
        switch (index) {
            case 1:
                [copy_self changeKeyboardToFunction];
                break;
            case 2:
                [copy_self changeKeyboardToMore];
                break;
            default:
                break;
        }
    }];

    // 註冊鍵盤通知,用於取得鍵盤高度與位置
    NSNotificationCenter *center = [NSNotificationCenter defaultCenter];
    [center addObserver:self
               selector:@selector(keyNotification:)
                   name:UIKeyboardWillChangeFrameNotification
                 object:nil];

    // 為 TextView 加上鍵盤上方的「完成」工具列
    UIToolbar *toolBar = [[UIToolbar alloc] initWithFrame:CGRectMake(0, 0, 320, 30)];
    UIBarButtonItem *item1 = [[UIBarButtonItem alloc] initWithBarButtonSystemItem:UIBarButtonSystemItemDone
                                                                           target:self
                                                                           action:@selector(tapDone:)];
    UIBarButtonItem *item2 = [[UIBarButtonItem alloc] initWithBarButtonSystemItem:UIBarButtonSystemItemFlexibleSpace
                                                                           target:nil
                                                                           action:nil];
    UIBarButtonItem *item3 = [[UIBarButtonItem alloc] initWithBarButtonSystemItem:UIBarButtonSystemItemFlexibleSpace
                                                                           target:nil
                                                                           action:nil];
    toolBar.items = @[item2, item1, item3];
    self.myTextView.inputAccessoryView = toolBar;
}
橫竖屏切換時調整自訂鍵盤的高度:
- (void)willAnimateRotationToInterfaceOrientation:(UIInterfaceOrientation)toInterfaceOrientation
                                         duration:(NSTimeInterval)duration {
    // 縱屏
    if (UIInterfaceOrientationIsPortrait(toInterfaceOrientation)) {
        CGRect frame = self.functionView.frame;
        frame.size.height = 216;
        self.functionView.frame = frame;
        self.moreView.frame = frame;
    }

    // 橫屏
    if (UIInterfaceOrientationIsLandscape(toInterfaceOrientation)) {
        CGRect frame = self.functionView.frame;
        frame.size.height = 150;
        self.functionView.frame = frame;
        self.moreView.frame = frame;
    }
}
監聽鍵盤彈出,讓 ToolView 浮到鍵盤上方:
// 收到鍵盤通知後要執行的動作
- (void)keyNotification:(NSNotification *)notification {
    self.keyBoardDic = notification.userInfo;

    // 取得鍵盤移動後的 frame
    CGRect rect = [self.keyBoardDic[UIKeyboardFrameEndUserInfoKey] CGRectValue];

    // 橫屏時鍵盤的座標系與當前 view 不同,需做座標系轉換
    CGRect r1 = [self.view convertRect:rect fromView:self.view.window];

    [UIView animateWithDuration:[self.keyBoardDic[UIKeyboardAnimationDurationUserInfoKey] floatValue]
                     animations:^{
        // 套用系統的動畫曲線,讓 ToolView 與鍵盤同步移動
        [UIView setAnimationCurve:[self.keyBoardDic[UIKeyboardAnimationCurveUserInfoKey] doubleValue]];

        CGRect frame = self.toolView.frame;
        frame.origin.y = r1.origin.y - frame.size.height;   // 貼在鍵盤上方
        self.toolView.frame = frame;
    }];
}
在系統鍵盤與自訂鍵盤之間切換:
- (void)changeKeyboardToFunction {
    if ([self.myTextView.inputView isEqual:self.functionView]) {
        // 已在顯示自訂鍵盤 → 切回系統鍵盤
        self.myTextView.inputView = nil;
        [self.myTextView reloadInputViews];
    } else {
        // 切換到自訂鍵盤
        self.myTextView.inputView = self.functionView;
        [self.myTextView reloadInputViews];
    }

    if (![self.myTextView isFirstResponder]) {
        [self.myTextView becomeFirstResponder];
    }
}
回顧:這個範例真正想傳達的三件事
第一,用 inputView 更換鍵盤才是正解。很多人做自訂鍵盤會去監聽鍵盤通知、再把自訂視圖「蓋」在鍵盤上,這是脆弱且錯誤的做法。正確方式是賦值給 inputView 再呼叫 reloadInputViews,讓系統自己處理高度回報與佈局。本文中 ToolView 之所以要監聽鍵盤通知,是因為它是獨立於 inputView 之外的浮動工具列,性質不同。
第二,橫屏時的座標系轉換不可省略。UIKeyboardFrameEndUserInfoKey 給出的 frame 位於 window 座標系,直接拿去用會在旋轉後錯位,必須先透過 convertRect:fromView: 轉到當前視圖座標系。這是本範例最容易出錯的一環。
第三,元件的價值取決於它的獨立性。FaceView、FunctionView、ToolView 三者都能脫離這個 App 單獨使用:更換 plist 就能換一套表情、改動約束就能適配新螢幕、透過 block 就能接到任何宿主。這種「知道自己該做什麼、不越界管事」的元件,才是封裝真正的目的。