
iOS 代碼筆記:用 Reachability 實現網絡狀態提醒
編輯:iOS 相關教學
本文分享一個 iOS 網絡狀態監聽的小工具,供大家參考。
一、效果圖
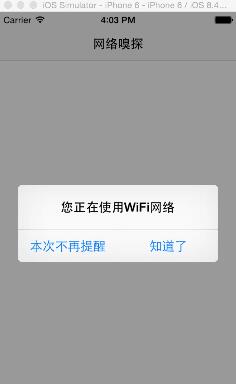
二、工程結構
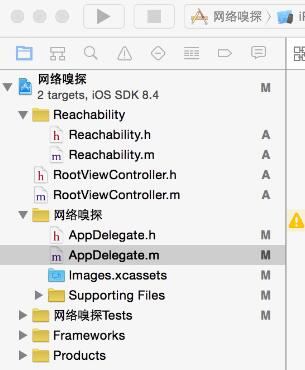
三、代碼
AppDelegate.h
#import <UIKit/UIKit.h>
#import "Reachability.h"

@interface AppDelegate : UIResponder <UIApplicationDelegate>
{
    Reachability *reachability;
    BOOL WarningViaWWAN;
}

@property (strong, nonatomic) UIWindow *window;

- (void)ReachabilitySniff:(Reachability*) curReach;
- (void)ReachabilitySniffNotification:(NSNotification* )notification;
- (void)alertView:(UIAlertView *)alertView clickedButtonAtIndex:(NSInteger)buttonIndex;

@end
AppDelegate.m
#import "AppDelegate.h"
#import "RootViewController.h"

@implementation AppDelegate

- (BOOL)application:(UIApplication *)application didFinishLaunchingWithOptions:(NSDictionary *)launchOptions
{
    self.window = [[UIWindow alloc] initWithFrame:[[UIScreen mainScreen] bounds]];
    // Override point for customization after application launch.
    RootViewController *rootVC=[[RootViewController alloc]init];
    UINavigationController *nav=[[UINavigationController alloc]initWithRootViewController:rootVC];
    self.window.rootViewController=nav;

    //啟動網絡監聽
    WarningViaWWAN = TRUE;
    [[NSNotificationCenter defaultCenter] addObserver:self selector:@selector(ReachabilitySniffNotification:) name:kReachabilityChangedNotification object:nil];
    if (!reachability) {
        reachability = [Reachability reachabilityForInternetConnection];
    }
    [reachability startNotifier];
    [self performSelector:@selector(ReachabilitySniff:) withObject:reachability afterDelay:20];

    self.window.backgroundColor = [UIColor whiteColor];
    [self.window makeKeyAndVisible];
    return YES;
}

#pragma mark -網絡監聽
- (void)ReachabilitySniffNotification:(NSNotification* )notification
{
    Reachability* curReach = [notification object];
    [self performSelector:@selector(ReachabilitySniff:) withObject:curReach afterDelay:2];
}

- (void)ReachabilitySniff:(Reachability*) curReach
{
    NSLog(@"ReachabilitySniffNewWorkStatus");
    if (!curReach) {
        return;
    }
    NetworkStatus status = [curReach currentReachabilityStatus];
    switch (status) {
        case ReachableViaWiFi:
        {
            UIAlertView *alert = [[UIAlertView alloc] initWithTitle:@"您正在使用WiFi網絡" message:Nil delegate:self cancelButtonTitle:Nil otherButtonTitles:@"本次不再提醒",@"知道了", nil];
            [alert show];
            break;
        }
        case ReachableViaWWAN:
        {
            UIAlertView *alert = [[UIAlertView alloc] initWithTitle:@"您正在使用移動網絡,運營商會收取流量費,建議使用WiFi網絡" message:Nil delegate:self cancelButtonTitle:Nil otherButtonTitles:@"本次不再提醒",@"知道了", nil];
            [alert show];
            break;
        }
        case NotReachable:
        {
            UIAlertView *alert = [[UIAlertView alloc] initWithTitle:@"沒有網絡" message:Nil delegate:self cancelButtonTitle:Nil otherButtonTitles:@"本次不再提醒",@"知道了", nil];
            [alert show];
            break;
        }
    }
}
實現要點有三處:註冊 kReachabilityChangedNotification 通知,在網絡切換時回調;啟動 notifier 開始監聽;根據 currentReachabilityStatus 的三種狀態(WiFi、蜂窩網絡、無網絡)分別彈出提示。延遲調用則是為了避讓啟動階段的通知密集觸發。
以上就是本文的全部內容,希望對大家的學習有所幫助。