
iOS 組件化實踐:用 JLRoutes 與 Mediator 完成模組解耦
近期替公司一個 iOS 專案做了組件化解耦。專案早期開發就不太規範,加上我對業務還不夠熟悉,所以並沒有把全部模組都納入組件化範圍。這套做法的原理與蘑菇街 App 的組件化之路相近,但有一點不同:我們沒有遇到「組件 A 需要呼叫組件 B 某個具體方法」的場景,所有跨組件呼叫都屬於「組件 A 打開組件 B」這種類型,組件之間保持透明。文章最後也會列出目前仍存在、待後續改善的問題。
為什麼要做組件化
組件化最大的價值有兩點:讓模組之間互相解耦,並把 wap 呼叫與本地呼叫統一在同一套介面上。
先看解耦。以往模組間要互相呼叫就必須彼此 import,結果形成層層依賴。想像一個場景:A、B、C、D 四個 VC,A 與 B 互相跳轉、B 與 C 互相跳轉、D 又與 A、B 互相跳轉,關係如下圖:
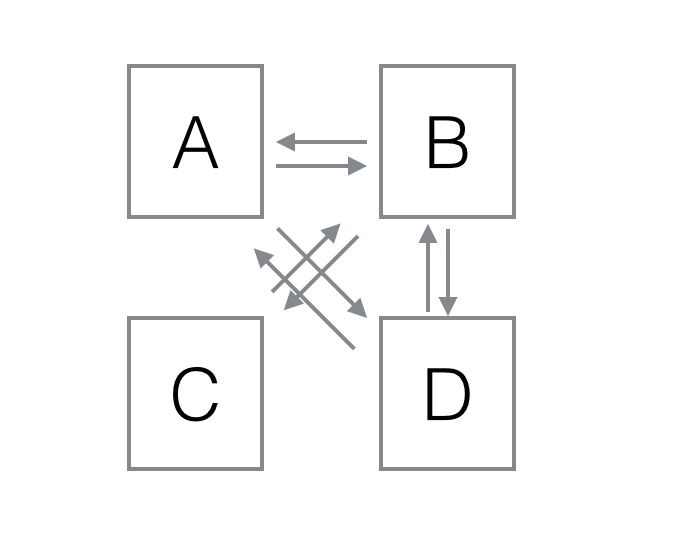
組件化在專案中引入了 Mediator 物件與 Action 物件,加入這兩者之後,A、B、C、D 之間的關係變成:
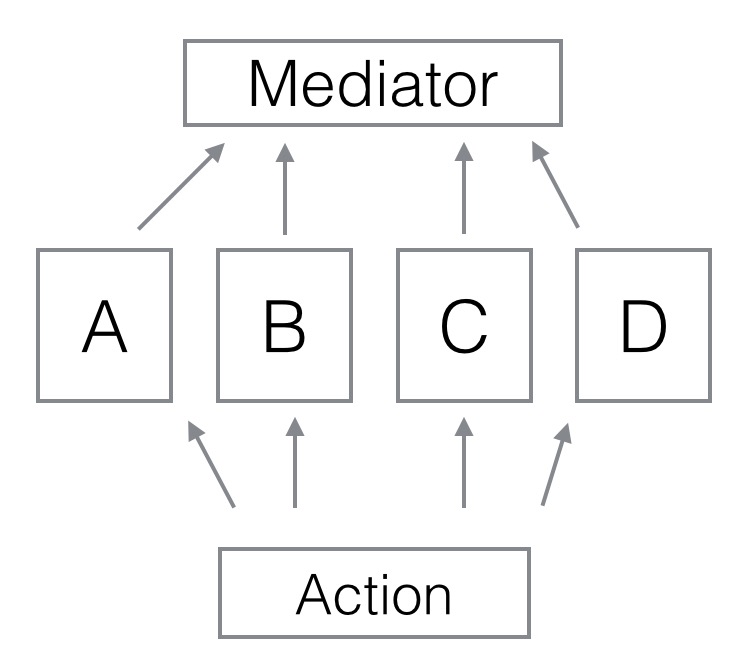
各模組不再直接引用彼此,統一透過 Mediator 轉發、由 Action 執行,依賴方向單一化。
組件化方案的實作
整體思路是在 App 啟動時註冊 URL,URL 註冊透過 JLRoutes 完成。基本用法如下:
- (BOOL)application:(UIApplication *)application didFinishLaunchingWithOptions:(NSDictionary *)launchOptions {
    JLRoutes *routes = [JLRoutes routesForScheme:scheme_url];
    [routes addRoute:LSYKey1 handler:^BOOL(NSDictionary<NSString *, NSString *> * _Nonnull parameters) {
        // 在這裡處理該路由對應的邏輯
        return YES; // 依回傳值決定是否執行該段程式
    }];
}
其中 scheme_url 是 App 自訂的 URL Scheme,LSYKey1 是路由路徑,parameters 是 URL 帶入的參數。App 啟動時初始化 JLRoutes 並註冊各條路由,之後只要有人嘗試打開符合該 scheme 的 URL,就會執行對應註冊路徑下的 block。
-(BOOL)application:(UIApplication *)application openURL:(NSURL *)url
      sourceApplication:(NSString *)sourceApplication
             annotation:(id)annotation {
    // 當 App 被打開,或從其他 App 返回時會呼叫此方法
    // 不同系統版本需要實作的方法不同
    if ([url.scheme isEqualToString:scheme_url]) {
        return [JLRoutes routeURL:url];
    }
    return YES;
}
因此打開 scheme_url://LSYKey1?oid=123&amount=456 這樣的 URL 時,就會執行上面註冊的 block,並可從 parameters 取出參數:
JLRoutes *routes = [JLRoutes routesForScheme:scheme_url];
[routes addRoute:LSYKey1 handler:^BOOL(NSDictionary<NSString *, NSString *> * _Nonnull parameters) {
    NSInteger oid = [parameters[@"oid"] integerValue];       // 取出 oid
    NSInteger amount = [parameters[@"amount"] integerValue]; // 取出 amount
    return YES;
}];
以上是 JLRoutes 註冊 URL 的部分,真正的解耦則由 Mediator 物件與 Action 物件搭配 JLRoutes 完成。
首先需要一個檔案集中管理本地模組的 Key,這裡放在 ComponentKey.h:
#import <Foundation/Foundation.h>

static NSString * const LSYKey1 = @"LSYKey1";
static NSString * const LSYKey2 = @"LSYKey2";
static NSString * const LSYKey3 = @"LSYKey3";
Mediator 的介面定義:
#import <Foundation/Foundation.h>

@interface Mediator : NSObject

/** 註冊 JLRoutes 路由 */
+ (void)componentRegister;

/** 本地以 key 開啟模組
 *  @param key 模組 key
 *  @param dic 傳遞的參數 */
+ (void)openComponentForKey:(NSString *)key parameter:(NSDictionary *)dic;

/** 透過 runtime 機制讓 Mediator 與 Action 解耦,把訊息轉發給 Action 執行
 *  @param targetName Action 類別名
 *  @param actionName 方法名
 *  @param params 傳遞的參數 */
+ (void)performTarget:(NSString *)targetName action:(NSString *)actionName params:(NSDictionary *)params;

@end
Mediator 的實作:
@implementation Mediator

+ (void)componentRegister {
    JLRoutes *routes = [JLRoutes routesForScheme:scheme_url];
    [routes addRoute:LSYKey1 handler:^BOOL(NSDictionary * _Nonnull parameters) {
        [self performTarget:@"Action" action:@"performActionA" params:parameters];
        return YES;
    }];
    [routes addRoute:LSYKey2 handler:^BOOL(NSDictionary * _Nonnull parameters) {
        [self performTarget:@"Action" action:@"performActionB" params:parameters];
        return YES;
    }];
}

+ (void)openComponentForKey:(NSString *)key parameter:(NSDictionary *)dic {
    // 把本地呼叫傳入的 key 與參數拼成 URL,最後同樣交給 JLRoutes 處理
    if (!key.length) { return; }

    NSMutableString *urlString = [NSMutableString stringWithString:
                                  [NSString stringWithFormat:@"%@://%@", scheme_url, key]];
    [urlString appendString:@"?"];
    [dic enumerateKeysAndObjectsUsingBlock:^(id _Nonnull key, id _Nonnull obj, BOOL * _Nonnull stop) {
        [urlString appendString:[NSString stringWithFormat:@"%@=%@&", key, obj]];
    }];
    [urlString deleteCharactersInRange:NSMakeRange(urlString.length - 1, 1)];

    NSURL *url = [NSURL URLWithString:[urlString copy]];
    [JLRoutes routeURL:url];
}

+ (void)performTarget:(NSString *)targetName action:(NSString *)actionName params:(NSDictionary *)params {
    NSString *targetClassString = [NSString stringWithFormat:@"%@", targetName];
    NSString *actionString = [NSString stringWithFormat:@"%@:", actionName];
    Class targetClass = NSClassFromString(targetClassString);
    id target = [[targetClass alloc] init];
    SEL action = NSSelectorFromString(actionString);

    if ([target respondsToSelector:action]) {
#pragma clang diagnostic push
#pragma clang diagnostic ignored "-Warc-performSelector-leaks"
        [target performSelector:action withObject:params];
#pragma clang diagnostic pop
    } else {
        // 這裡處理無回應的請求
    }
}

@end
Action 物件負責處理 Mediator 轉發過來的訊息,上例中分別執行了 performActionA 與 performActionB。可以依功能把這些方法分類:若兩者都屬於跳轉,就建立一個 Action+Jump 的 category 專門處理跳轉,把方法寫進去。
#import "Action+Jump.h"

@implementation Action (Jump)

- (void)performActionA:(NSDictionary *)params {
    // 跳轉到 A 界面
}

- (void)performActionB:(NSDictionary *)params {
    // 跳轉到 B 界面
}

@end
這樣一來,本地要呼叫 LSYKey1 模組並帶入 oid 與 amount,只需一行:
[Mediator openComponentForKey:LSYKey1 parameter:@{@"oid": @123, @"amount": @"456"}];
遠端呼叫則直接走:
[JLRoutes routeURL:url];
因為所有 URL 已在啟動時註冊完成:
[Mediator componentRegister];
目前仍存在的問題
這套方案雖然達成了組件化,仍有幾點需要後續改善:
· 本地呼叫與遠端呼叫混在一起,呼叫端無法直觀分辨差異。
· 尚不支援「組件 A 呼叫組件 B 某個具體方法」這類需要回傳值的業務場景。
· 組件數量過多時,啟動階段大量註冊路由可能影響 App 啟動速度。