
iOS 8 互動式通知:讓使用者不離開當前畫面就能回覆訊息
編輯:iOS 相關資訊
iOS 8 帶來了全新的通知中心與通知機制。當螢幕頂部收到推送時,只要往下拉就能看到快速操作介面,完全不必進入 App;在鎖屏狀態下,同樣能直接處理通知項目。整套設計的核心目標很清楚:讓使用者盡量不離開手上正在做的事,就能把訊息處理掉。
天生支援直接互動的項目包括簡訊、郵件、行事曆、提醒事項,以及更新介面後的第三方應用:
- 在通知橫幅直接回覆簡訊,不必開啟簡訊 App
- 直接接受或婉拒郵件邀請
- 把提醒標記為完成或稍後提醒
- 第三方 App 只要更新介面,也能提供快速操作
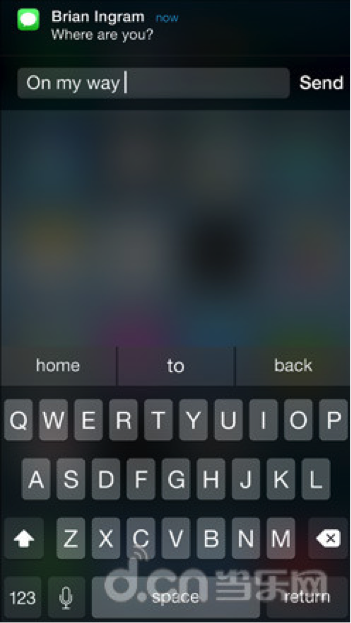
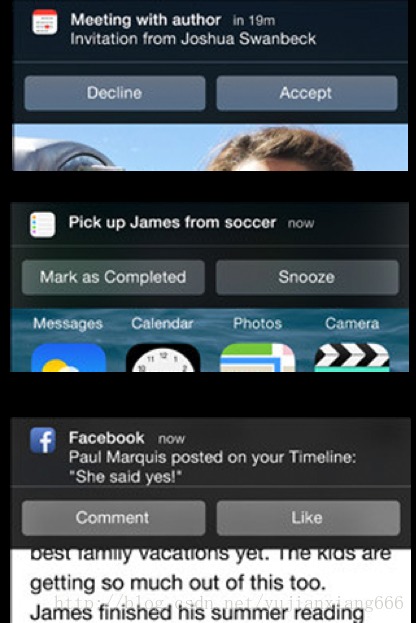
研究官方文件之後,這項功能的效果已經做出來了。由於遠端推送流程較繁瑣、需要後端支援,這裡改用本地推送示範,兩者要呼叫的代理方法幾乎一致。基本流程如下。
步驟一:建立通知上的動作(按鈕)
UIMutableUserNotificationAction *action = [[UIMutableUserNotificationAction alloc] init];
action.identifier = @"action";          // 按鈕識別碼
action.title = @"Accept";               // 按鈕標題
action.activationMode = UIUserNotificationActivationModeForeground;  // 點擊後啟動 App
// action.authenticationRequired = YES;
// action.destructive = YES;

UIMutableUserNotificationAction *action2 = [[UIMutableUserNotificationAction alloc] init];
action2.identifier = @"action2";
action2.title = @"Reject";
action2.activationMode = UIUserNotificationActivationModeBackground;  // 不啟動 App,背景處理
action.authenticationRequired = YES;    // 需解鎖才能處理;若為 Foreground 模式則此屬性被忽略
action.destructive = YES;
步驟二:建立動作的類別集合
UIMutableUserNotificationCategory *categorys = [[UIMutableUserNotificationCategory alloc] init];
categorys.identifier = @"alert";        // 這組動作的唯一識別碼
[categorys setActions:@[action, action2] forContext:UIUserNotificationActionContextMinimal];
步驟三:建立設定並指定通知樣式
UIUserNotificationSettings *uns = [UIUserNotificationSettings
    settingsForTypes:(UIUserNotificationTypeAlert | UIUserNotificationTypeBadge | UIUserNotificationTypeSound)
    categories:[NSSet setWithObjects:categorys, nil]];
步驟四:註冊
[[UIApplication sharedApplication] registerForRemoteNotifications];
[[UIApplication sharedApplication] registerUserNotificationSettings:uns];
步驟五:發送本地推送
UILocalNotification *notification = [[UILocalNotification alloc] init];
notification.fireDate = [NSDate dateWithTimeIntervalSinceNow:5];
notification.timeZone = [NSTimeZone defaultTimeZone];
notification.alertBody = @"測試推送的快捷回覆";
notification.category = @"alert";
[[UIApplication sharedApplication] scheduleLocalNotification:notification];
若要確認是否註冊成功,可以查看 currentUserNotificationSettings 與 isRegisteredForRemoteNotifications。
步驟六:在 AppDelegate 中處理結果
// 註冊結果回調
- (void)application:(UIApplication *)application didRegisterUserNotificationSettings:(UIUserNotificationSettings *)notificationSettings
{
    NSLog(@"%@", notificationSettings);
}

// 收到本地通知
- (void)application:(UIApplication *)application didReceiveLocalNotification:(UILocalNotification *)notification
{
    NSLog(@"%@", notification);
}

// 點擊通知上的動作按鈕
- (void)application:(UIApplication *)application handleActionWithIdentifier:(NSString *)identifier forLocalNotification:(UILocalNotification *)notification completionHandler:(void (^)())completionHandler
{
    // identifier 用來判斷點了哪顆按鈕,notification 是訊息內容
    NSLog(@"%@----%@", identifier, notification);
    completionHandler();    // 處理完畢務必呼叫
}

// 遠端推送相關
- (void)application:(UIApplication *)application didRegisterForRemoteNotificationsWithDeviceToken:(NSData *)deviceToken
{
    // 向 APNS 註冊成功,取得 deviceToken
}

- (void)application:(UIApplication *)application didFailToRegisterForRemoteNotificationsWithError:(NSError *)error
{
    // 註冊失敗
}

- (void)application:(UIApplication *)application didReceiveRemoteNotification:(NSDictionary *)userInfo
{
    // 收到遠端推送
}

- (void)application:(UIApplication *)application handleActionWithIdentifier:(NSString *)identifier forRemoteNotification:(NSDictionary *)userInfo completionHandler:(void (^)())completionHandler
{
    // App 未啟動時收到推送,下拉後點擊按鈕觸發
}
重要:執行後請按 Shift + Command + H 把 App 推到背景,或按 Command + L 讓模擬器鎖屏,才看得到效果。App 在背景時,下拉通知會出現剛才新增的兩個按鈕;鎖屏時,訊息左滑也會出現同樣的按鈕。
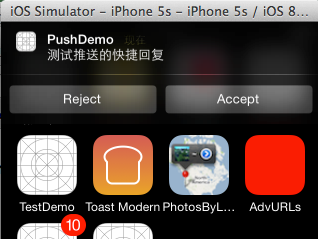
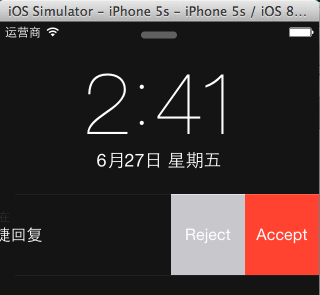
目前只做到讓通知顯示按鈕,帶輸入框的版本還在研究中。如果誰先摸出來,也歡迎分享,一起進步。
程式碼:https://github.com/ios44first/PushDemo