
自定義轉場動畫完整指南:Push & Pop、Modal、Segue 三種做法
作者:@翁呀偉呀,授權本站轉載。
概述
這篇文章會說明幾種自定義轉場動畫的方式,並為每種方式附上一個示例——畢竟程式碼才是我們的語言,這樣比較容易上手。主要涵蓋三種做法:
- Push & Pop
- Modal
- Segue
前兩種大家都很熟悉,第三種是 Storyboard 中的拖線,屬於 UIStoryboardSegue 類別,透過繼承它來自定義轉場過程動畫。
Push & Pop
操作步驟如下:
1. 建立一個繼承自 NSObject 並遵守 UIViewControllerAnimatedTransitioning 協議的類別。
2. 實作該協議的兩個基本方法:
// 指定轉場動畫的持續時間
func transitionDuration(transitionContext: UIViewControllerContextTransitioning) -> NSTimeInterval

// 轉場動畫的具體內容
func animateTransition(transitionContext: UIViewControllerContextTransitioning)
3. 遵守 UINavigationControllerDelegate 協議並實作:
func navigationController(navigationController: UINavigationController,
             animationControllerForOperation operation: UINavigationControllerOperation,
                          fromViewController fromVC: UIViewController,
                            toViewController toVC: UIViewController)
    -> UIViewControllerAnimatedTransitioning?
在此方法中回傳第 1 步建立的動畫類別。
注意:由於 Push 與 Pop 需要兩套動畫,解法是在第 1 步建立兩個檔案,一個負責 Push、一個負責 Pop;然後在第 3 步回傳之前先判斷動畫方向——用 operation == UINavigationControllerOperation.Push 即可區分,再依情況回傳不同的類別。
到這裡就能看到轉場動畫的效果了。但系統預設的 Push 與 Pop 都支援手勢驅動,能依手勢移動距離改變動畫完成度。幸運的是 Cocoa 已整合相關機制,我們只要告訴它百分比即可,所以下一步是手勢驅動。
4. 在第二個 UIViewController 中替 view 加入一個滑動(Pan)手勢,並建立一個 UIPercentDrivenInteractiveTransition 屬性。在手勢的監聽方法中計算移動百分比,用 updateInteractiveTransition() 即時更新;最後在手勢 state 為 ended 或 cancelled 時,依完成度決定要還原還是完成動畫,分別呼叫 cancelInteractiveTransition() 或 finishInteractiveTransition()。
5. 實作 UINavigationControllerDelegate 中另一個回傳 UIViewControllerInteractiveTransitioning 的方法,回傳第 4 步建立的屬性。
自定義 Push & Pop 示例
此示例源自 Kitten Yang 的部落格,實作 Keynote 中的神奇移動效果,作者以 Swift 重新實作了一遍,原始碼:MagicMove。
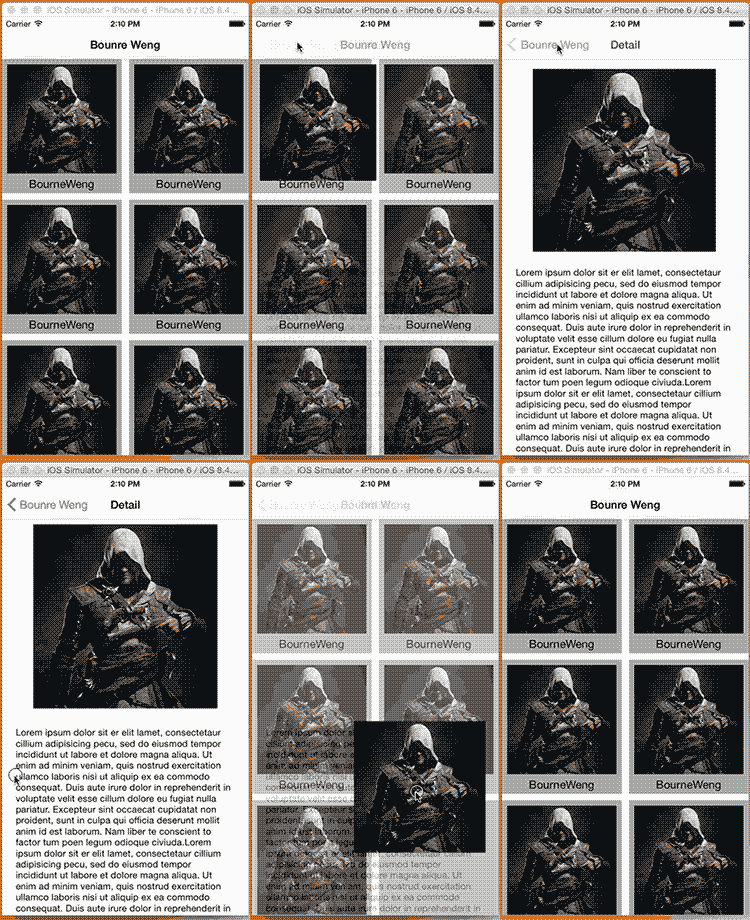
初始化
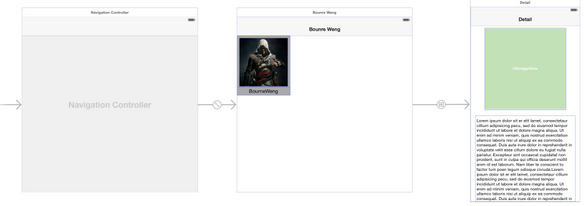
- 建立兩個 ViewController:一個繼承 UICollectionViewController,命名 ViewController;另一個繼承 UIViewController,命名 DetailViewController。在 Storyboard 中建立並綁定。
- 在 Storyboard 中拖入一個 UINavigationController,刪除預設的 rootViewController,讓 ViewController 成為它的 root,再拉一條從 ViewController 到 DetailViewController 的 segue。
- 在 ViewController 中自定義 UICollectionViewCell,加入 UIImageView 與 UILabel。
- 在 DetailViewController 中加入 UIImageView 與 UITextView。
加入 UIViewControllerAnimatedTransitioning
- 新增一個 Cocoa Touch Class,繼承 NSObject,命名 MagicMoveTransion,遵守 UIViewControllerAnimatedTransitioning 協議。
- 實作兩個協議方法,在其中撰寫 Push 動畫(細節見註解):
func transitionDuration(transitionContext: UIViewControllerContextTransitioning) -> NSTimeInterval {
    return 0.5
}

func animateTransition(transitionContext: UIViewControllerContextTransitioning) {
    // 1. 取得動畫的來源與目標控制器
    let fromVC = transitionContext.viewControllerForKey(UITransitionContextFromViewControllerKey) as! ViewController
    let toVC = transitionContext.viewControllerForKey(UITransitionContextToViewControllerKey) as! DetailViewController
    let container = transitionContext.containerView()

    // 2. 為 Cell 中的 imageView 做一張截圖並隱藏原物件,
    //    讓使用者以為移動的就是 imageView 本身
    let snapshotView = fromVC.selectedCell.imageView.snapshotViewAfterScreenUpdates(false)
    snapshotView.frame = container.convertRect(fromVC.selectedCell.imageView.frame,
                                              fromView: fromVC.selectedCell)
    fromVC.selectedCell.imageView.hidden = true

    // 3. 設定目標控制器位置,透明度設為 0,後續動畫中慢慢顯示
    toVC.view.frame = transitionContext.finalFrameForViewController(toVC)
    toVC.view.alpha = 0

    // 4. 依序加入 container,順序不可顛倒
    container.addSubview(toVC.view)
    container.addSubview(snapshotView)

    // 5. 執行動畫
    UIView.animateWithDuration(transitionDuration(transitionContext), delay: 0,
        options: UIViewAnimationOptions.CurveEaseInOut,
        animations: {
            snapshotView.frame = toVC.avatarImageView.frame
            toVC.view.alpha = 1
        }) { (finish: Bool) -> Void in
            fromVC.selectedCell.imageView.hidden = false
            toVC.avatarImageView.image = toVC.image
            snapshotView.removeFromSuperview()
            // 動畫結束後務必呼叫,交還 navigation 轉場的管理權
            transitionContext.completeTransition(true)
        }
}
啟用動畫
- 讓 ViewController 遵守 UINavigationControllerDelegate 協議,並設定代理為自己:
override func viewDidAppear(animated: Bool) {
    super.viewDidAppear(animated)
    self.navigationController?.delegate = self
}
- 實作代理方法:
func navigationController(navigationController: UINavigationController,
    animationControllerForOperation operation: UINavigationControllerOperation,
    fromViewController fromVC: UIViewController,
    toViewController toVC: UIViewController) -> UIViewControllerAnimatedTransitioning? {
    if operation == UINavigationControllerOperation.Push {
        return MagicMoveTransion()
    } else {
        return nil
    }
}
- 在 collectionView 的點擊方法中觸發 segue:
override func collectionView(collectionView: UICollectionView,
                    didSelectItemAtIndexPath indexPath: NSIndexPath) {
    self.selectedCell = collectionView.cellForItemAtIndexPath(indexPath) as! MMCollectionViewCell
    self.performSegueWithIdentifier("detail", sender: nil)
}
- 在 prepareForSegue 中把點擊的圖片傳給 DetailViewController:
override func prepareForSegue(segue: UIStoryboardSegue, sender: AnyObject?) {
    if segue.identifier == "detail" {
        let detailVC = segue.destinationViewController as! DetailViewController
        detailVC.image = self.selectedCell.imageView.image
    }
}
至此,點擊 Cell 就會執行剛才自定義的動畫。接著加入手勢驅動。
手勢驅動
- 在 DetailViewController 的 viewDidAppear 中加入螢幕邊緣手勢:
let edgePan = UIScreenEdgePanGestureRecognizer(target: self, action: Selector("edgePanGesture:"))
edgePan.edges = UIRectEdge.Left
self.view.addGestureRecognizer(edgePan)
- 在監聽方法中建立 UIPercentDrivenInteractiveTransition 屬性並更新百分比:
func edgePanGesture(edgePan: UIScreenEdgePanGestureRecognizer) {
    let progress = edgePan.translationInView(self.view).x / self.view.bounds.width

    if edgePan.state == UIGestureRecognizerState.Began {
        self.percentDrivenTransition = UIPercentDrivenInteractiveTransition()
        self.navigationController?.popViewControllerAnimated(true)
    } else if edgePan.state == UIGestureRecognizerState.Changed {
        self.percentDrivenTransition?.updateInteractiveTransition(progress)
    } else if edgePan.state == UIGestureRecognizerState.Cancelled ||
              edgePan.state == UIGestureRecognizerState.Ended {
        if progress > 0.5 {
            self.percentDrivenTransition?.finishInteractiveTransition()
        } else {
            self.percentDrivenTransition?.cancelInteractiveTransition()
        }
        self.percentDrivenTransition = nil
    }
}
- 實作回傳 UIViewControllerInteractiveTransitioning 的方法:
func navigationController(navigationController: UINavigationController,
    interactionControllerForAnimationController animationController: UIViewControllerAnimatedTransitioning)
    -> UIViewControllerInteractiveTransitioning? {
    if animationController is MagicMovePopTransion {
        return self.percentDrivenTransition
    } else {
        return nil
    }
}
至此手勢驅動就完成了,但還不能用——因為 Pop 動畫尚未實作,請自行參考原始碼 MagicMove 補上。
Modal
modal 轉場即以 presentViewController() 推出的方式,預設情況下第二個視圖從螢幕下方彈出。步驟如下:
1. 建立一個繼承 NSObject 並遵守 UIViewControllerAnimatedTransitioning 協議的類別。
2. 實作 transitionDuration: 與 animateTransition: 兩個方法。
以上兩步與 Push & Pop 相同,接下來才開始不同。
3. 若要以 Modal 方式從第一個 VC 前往第二個,第一個 VC 需遵循 UIViewControllerTransitioningDelegate 協議,並實作 animationControllerForPresentedController: 與 animationControllerForDismissedController: 兩個方法。
4. 在第一個 VC 的 prepareForSegue() 中,把第二個 VC 的 transitioningDelegate 設為 self。
由第 3 步可知,最好也建立兩個動畫類別,一個負責 Present、一個負責 Dismiss;若只建一個,就必須在動畫實作中判斷當前方向。
5. 在第一個 VC 中建立 UIPercentDrivenInteractiveTransition 屬性,並在 prepareForSegue() 中替第二個 VC.view 加入手勢用於 dismiss,監聽方法與 Push & Pop 相同。
6. 實作 UIViewControllerTransitioningDelegate 的另外兩個方法,分別回傳 Present 與 Dismiss 的百分比控制器。
自定義 Modal 示例
此示例同樣源自 Kitten Yang 的部落格,實作 3D 翻轉效果,以 Swift 重新實作,原始碼:FlipTransion。
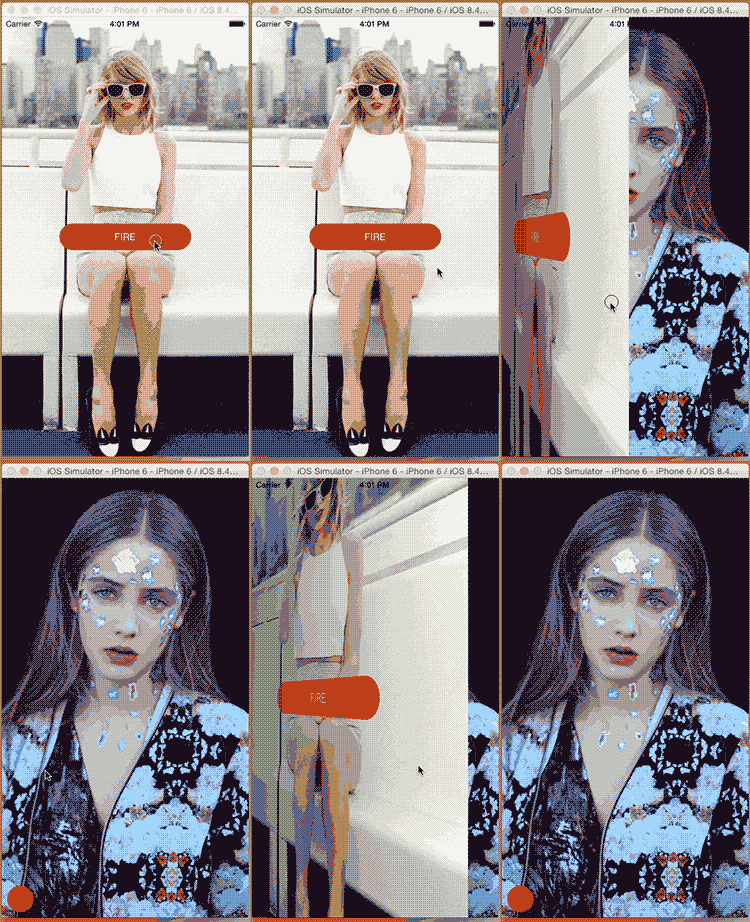
初始化
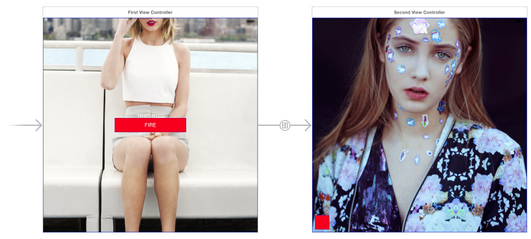
- 建立兩個 UIViewController,命名為 FirstViewController 與 SecondViewController,在 Storyboard 中加入並綁定。
- 分別為兩個視圖加入 UIImageView 以便區分。若圖片設為 Aspect Fill 或其他 Fill 模式,記得呼叫 imageView 的 clipsToBounds() 裁掉多餘部分。
- 為兩個控制器各加入按鈕:第一個拖線到第二個控制器,第二個綁定一個用來 dismiss 的方法。
加入動畫類別與啟用
- 新增 Cocoa Touch Class,繼承 NSObject,命名 BWFlipTransionPush,遵守 UIViewControllerAnimatedTransitioning 協議,並實作兩個方法撰寫 Present 動畫。
- 讓 FirstViewController 遵守 UIViewControllerTransitioningDelegate,把 transitioningDelegate 設為 self。
- 實作 UIViewControllerTransitioningDelegate 的兩個方法,指定動畫類別。
動畫細節請直接看程式碼註解。完成 Pop 動畫後即可看到自定義 Modal 轉場效果,剩下手勢驅動。
手勢驅動
- 要同時支援 Present 與 Dismiss 手勢,需為兩個 viewController.view 都加入手勢。首先在 FirstViewController 中替自己加入螢幕右緣手勢,並在 prepareForSegue() 中替 SecondViewController.view 加入螢幕左緣手勢,讓它們共用同一個監聽方法。
- 在監聽方法中的做法與前面相同,但要注意本示例的轉場動畫較特殊且涉及兩個手勢,因此計算百分比時使用的是 KeyWindow。同樣別忘了 UIPercentDrivenInteractiveTransition 屬性。
- 實作 UIViewControllerTransitioningDelegate 的另外兩個方法,分別回傳 Present 與 Dismiss 的百分比控制器。
完整原始碼請見 FlipTransion。
Segue
這種方式比較特殊:把 Storyboard 中的拖線與自定義的 UIStoryboardSegue 類別綁定,藉此定義轉場動畫。
先來看 UIStoryboardSegue 的定義:
func navigationController(navigationController: UINavigationController,
    animationControllerForOperation operation: UINavigationControllerOperation,
    fromViewController fromVC: UIViewController,
    toViewController toVC: UIViewController) -> UIViewControllerAnimatedTransitioning?
可以發現它只有一個方法 perform(),所以很明顯就是覆寫這個方法來自定義轉場動畫。再注意它的屬性 sourceViewController 與 destinationViewController——透過這兩個屬性就能取得轉場動畫的兩個主角,動畫因此可以隨心所欲。
唯一要注意的是:拉線時記得在彈出選項中選擇 custom,才能與自定義的 UIStoryboardSegue 綁定。
那麼,返回時的動畫呢?
由於 perform 所在的是 segue,返回用的上一個控制器稱為 unwind segue。
- 解除轉場(unwind segue)通常與正常自定義轉場一起出現。
- 要讓解除轉場生效,我們必須覆寫 perform 方法並套用自定義動畫。另外,導航返回源視圖控制器的過渡效果不需要與正向轉場相同。
實作步驟:
- 建立一個 IBAction 方法,該方法在解除轉場被執行時可選擇性地執行一些程式碼。方法名可以任取,內容可以留空,但必須存在,因為解除轉場的定義要依賴它。
- 建立解除轉場的設定(與正向轉場的建立方式不同,稍後示例會展示)。
- 覆寫 UIStoryboardSegue 子類別中的 perform() 方法,實作自定義動畫。
- UIViewController 提供了特定方法的定義,讓系統知道解除轉場即將執行。
Segue 示例
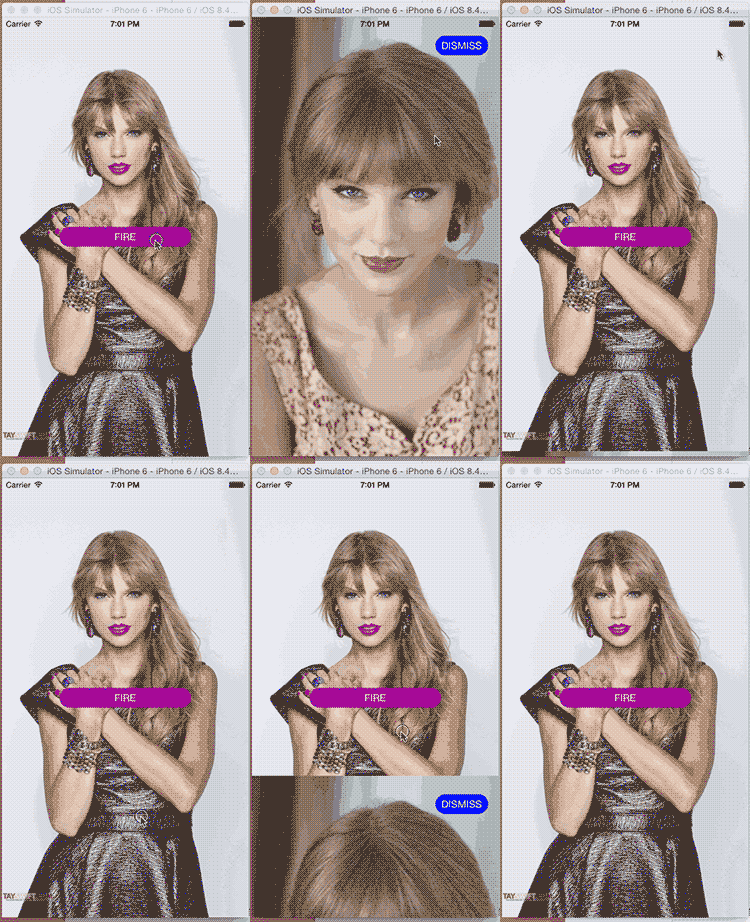
此示例為作者自行撰寫,原始碼:SegueTransion。
初始化
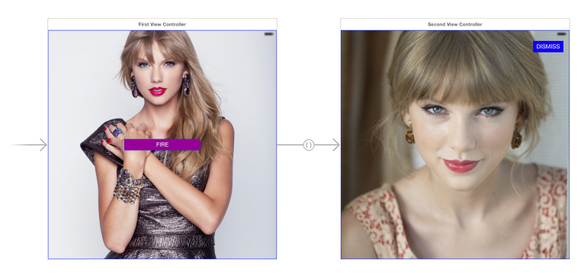
- 建立兩個 UIViewController,命名 FirstViewController 與 SecondViewController,在 Storyboard 中加入並綁定。
- 為兩個控制器加上背景圖片或不同背景色以便區分。在 FirstViewController 加入一個觸發按鈕,拖線到 SecondViewController,在彈出選項中選擇 custom。
Present
- 新增 Cocoa Touch Class,繼承 UIStoryboardSegue,命名 FirstSegue,並綁定到上一步拉出的 segue。
- 覆寫 perform() 方法,在其中撰寫動畫邏輯。
動畫過程請直接看程式碼,邏輯都很簡單。
Present 手勢
這裡要注意:這種方式自定義的轉場動畫無法動態手勢驅動,也就是不能依手勢百分比改變動畫完成度。因此這裡只加入一個簡單的滑動(swipe)手勢。
- 在 FirstViewController 中加入手勢並實作監聽方法。
現在已經可以 present 了,接著實作 dismiss。
Dismiss
- 在 FirstViewController 中加入一個 IBAction 方法,方法名與是否有回傳值皆可自便。
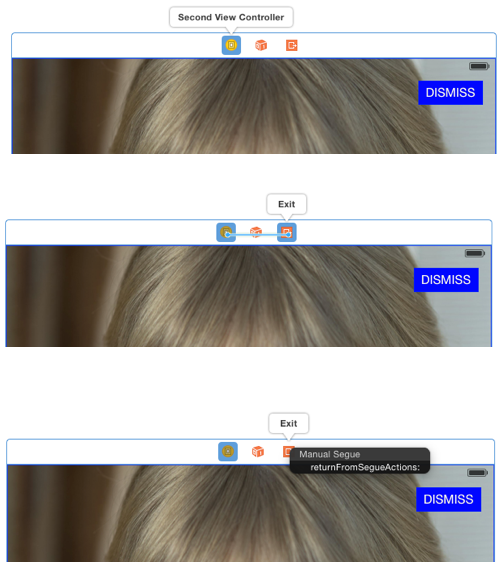
- 在 Storyboard 中選取 SecondViewController,按住 control 鍵拖線到它自己的 Exit 圖示,並在彈出選項中選擇上一步的 IBAction 方法。
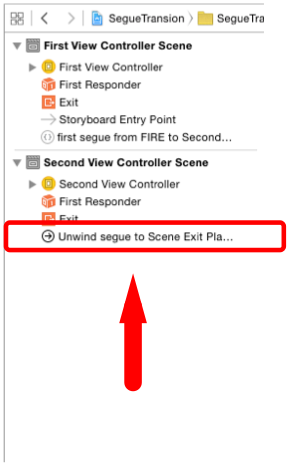
- 在 Storyboard 左側的文件視圖中找到剛才拉的那條 segue,設定它的 identifier。
- 新增另一個 Cocoa Touch Class,繼承 UIStoryboardSegue,命名 FirstSegueUnWind,覆寫 perform() 實作 dismiss 動畫。
- 在 FirstViewController 中覆寫 segue 的處理方法,依 identifier 判斷是否需要 dismiss,若是則回傳剛才建立的 FirstUnWindSegue。
- 最後一步:在 SecondViewController 的按鈕監聽方法中實作 dismiss。注意不是呼叫 self.dismiss...! 而是觸發 unwind segue。
再為 SecondViewController 加上手勢,並把手勢監聽方法指向同一個方法即可。完整程式碼請見 SegueTransion。
總結
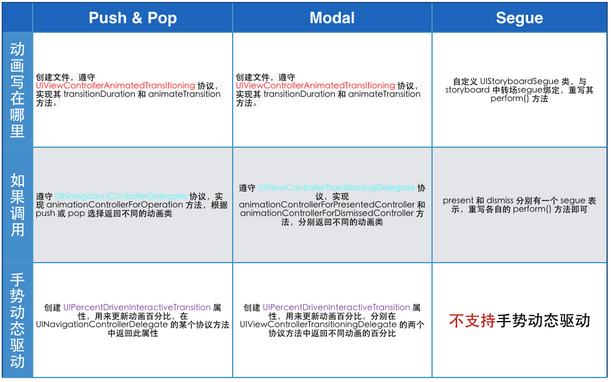
三種方法的差異可以這樣記:
- Push & Pop:動畫類別遵守 UIViewControllerAnimatedTransitioning,透過 UINavigationControllerDelegate 回傳;支援手勢驅動。
- Modal:同樣用動畫類別,但透過 UIViewControllerTransitioningDelegate 回傳,且需設定 transitioningDelegate;支援手勢驅動。
- Segue:繼承 UIStoryboardSegue 覆寫 perform(),返回動畫靠 unwind segue;不支援手勢百分比驅動。
寫這篇 blog 花了一整天的時間,希望自己和看過的人都能記住。若有錯誤之處,歡迎提出。
- 上一篇文章: 輕鬆理解 IMP 指標的作用(以 Method Swizzling 為例)
- 下一篇文章: 提升 iOS 開發效率的方法與工具整理