
iOS 控件入門:UIAlertView 三種型態與 delegate 回呼
編輯:iOS 相關資訊
前言
在熟悉 Objective-C 基本語法之後,正式進入 iOS 視圖開發的第一步,就從最常被用到的提示方塊 UIAlertView 開始。它有三種常見型態:普通提示、需要使用者確認的雙按鈕提示,以及內建輸入框的登入型提示。
2.1 普通提示方塊
建立提示方塊最好的方式就是使用它專屬的初始化方法,參數本身就帶有說明性:
- (void)viewDidLoad {
    [super viewDidLoad];

    UIAlertView *alertView = [[UIAlertView alloc]
        initWithTitle:@"Title"        // 顯示於最上方的標題
              message:@"Message"      // 呈現給使用者看的實際訊息
             delegate:nil             // 可選;傳入 delegate 才能在狀態變更時收到通知
                                      // 該物件必須實作 UIAlertViewDelegate 協議
    cancelButtonTitle:@"Cancel"       // 可選;取消按鈕的文字,通常置於左側
        otherButtonTitles:@"Ok", nil]; // 可選;其他按鈕,以逗號分隔,並以 nil 收尾

    [alertView show];
}
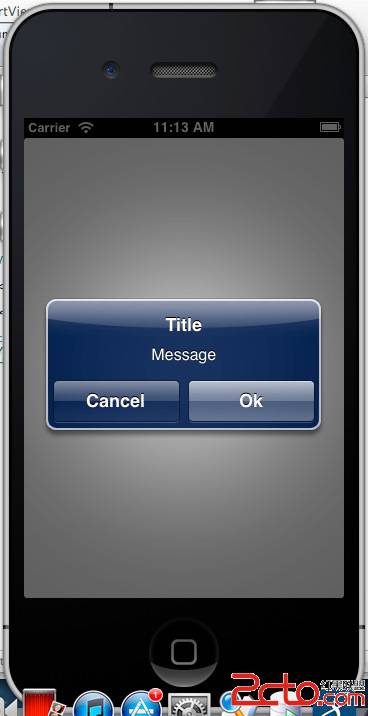
注意 otherButtonTitles: 這類變參數的結尾必須是 nil,漏掉的話會發生未定義行為。另外,cancel 按鈕的文字可以自訂,不一定非得是「取消」。
2.2 需要使用者確認的雙按鈕提示
// .h
@interface ZYAlertYesOrNoViewController : UIViewController <UIAlertViewDelegate>

- (void)alertView:(UIAlertView *)alertView clickedButtonAtIndex:(NSInteger)buttonIndex;

@end
// .m
- (void)viewDidAppear:(BOOL)animated {
    [super viewDidAppear:animated];
    self.view.backgroundColor = [UIColor whiteColor];

    UIAlertView *alertView = [[UIAlertView alloc]
        initWithTitle:@"Rating"
              message:@"Can you please rate our app?"
             delegate:self
    cancelButtonTitle:[self noButtonTitle]
    otherButtonTitles:[self yesButtonTitle], nil];
    [alertView show];
}

- (NSString *)yesButtonTitle { return @"Yes"; }
- (NSString *)noButtonTitle  { return @"No";  }

// 依點擊的按鈕決定後續行為
- (void)alertView:(UIAlertView *)alertView clickedButtonAtIndex:(NSInteger)buttonIndex {
    NSString *buttonTitle = [alertView buttonTitleAtIndex:buttonIndex];
    if ([buttonTitle isEqualToString:[self yesButtonTitle]]) {
        NSLog(@"User pressed the Yes button.");
    } else if ([buttonTitle isEqualToString:[self noButtonTitle]]) {
        NSLog(@"User pressed the No button.");
    }
}
點擊 Yes 後,主控台輸出:
User pressed the Yes button.
實務上更穩健的判斷方式是直接比對 buttonIndex,因為 cancel 按鈕固定為 index 0,其餘按鈕依宣告順序遞增。以文字比對的缺點是:一旦日後進行本地化,按鈕文字會隨語言改變而使判斷失效。
2.3 內建輸入框的提示方塊
// 登入型提示:一個帳號欄 + 一個密碼欄
UIAlertView *alertView = [[UIAlertView alloc]
    initWithTitle:@"Password"
          message:@"Please enter your credentials"
         delegate:self
  cancelButtonTitle:@"Cancel"
  otherButtonTitles:@"OK", nil];

// 指定提示方塊的樣式
[alertView setAlertViewStyle:UIAlertViewStyleLoginAndPasswordInput];
[alertView show];
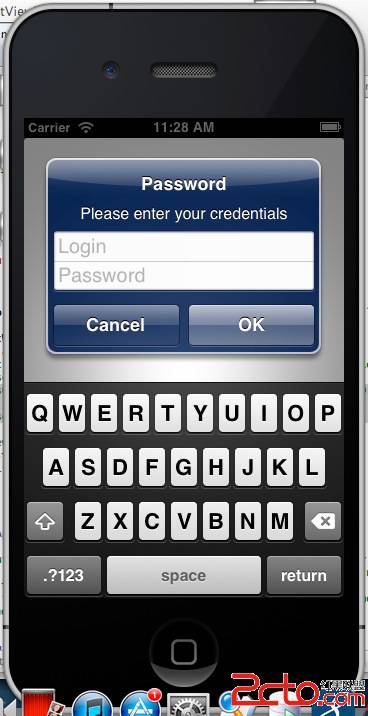
可用的樣式共有四種:
typedef enum {
    UIAlertViewStyleDefault = 0,              // 預設,無輸入框
    UIAlertViewStyleSecureTextInput,          // 單一密碼欄
    UIAlertViewStylePlainTextInput,           // 單一文字欄
    UIAlertViewStyleLoginAndPasswordInput     // 帳號 + 密碼
} UIAlertViewStyle;
使用輸入框樣式時,可透過 textFieldAtIndex: 取得內建的 text field 進一步設定 delegate 或鍵盤型態。由於登入型提示的 cancel 按鈕在左、確認在右,實作時仍建議以 buttonIndex 判斷而非文字。
重要提醒
UIAlertView 自 iOS 8 起已被 UIAlertController 取代,並在 iOS 9 之後標記為不建議使用,新的 App Store 送審也已不再接受。新專案請一律改用 UIAlertController,寫法如下:
UIAlertController *controller =
    [UIAlertController alertControllerWithTitle:@"Title"
                                        message:@"Message"
                                 preferredStyle:UIAlertControllerStyleAlert];

[controller addAction:[UIAlertAction actionWithTitle:@"Cancel"
                                               style:UIAlertActionStyleCancel
                                             handler:^(UIAlertAction *action) {
    // 使用者按下取消
}]];

[self presentViewController:controller animated:YES completion:nil];
相較於 delegate 模式,UIAlertController 用 block 把「哪顆按鈕對應哪段行為」寫在同一處,可讀性與維護性都更好,也不必再為每個提示方塊實作一套 delegate 方法。
- 上一篇文章: iOS 自訂視圖實作:不依賴 XIB 的純程式碼繪圖方案
- 下一篇文章: iOS 控件實作:UISwitch 開關控件與值變更事件