
iOS 委派模式 Delegate 完整解說:傳值、傳事件與視圖間溝通
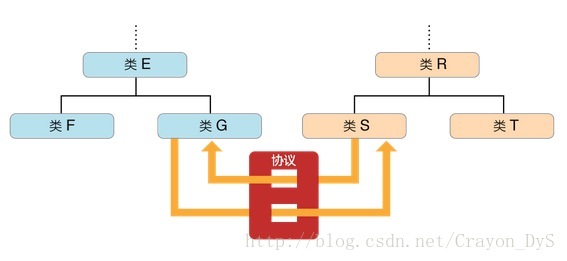
Delegate 是本質上就是一種 @protocol。顧名思義,就是「委託他人幫自己做事」——當某件事自己做不方便,就建立一個委託關係,讓別人去實作那個方法。
一、Delegate 的兩大用途
傳值:B 類要把自己的資料或物件交給 A 類去展示或處理。兩個 view 之間傳遞參數時特別有用。
傳事件:A 類發生了一件事,通知關心它的委託對象,由對方決定要如何反應。A 類本身不出面處理,而是把方法交給 B 類實作。
二、實作時的六個要點
1. 定義 @protocol。可以獨立成一個檔案,也可以放在委託類的 header 裡,習慣上是後者。
2. 在協議中宣告委託對象需要處理的方法。
3. 委託類中宣告一個協議型別的屬性,通常設為 assign 而非 retain,這是為了避免循環引用。命名慣例是 delegate,但若類別本身已有同名字段就得換名。
4. 被委託類在 interface 中宣告採用該協議,寫成 <XXXDelegate>。
5. 實作協議中的所有方法。
6. 把委託對象的 delegate 指向被委託類。常見兩種寫法:由外部直接指派(a.delegate = b),或在被委託類內部建立委託對象並設 delegate = self。
三、範例一:用 delegate 傳值
顧客(Customer)要買手機,但店家事務由商人(Businessman)處理。Customer 是委託類,Businessman 是被委託類。
// Customer.h
#import <Foundation/Foundation.h>

@protocol MyDelegate <NSObject>
-(void)buyIphone:(NSString *)iphoneType;
@end

@interface Customer : NSObject
@property (nonatomic, assign) id<MyDelegate> delegate;
-(void)willBuy;
@end

// Customer.m
@implementation Customer
@synthesize delegate;

-(void)willBuy {
    [delegate buyIphone:@"Iphone5"];
}
@end
被委託方宣告協議並實作:
// Businessman.h
#import "Customer.h"
@interface Businessman : NSObject <MyDelegate>
@end

// Businessman.m
-(void)buyIphone:(NSString *)iphoneType {
    NSLog(@"There is an Iphone store, we have %@", iphoneType);
}
把兩者接起來:
Customer *customer = [[Customer alloc] init];
Businessman *businessman = [[Businessman alloc] init];
customer.delegate = businessman;
[customer willBuy];
iPhone 型號由 Customer 決定,實際處理則落在 Businessman,這就是「傳值」的典型樣貌。
四、範例二:用 delegate 傳事件
老闆(Boss)要處理起草文件與接電話,但他不自己實作,而是交給秘書(Secretary)。
// Boss.h
@protocol MissionDelegate <NSObject>
-(void)draftDocuments;
-(void)tellPhone;
@end

@interface Boss : NSObject
@property (nonatomic, assign) id<MissionDelegate> delegate;
-(void)manage;
@end

// Boss.m
-(void)manage {
    [_delegate draftDocuments];
    [_delegate tellPhone];
}

// Secretary.m
-(void)draftDocuments { NSLog(@"Secretary draft documents"); }
-(void)tellPhone     { NSLog(@"Secretary tell phone"); }

// 使用
Boss *boss = [[Boss alloc] init];
Secretary *secretary = [[Secretary alloc] init];
boss.delegate = secretary;
[boss manage];
這裡 Boss 只負責「宣布要做什麼」,怎麼做由 Secretary 決定。事件驅動的感覺更明顯。
五、範例三:兩個 view 之間溝通
自訂一個 MyView,內部有個按鈕,但按鈕被點擊後要做什麼,MyView 自己不管,交給它的 delegate:
// MyView.h
@protocol MyDelegate <NSObject>
-(void)print:(NSString *)viewName;
@end

@interface MyView : UIView
@property (nonatomic, assign) id<MyDelegate> mydelegate;
@end

// MyView.m
-(void)buttonPressed {
    [_mydelegate print:@"this is a view"];
}

// DelegateViewController.m
@interface DelegateViewController () <MyDelegate>
@end

- (void)viewDidLoad {
    [super viewDidLoad];
    MyView *myView = [[MyView alloc] initWithFrame:CGRectMake(50, 100, 200, 100)];
    [myView setBackgroundColor:[UIColor yellowColor]];
    myView.mydelegate = self;        // 關鍵:把自己設為委託對象
    [self.view addSubview:myView];
}

-(void)print:(NSString *)viewName {
    NSLog(@"%@", viewName);
}
這正是 Cocoa Touch 中無數控制項的運作方式:UIButton 不知道你要做什麼,它只透過 target-action 把事件往外拋;UITableView 不知道每一列要顯示什麼,它透過 delegate 與 dataSource 來問。理解這層關係, UIKit 的設計就不再是硬背下來的規則。
六、現代寫法提醒
delegate 屬性在今日一律寫成 weak 而非 assign。兩者在「不 retain 對象」這一點上相同,但 weak 會在對象釋放後自動置為 nil,而 assign 會留下指向已釋放記憶體的野指標,一呼叫就崩潰。這是早期程式碼常見的隱形地雷。
另外,當回呼只有單一事件、或呼叫端與處理端關係明確時,block 或 notification 往往比 delegate 更輕巧。蘋果自己的 API 也朝這個方向演進。選擇的原則是:一對一、需雙向對話的長期關係用 delegate;一次性的回應回呼用 block;一對多、彼此不認識的通知用 NotificationCenter。