
在 iOS 上實現簡單繪畫板功能的完整做法
本文分享一個在 iOS 上實現基本繪畫板功能的完整方案,核心在於透過觸摸事件記錄手指軌跡,並利用 Core Graphics 即時繪製。
TouchView.h
#import <UIKit/UIKit.h>
@interface TouchView : UIView
{
NSMutableArray *points;
NSArray *points_all;
CGContextRef context;
UIColor *paint_clr;
}
@property (strong, nonatomic) NSMutableArray *points;
@property (strong, nonatomic) NSArray *points_all;
@property (strong, nonatomic) UIColor *paint_clr;
@end
TouchView.m
#import "TouchView.h"
@implementation TouchView
@synthesize points, points_all, paint_clr;
- (id)initWithFrame:(CGRect)frame
{
self = [super initWithFrame:frame];
if (self) {
paint_clr = [UIColor greenColor];
}
return self;
}
- (void)drawRect:(CGRect)rect
{
if ((!self.points) || (self.points.count < 2)) {
return;
}
context = UIGraphicsGetCurrentContext();
CGContextSetLineWidth(context, 5.0f); // 設置畫筆粗細
CGContextSetStrokeColorWithColor(context, [paint_clr CGColor]); // 設置畫筆顏色
// 畫以前的軌跡
for (int j = 0; j < [self.points_all count]; j++) {
NSMutableArray *points_tmp = [points_all objectAtIndex:j];
for (int i = 0; i < [points_tmp count]-1; i++) {
CGPoint point1 = [[points_tmp objectAtIndex:i] CGPointValue];
CGPoint point2 = [[points_tmp objectAtIndex:(i+1)] CGPointValue];
CGContextMoveToPoint(context, point1.x, point1.y);
CGContextAddLineToPoint(context, point2.x, point2.y);
CGContextStrokePath(context);
}
}
// 畫這次
for (int i=0; i < [self.points count]-1; i++) {
CGPoint point1 = [[self.points objectAtIndex:i] CGPointValue];
CGPoint point2 = [[self.points objectAtIndex:(i+1)] CGPointValue];
CGContextMoveToPoint(context, point1.x, point1.y);
CGContextAddLineToPoint(context, point2.x, point2.y);
CGContextStrokePath(context);
}
}
// 不支援多點觸摸
- (BOOL)isMultipleTouchEnabled
{
return NO;
}
// 創建 array 並記錄初始 point
- (void)touchesBegan:(NSSet *)touches withEvent:(UIEvent *)event
{
self.points = [NSMutableArray array];
CGPoint pt = [[touches anyObject] locationInView:self];
[self.points addObject:[NSValue valueWithCGPoint:pt]];
}
// 移動過程中記錄 points,調用 setNeedsDisplay 會觸發 drawRect
- (void)touchesMoved:(NSSet *)touches withEvent:(UIEvent *)event
{
CGPoint pt = [[touches anyObject] locationInView:self];
[self.points addObject:[NSValue valueWithCGPoint:pt]];
[self setNeedsDisplay];
}
- (void)touchesEnded:(NSSet *)touches withEvent:(UIEvent *)event
{
NSMutableArray *points_tmp = [[NSMutableArray alloc] initWithArray:self.points];
if (self.points_all == nil) {
self.points_all = [[NSArray alloc] initWithObjects:points_tmp, nil];
} else {
self.points_all = [self.points_all arrayByAddingObject:points_tmp];
}
}
@end
ViewController.h
#import <UIKit/UIKit.h>
@class TouchView;
@interface ViewController : UIViewController
{
TouchView *tv;
}
@end
ViewController.m
#import "ViewController.h"
#import "TouchView.h"
@implementation ViewController
- (void)viewDidLoad
{
[super viewDidLoad];
self.view.userInteractionEnabled = YES;
tv = [[TouchView alloc] initWithFrame:self.view.frame];
tv.backgroundColor = [UIColor blackColor];
[self.view addSubview:tv];
// 建立顏色選擇器
UISegmentedControl *seg = [[UISegmentedControl alloc] initWithItems:[@"White Red Blue Green Yellow" componentsSeparatedByString:@" "]];
seg.segmentedControlStyle = UISegmentedControlSegmentCenter;
seg.tintColor = [UIColor blackColor];
seg.center = CGPointMake(self.view.center.x, (self.view.bounds.size.height - seg.bounds.size.height));
[self.view addSubview:seg];
[seg addTarget:self action:@selector(colorChange:) forControlEvents:UIControlEventValueChanged];
}
- (void)colorChange:(UISegmentedControl *)seg
{
switch ([seg selectedSegmentIndex]) {
case 0: tv.paint_clr = [UIColor whiteColor]; break;
case 1: tv.paint_clr = [UIColor redColor]; break;
case 2: tv.paint_clr = [UIColor blueColor]; break;
case 3: tv.paint_clr = [UIColor greenColor]; break;
case 4: tv.paint_clr = [UIColor yellowColor]; break;
default: break;
}
}
@end
效果圖
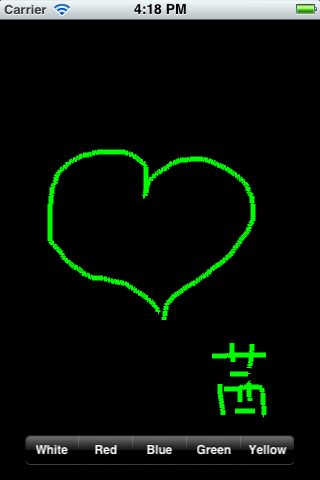
整體原理並不複雜:在 touchesBegan 中記錄起始點,touchesMoved 中持續追加座標並觸發重繪,touchesEnded 中將本筆軌跡存入歷史陣列;drawRect 則負責把歷史軌跡與當前軌跡逐段連接繪出。搭配 UISegmentedControl 便能實現多色繪畫。
- 上一篇文章: 使用 Quartz2D 繪製下載進度條(含 Demo)
- 下一篇文章: 動手實現一個 iOS 秒表小應用