
iOS 實作筆記:單張圖片點擊全屏預覽與雙指縮放
編輯:iOS 開發綜合
網路上關於圖片瀏覽器的開源方案很多,功能強大的不少,但有些時候專案裡真正需要的,其實只是「點一下圖片放大到全螢幕,再用兩根手指捏合縮放」這麼簡單一件事。試了幾種寫法之後,最後我選擇用最直觀的方式自己實作了一個:點擊觸發全屏展示,放大後顯示的仍是同一張圖片(若要切換高清圖,只要在這裡換掉 image 來源即可)。以下是完整程式碼。
一、點擊圖片彈出全屏預覽
核心思路是:以一個鋪滿整個螢幕的 UIScrollView 作為黑色背景,把被點擊的那張圖片「複製」一份放上去,先擺在原圖的位置,再用動畫把它放大到螢幕寬度並垂直居中。因為用的是 ScrollView,順便就免費獲得了縮放能力。
//  ViewController.m
//  XWZoomImageView

#import "ViewController.h"

@interface ViewController ()<UIScrollViewDelegate>
@property (weak, nonatomic) IBOutlet UIImageView *picView;
@property (weak, nonatomic) UIScrollView *scrollView;
@property (weak, nonatomic) UIImageView *lastImageView;
@property (nonatomic, assign) CGRect originalFrame;
@end

@implementation ViewController

- (void)viewDidLoad {
    [super viewDidLoad];
    self.picView.userInteractionEnabled = YES;

    // 註冊單點手勢
    UITapGestureRecognizer *tap = [[UITapGestureRecognizer alloc] initWithTarget:self action:@selector(showZoomImageView:)];
    [self.picView addGestureRecognizer:tap];
}

#pragma mark - 展開大圖
- (void)showZoomImageView:(UITapGestureRecognizer *)tap {
    if (![(UIImageView *)tap.view image]) {
        return;
    }

    // 用 ScrollView 充當黑色背景
    UIScrollView *bgView = [[UIScrollView alloc] init];
    bgView.frame = [UIScreen mainScreen].bounds;
    bgView.backgroundColor = [UIColor blackColor];

    UITapGestureRecognizer *tapBg = [[UITapGestureRecognizer alloc] initWithTarget:self action:@selector(tapBgView:)];
    [bgView addGestureRecognizer:tapBg];

    UIImageView *picView = (UIImageView *)tap.view;
    UIImageView *imageView = [[UIImageView alloc] init];
    imageView.image = picView.image;
    // 先對齊到原圖在畫面上的位置
    imageView.frame = [bgView convertRect:picView.frame fromView:self.view];
    [bgView addSubview:imageView];

    [[[UIApplication sharedApplication] keyWindow] addSubview:bgView];

    self.lastImageView = imageView;
    self.originalFrame = imageView.frame;
    self.scrollView = bgView;

    // 最大放大倍率
    self.scrollView.maximumZoomScale = 1.5;
    self.scrollView.delegate = self;

    [UIView animateWithDuration:0.5 animations:^{
        CGRect frame = imageView.frame;
        frame.size.width = bgView.frame.size.width;
        frame.size.height = frame.size.width * (imageView.image.size.height / imageView.image.size.width);
        frame.origin.x = 0;
        frame.origin.y = (bgView.frame.size.height - frame.size.height) * 0.5;
        imageView.frame = frame;
    }];
}

#pragma mark - 點擊背景收起
- (void)tapBgView:(UITapGestureRecognizer *)tapBgRecognizer {
    self.scrollView.contentOffset = CGPointZero;
    [UIView animateWithDuration:0.5 animations:^{
        self.lastImageView.frame = self.originalFrame;
        tapBgRecognizer.view.backgroundColor = [UIColor clearColor];
    } completion:^(BOOL finished) {
        [tapBgRecognizer.view removeFromSuperview];
        self.scrollView = nil;
        self.lastImageView = nil;
    }];
}

#pragma mark - 告訴 ScrollView 誰需要縮放
- (UIView *)viewForZoomingInScrollView:(UIScrollView *)scrollView {
    return self.lastImageView;
}

@end
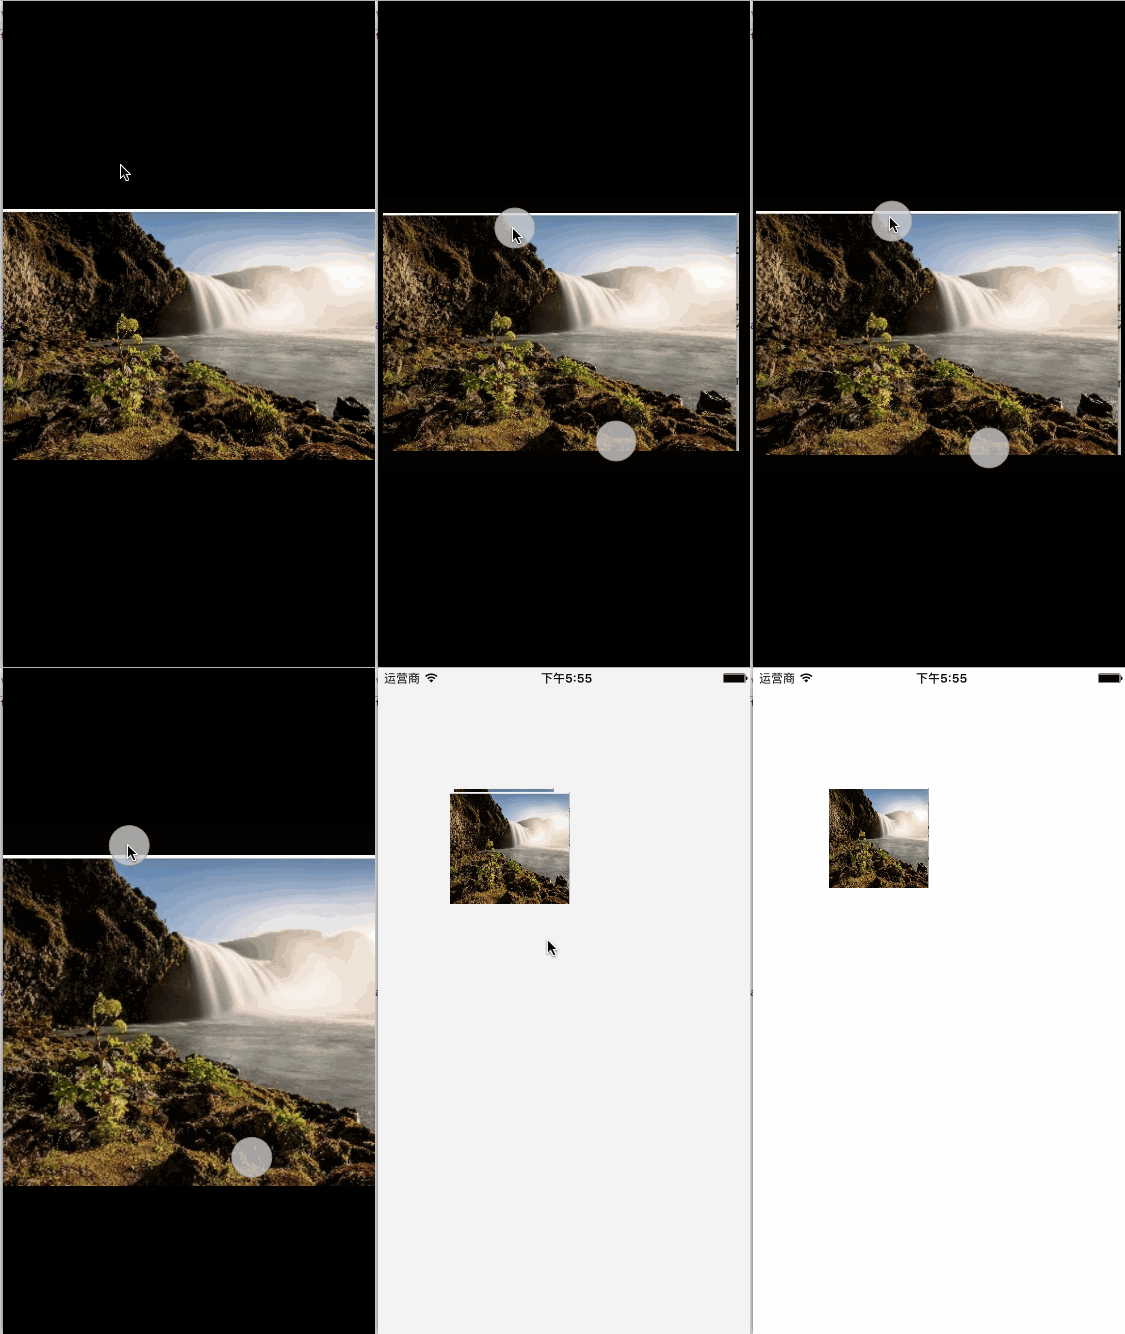
效果大致如下:
二、另一種寫法:抽成獨立工具類
如果不想把邏輯寫在控制器裡,可以把「放大 / 縮小」抽成一個類方法,任何地方只要傳入 imageView 就能用。這種寫法用半透明黑色視圖當遮罩,點一下畫面即可收回。
頭檔:
#import <UIKit/UIKit.h>

@interface ZoomImage : NSObject

/**
 *  點擊圖片放大,再次點擊還原
 *  @param avatarImageView 原圖所在的 imageView
 */
+ (void)showImage:(UIImageView *)avatarImageView;

@end
實作檔:
#import "ZoomImage.h"

static CGRect oldframe;

@implementation ZoomImage

+ (void)showImage:(UIImageView *)avatarImageView {
    UIImage *image = avatarImageView.image;

    // 取得主視窗
    UIWindow *window = [UIApplication sharedApplication].keyWindow;
    UIView *backgroundView = [[UIView alloc] initWithFrame:CGRectMake(0, 0, WIDTH, HEIGHT)];
    oldframe = [avatarImageView convertRect:avatarImageView.bounds toView:window];
    backgroundView.backgroundColor = [UIColor blackColor];
    backgroundView.alpha = 0.5;

    UIImageView *imageView = [[UIImageView alloc] initWithFrame:oldframe];
    imageView.image = image;
    imageView.tag = 1;
    [backgroundView addSubview:imageView];
    [window addSubview:backgroundView];

    // 點擊遮罩即可還原
    UITapGestureRecognizer *tap = [[UITapGestureRecognizer alloc] initWithTarget:self action:@selector(hideImage:)];
    [backgroundView addGestureRecognizer:tap];

    [UIView animateWithDuration:0.3 animations:^{
        imageView.frame = CGRectMake(0,
                                     ([UIScreen mainScreen].bounds.size.height - image.size.height * [UIScreen mainScreen].bounds.size.width / image.size.width) / 2,
                                     [UIScreen mainScreen].bounds.size.width,
                                     image.size.height * [UIScreen mainScreen].bounds.size.width / image.size.width);
        backgroundView.alpha = 1;
    }];
}

+ (void)hideImage:(UITapGestureRecognizer *)tap {
    UIView *backgroundView = tap.view;
    UIImageView *imageView = (UIImageView *)[tap.view viewWithTag:1];
    [UIView animateWithDuration:0.3 animations:^{
        imageView.frame = oldframe;
        backgroundView.alpha = 0;
    } completion:^(BOOL finished) {
        [backgroundView removeFromSuperview];
    }];
}

@end
幾個實作上的小提醒
動畫的關鍵在於「起始 frame 一定要等於原圖在畫面上的 frame」,這樣放大和還原才會有從原位長出來、再縮回去的連貫感。另外記得把 UIImageView 的 userInteractionEnabled 設為 YES,手勢才會生效;縮放時若要避免圖片超出螢幕,記得同時處理 contentOffset 與 maximumZoomScale。