
iOS 開發實戰:讀取本機通訊錄的完整代碼解析
編輯:iOS 開發綜合
一、添加必要的框架
首先在工程中添加 AddressBook.framework 和 AddressBookUI.framework 兩個庫。
二、獲取通訊錄
1. 在 interface 中定義數組並在 init 方法中初始化:
NSMutableArray *addressBookTemp;

- (id)initWithNibName:(NSString *)nibNameOrNil bundle:(NSBundle *)nibBundleOrNil {
    addressBookTemp = [NSMutableArray array];
}
2. 定義一個 model 用來存放通訊錄裡的屬性。新建一個繼承自 NSObject 的類 TKAddressBook:
@interface TKAddressBook : NSObject {
    NSInteger sectionNumber;
    NSInteger recordID;
    NSString *name;
    NSString *email;
    NSString *tel;
}
@property NSInteger sectionNumber;
@property NSInteger recordID;
@property (nonatomic, retain) NSString *name;
@property (nonatomic, retain) NSString *email;
@property (nonatomic, retain) NSString *tel;
@end

@implementation TKAddressBook
@synthesize name, email, tel, recordID, sectionNumber;
@end
3. 獲取聯繫人。從 iOS 6 開始,讀取通訊錄需要先獲得用戶授權:
// 新建通訊錄
ABAddressBookRef addressBooks = nil;

if ([[UIDevice currentDevice].systemVersion floatValue] >= 6.0) {
    addressBooks = ABAddressBookCreateWithOptions(NULL, NULL);
    // 請求通訊錄權限(用信號量同步等待授權結果)
    dispatch_semaphore_t sema = dispatch_semaphore_create(0);
    ABAddressBookRequestAccessWithCompletion(addressBooks, ^(bool granted, CFErrorRef error) {
        dispatch_semaphore_signal(sema);
    });
    dispatch_semaphore_wait(sema, DISPATCH_TIME_FOREVER);
    dispatch_release(sema);
} else {
    addressBooks = ABAddressBookCreate();
}

// 獲取通訊錄中的所有人
CFArrayRef allPeople = ABAddressBookCopyArrayOfAllPeople(addressBooks);
CFIndex nPeople = ABAddressBookGetPersonCount(addressBooks);

// 遍歷每個人
for (NSInteger i = 0; i < nPeople; i++) {
    TKAddressBook *addressBook = [[TKAddressBook alloc] init];
    ABRecordRef person = CFArrayGetValueAtIndex(allPeople, i);

    // 名字處理:優先取全名,其次拼接姓與名
    CFTypeRef abName = ABRecordCopyValue(person, kABPersonFirstNameProperty);
    CFTypeRef abLastName = ABRecordCopyValue(person, kABPersonLastNameProperty);
    CFStringRef abFullName = ABRecordCopyCompositeName(person);
    NSString *nameString = (__bridge NSString *)abName;
    NSString *lastNameString = (__bridge NSString *)abLastName;
    if ((__bridge id)abFullName != nil) {
        nameString = (__bridge NSString *)abFullName;
    } else {
        if ((__bridge id)abLastName != nil) {
            nameString = [NSString stringWithFormat:@"%@ %@", nameString, lastNameString];
        }
    }
    addressBook.name = nameString;
    addressBook.recordID = (int)ABRecordGetRecordID(person);

    // 遍歷電話與郵箱這類多值屬性
    ABPropertyID multiProperties[] = {
        kABPersonPhoneProperty,
        kABPersonEmailProperty
    };
    NSInteger multiPropertiesTotal = sizeof(multiProperties) / sizeof(ABPropertyID);
    for (NSInteger j = 0; j < multiPropertiesTotal; j++) {
        ABPropertyID property = multiProperties[j];
        ABMultiValueRef valuesRef = ABRecordCopyValue(person, property);
        NSInteger valuesCount = 0;
        if (valuesRef != nil) valuesCount = ABMultiValueGetCount(valuesRef);
        if (valuesCount == 0) {
            CFRelease(valuesRef);
            continue;
        }
        for (NSInteger k = 0; k < valuesCount; k++) {
            CFTypeRef value = ABMultiValueCopyValueAtIndex(valuesRef, k);
            switch (j) {
                case 0: addressBook.tel = (__bridge NSString*)value; break;   // 電話
                case 1: addressBook.email = (__bridge NSString*)value; break; // 郵箱
            }
            CFRelease(value);
        }
        CFRelease(valuesRef);
    }
    [addressBookTemp addObject:addressBook];

    if (abName) CFRelease(abName);
    if (abLastName) CFRelease(abLastName);
    if (abFullName) CFRelease(abFullName);
}
三、顯示在 TableView 中
// 分區數
- (NSInteger)numberOfSectionsInTableView:(UITableView *)tableView {
    return 1;
}
// 行數
- (NSInteger)tableView:(UITableView *)tableView numberOfRowsInSection:(NSInteger)section {
    return [addressBookTemp count];
}
// cell 內容
- (UITableViewCell *)tableView:(UITableView *)tableView cellForRowAtIndexPath:(NSIndexPath *)indexPath {
    NSString *cellIdentifier = @"ContactCell";
    UITableViewCell *cell = [tableView dequeueReusableCellWithIdentifier:cellIdentifier];
    if (cell == nil) {
        cell = [[UITableViewCell alloc] initWithStyle:UITableViewCellStyleSubtitle reuseIdentifier:cellIdentifier];
    }
    TKAddressBook *book = [addressBookTemp objectAtIndex:indexPath.row];
    cell.textLabel.text = book.name;
    cell.detailTextLabel.text = book.tel;
    return cell;
}
列表效果如下:
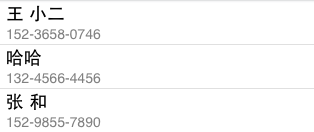
小提示:通訊錄號碼裡的「-」可以在存入數組前先處理掉,這屬於 NSString 的處理範疇,方法有很多,本文不多展開。
四、刪除通訊錄數據
ABRecordRef person = objc_unretainedPointer([myContacts objectAtIndex:indexPath.row]);
CFErrorRef *error;
ABAddressBookRemoveRecord(addressBook, person, error);
ABAddressBookSave(addressBook, error);
myContacts = nil;
[tableView deleteRowsAtIndexPaths:[NSArray arrayWithObject:indexPath] withRowAnimation:UITableViewRowAnimationFade];
以上就是讀取並展示本機通訊錄的完整流程,包含權限申請、數據封裝、列表展示與刪除操作,希望對你有所幫助。