
Objective-C 多執行緒指南:NSOperation 與 NSOperationQueue 完整用法
相較於 GCD 的函式導向風格,NSOperation 系列走的是物件導向路線。它把「一個操作」抽象成物件,因此天然適合需要取消、需要設定依賴、需要監聽完成狀態的場景。本文分成 NSOperation 與 NSOperationQueue 兩大部分。
一、NSOperation 基礎
NSOperation 實例封裝了「要執行的操作」與「執行所需的資料」,並能以並發或非並發方式執行。
NSOperation 本身是抽象基類,必須透過子類使用,有兩種途徑:
- 使用 Foundation 提供的具體子類:
NSInvocationOperation與NSBlockOperation - 自行繼承 NSOperation,實作內部方法
執行:呼叫 start 即可開始。NSOperation 預設是同步的,也就是直接在呼叫 start 的那個執行緒裡跑完。isConcurrent 會告訴你該操作相對於呼叫執行緒是同步還是異步,預設回傳 NO。
取消:執行中可隨時呼叫 cancel 要求取消。
[operation cancel];
監聽完成:用 completionBlock 註冊收尾工作。
operation.completionBlock = ^() {
    NSLog(@"執行完畢");
};

// 或者
[operation setCompletionBlock:^() {
    NSLog(@"執行完畢");
}];
二、NSInvocationOperation
以「物件 + selector」建立操作。若你已有現成的方法能完成任務,用它最方便:
// 這個操作就是呼叫 self 的 run 方法
NSInvocationOperation *operation =
    [[NSInvocationOperation alloc] initWithTarget:self selector:@selector(run) object:nil];
[operation start];   // 同步執行
三、NSBlockOperation
能並發執行一個或多個 block,所有 block 都跑完,操作才算完成:
NSBlockOperation *operation = [NSBlockOperation blockOperationWithBlock:^(){
    NSLog(@"執行了一個新的操作,線程:%@", [NSThread currentThread]);
}];
[operation start];   // 這裡仍是同步執行
透過 addExecutionBlock: 可以陸續掛上更多 block:
NSBlockOperation *operation = [NSBlockOperation blockOperationWithBlock:^(){
    NSLog(@"執行第1次操作,線程:%@", [NSThread currentThread]);
}];

[operation addExecutionBlock:^() {
    NSLog(@"又執行了1個新的操作,線程:%@", [NSThread currentThread]);
}];
[operation addExecutionBlock:^() {
    NSLog(@"又執行了1個新的操作,線程:%@", [NSThread currentThread]);
}];
[operation addExecutionBlock:^() {
    NSLog(@"又執行了1個新的操作,線程:%@", [NSThread currentThread]);
}];

[operation start];
輸出範例:
2013-02-02 21:38:46.102 thread[4602:c07] 又執行了1個新的操作,線程:<NSThread: 0x7121d50>{name = (null), num = 1}
2013-02-02 21:38:46.102 thread[4602:3f03] 又執行了1個新的操作,線程:<NSThread: 0x742e1d0>{name = (null), num = 5}
2013-02-02 21:38:46.102 thread[4602:1b03] 執行第1次操作,線程:<NSThread: 0x742de50>{name = (null), num = 3}
2013-02-02 21:38:46.102 thread[4602:1303] 又執行了1個新的操作,線程:<NSThread: 0x7157bf0>{name = (null), num = 4}
可以清楚看到四個 block 跑在不同執行緒上(num 可視為執行緒編號),也就是並發執行。順帶一提,這些 block 實際上是在 start 被呼叫的那個 run loop 中調度,因此嚴格來說並非「開四條新執行緒」,而是由 GCD 依負載分派。
四、自訂 NSOperation
若兩個現成子類都不夠用,就直接繼承 NSOperation。工作量取決於你要做非並發還是並發版本:非並發只需重寫 main;並發則要實作 start、isExecuting、isFinished、isConcurrent 等多個方法。以下示範非並發版本,做一個下載圖片的操作。
頭檔:
#import <Foundation/Foundation.h>

@protocol DownloadOperationDelegate;

@interface DownloadOperation : NSOperation
@property (nonatomic, copy) NSString *imageUrl;
@property (nonatomic, retain) id<DownloadOperationDelegate> delegate;
- (id)initWithUrl:(NSString *)url delegate:(id<DownloadOperationDelegate>)delegate;
@end

// 圖片下載完成的協議
@protocol DownloadOperationDelegate <NSObject>
- (void)downloadFinishWithImage:(UIImage *)image;
@end
實作:
#import "DownloadOperation.h"

@implementation DownloadOperation
@synthesize delegate = _delegate;
@synthesize imageUrl = _imageUrl;

- (id)initWithUrl:(NSString *)url delegate:(id<DownloadOperationDelegate>)delegate {
    if (self = [super init]) {
        self.imageUrl = url;
        self.delegate = delegate;
    }
    return self;
}

- (void)main {
    // 異步執行時無法取用主執行緒的 autorelease pool,必須自行建立
    @autoreleasepool {
        if (self.isCancelled) return;

        NSURL *url = [NSURL URLWithString:self.imageUrl];
        NSData *imageData = [NSData dataWithContentsOfURL:url];

        if (self.isCancelled) { url = nil; imageData = nil; return; }

        UIImage *image = [UIImage imageWithData:imageData];

        if (self.isCancelled) { image = nil; return; }

        if ([self.delegate respondsToSelector:@selector(downloadFinishWithImage:)]) {
            // 回主執行緒更新 UI
            [(NSObject *)self.delegate performSelectorOnMainThread:@selector(downloadFinishWithImage:)
                                                     withObject:image waitUntilDone:NO];
        }
    }
}
@end
正確響應取消事件
操作一旦開始就會跑到完成,或被顯式取消,而取消可能發生在任何時刻,甚至在開始之前。NSOperation 提供了 cancel 方法,但「察覺自己被取消」是子類自己的責任。若直接中止而不理會,可能導致已配置的記憶體與資源無法回收,因此操作物件需要主動檢查並優雅退出。
做法是定期呼叫 isCancelled,回傳 YES 就立刻退出。這個方法非常輕量,高頻呼叫也不會造成明顯效能損失。建議在以下時機檢查:
- 真正開始工作之前
- 迴圈每次迭代中(若單次迭代耗時較長,可在一輪中檢查多次)
- 任何適合提前中止的段落
五、NSOperationQueue 基礎
NSOperation 單靠 start 是同步的;一旦把它放進 NSOperationQueue,就會變成異步執行。
NSOperationQueue *queue = [[NSOperationQueue alloc] init];
加入隊列的幾種寫法:
[queue addOperation:operation];                                // 單一操作
[queue addOperations:operations waitUntilFinished:NO];          // 一組操作
[queue addOperationWithBlock:^() {                             // block 形式
    NSLog(@"執行一個新的操作,線程:%@", [NSThread currentThread]);
}];
加入後通常很快就被調度執行,但若存在依賴或隊列被暫停,也可能需要等待。
重要提醒:NSOperation 一旦加入 queue,就絕對不要再修改它的狀態。操作可能在任何時刻執行,事後改動依賴或資料會造成難以追蹤的錯誤。此時你只能「讀取」狀態,例如 isExecuting、isFinished、isCancelled。
六、設定依賴關係
當某個操作必須等另一個完成才能開始,用 addDependency: 建立依賴,用 removeDependency: 移除:
[operation2 addDependency:operation1]; // operation2 等 operation1 完成後才執行
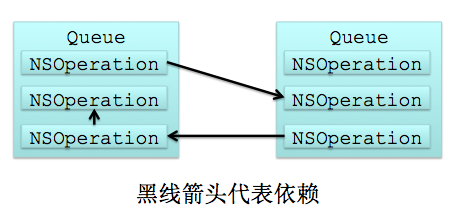
依賴關係不受 queue 限制,不同 queue 中的操作也能互相建立依賴。唯一的禁忌是不能形成環形依賴,例如 A 依賴 B、B 又依賴 A,這會導致兩者永遠等待。
依賴會直接改變執行順序。對照實驗:
(1)沒有依賴時,預設依加入順序執行:
2013-02-03 00:21:35.024 thread[5616:3d13] 執行第1次操作,線程:<NSThread: 0x7658570>{num = 3}
2013-02-03 00:21:35.063 thread[5616:1303] 執行第2次操作,線程:<NSThread: 0x765a2e0>{num = 4}
(2)讓 operation1 依賴 operation2 之後:
[operation1 addDependency:operation2];
[queue addOperation:operation1];
[queue addOperation:operation2];
2013-02-03 00:24:16.260 thread[5656:1b03] 執行第2次操作,線程:<NSThread: 0x7634490>{num = 3}
2013-02-03 00:24:16.285 thread[5656:1303] 執行第1次操作,線程:<NSThread: 0x9138b50>{num = 4}
順序整個反了過來——即使 operation1 先加入 queue。
七、優先級
queue 中的執行順序取決於兩點:先看你是否「已準備好」(由依賴決定),再看相對優先級。優先級是 operation 自身的屬性,預設為普通等級,可透過 setQueuePriority: 調整。
兩個關鍵限制請務必記住:
- 優先級只在同一個 queue 內有效。多個 queue 之間的優先級互相獨立,低優先級 queue 中的操作仍可能比高優先級 queue 更早執行。
- 優先級不能取代依賴關係。系統會先篩出所有已準備好的操作,再從中挑優先級最高者執行。
八、控制最大並發數
NSOperationQueue 的設計目標是並發執行,但你可以限制同時運行的數量:
queue.maxConcurrentOperationCount = 1;
// 或
[queue setMaxConcurrentOperationCount:1];
設為 1 就是序列化執行。不過要注意:序列化的 operation queue 不等於 GCD 的序列化 dispatch queue。前者仍會依優先級與準備狀態決定下一個執行者,順序未必等於加入順序;後者則嚴格 FIFO。
九、取消操作
操作一旦加入 queue,queue 就持有它且無法移除,唯一能做的是取消:
[operation cancel];              // 取消單一操作
[queue cancelAllOperations];     // 取消 queue 中所有操作
補充:取消只是「標記」,已在執行中的操作不會被強制中止,仍須由操作內部檢查 isCancelled 自行退出——這正是前面那個下載範例到處埋檢查點的原因。
十、等待完成
為獲得最佳效能,應盡量讓應用異步運行,在操作執行期間去處理其他事情。若確實需要等待結果:
[operation waitUntilFinished];               // 阻塞當前執行緒
[queue waitUntilAllOperationsAreFinished];   // 阻塞當前執行緒,等整個 queue
阻塞的代價是引入更多序列化程式碼、削弱整體並發性、拖慢使用者體驗。因此有兩條硬性原則:絕對不要在主執行緒等待 operation,只能於次要執行緒進行,否則 UI 將完全無回應;另外,等待 queue 時其他執行緒仍可往其中加入新操作,可能進一步拉長等待時間。
十一、暫停與恢復
[queue setSuspended:YES];   // 暫停
[queue setSuspended:NO];    // 恢復
暫停不會中斷正在執行的操作,只是停止調度新的操作。典型用法是:使用者離開某頁面時暫停 queue 以節省資源,返回時再恢復。