
用 CocoaPods 整合 PPRevealSideViewController 做 iOS 抽屜效果
談到 iOS 的抽屜效果,PPRevealSideViewController 絕對是老牌選手之一。既然要用第三方類庫,自然想到 CocoaPods。本文示範如何用 CocoaPods 引入它,並以「程式碼 + storyboard」混搭的方式把抽屜效果跑起來。
一、用 CocoaPods 引入 PPRevealSideViewController
先在終端搜尋可用版本:
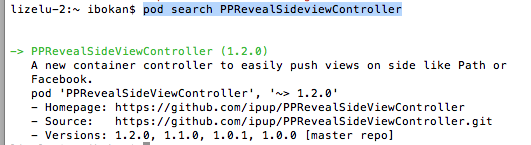
接著在 Podfile 中寫入對應版本:

存檔後執行 pod install 即可。
二、為專案補上 pch 檔
示範環境為 Xcode 6,預設並不會建立 pch 檔。若想把第三方標頭檔放在 pch 裡全域引入,需要手動建立並設定。
1. 專案預設沒有 pch:

2. 新增 pch 檔:


3. 設定 pch 路徑:
(1)找到 Targets → Build Settings → Apple LLVM 6.0 - Language。

(2)在 Prefix Header 的 Debug 與 Release 兩欄填入 $(SRCROOT)/專案名稱/pch檔名.pch:

三、以 PPRevealSideViewController 實作抽屜
先在 pch 檔引入標頭,之後各處都能直接使用。整體互動設計是:主畫面點擊按鈕 → 以抽屜形式滑出導航頁 → 在導航頁選擇要前往的功能頁 → 各頁再返回主畫面。
1. 在 storyboard 中擺好要用到的視圖控制器:

2. 在 AppDelegate 中建立 PPRevealSideViewController 並設為啟動畫面:
- (BOOL)application:(UIApplication *)application didFinishLaunchingWithOptions:(NSDictionary *)launchOptions {
    self.window = [[UIWindow alloc] initWithFrame:[[UIScreen mainScreen] bounds]];

    // 從 storyboard 取出主頁面的導航控制器
    UIStoryboard *storyboard = [UIStoryboard storyboardWithName:@"Main" bundle:[NSBundle mainBundle]];
    UIViewController *vc = [storyboard instantiateViewControllerWithIdentifier:@"NavigationController"];

    // 以主頁面作為 rootViewController 建立抽屜容器
    PPRevealSideViewController *sideViewController =
        [[PPRevealSideViewController alloc] initWithRootViewController:vc];
    sideViewController.fakeiOS7StatusBarColor = [UIColor whiteColor];

    self.window.rootViewController = sideViewController;
    [self.window makeKeyAndVisible];
    return YES;
}
3. 在主畫面把導航頁「推」出來:
- (IBAction)tapItem:(id)sender {
    UIStoryboard *storyboard = [UIStoryboard storyboardWithName:@"Main" bundle:[NSBundle mainBundle]];
    UITableViewController *table = [storyboard instantiateViewControllerWithIdentifier:@"CustomViewViewController"];
    [self.revealSideViewController pushViewController:table
                                          onDirection:PPRevealSideDirectionLeft
                                             animated:YES];
}
4. 在導航頁點不同項目,換掉中央的主視圖:
- (IBAction)tap1:(id)sender {
    UIStoryboard *storyboard = [UIStoryboard storyboardWithName:@"Main" bundle:[NSBundle mainBundle]];
    UIViewController *one = [storyboard instantiateViewControllerWithIdentifier:@"one"];
    [self.revealSideViewController popViewControllerWithNewCenterController:one animated:YES];
}

- (IBAction)tap2:(id)sender {
    UIStoryboard *storyboard = [UIStoryboard storyboardWithName:@"Main" bundle:[NSBundle mainBundle]];
    UIViewController *two = [storyboard instantiateViewControllerWithIdentifier:@"two"];
    [self.revealSideViewController popViewControllerWithNewCenterController:two animated:YES];
}

- (IBAction)tap3:(id)sender {
    UIStoryboard *storyboard = [UIStoryboard storyboardWithName:@"Main" bundle:[NSBundle mainBundle]];
    UIViewController *three = [storyboard instantiateViewControllerWithIdentifier:@"three"];
    [self.revealSideViewController popViewControllerWithNewCenterController:three animated:YES];
}

- (IBAction)tap4:(id)sender {
    UIStoryboard *storyboard = [UIStoryboard storyboardWithName:@"Main" bundle:[NSBundle mainBundle]];
    UIViewController *four = [storyboard instantiateViewControllerWithIdentifier:@"four"];
    [self.revealSideViewController popViewControllerWithNewCenterController:four animated:YES];
}
5. 各功能頁要回到主畫面時,把中央控制器換回原本的導航控制器:
- (IBAction)tapPage:(id)sender {
    UIStoryboard *storyboard = [UIStoryboard storyboardWithName:@"Main" bundle:[NSBundle mainBundle]];
    UIViewController *view = [storyboard instantiateViewControllerWithIdentifier:@"NavigationController"];
    [self.revealSideViewController popViewControllerWithNewCenterController:view animated:YES];
}
這裡的關鍵 API 只有兩個:pushViewController:onDirection:animated: 負責把側欄拉出來,popViewControllerWithNewCenterController:animated: 則同時完成「收起側欄」與「替換中央畫面」兩件事。方向參數除了 Left,也可以傳 Right、Top、Bottom,因此同一套程式碼足以支撐多方向的抽屜選單。
四、成果

以上就是本次分享的全部內容,希望對大家的學習有所幫助。