
iOS 手勢解鎖功能完整實作教學
編輯:iOS 開發綜合
手勢解鎖已經成為行動裝置上相當常見的互動方式,無論是螢幕解鎖、支付驗證還是快捷登入,都能看到它的身影。本文將帶你透過手勢辨識的機制,從零開始打造一個九宮格解鎖介面,並逐步完成節點渲染、連線繪製到密碼比對的整個流程。
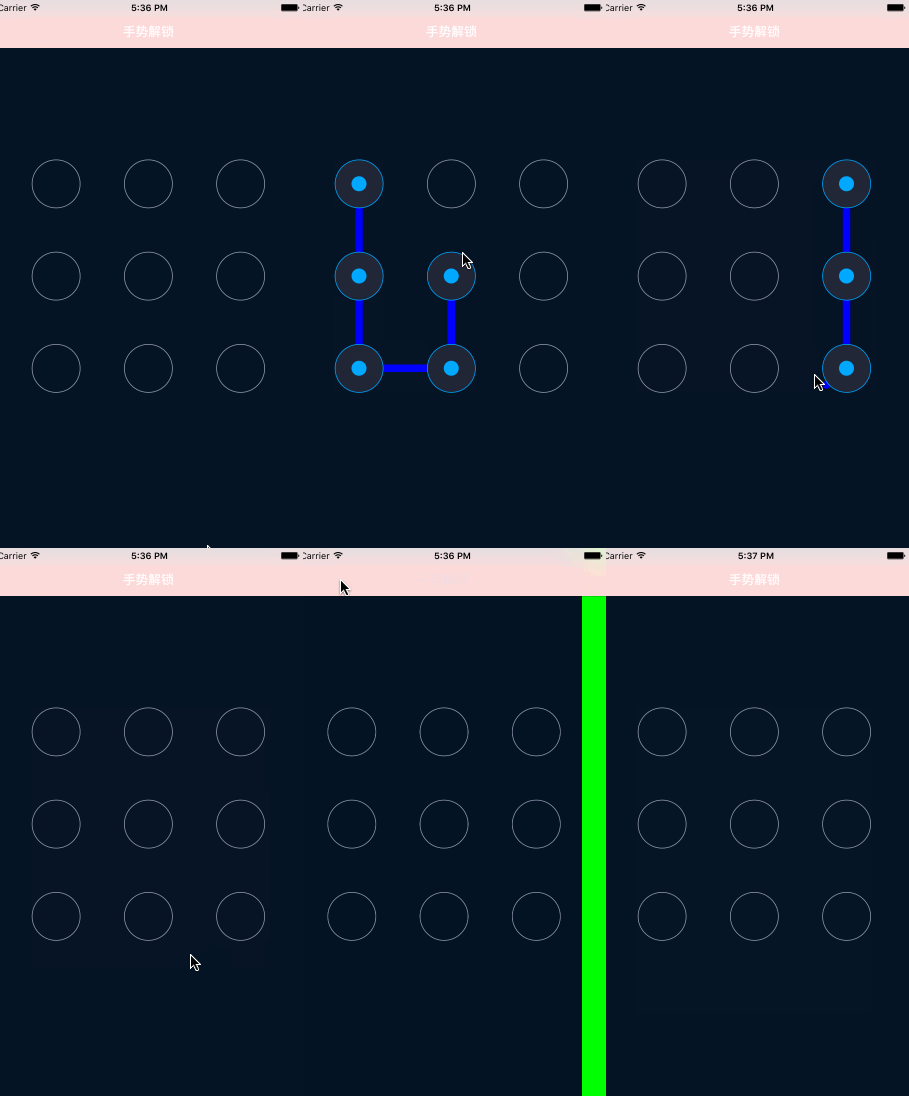
動手寫程式碼之前,先把整體思路梳理清楚。整個功能可以拆成五個步驟:
1. 載入九宮格頁面;
2. 處理按鈕在被點擊與滑動過程中的狀態切換;
3. 描繪手指滑過時的連線軌跡;
4. 手勢結束後比對密碼是否正確;
5. 根據比對結果執行頁面跳轉。
接下來,我們就逐一用程式碼把這五個環節實作出來。
一、載入九宮格介面
九宮格由 3×3 共九個按鈕組成,我們可以自訂一個 view 來承載這些按鈕,再把它加入 viewController 之中。
先在初始化時建立九個按鈕:
 //在view中添加子控件
-(void)awakeFromNib {
 // 建立九個按鈕
 for (int i=0; i<9; i++) {
 self.LineColor=[UIColor blueColor];
 UIButton *btn=[UIButton buttonWithType:UIButtonTypeCustom];
 btn.userInteractionEnabled=NO;
 // 設定按鈕在不同狀態下的背景圖
 [btn setBackgroundImage:[UIImage imageNamed:@"gesture_node_normal"] forState:UIControlStateNormal];
 [btn setBackgroundImage:[UIImage imageNamed:@"gesture_node_highlighted"] forState:UIControlStateHighlighted ];
 [btn setBackgroundImage:[UIImage imageNamed:@"gesture_node_error"] forState:UIControlStateDisabled];
 [self addSubview:btn];
 }
}
//布局view子控件
-(void)layoutSubviews {
 [super layoutSubviews];
 CGFloat width=74;
 CGFloat height=74;
 CGFloat Margin=(self.bounds.size.width-3*width)/2;
 // 遍歷設定九個按鈕的frame
 [self.subviews enumerateObjectsUsingBlock:^(__kindof UIView * _Nonnull obj, NSUInteger idx, BOOL * _Nonnull stop) {
 // 透過tag標記按鈕索引
 obj.tag=idx;
 int row=(int)idx/3;
 int col=idx%3;
 obj.frame=CGRectMake(col*(Margin + width), row*(Margin +height), width, height);
 }];
}
接著透過 xib 把這個自訂 view 加入 viewController。先為九宮格 view 定義一個類方法,用來從 xib 載入:
 // 載入xib檔案
+(instancetype)lockView {
 return [[[NSBundle mainBundle]loadNibNamed:@"MYblockView" owner:nil options:nil]lastObject];
}
然後在控制器中把它放到畫面上:
 // 設定控制器view的背景圖
self.view.backgroundColor=[UIColor colorWithPatternImage:[UIImage imageNamed:@"bg"]];
MYblockView *blockView=[MYblockView lockView];
blockView.center=self.view.center;
// 將blockview加入viewController
[self.view addSubview:blockView];
二、處理按鈕點擊與滑動時的狀態變化
先宣告一個陣列屬性,用來存放被點中的按鈕:
 @property(nonatomic,strong)NSMutableArray *btnArr; //懶載入
-(NSMutableArray *)btnArr {
 if (_btnArr==nil) {
 _btnArr=[NSMutableArray array];
 }
 return _btnArr;
}
再建立繪製路徑,把軌跡畫出來:
 #pragma mark----繪製圖形
-(void)drawRect:(CGRect)rect {
 if (self.btnArr.count==0 ) {
 return;
 }
 // 建立路徑
 UIBezierPath *path=[UIBezierPath bezierPath];
 // 遍歷所有按鈕進行繪製
 [self.btnArr enumerateObjectsUsingBlock:^(__kindof UIButton * _Nonnull obj, NSUInteger idx, BOOL * _Nonnull stop) {
 // 第一個按鈕的中心點作為起點
 if (idx==0) {
 [path moveToPoint:obj.center];
 }else {
 [path addLineToPoint:obj.center];
 }
 }];
 [path addLineToPoint:self.currentPoint];
 // 設定路徑樣式
 path.lineWidth=10;
 path.lineCapStyle=kCGLineCapRound;
 path.lineJoinStyle=kCGLineJoinRound;
 [self.LineColor setStroke];
 // 渲染
 [path stroke];
}
手指剛觸發螢幕時,判斷落點是否落在某個按鈕上:
 #pragma mark-----開始觸摸
-(void)touchesBegan:(NSSet<UITouch *> *)touches withEvent:(UIEvent *)event {
 UITouch *touch=touches.anyObject;
 CGPoint loc=[touch locationInView:self];
 // 遍歷按鈕,判斷觸摸點是否落在按鈕範圍內
 [self.subviews enumerateObjectsUsingBlock:^(__kindof UIButton * _Nonnull obj, NSUInteger idx, BOOL * _Nonnull stop) {
 BOOL isContains=CGRectContainsPoint(obj.frame, loc);
 // 命中則記錄並切換為高亮狀態
 if (isContains&&obj.highlighted==NO) {
 [self.btnArr addObject:obj];
 obj.highlighted=YES;
 }else {
 obj.highlighted=NO;
 }
 }];
}
滑動過程中持續重繪,並把途經的按鈕納入軌跡:
 #pragma mark----開始滑動
-(void)touchesMoved:(NSSet<UITouch *> *)touches withEvent:(UIEvent *)event {
 UITouch *touch=touches.anyObject;
 CGPoint loc=[touch locationInView:self];
 self.currentPoint=loc;
 // 遍歷按鈕,命中滑動路徑即切換狀態
 [self.subviews enumerateObjectsUsingBlock:^(__kindof UIButton * _Nonnull obj, NSUInteger idx, BOOL * _Nonnull stop) {
 BOOL isContains=CGRectContainsPoint(obj.frame, loc);
 if (isContains&&obj.highlighted==NO) {
 [self.btnArr addObject:obj];
 obj.highlighted=YES;
 }
 }];
 // 觸發重繪
 [self setNeedsDisplay];
}
三、連線收尾與密碼比對
 #pragma mark----停止滑動結束
-(void)touchesEnded:(NSSet<UITouch *> *)touches withEvent:(UIEvent *)event {
 // 取最後一個按鈕
 UIButton *lastBtn=[self.btnArr lastObject];
 // 將最後一個按鈕的中心點作為終點
 self.currentPoint=lastBtn.center;
 [self setNeedsDisplay];
 // 拼接密碼
 self.password=[NSMutableString string];
 [self.btnArr enumerateObjectsUsingBlock:^( UIButton * _Nonnull obj, NSUInteger idx, BOOL * _Nonnull stop) {
 [self.password appendFormat:@"%@",@(obj.tag)];
 }];
 NSLog(@"%@",self.password);
 BOOL isOk;
 if ([self.delegate respondsToSelector:@selector(blockView:finishedWithPassword:)]) {
 isOk= [self.delegate blockView:self finishedWithPassword:self.password];
 }
 if (isOk) {
 [self.btnArr enumerateObjectsUsingBlock:^(UIButton* _Nonnull obj, NSUInteger idx, BOOL * _Nonnull stop) {
 obj.highlighted=NO;
 }];
 [self.btnArr removeAllObjects];
 [self setNeedsDisplay];
 NSLog(@"密碼正確");
 }else {
 NSLog(@"密碼錯誤");
 }
}
這裡有兩個重點:密碼字串是根據先前布局時設定的按鈕 tag 值拼接而成,而密碼的傳遞則透過 delegate 代理完成。相關的協議宣告如下:
 #import <UIKit/UIKit.h>
@class MYblockView;
// 宣告代理協議
@protocol MYblockViewDelegate <NSObject>
@optional
// 代理方法
-(BOOL) blockView:(MYblockView *)blockView finishedWithPassword:(NSString *)password;
@end
@interface MYblockView : UIView
+(instancetype)lockView;
// 代理屬性
@property(nonatomic,weak)id<MYblockViewDelegate>delegate;
@end
四、密碼判定後的頁面跳轉
當密碼錯誤時,讓按鈕變紅並短暫鎖定,一秒後再復原:
 else {
 // 關閉使用者互動
 self.userInteractionEnabled=NO;
 [self.btnArr enumerateObjectsUsingBlock:^(UIButton * _Nonnull obj, NSUInteger idx, BOOL * _Nonnull stop) {
 self.LineColor=[UIColor redColor];
 obj.highlighted=NO;
 obj.enabled=NO;
 [self setNeedsDisplay];
 dispatch_after(dispatch_time(DISPATCH_TIME_NOW, (int64_t)(1.0 * NSEC_PER_SEC)), dispatch_get_main_queue(), ^{
 // 恢復按鈕狀態
 [self.btnArr enumerateObjectsUsingBlock:^(UIButton * _Nonnull obj, NSUInteger idx, BOOL * _Nonnull stop) {
 obj.enabled=YES;
 }];
 // 恢復線條顏色
 self.LineColor=[UIColor blueColor];
 [self.btnArr removeAllObjects];
 [self setNeedsDisplay];
 });
 }];
 NSLog(@"密碼錯誤");
 }
 self.userInteractionEnabled=YES;
}
而在代理方法裡進行密碼比對並跳轉:
 -(BOOL)blockView:(MYblockView *)blockView finishedWithPassword:(NSString *)password {
 if ([password isEqualToString:@"012"]) {
 UIViewController *two=[UIViewController new];
 two.view.backgroundColor=[UIColor greenColor];
 [self.navigationController pushViewController:two animated:YES];
 return YES;
 } else{
 return NO;
 }
}
最後別忘了調整導覽列的外觀:
 [self.navigationController.navigationBar setBackgroundColor:[UIColor redColor]];
[ self.navigationController.navigationBar setTitleTextAttributes:@{ NSForegroundColorAttributeName :[UIColor whiteColor] }];
以上就是完整的實作流程。透過九宮格、自訂繪製與代理回傳的組合,就能打造出一個流暢直覺的手勢解鎖體驗,也能延伸應用到更多需要圖形密碼驗證的場景中。
- 上一篇文章: iOS UITableView 左滑刪除與 Cell 重用
- 下一篇文章: 深入解析 iOS 九宮格視圖布局的尺寸與座標計算